{{ secondMenu.name }}


HCI offers a distributed firewall (DFW) This enables micro-segmentation between VMs and ensures L3 and L4 security protection for internal traffic, significantly reducing the impact of attacks on the data center.
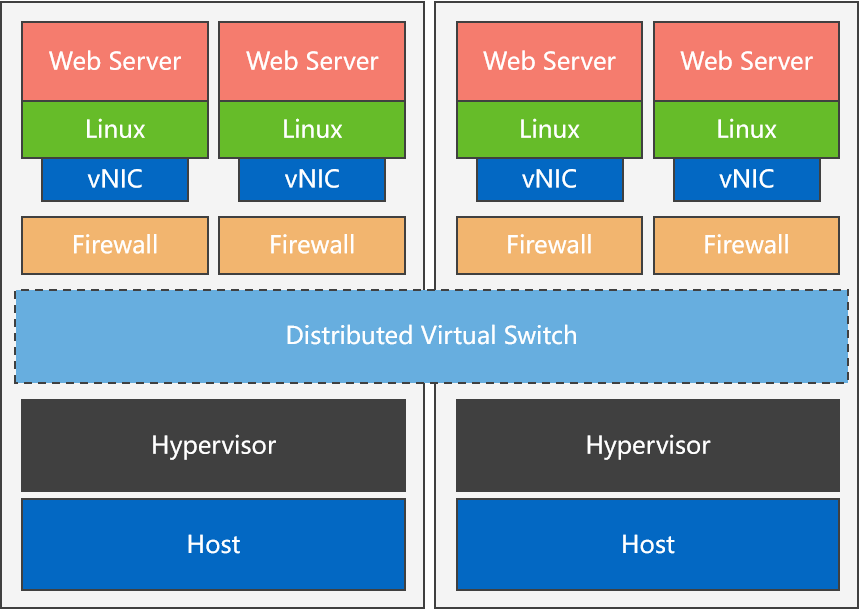
Figure 1: DFW Principle
Function Description:
Precautions:
Steps:
Step 1: Log in to the SCP admin platform and navigate Security > Distributed Firewall to enter the distributed firewall configuration page. The Platform Global control policy is the default policy and cannot be edited.
• Global control policy: Contains global control rules, which ensure overall traffic is released.
Step 2: Select the resource pool name or tenant’s name on the left list to enter the corresponding page and click the Create Policy button to create a firewall policy for the resource pool or tenant network.
• Name: The firewall policy name.
• Scope: The effective domain of the firewall policy. It can be the entire resource pool, the tenant's classic, or the VPC.
• Priority: The policy priorities can be adjusted manually, above or below one policy.
• Click Applicable Scope to set the applicable scope of the policy, which can be a custom of VMs.
Step 3: Create new rules. Click New Rule to create new rules.
• Name: The firewall policy name.
• Source/Destination condition: Support configuring Any IP Address, IP Group and IP Range, Virtual Machine, and VM Group.
![]()
When the source/destination selects a virtual machine, if the virtual machine does not have vmTools installed, the system cannot automatically obtain the virtual machine’s IP, and the underlying firewall rules cannot perform effective IP conversion. As a result, the rules are ineffective for the virtual machine. Therefore, in this case, you need to configure an IP for the virtual machine before using it as the source/destination of firewall rules.
• Service: It supports the selection of Predefined Service on the platform and Custom Service based on protocols and port numbers. Multiple rules can share custom services in the same effective scope.
• Action: How to handle the traffic of the rule can be set to either allow or drop.
• Status: Disable or enable the current rule.
• Operation: Delete operation
After clicking a new rule, return to the Create Rule page, and click the Add button to continue adding other rules.
Step 4: After confirming that all rules are added correctly, click OK to create. On the Configure Rules page, select a rule record and click the Move Up or Move Down button to adjust the priority of the created rule. Click Move To to move the rule to another policy group.
Step 5: Create IP Groups. The platform administrator can manage the IP groups in the distributed firewall policy. Click the IP Groups button, click the New button, and enter the Name, Description, and the IP Range to complete the IP groups creation.
Step 6: After configuring the firewall policy, you can configure the Dropped Packet Logging.

 {{ $t('index.defaultHeader.chromeBrowserTip') }}