{{ secondMenu.name }}


Step 1: Configure Storage Network
![]()
Make sure the IP can communicate with the storage pool successfully. If the HCI IP address and storage pool access IP not in the same IP subnet and the HCI’s network gateway is not on the external storage network interface, you can go to Nodes > physical Interfaces select the node and then click Other. Click Static Route > Add New Static Route. Fill out the related information.
IP Address: The IP subnet where the storage pool access IP is located.
Netmask: The storage pool access IP netmask.
Next-Hop IP: the IP address of the next router or device that HCI accesses external storage through the external storage network Interface.
Step 2: Add iSCSI server.
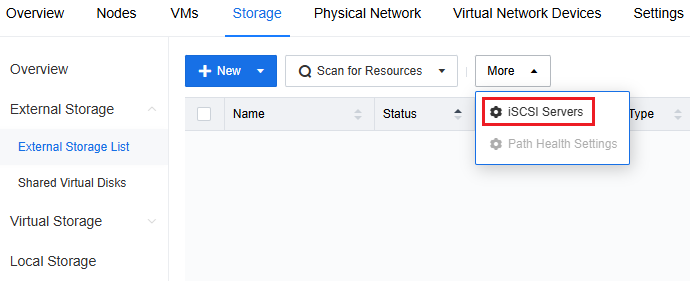
Click New, it will pop up a new window, fill out the server and port information then click Detect Target.
Server: the iSCSI access IP.
Port: keep the default if the iSCSI is not required.
Waiting for a while in the new pop-up window click the Start button under Authentication. If HCI can access directly without CHAP method, just click the Save button. wait for the information authentication to be completed.
If the storage server has enabled CHAP authentication, after clicking the Start button please check the Account for authenticating initiator by iSCSI server (one-way CHAP) and fill in the username and password. If you want to enable authentication for the iSCSI server as well, please check the Account for mutual authentication of initiator and iSCSI server (mutual CHAP) and fill in the username and password, then click Save, wait for the information authentication to complete.
After the information authentication is completed, the Start button will change to Authenticated.
Step 3: Format and Mount LUN
Storage Resource: selected the iSCSI server and Lun.
Name: Fill in the name for the storage.
Description: Fill in the description for the storage.
Storage tag: It is mainly used to differentiate between different types of storage, enabling better management and utilization of storage resources within resource pools and clusters.
• High Performance Storage: High read/write performance, suitable for creating high-performance cloud hosts.
• Performance Sensitive Storage: Strong read/write performance, but relatively older, typically referring to legacy storage.
• Capacity Sensitive Storage: Average read/write performance, but large in capacity, high in security, and cost-effective.
Connected nodes: Choose the nodes within the cluster that this storage needs to connect to, based on actual requirements. Click OK fill in the Sangfor platform password in the pop-up windows, then click OK.
Space Reclamation: Refers to the actual storage space that is freed up after files are deleted.
Other: Check Add this datastore to VM backup repositories as well you can add this datastore VM backup repositories at the same time. Waiting for the addition process completed, after the iSCSI add complete you can see the iSCSI in the External Storage List page and the status is normal.

 {{ $t('index.defaultHeader.chromeBrowserTip') }}