{{ secondMenu.name }}


Here is the guidance how to migrate the VM via SCMT Hot Standby method.
Prerequisite
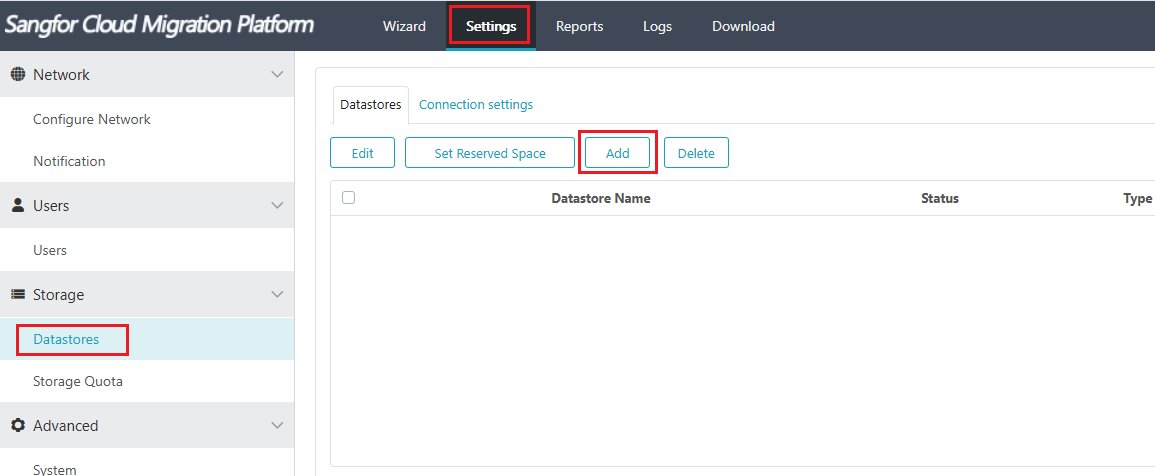
Step 1.Use the admin account to Log in SCMT, go to Settings > Datastores, click Add.
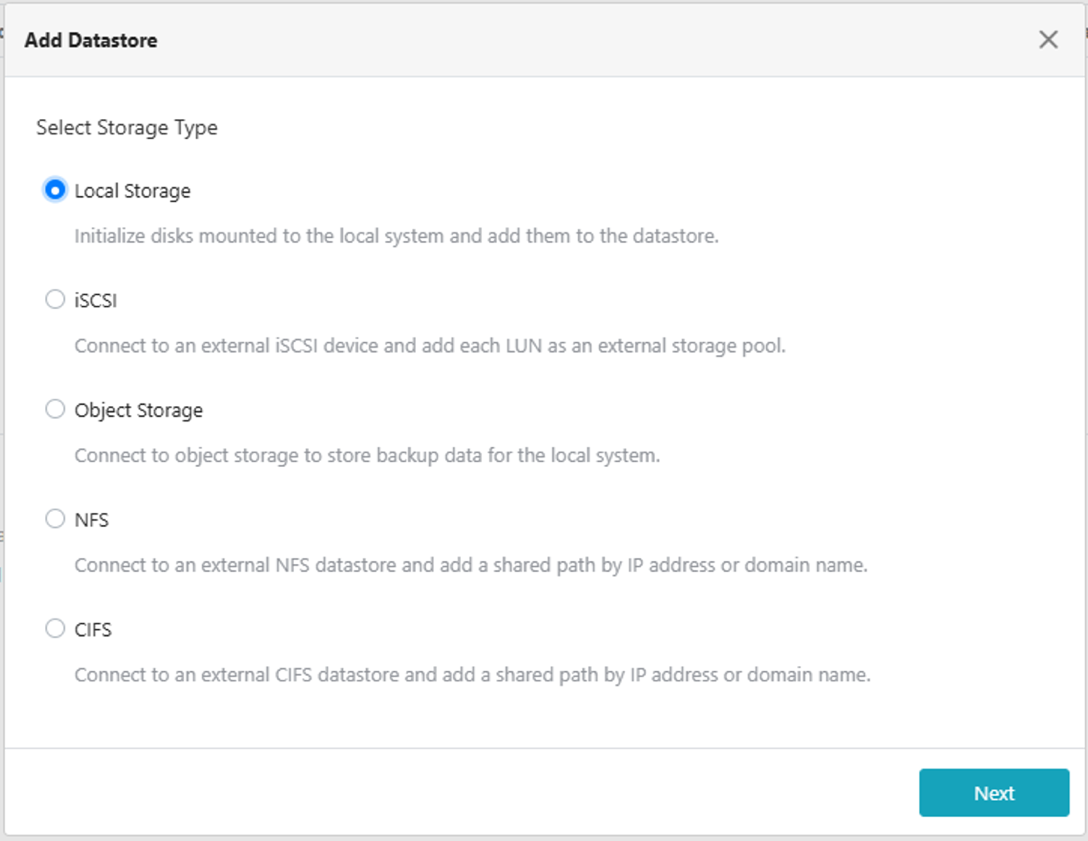
Step 2.Select Local storage. (You can see SCMT can add local storage, iSCSI, object storge, NFS and CIFS, here take local storage as an example.)
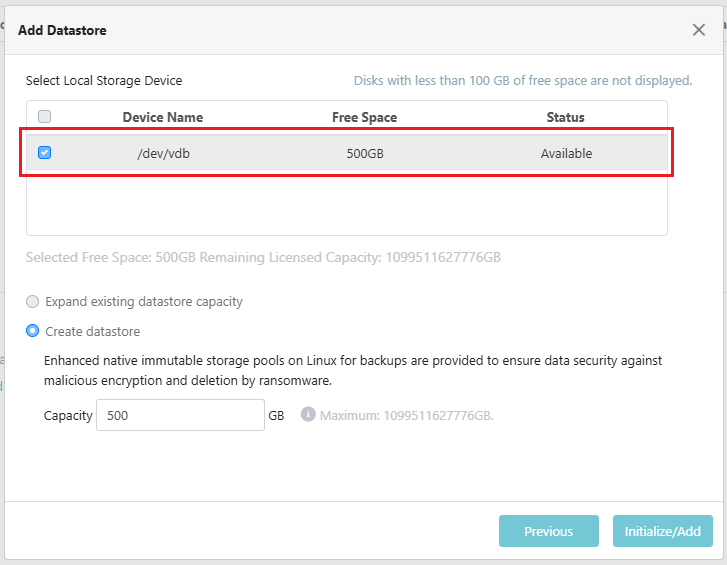
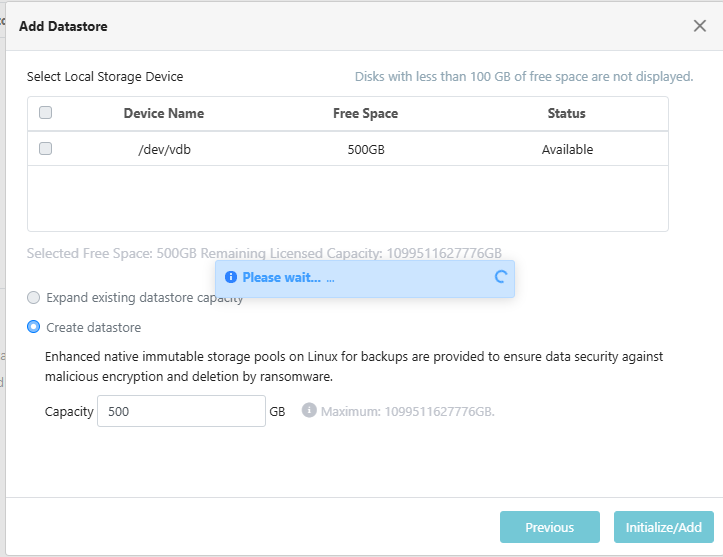
Step 3.Click Initalize/Add wait for the initialization complete.
Step 4.After the initialization completed, you will see the datastore here. You can click Set Reserved Space to adjust the reserved space.


Step 5.Go to Settings > Datastores > Storage Quota, check the datastore you want.
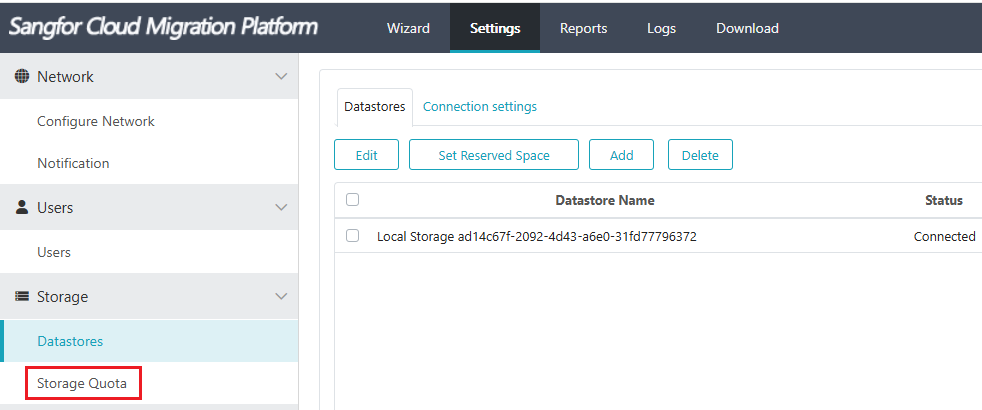
Step 6.Click Add Quota.
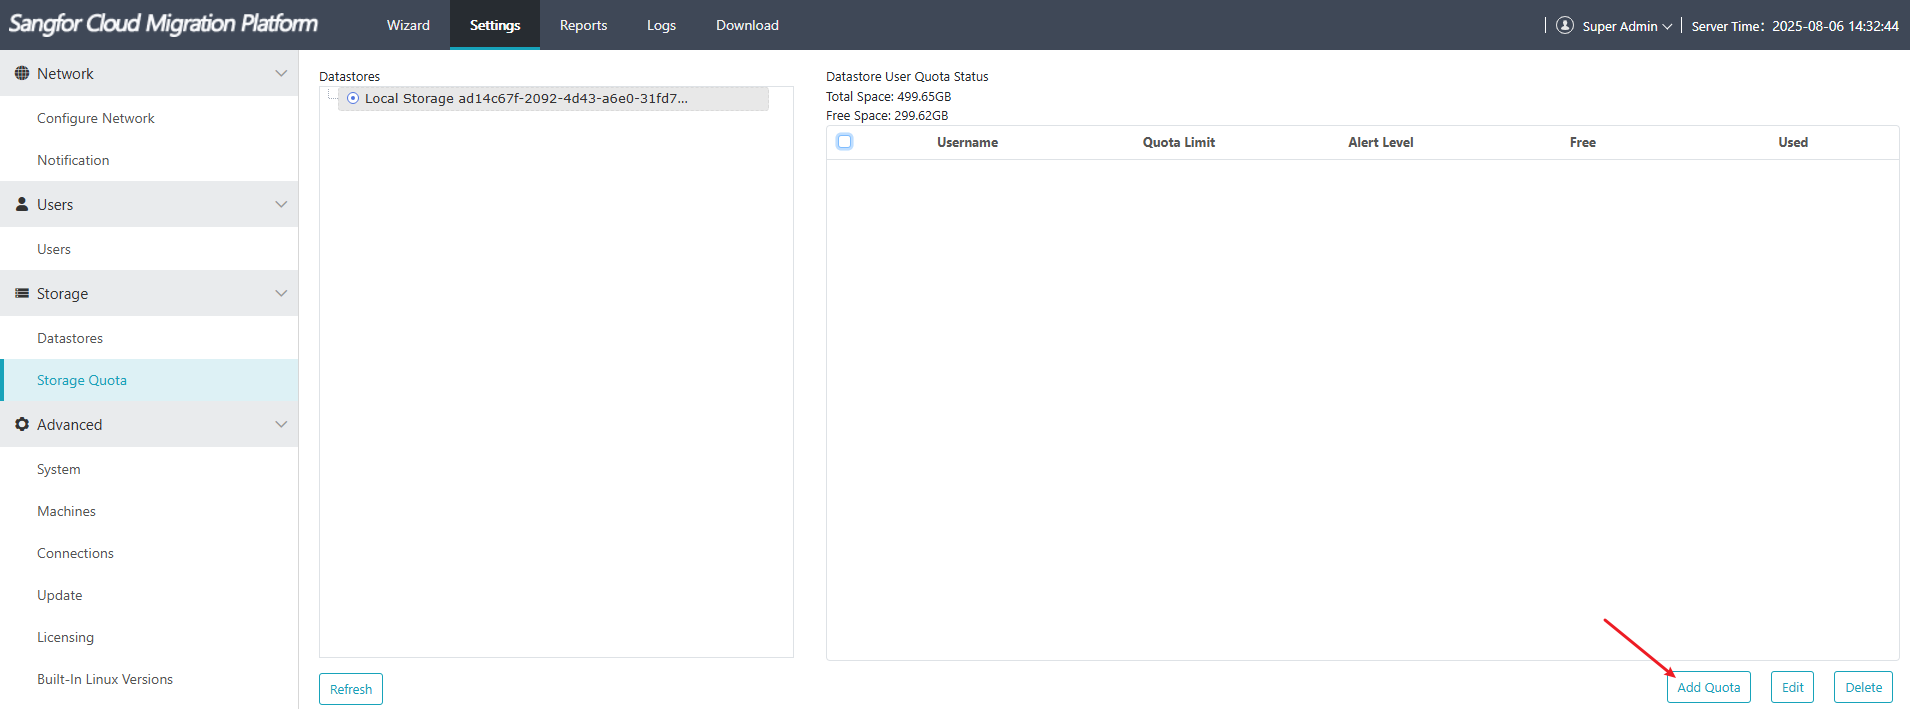
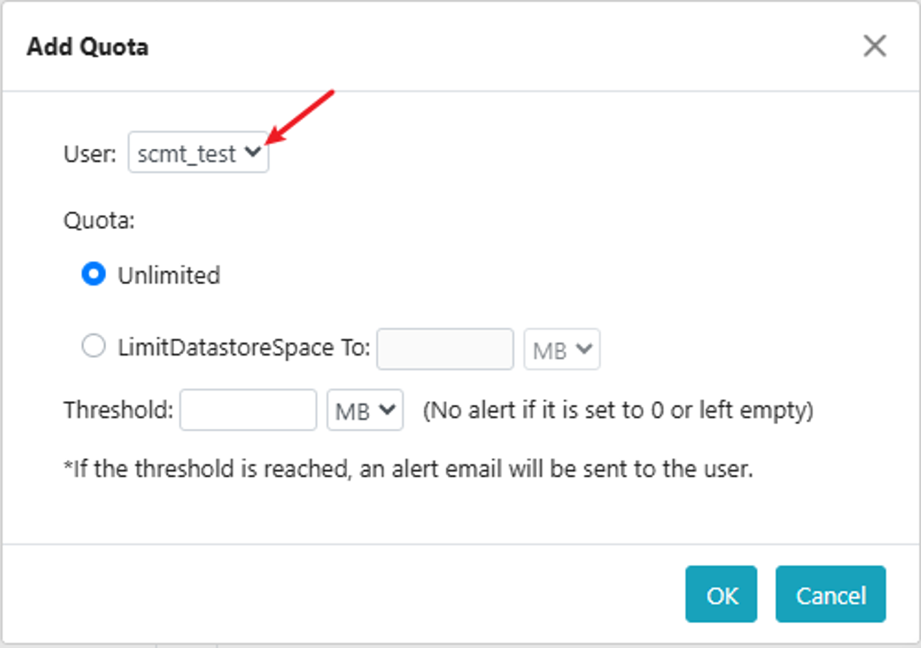
Step 7.Select the user created for migration, select Unlimited, click OK.
Bare Metal Recovery is an ISO file. It is a PE system that the destination VM needs to boot from, and it is used to transfer migration data during the migration process. You need to download Bare Metal Recovery and create a Bare metal PE on HCI.
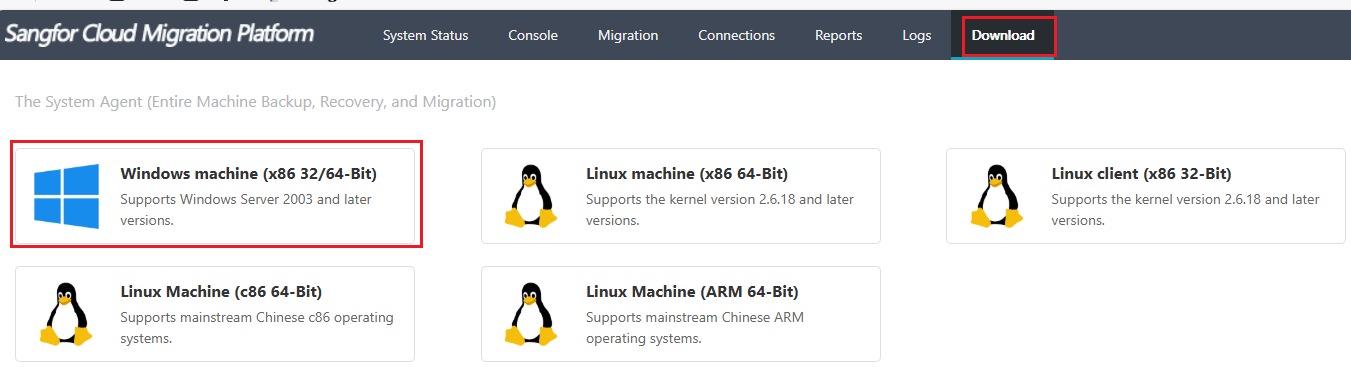
Step 1. Log in to SCMT with the created account, go to Download, download the Bare Metal Recovery (X86 32/64-Bit).

Step 2.You can select DHCP or Static in the Step2 Enter the bootable media IP address. This IP is used for destination VM after booting from Bare Metal Recovery PE. 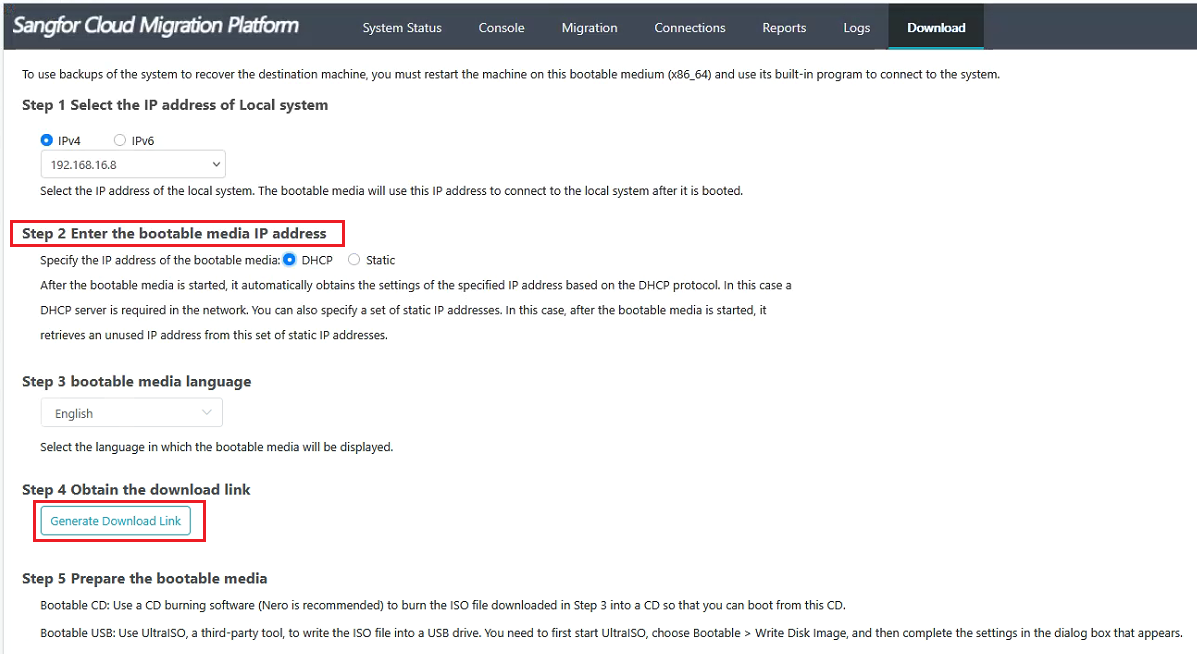
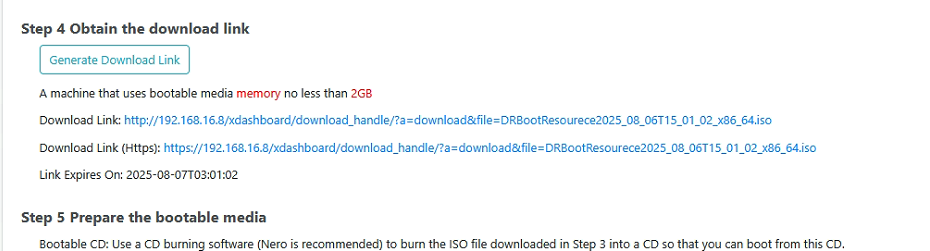
Step 3.Click Generate Download Link. Select one download link to download the Bare Metal Recovery PE iso file.
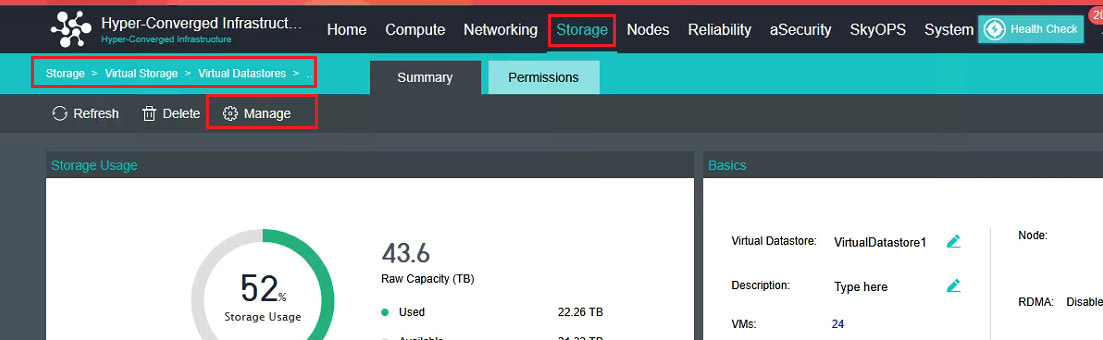
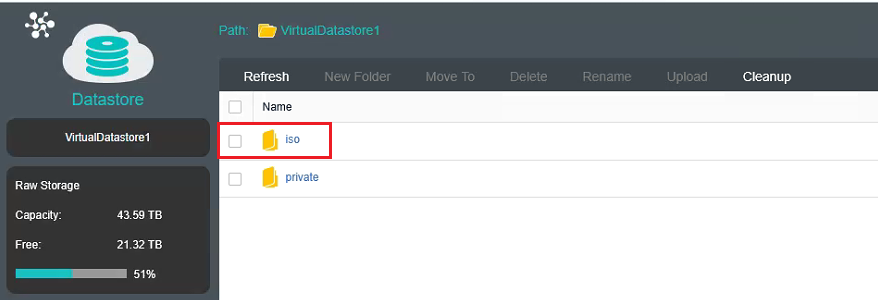
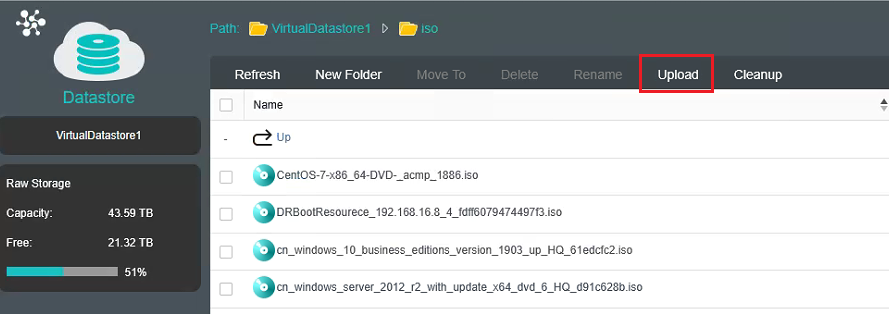
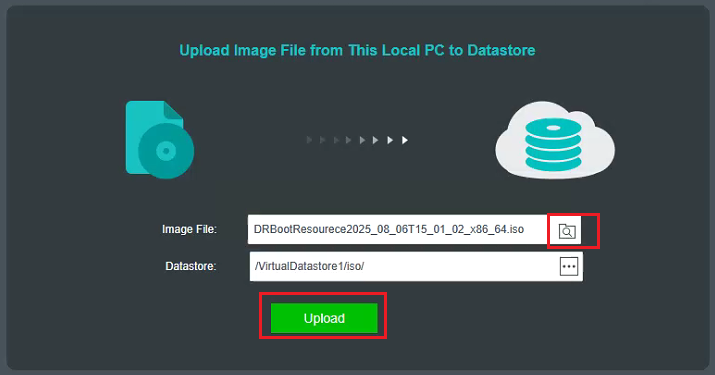
Step 4.Log in to HCI, go to Storage, click Virtual Storage > Virtual Datastores, and click the name of the virtualDatasotre (The default name is Datastore1.), click Manage > iso> Upload, upload the iso file.

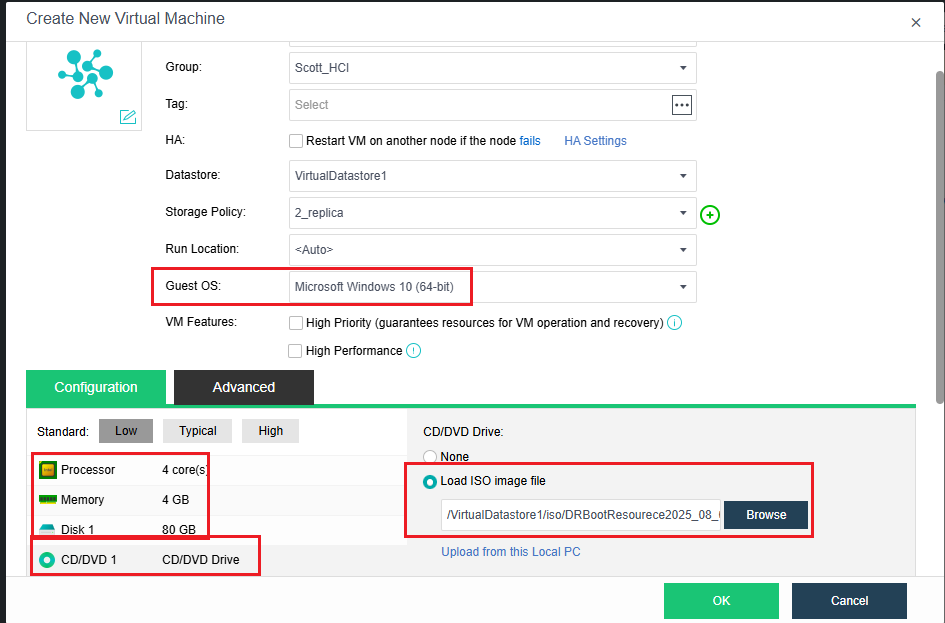
Step 5.Log in to HCI, create a VM with the same CPU, memory, disk (Quantity and capacity) and select the same OS type, select the Bare Metal Recovery ISO file for VM’s virtual CD/DVD drive.
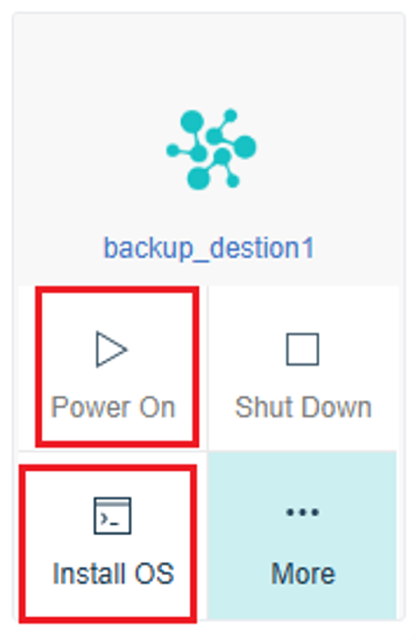
Step 6.Click Power On the VM, and click Install OS, wait for the VM to load the bare metal recovery iso file successfully.
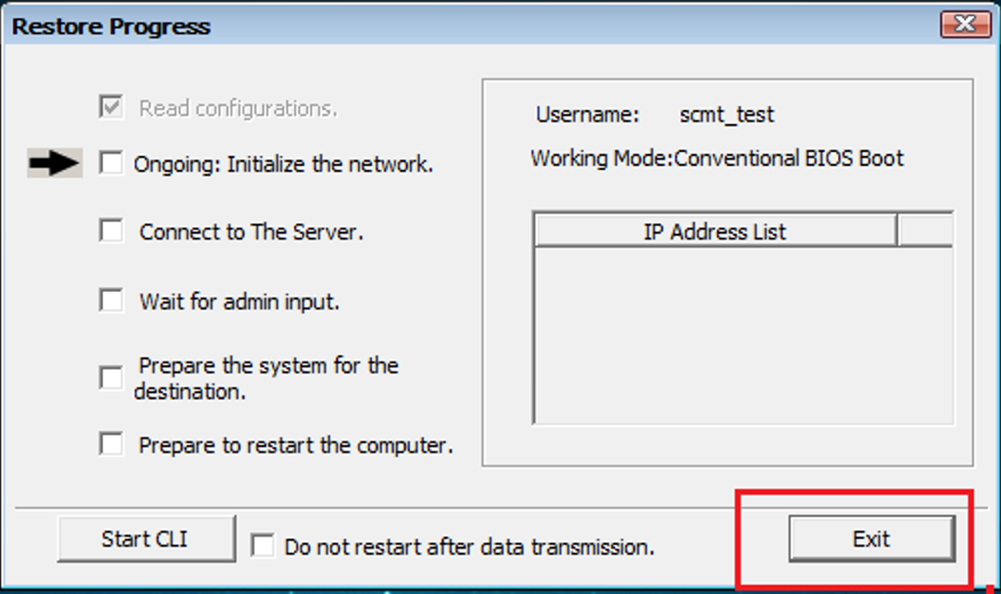
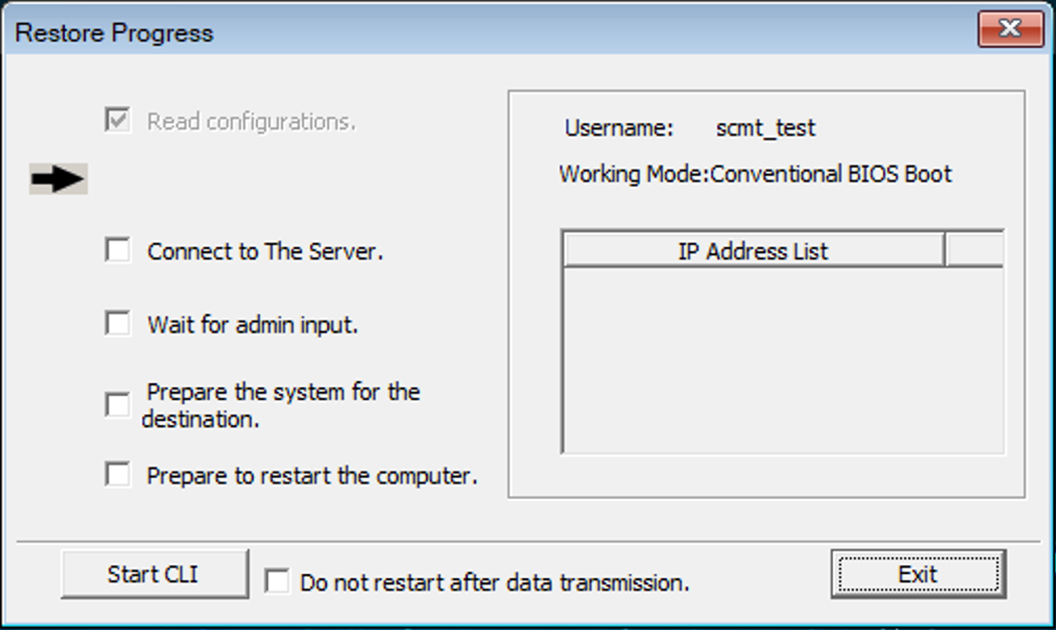
Step 7.The VM will enter the PE system after waiting for a while. When the PE system cannot get IP address from the DHCP server, cannot communicate with SCMT, or requires manual configuration, it will get stuck at Onging: Initialize the network, you can either click Exit or wait for a while to proceed to the IP configuration step.
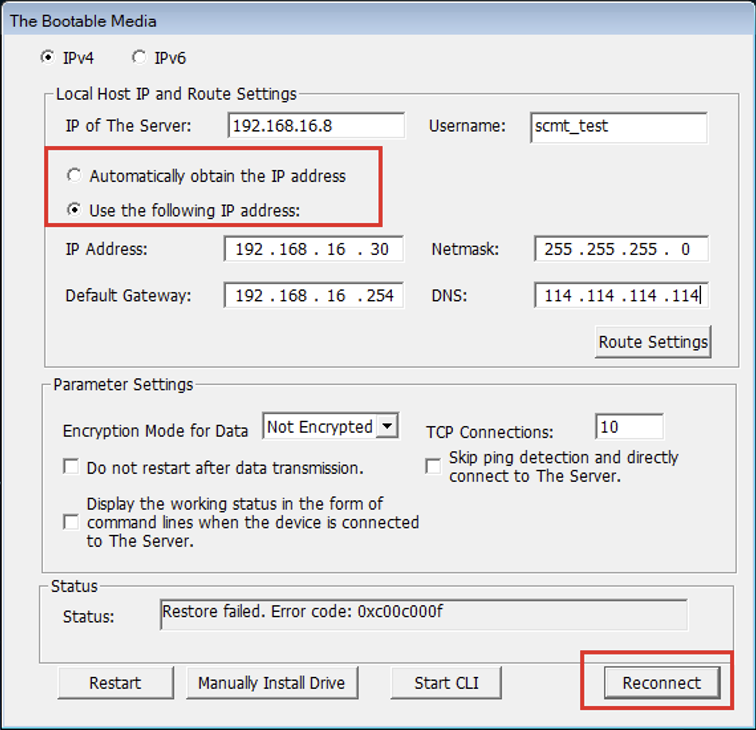
Step 8.Enter the IP configuration step. You can select Automatically obtain the IP address, so that the PE system can obtain the IP from DHCP server. Please ensure the IP address can communicate with SCMT and the source VM. Or you can select Use the following IP address to assign the IP address manually. Click Reconnect.
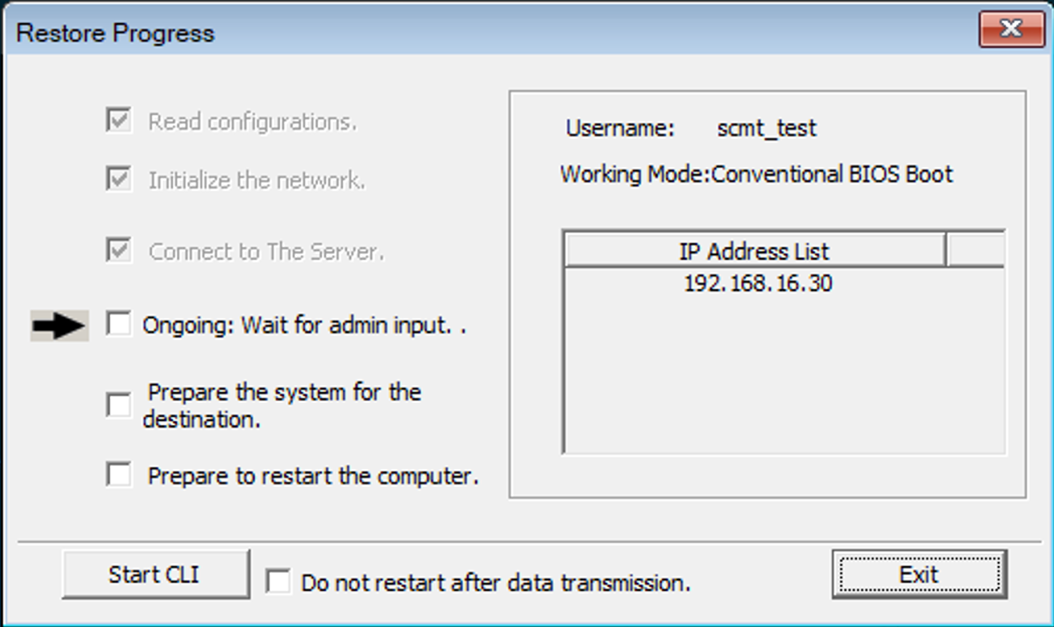
Step 9.Wait for the IP address initiation complete, when the process reaches Ongoing: Wait for admin input, it means the IP address initiation successfully.
Install the agent on the source VM.
Windows Agent
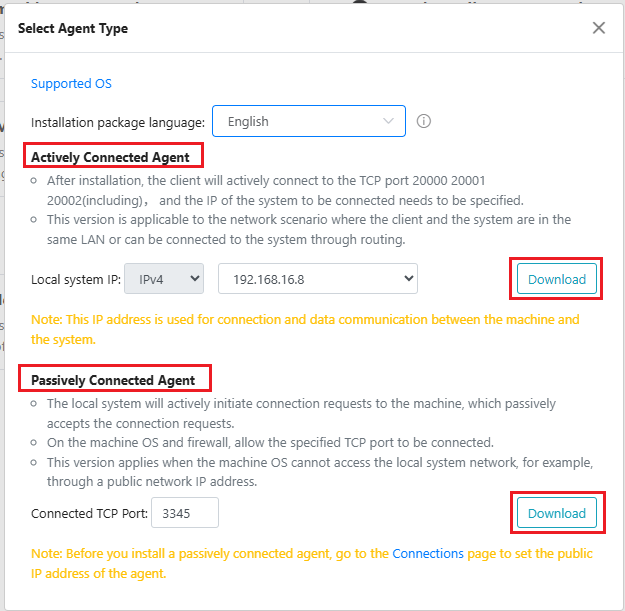
Step 1.Log in to SCMT using created account, go to Download, click Windows machines (x86 32/64-Bit).
Step 2.It provides Actively Connected Agent, and Passively Connected Agent to download, select the agent based on network conditions, and click the Download.
Step 3.Wait for the download link to be generated, use the provide download link to download the agent. You can download it within the VM to be migrated, or you can download it in another PC and then transmit it to the VM to be migrated.
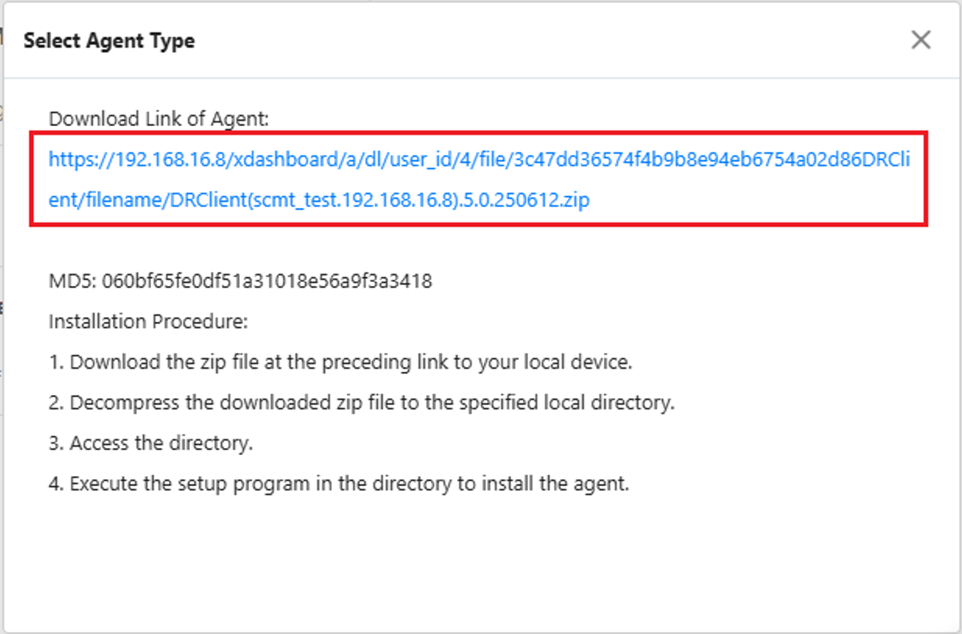
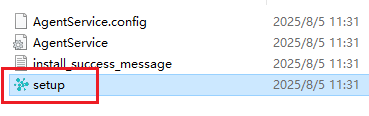
Step 4.The download agent file is a zip file, you need to unzip it first. After unzipping it, click the setup to launch the agent install process.
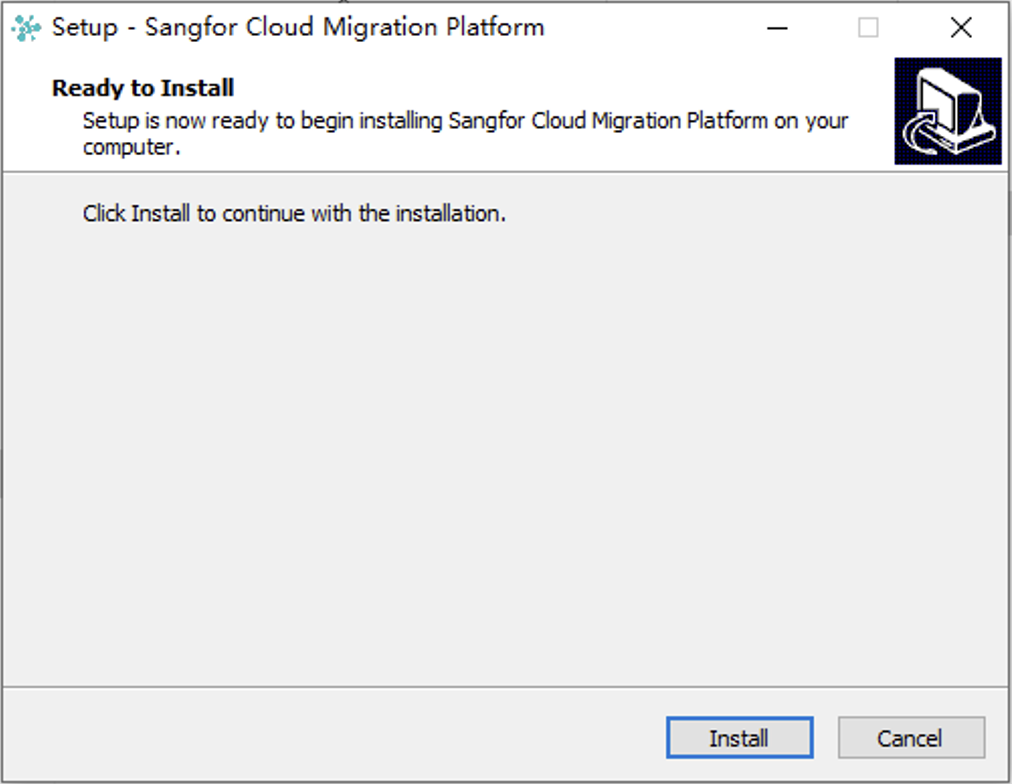
Step 5.Click the Install, and waiting for the installation process to be completed.
Linux Agent
Step 1.Log in to SCMT using created account, go to Download, click Linux machine (x86 64-Bit) or Linux client (x86 32-Bit) based on the OS of the VM to be migrated is 32 or 64 Bit. No matter 32 or 64 Bit the following steps are the same.

Step 2.It provides actively connected agent, and passively connected agent to download, select the agent based on network conditions, click the Download.
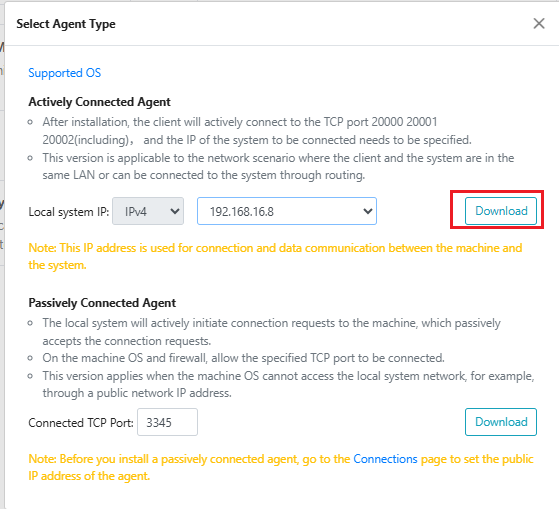
Step 3.Wait for the download link to be generated, use the provide download link download the agent.
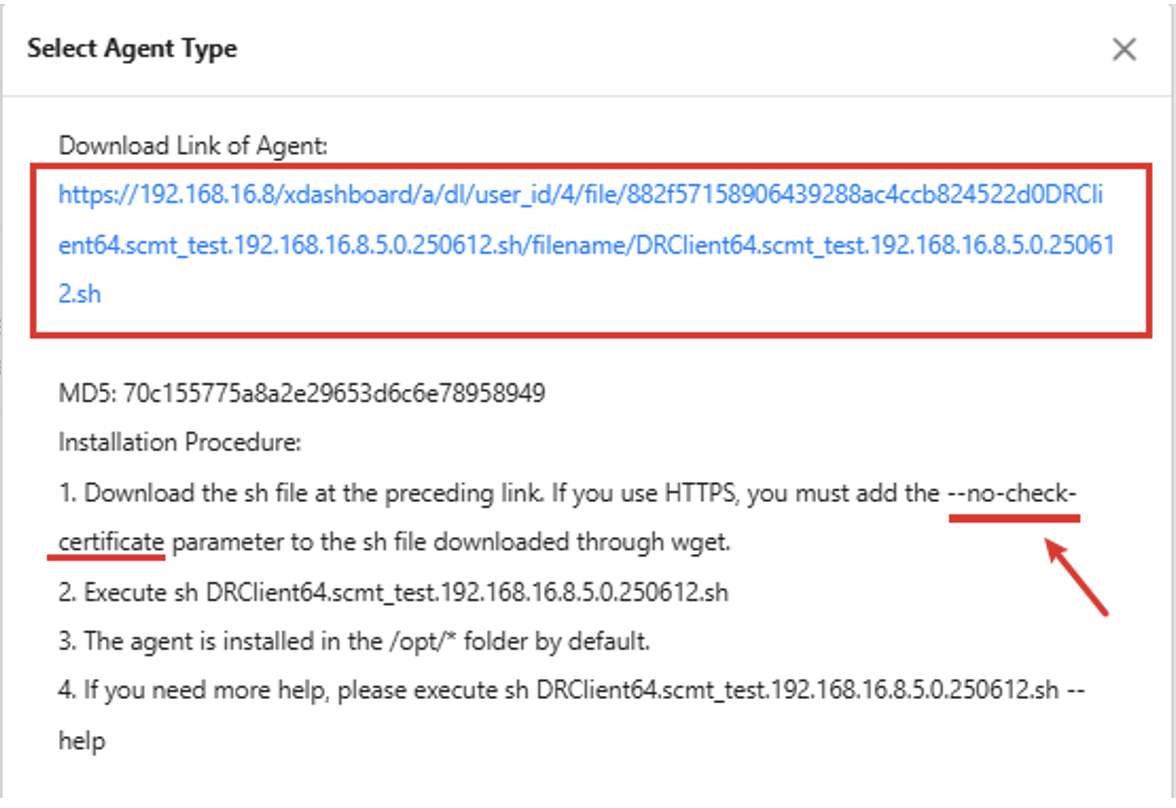
After the download link generated, download the agent. You can either download it directly within the VM to be migrated, or download it to another PC first and then transfer it to the target VM.
![]()
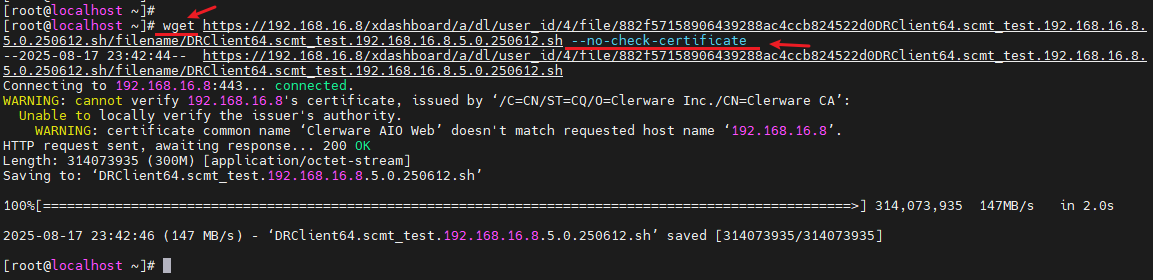
When you download the agent install file do not forget the parameter –-no-check-certificate.
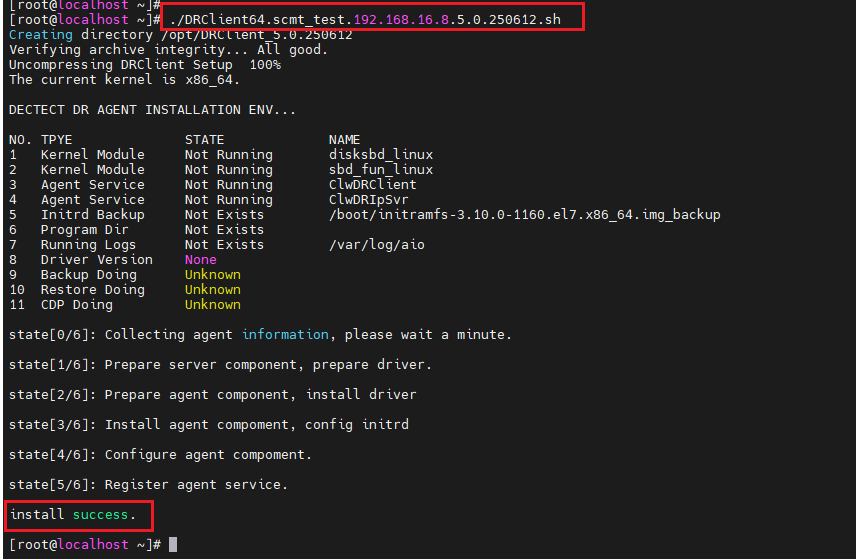
Step 4.After the agent installation file has been downloaded, authorize it using following command:
chmod +x [agent_installation_ file]

Step 5.Once authorized, run the command to install the agent and wait for the installation to finish.
./[agent_installation_ file]
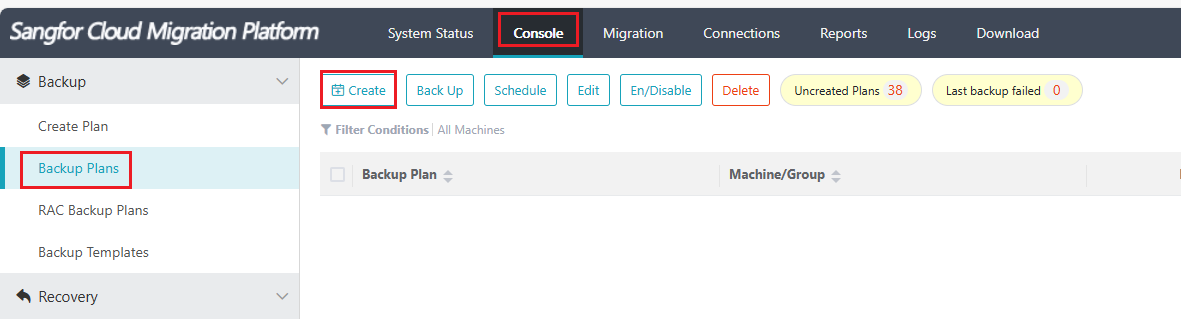
Step 1.Log in to SCMT using created account, go to Console > Backup Plans, click Create.
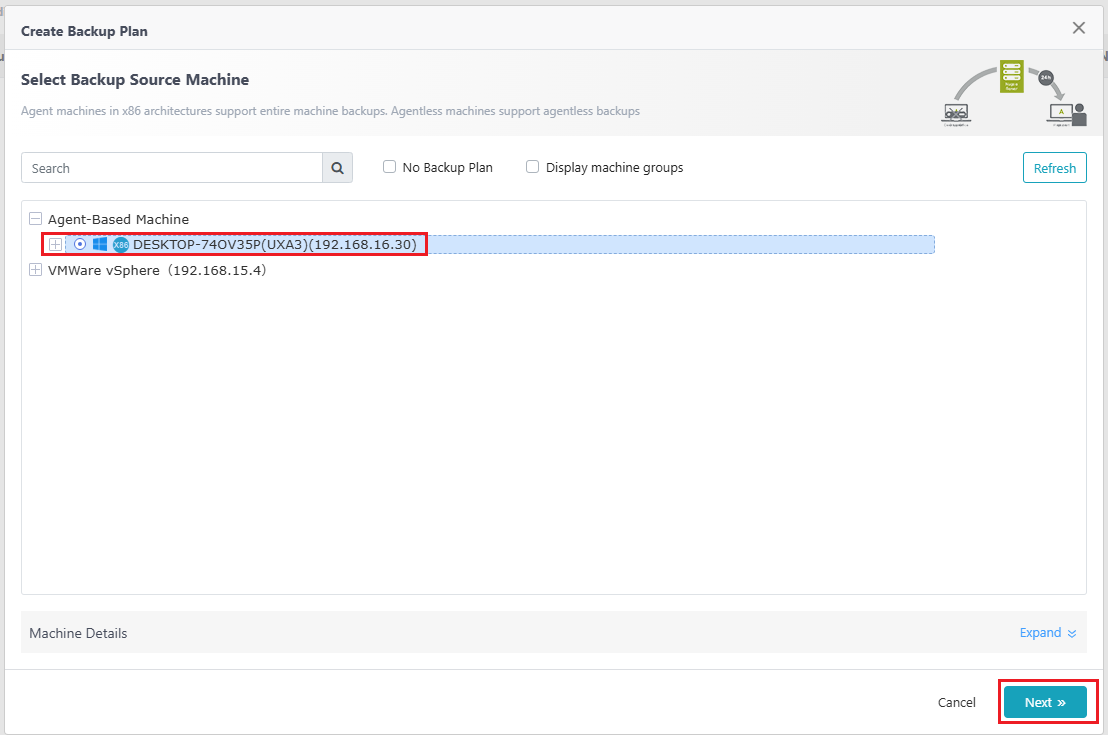
Step 2.Select the source VM to be migrated, and click Next.
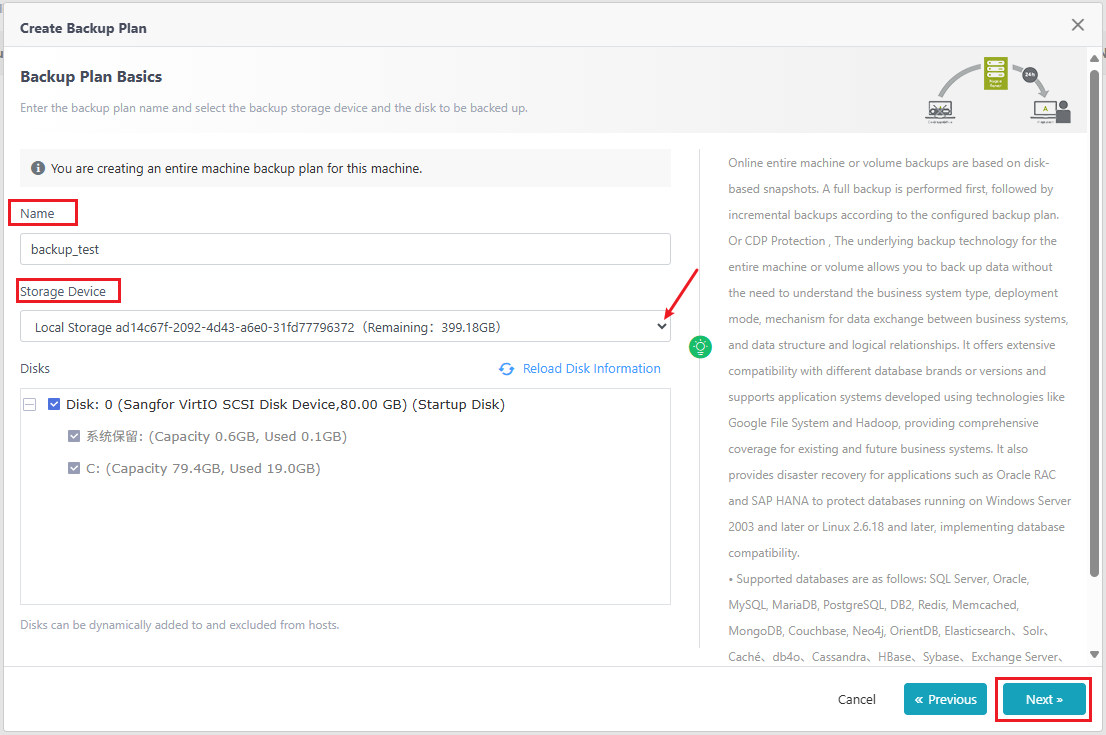
Step 3.Define the name of the backup plan and select the storage device. Select all disks and all partitions of the corresponding disks.
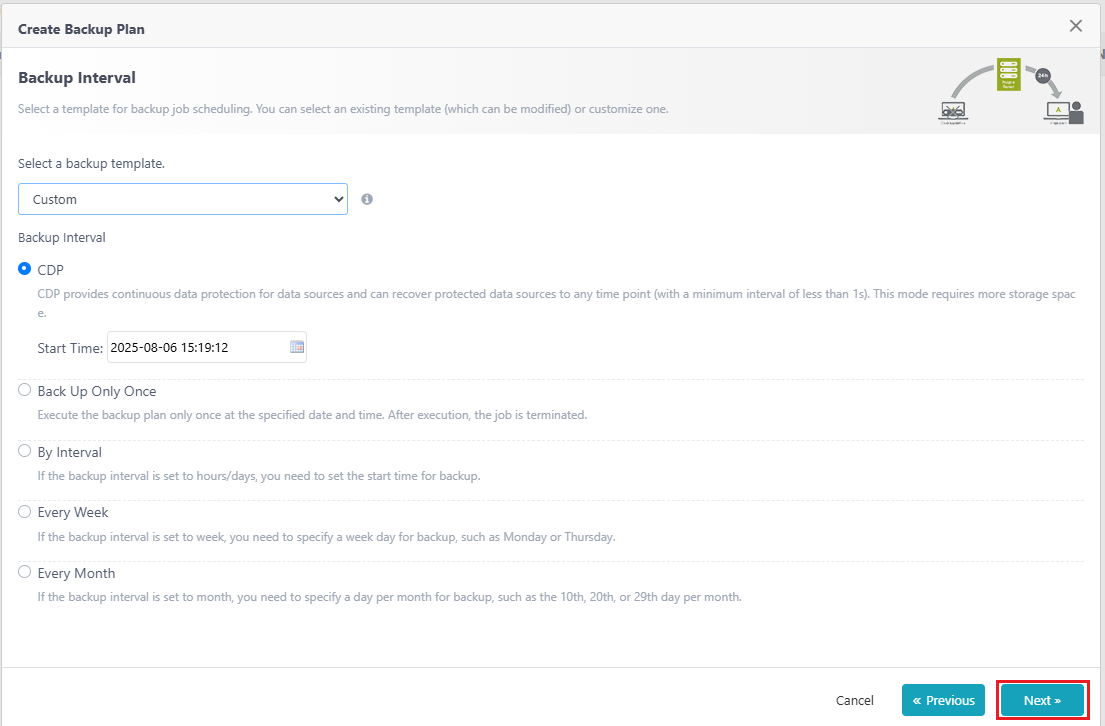
Step 4.Backup intervals select CDP, then click Next.
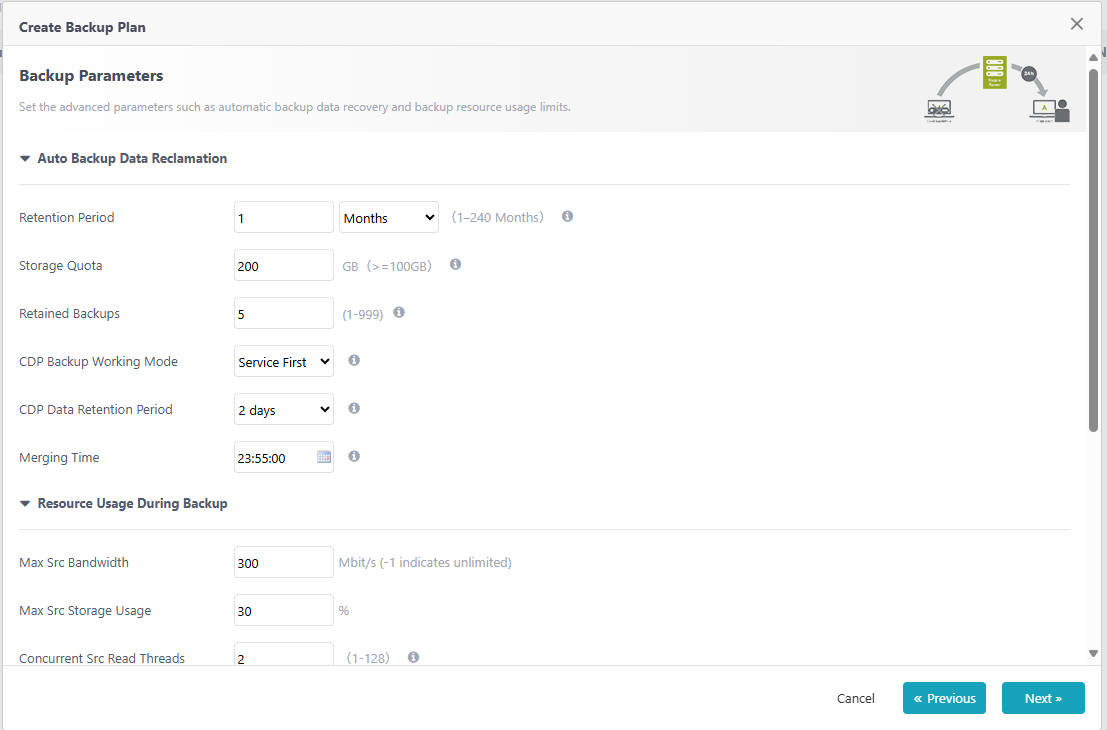
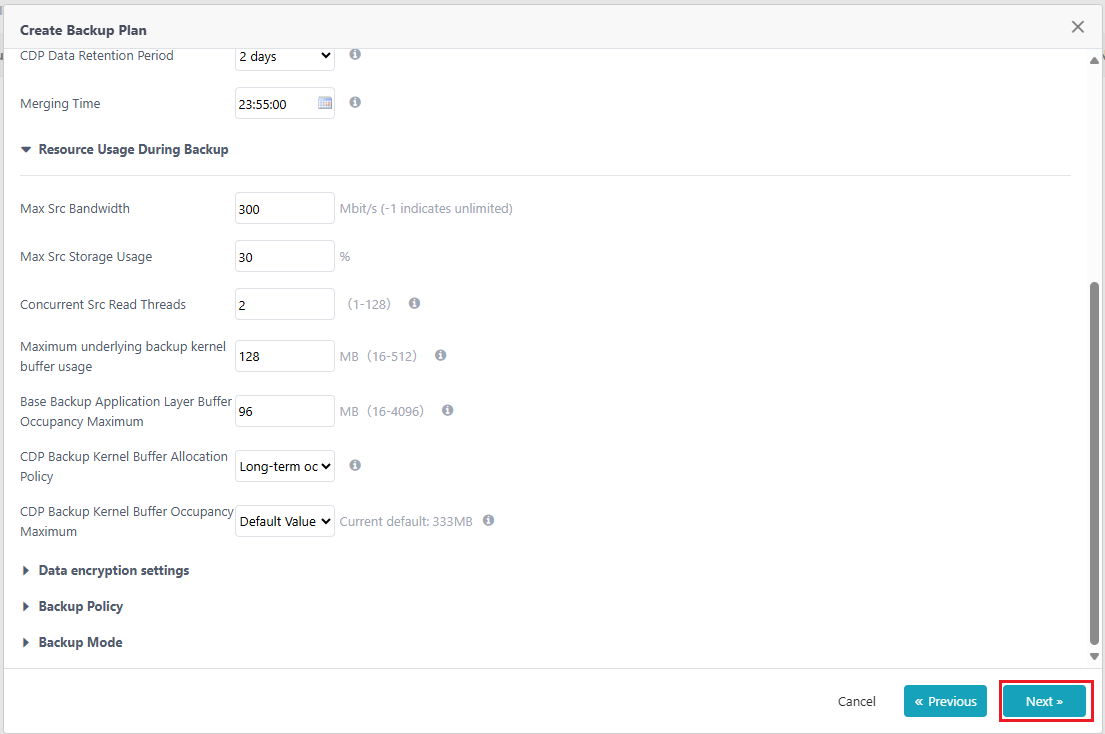
Step 5.Keep the backup parameters as default configuration. Click Next.
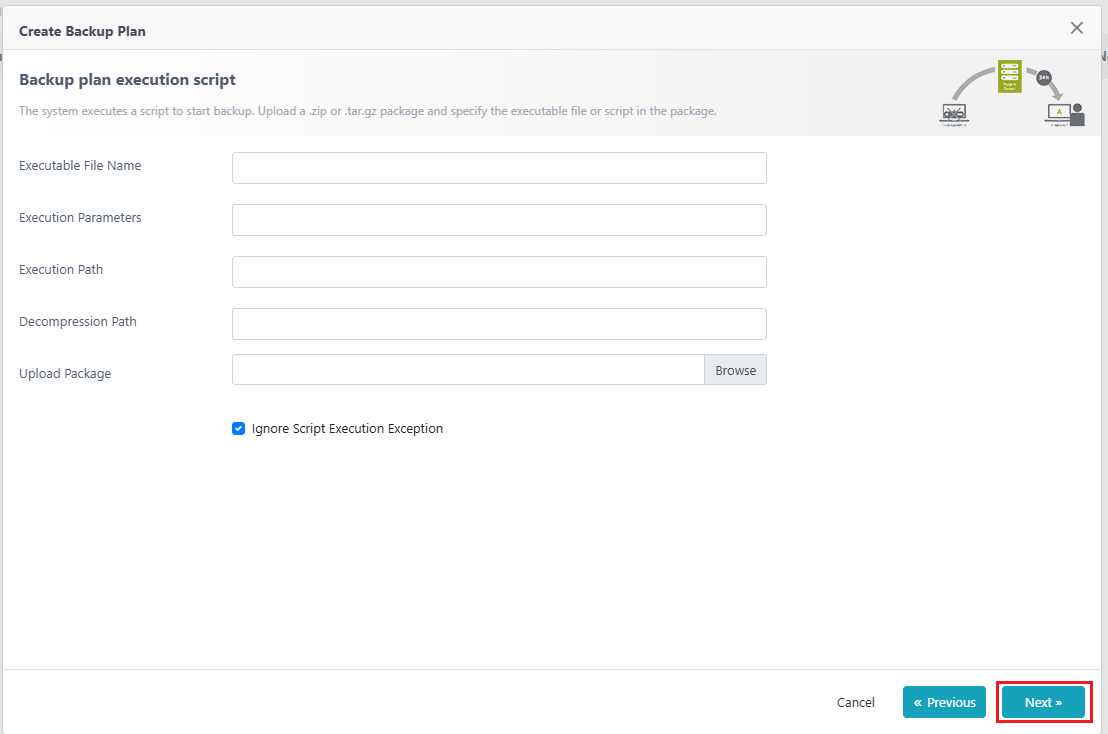
Step 6.Ignore the Script configuration, click Next.
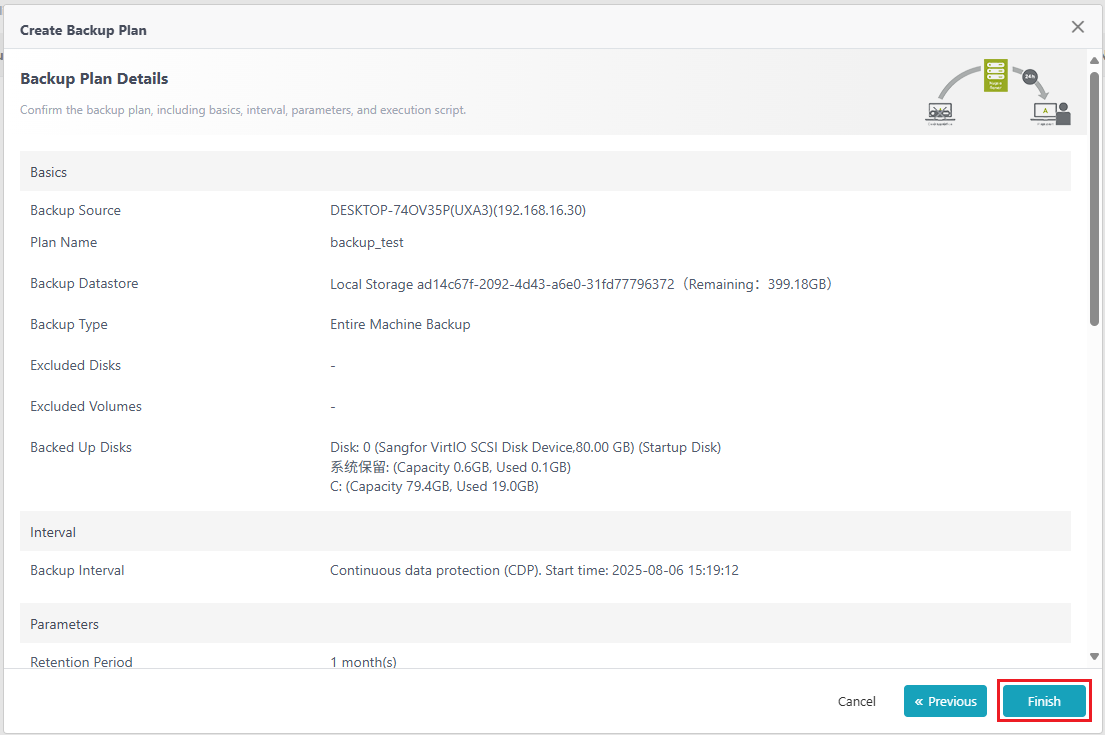
Step 7.Confirm the backup plan configuration. Click Finish.
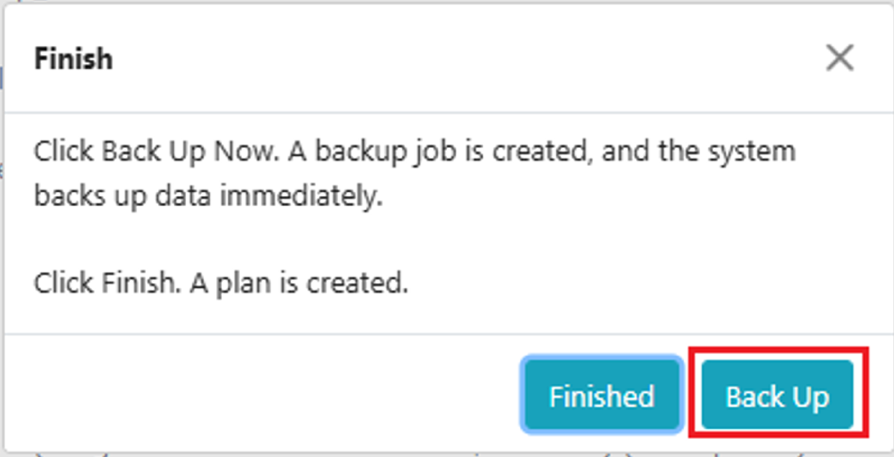
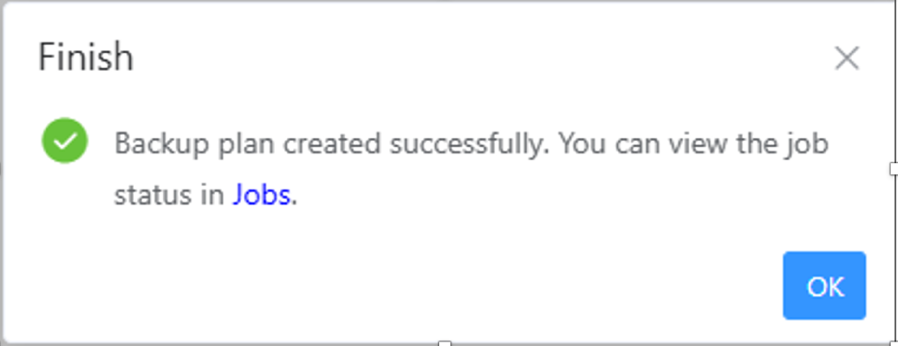
Step 8.In the pop-up window, click Back Up to start the backup plan, in the next pop-up window click OK.
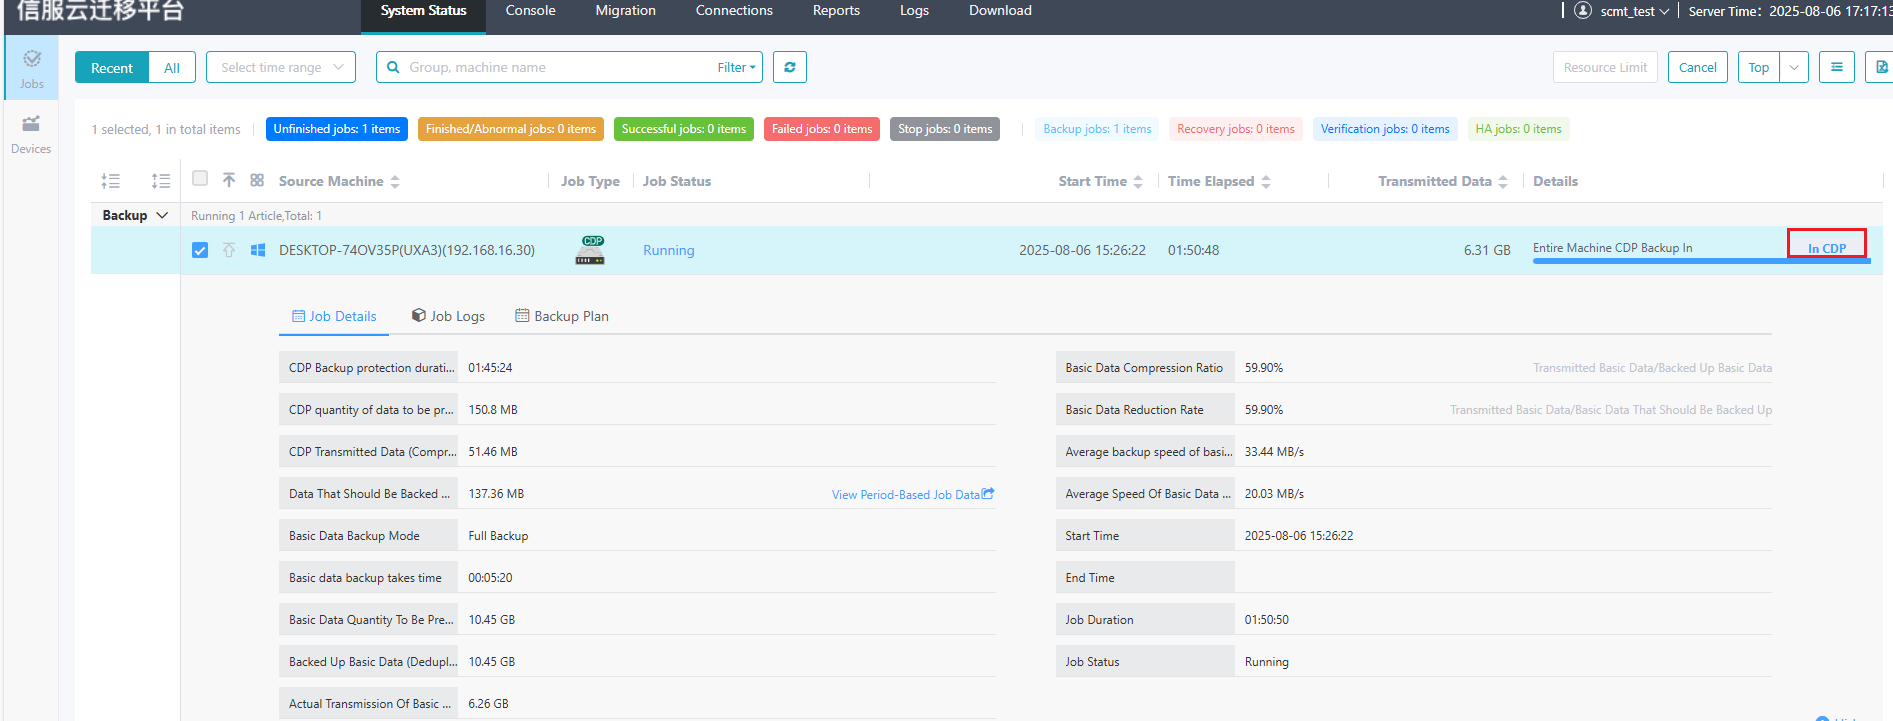
Step 9.Go to System Status > Jobs you can see the backup job. By clicking the Collapse, you can see the detail of the job.

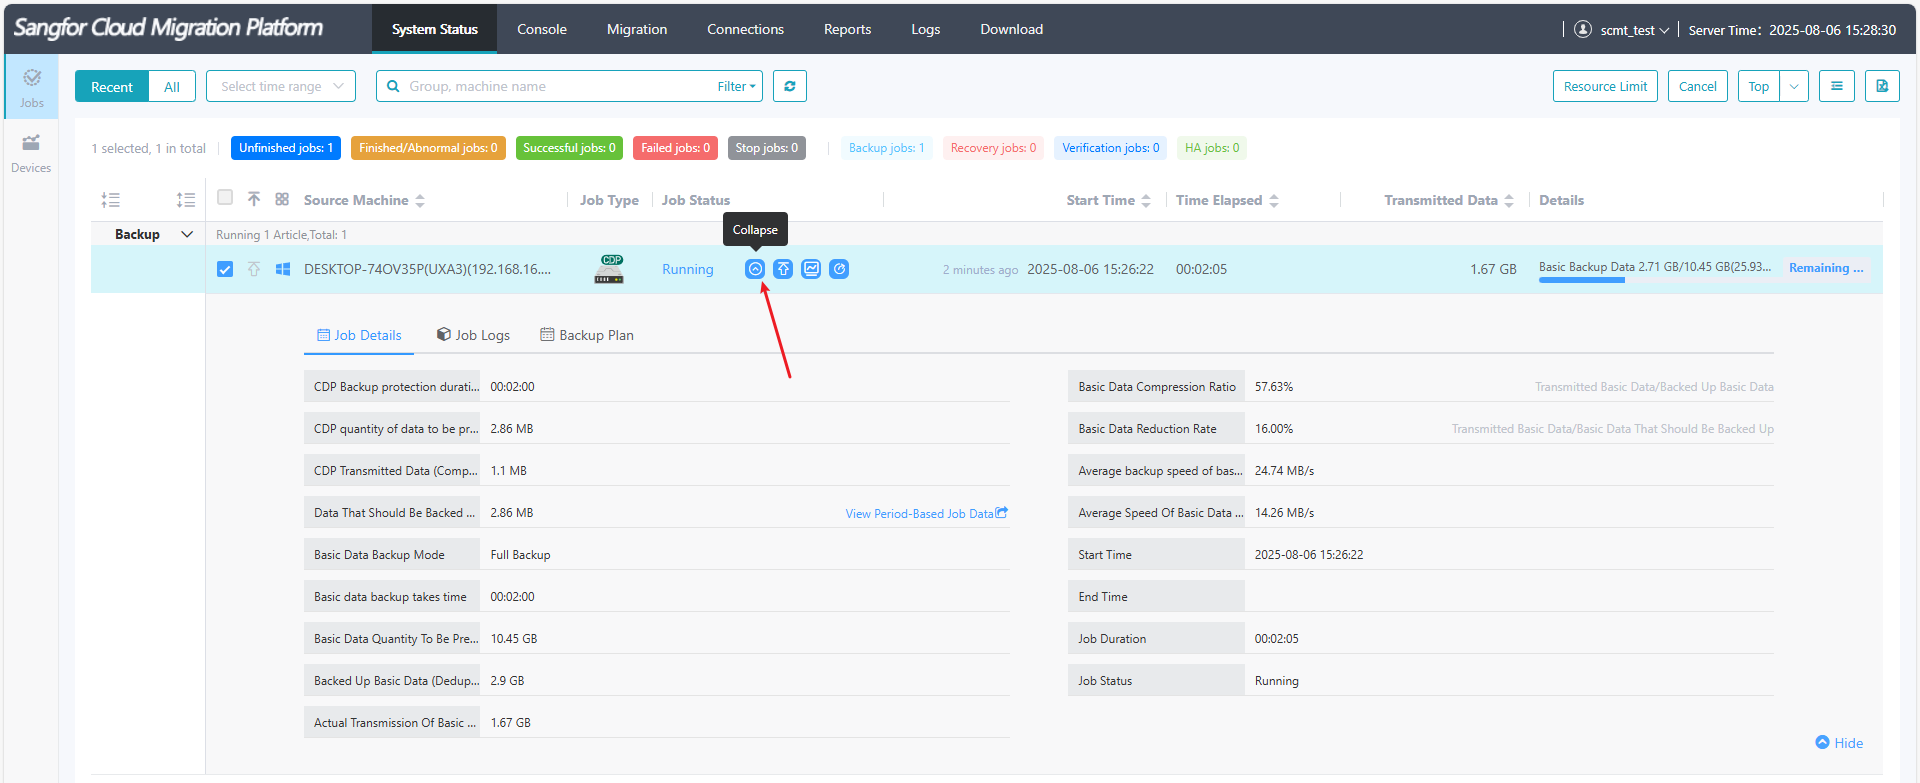
Step 10.When the job status goes to In CDP, it means that you can do the failover job.
After the backup plan is completed then need to create the HA plan.
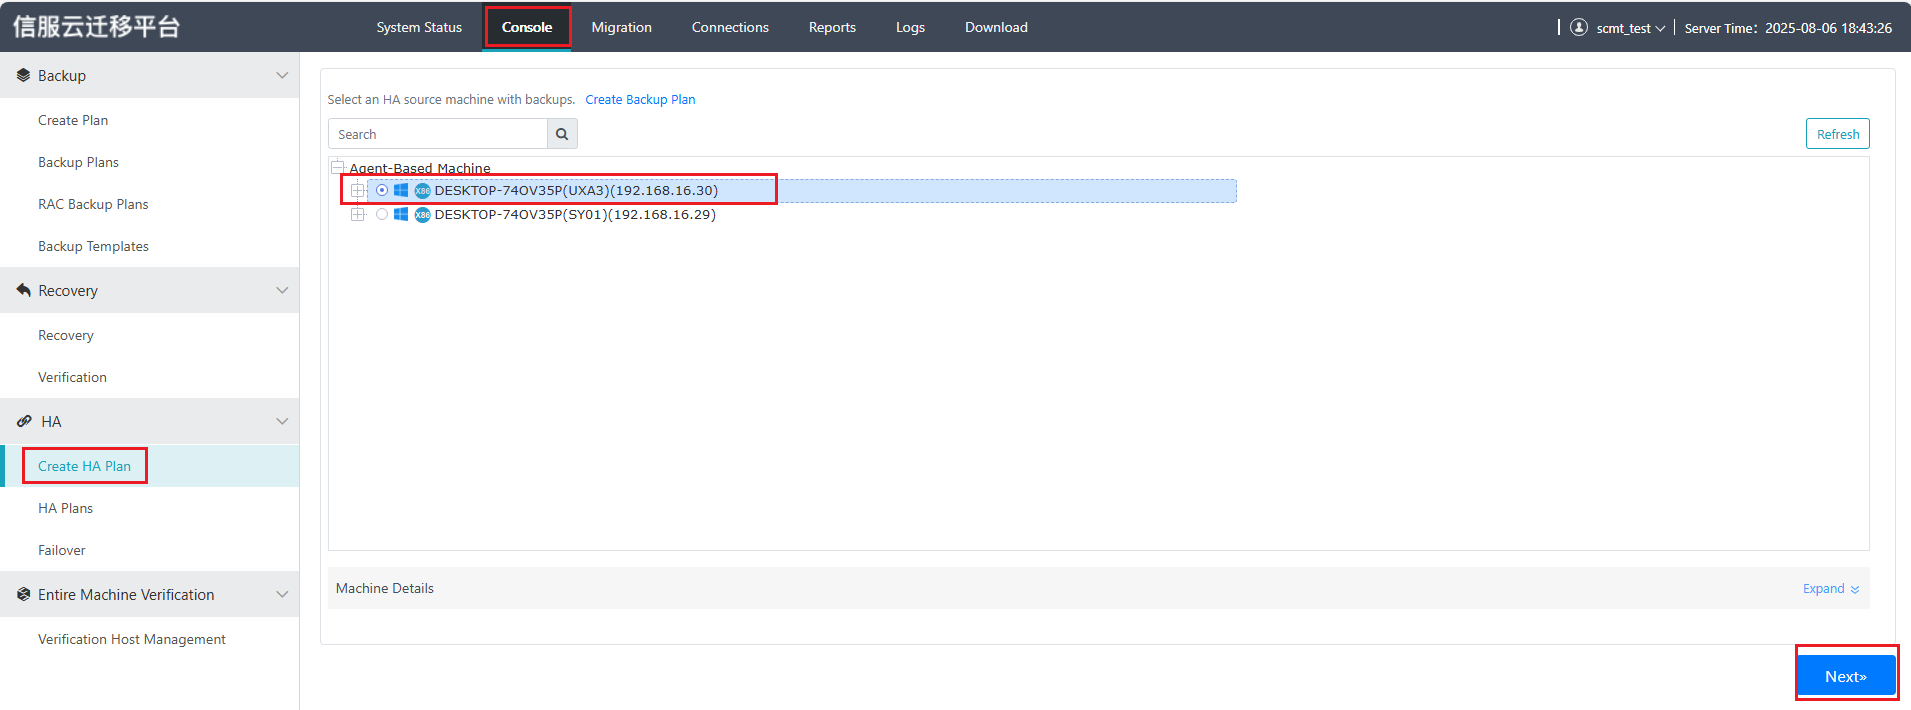
Step 1.Log in to SCMT, go to Console > HA > Create HA Plan, select the source VM (the VM requires complete the backup under the previous backup plan), click Next.
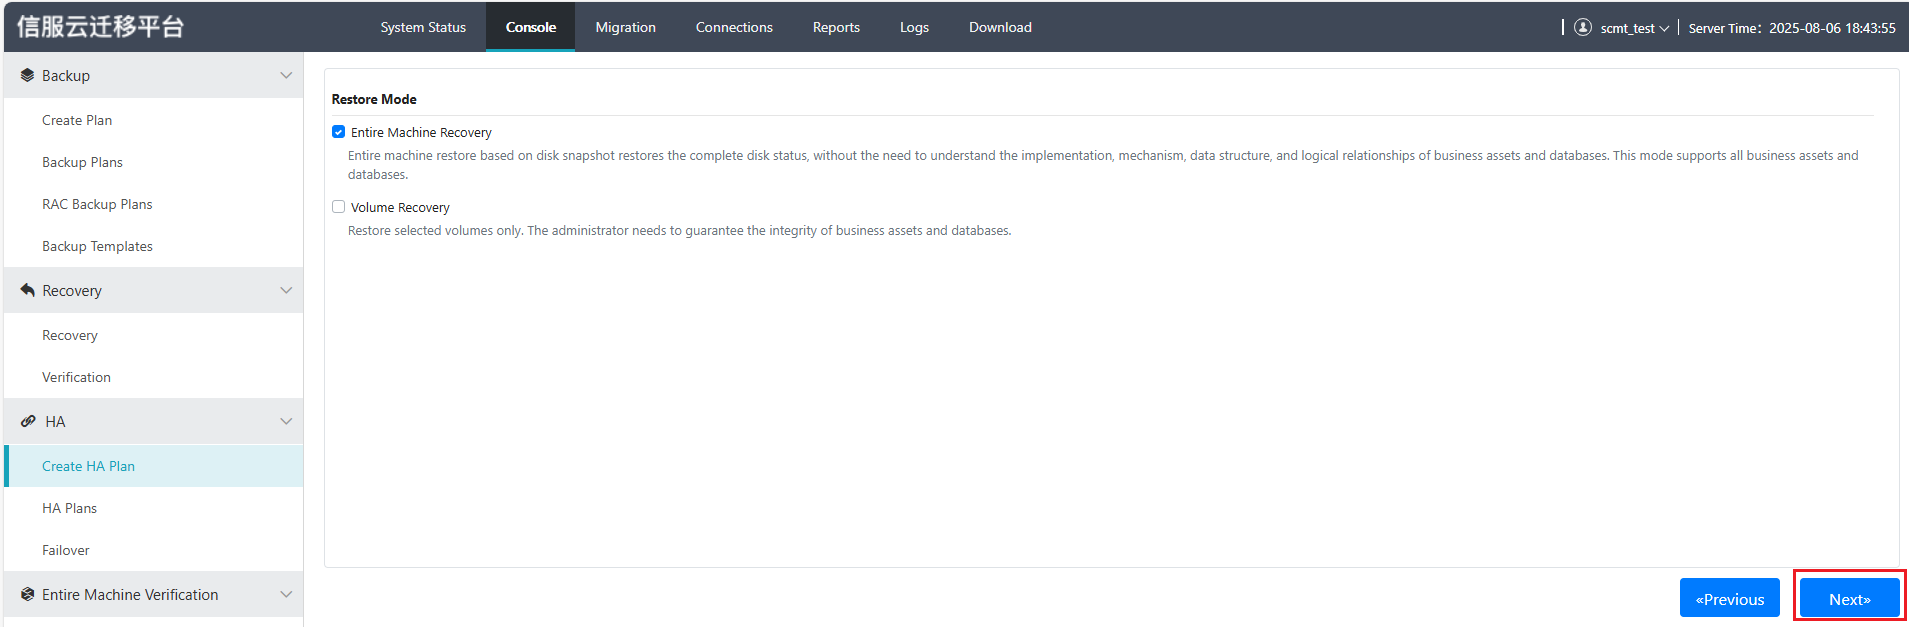
Step 2.Select Entire Machine Recovery, click Next.
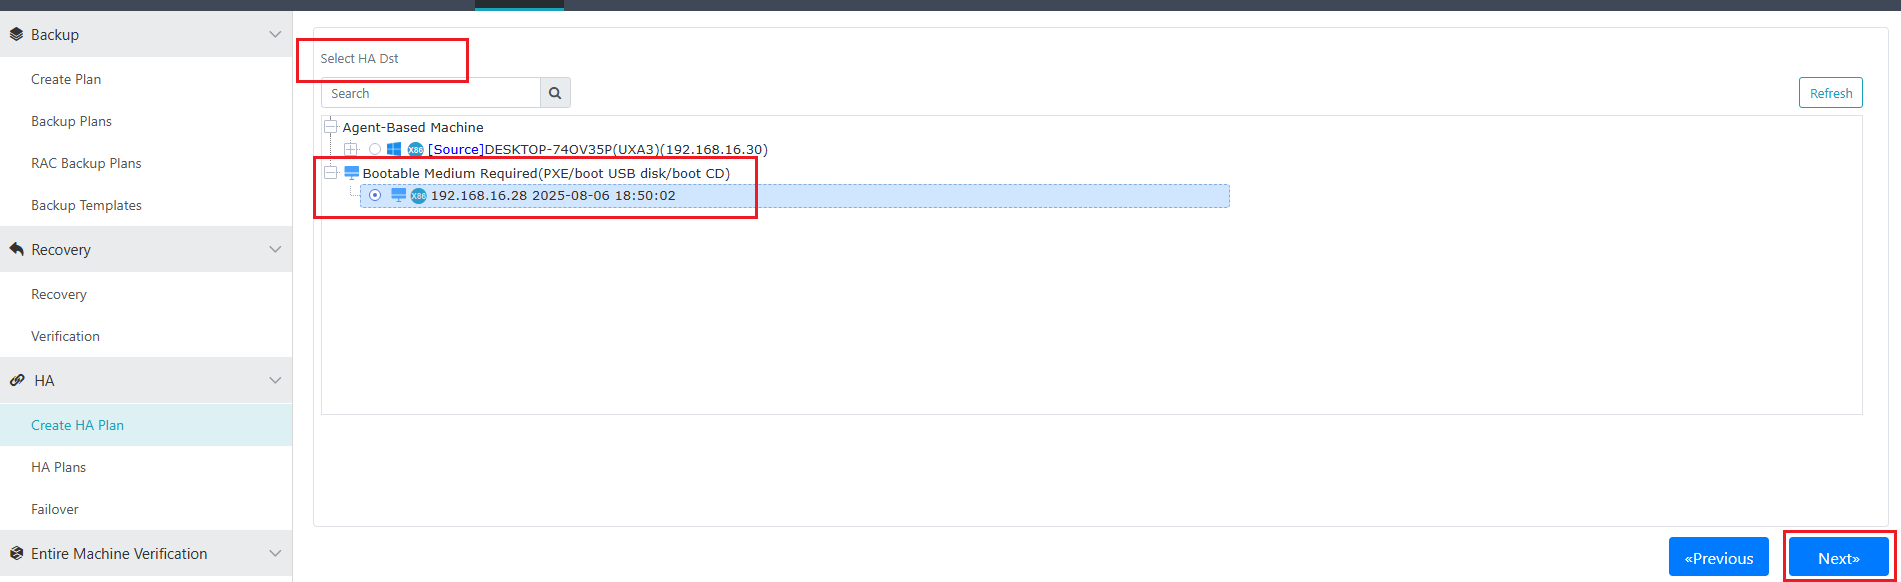
Step 3.Select the HA destination VM (created in 4.1.1.4.2), then click Next.
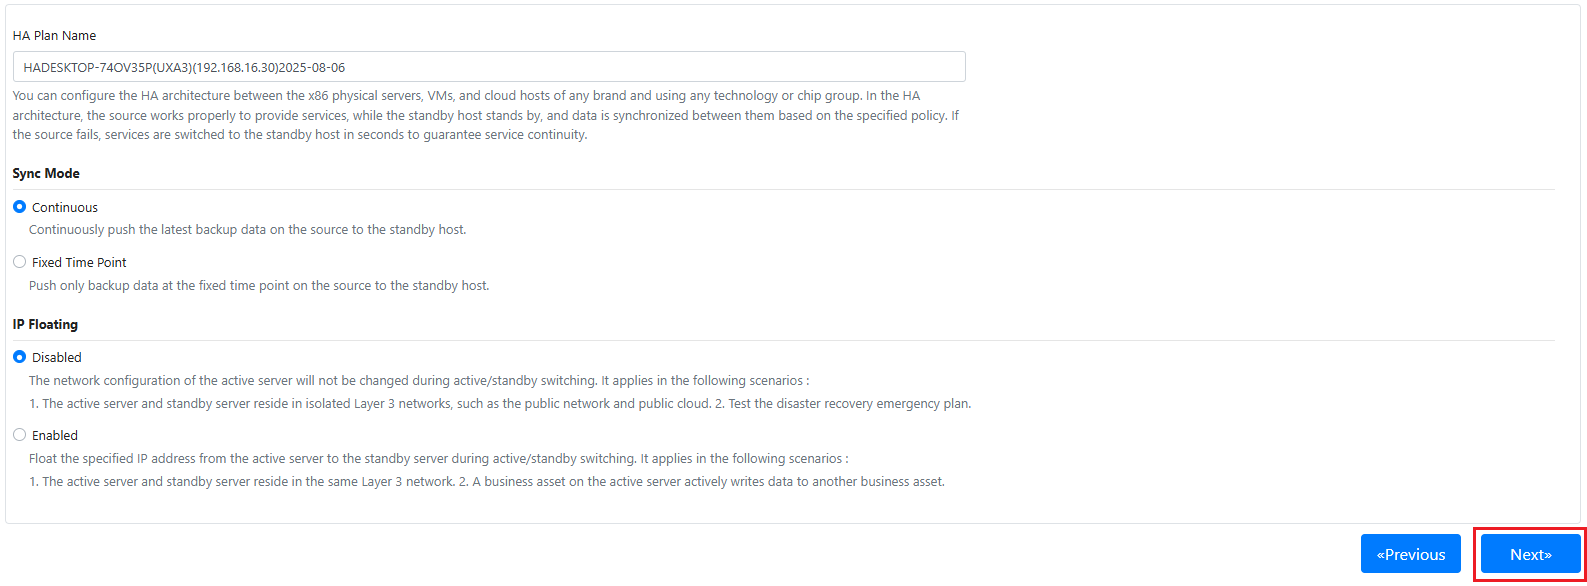
Step 4.You can define the HA Plan Name here, the sync mode selects Continuous, disable or enable IP Floating based on network enviroment, normally we set disabled. Click Next.
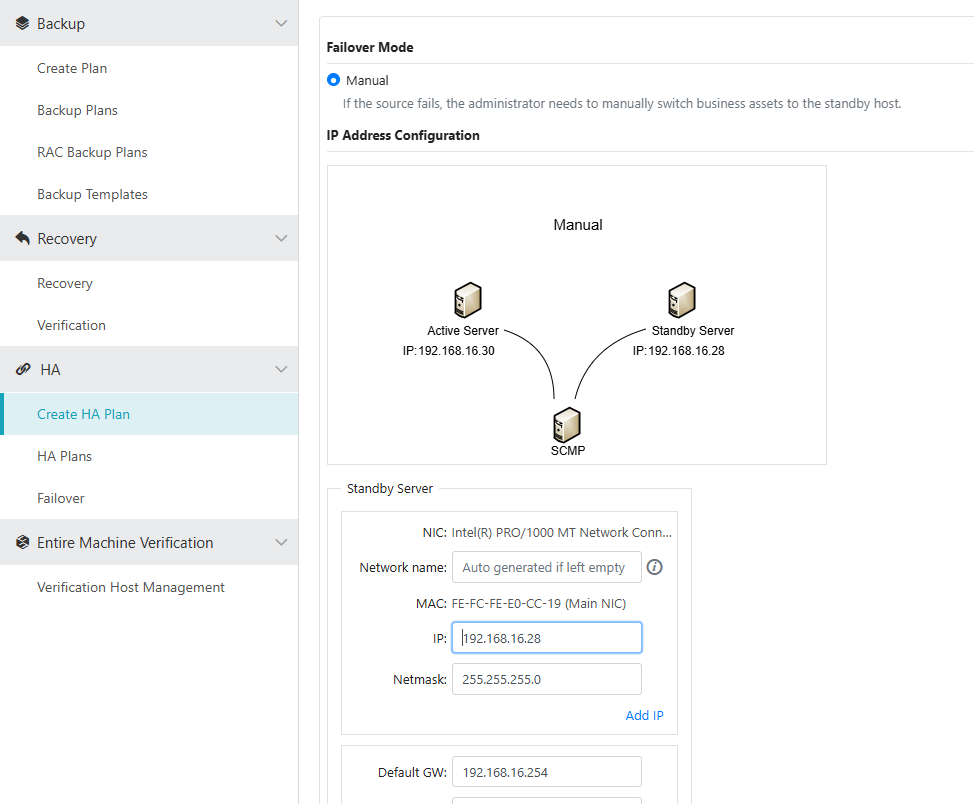
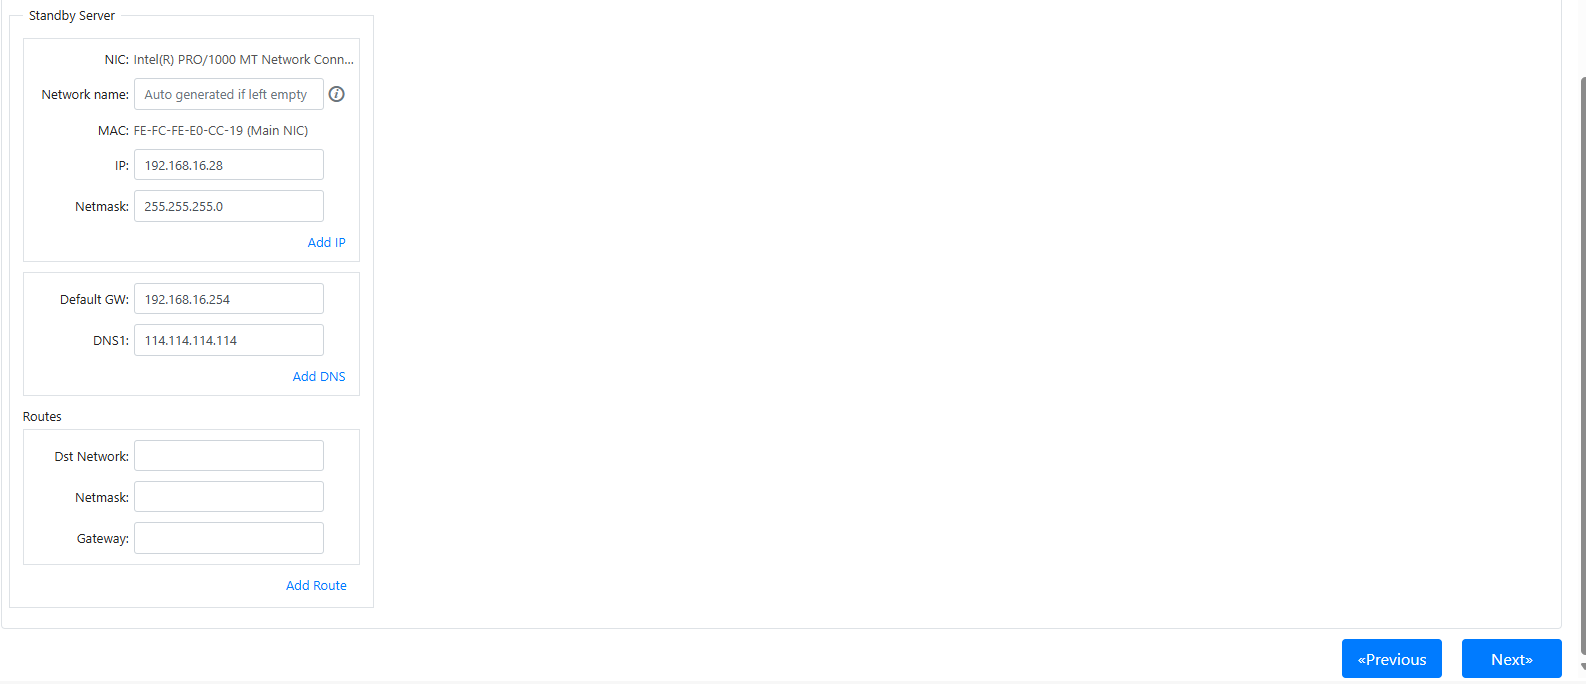
Step 5.Failover Mode select Manual. The other parameter keeps the default.
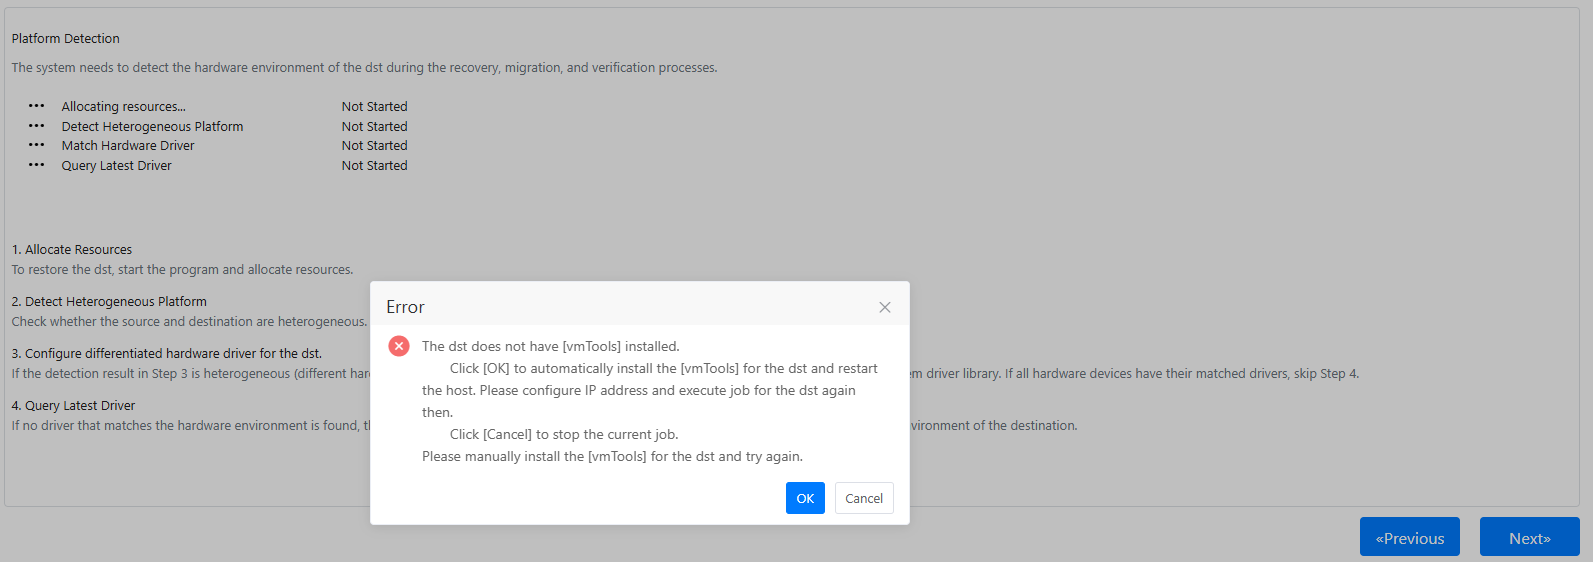
It may pop-up prompts windows to inform you that the vmtool is not installed in the destination VM. If you have encountered the prompts. Click OK.
Step 6.Log in to the HCI and locate the destination VM, click the console, the message shows Automatically install the drive. Simply wait for VMware Tools to install automatically.
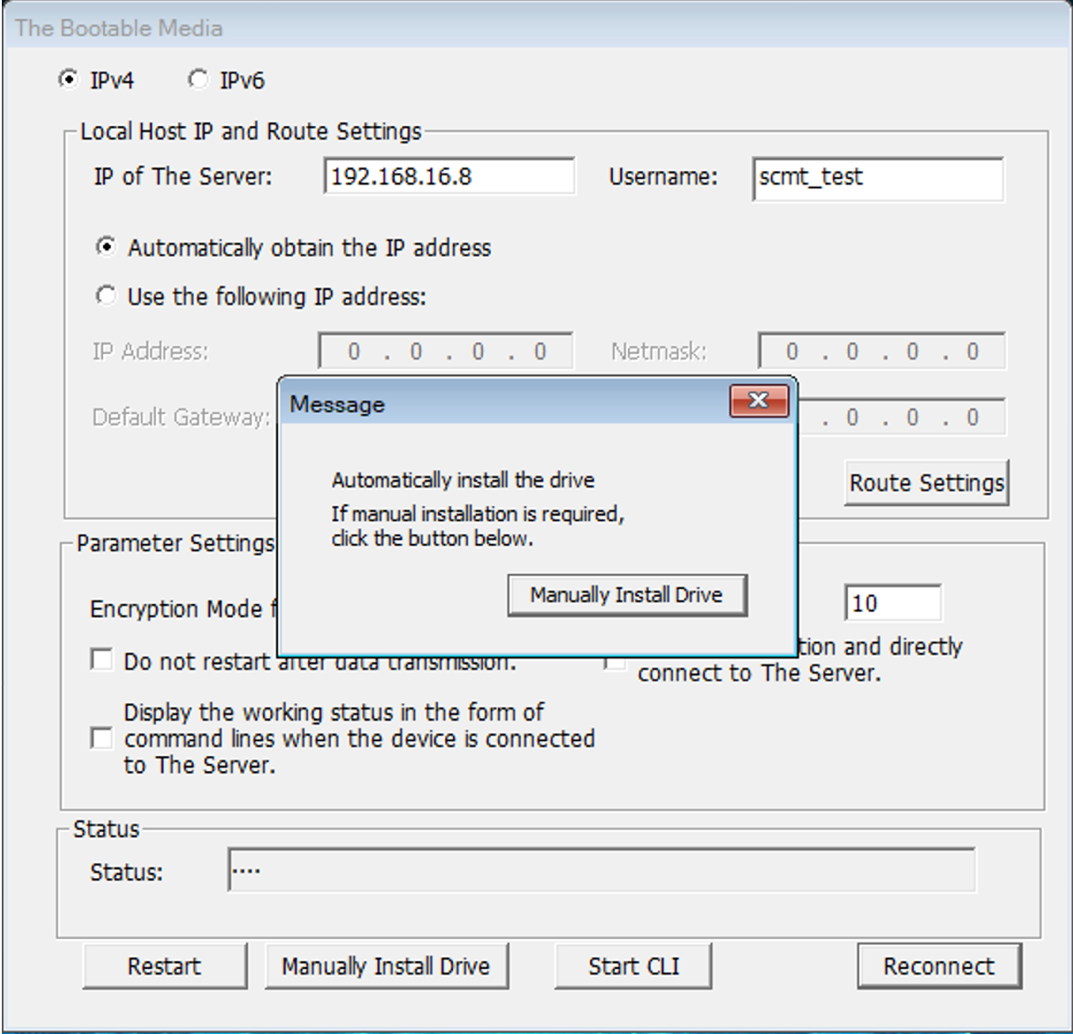
Step 7.Then the VM will restart after the drive installed. Then configure the network settings for the target VM with reference to Step 8 in the 4.1.1.4.2.
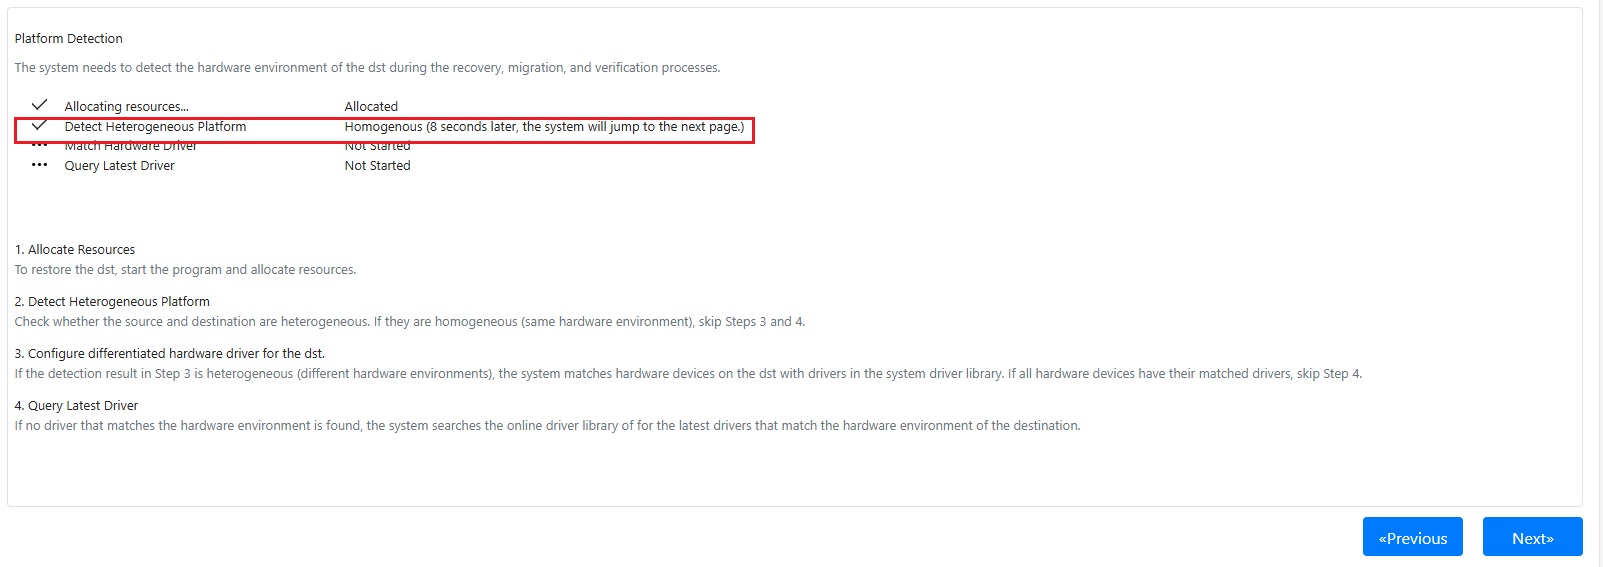
Step 8.The system start to detect the enviroment, it will go to the next step automatically after a while.
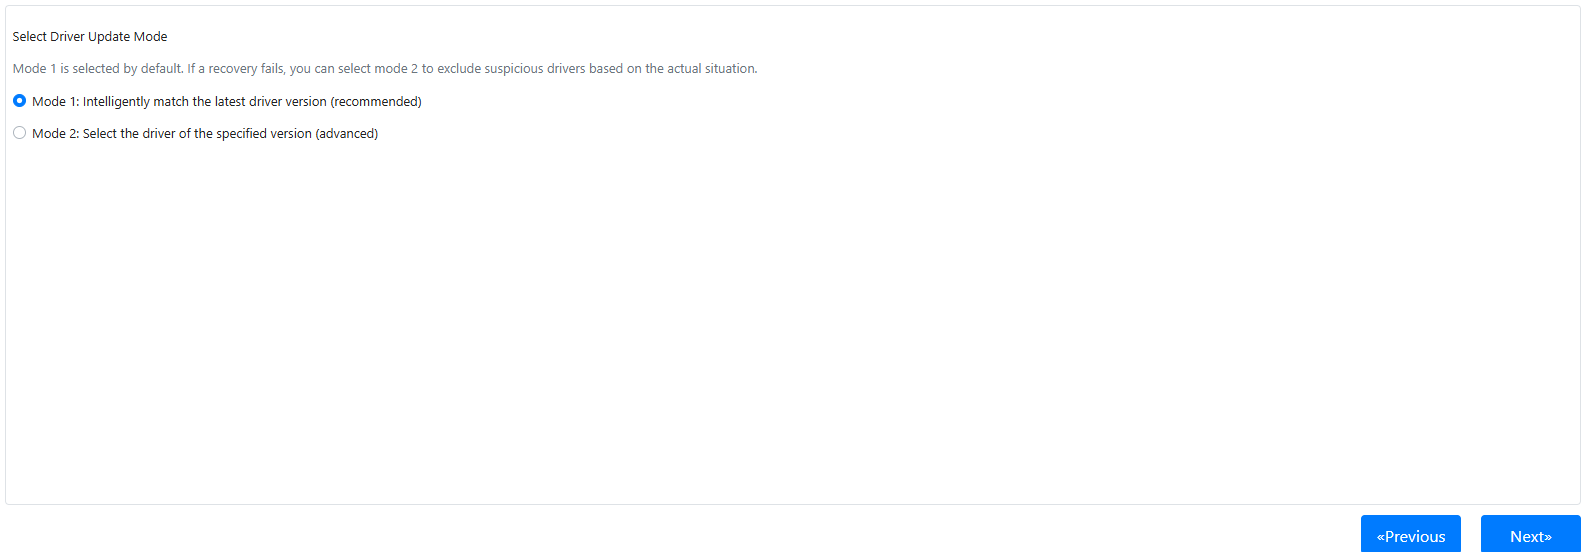
Step 9.Select Mode 1: Intelligently mattch the latest driver version(recommended).
If the recovery fails and you need to attempt it again, select Mode 2 as appropriate and uncheck the suspicious drivers.
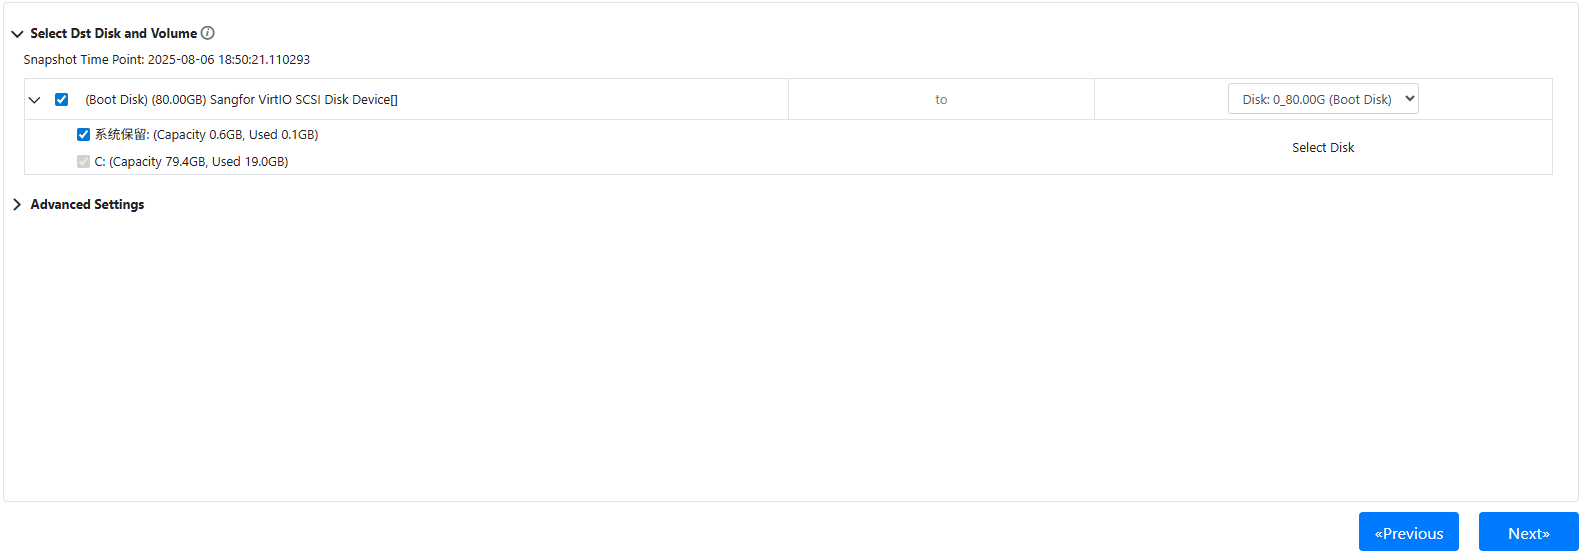
Step 10.Select all the disk and volume to ensure entire machine data synchronized.
Step 11.Keep the scripts configuration as default, click Finish.
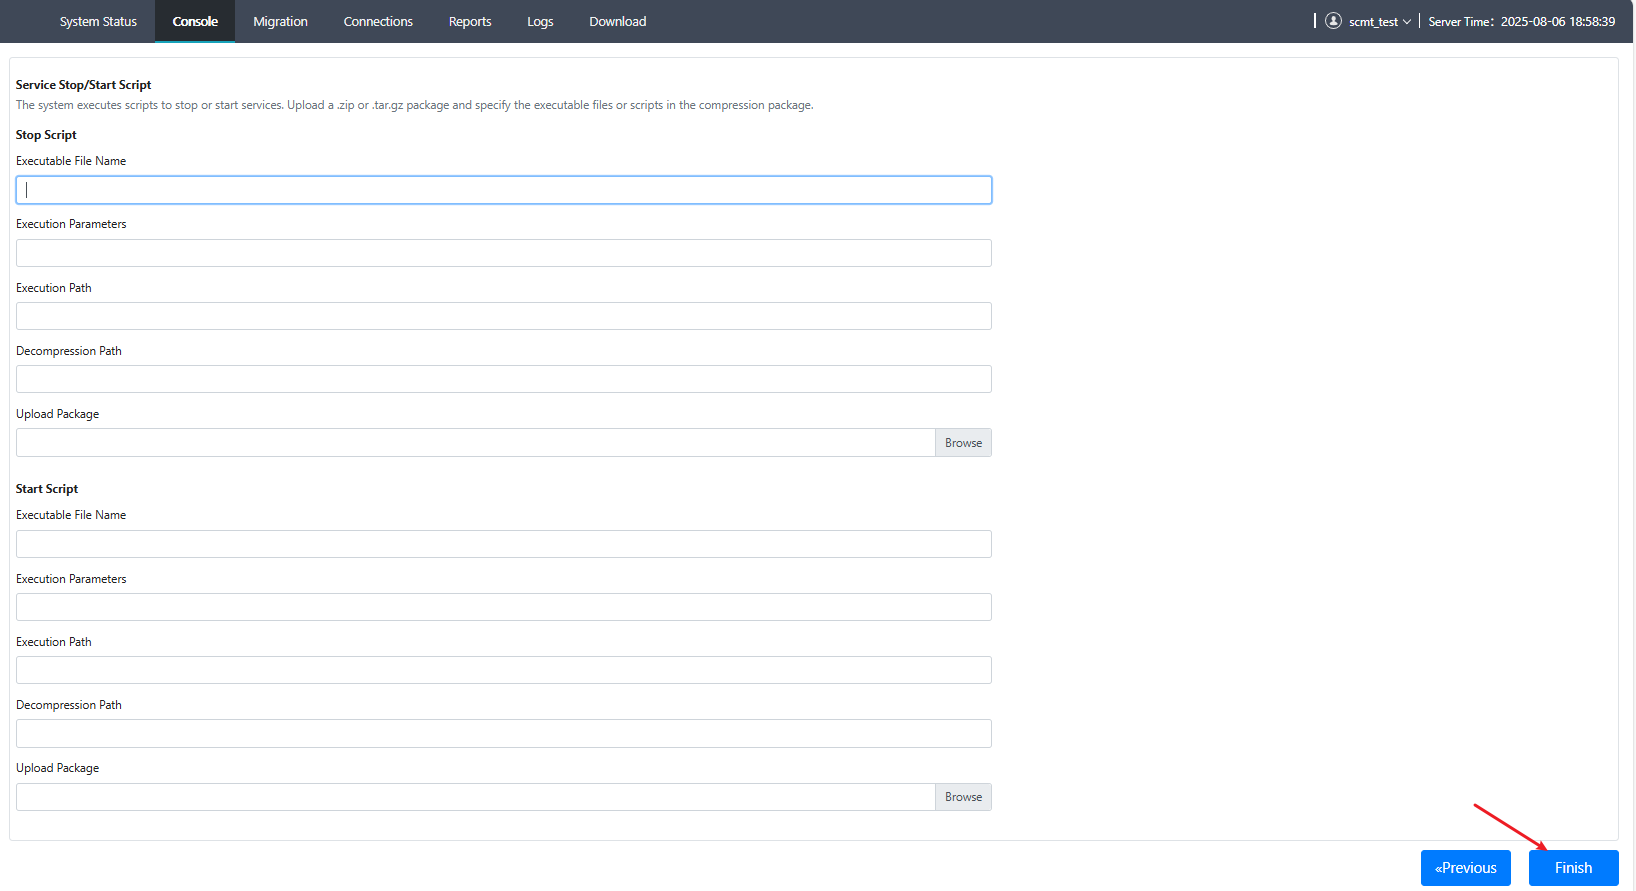
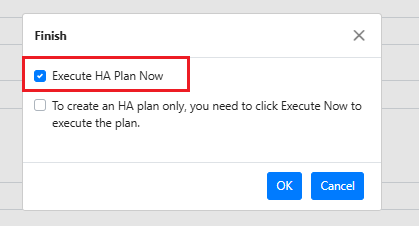
Step 12.In the pop-up window, select Execute HA Plan Now and click OK.
In the next pop-up window, click OK.

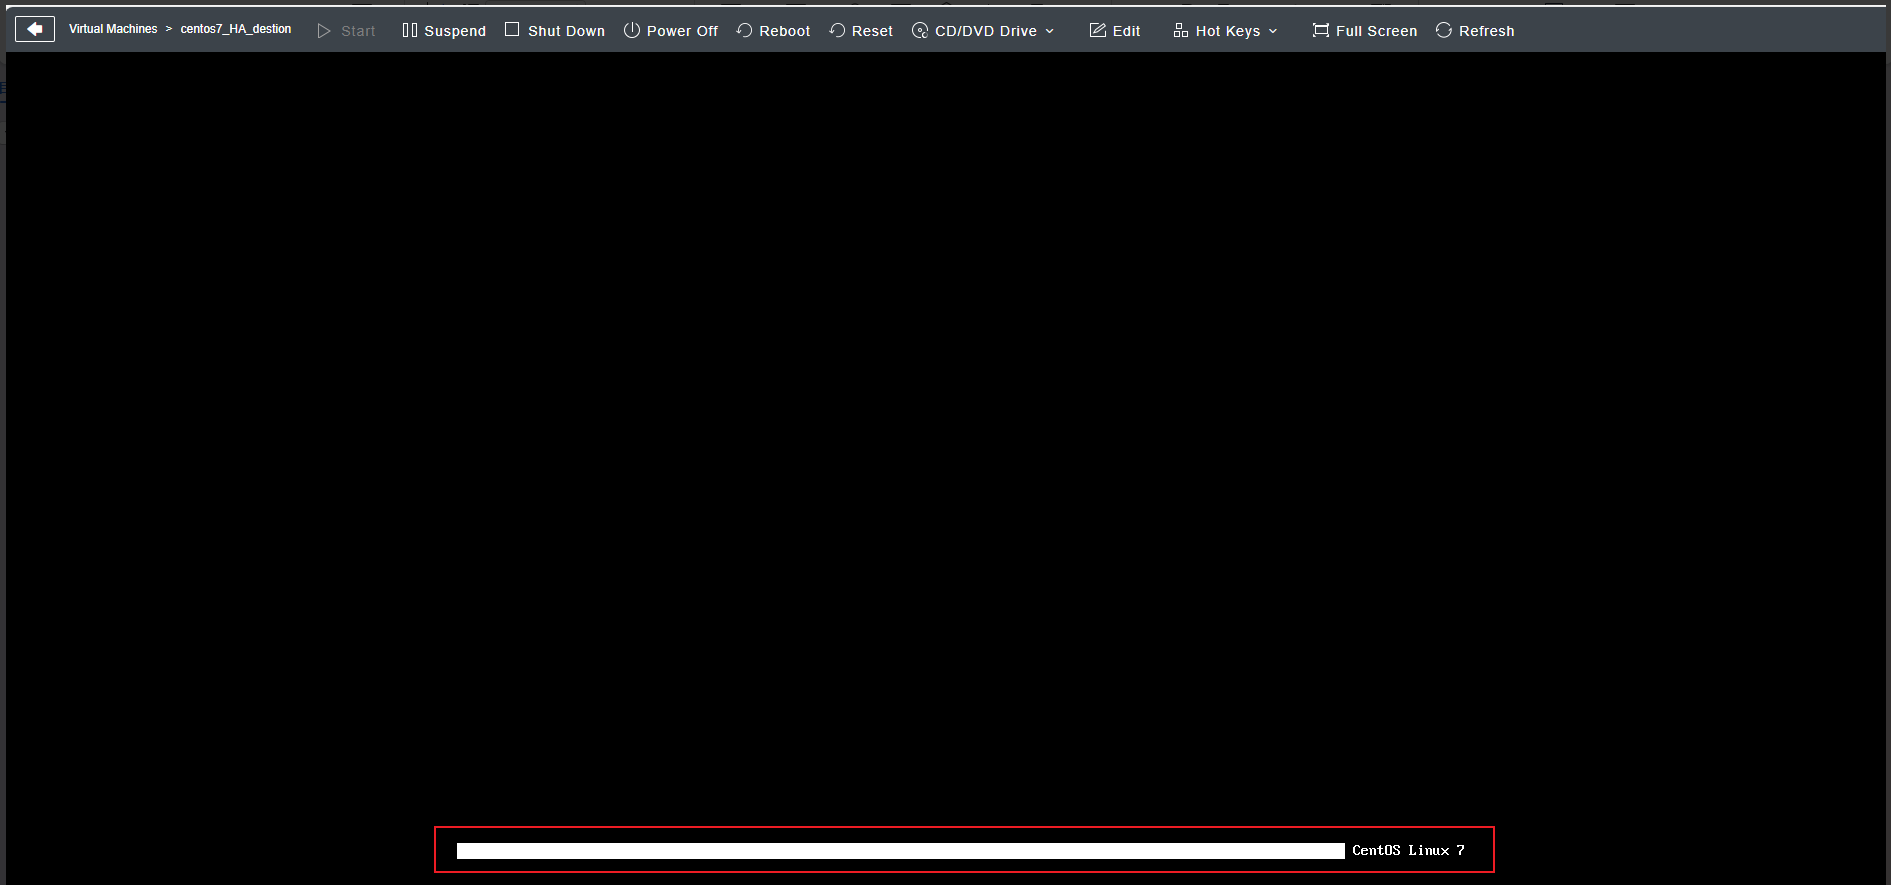
Step 13.Log in to SCMT, go to System Status > Jobs, you can see the HA plan the status is running.

Step 14.Log in to SCP, go to Compute, select the destination VM and access the Console, the VM will enter a bootloaded status.

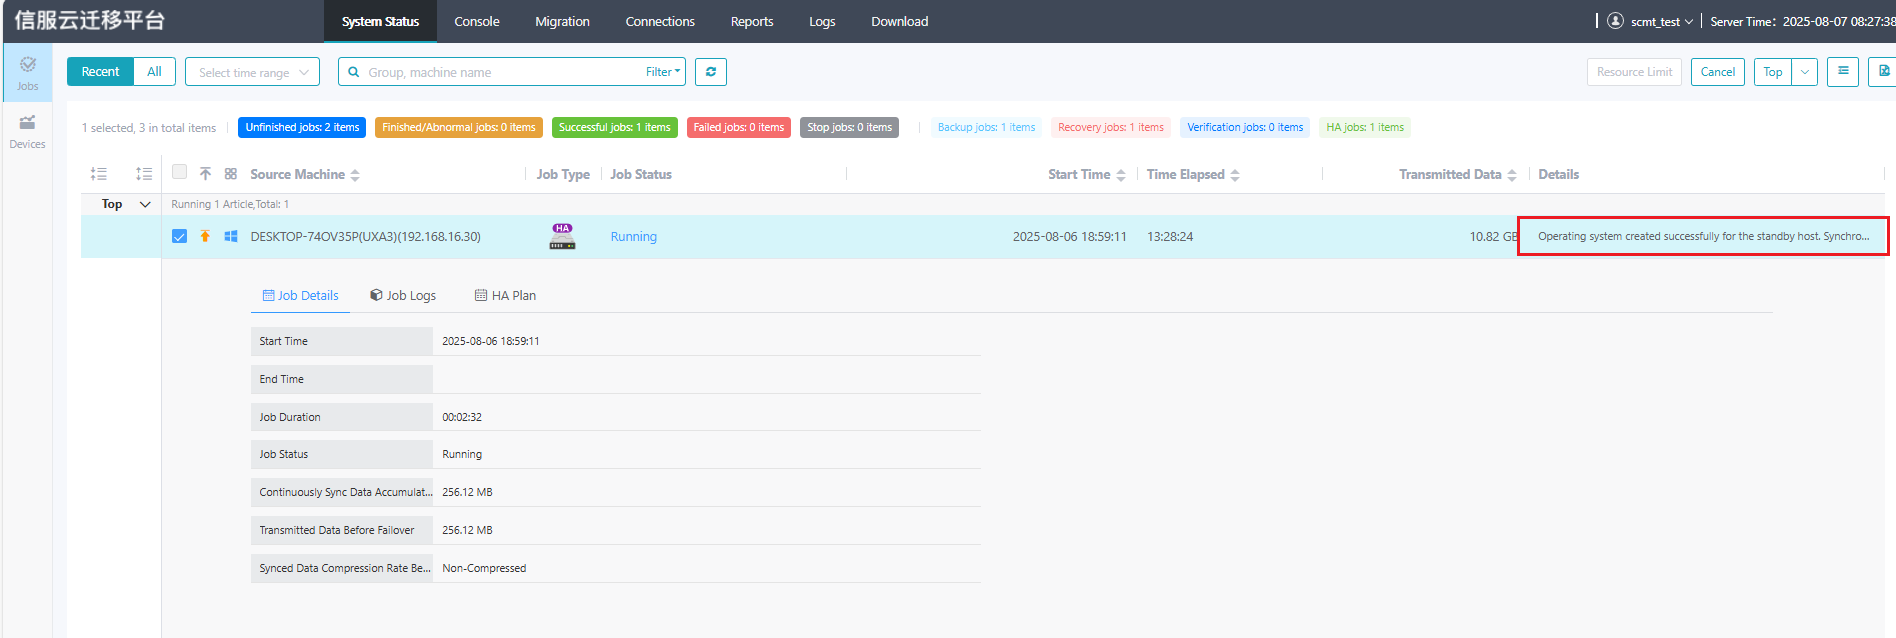
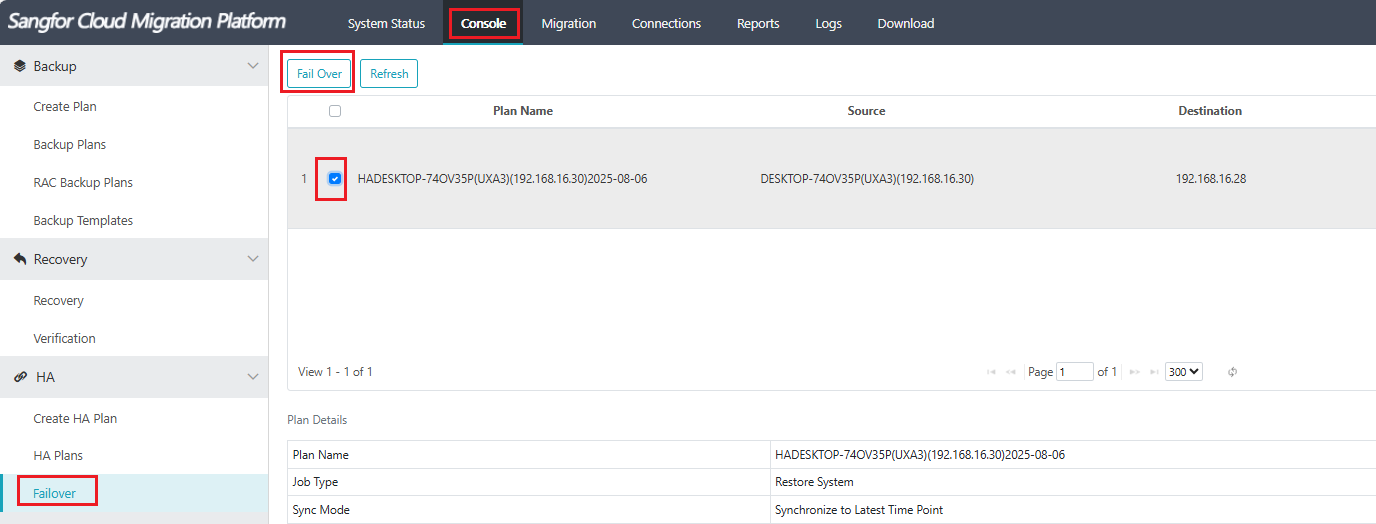
Step 1.Log in to SCMT, go to System Status > Jobs, when the HA job shows Operating system created successfully for the standby host, you can launch the failover operation.
Step 2.Navigate to Console > HA > Failover, click Failover for the selected source VM.
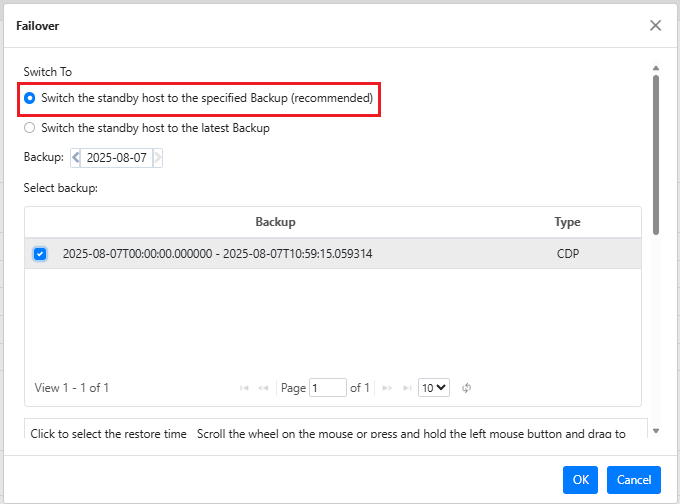
Step 3.Select Switch the standby host to the specified Backup (recommended) and choose the backup file. By scrolling down the bar, you can select a specific time, normally choose the latest time. Then click OK.

Step 4.It will pop-up the information the failover is sent successfully, click OK.

Then you can log in to HCI to check whether the VM is boot successful.


 {{ $t('index.defaultHeader.chromeBrowserTip') }}