{{ secondMenu.name }}


Feature Description:
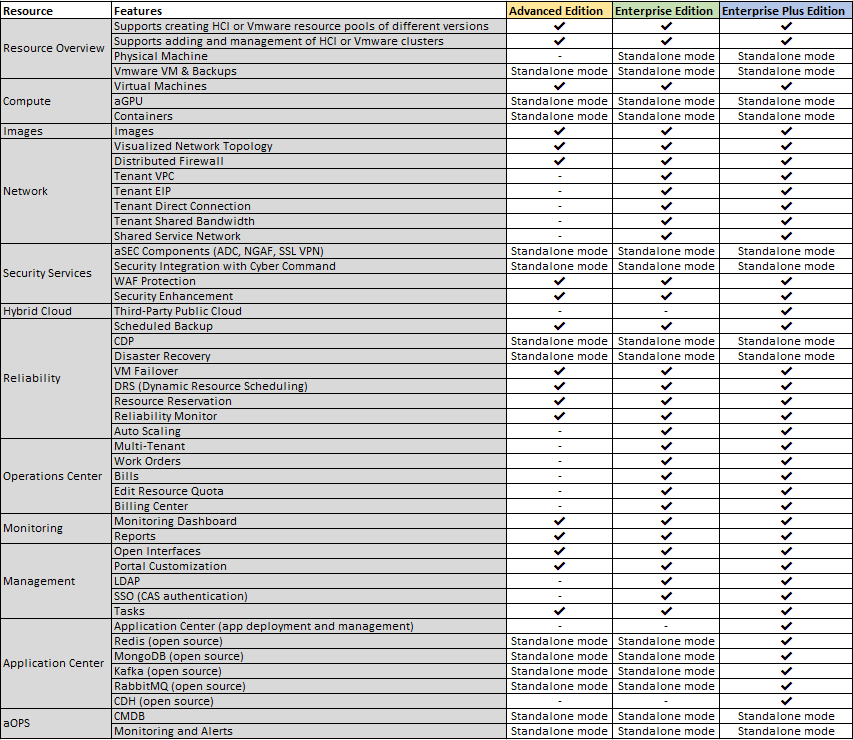
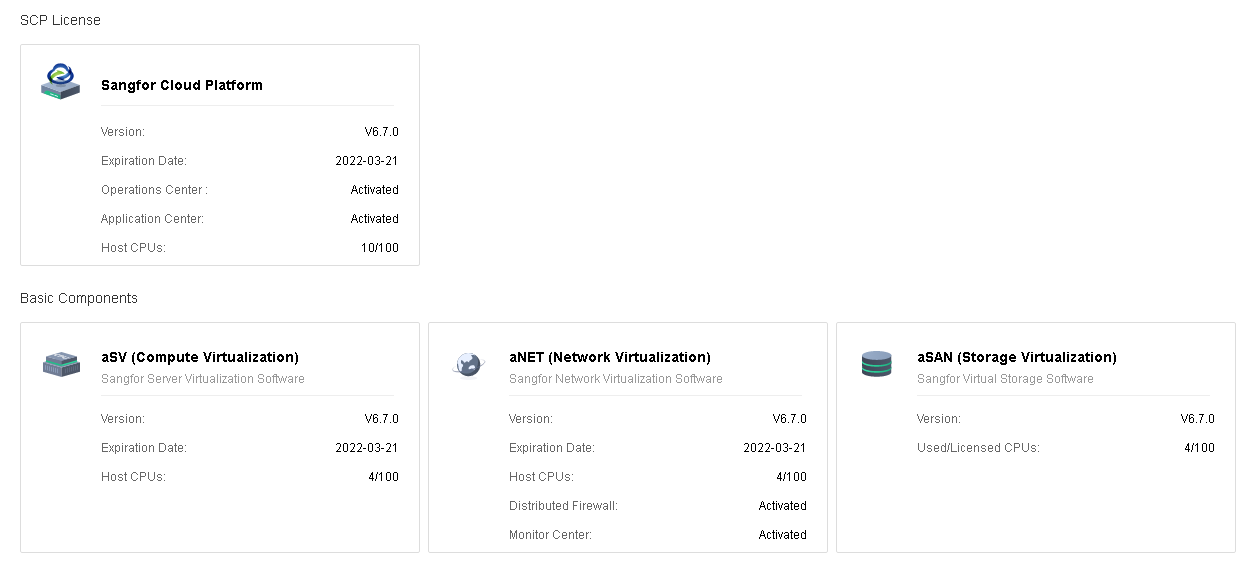
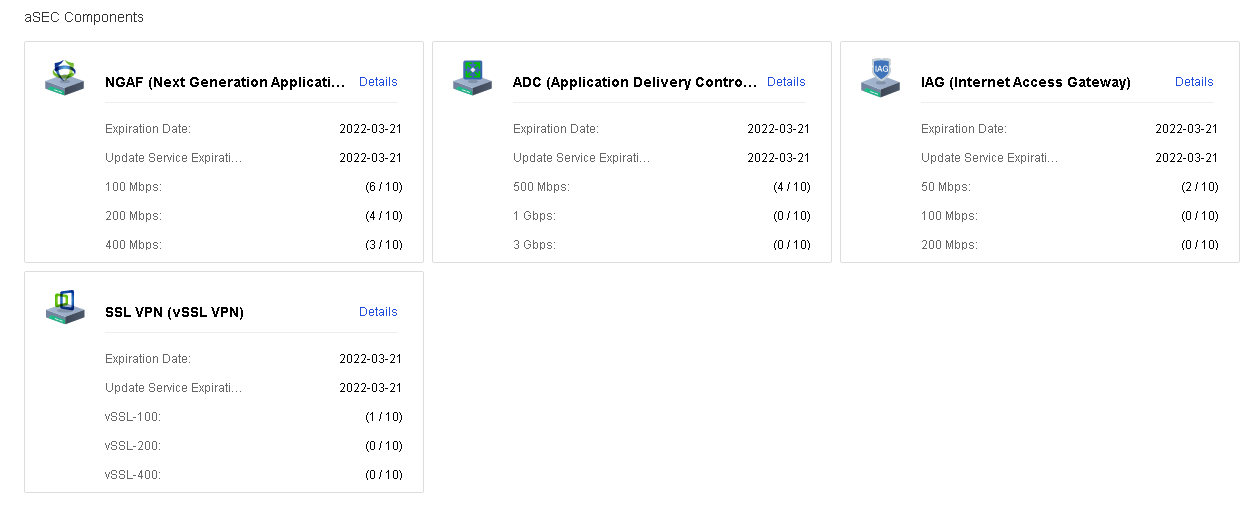
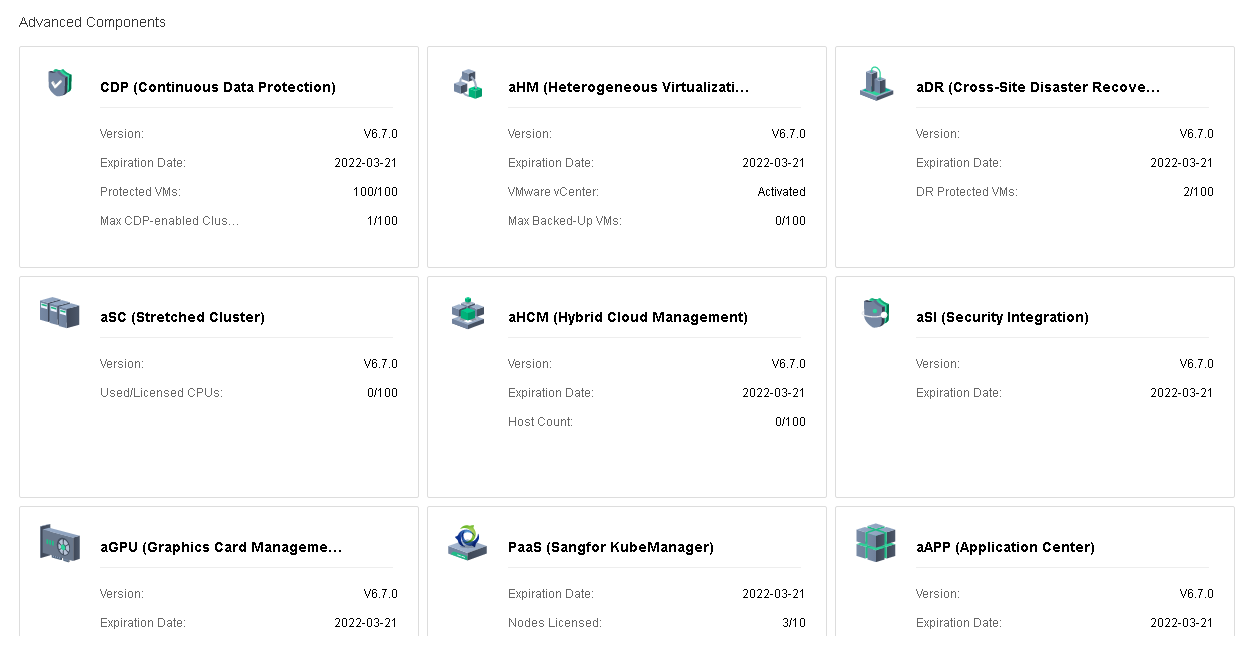
SCP controls the authorization of each module through the license key. Currently, there are three licensing modes: Advanced Edition, Enterprise Edition, and Enterprise Plus Edition. The differences between the three are shown in the figure below.
Precautions:
The Number of CPUs on Physical Hosts of the SCP must not be lower than the number of CPUs in all managed clusters. Regardless the HCI is using standalone mode or centralized mode.
Prerequisite
Has the license key ready.
Steps:
Step 1.Login to the SCP platform, navigate to Resources > Management > System, and then select Licensing to enter the license page.
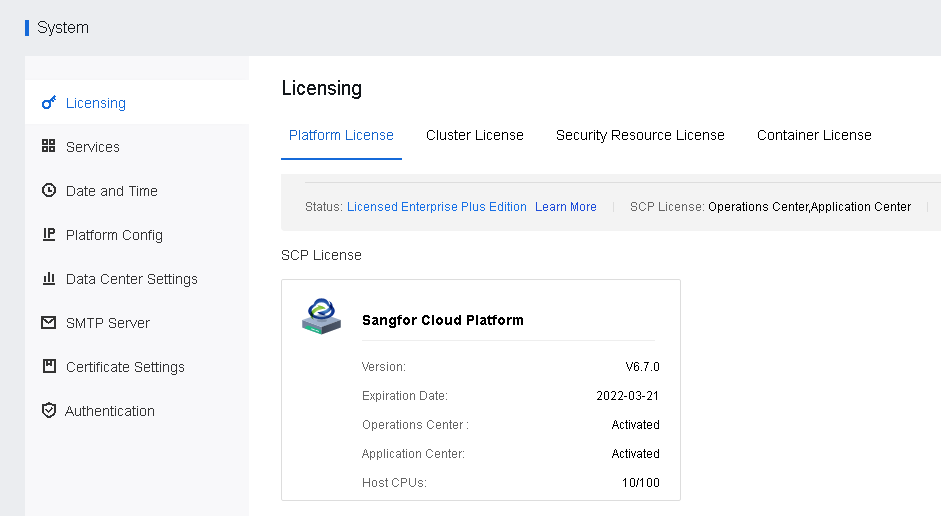
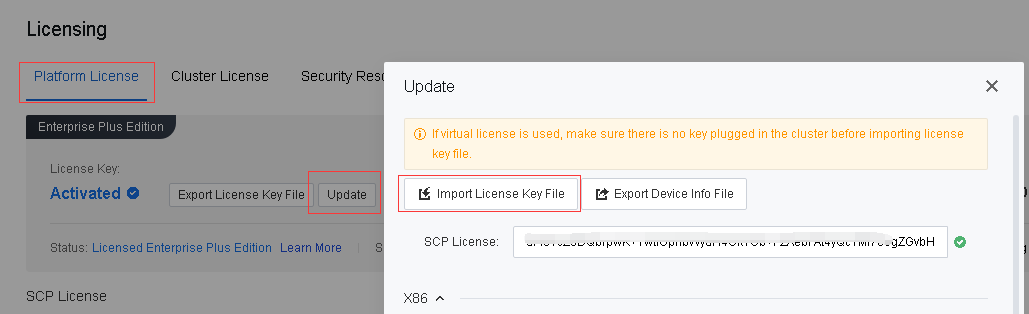
Step 2.In Platform License, click Update and then click Import License Key File to import the license key or renew the license.
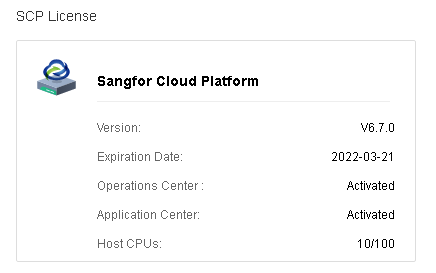
Step 3.After the license key file has been imported successfully, you can view all the licensing-related information.

Feature Description:
The SCP platform supports custom starting and stopping API service, Billing Center, and Application Center.
API: SCP external interface service can be used for secondary development and docking with third-party cloud computing platforms.
Billing Center: User resource billing and metering service, support expenses overview, tenant expenses details query, and pricing.
Application Center: Traditional and cloud-native application services, providing full lifecycle management such as rapid deployment, configuration, monitoring, and backup.
Precautions:
If required to enable the API service and the billing center simultaneously, it is recommended to configure the platform with a 16-core CPU, 24G memory, or higher in HCI to ensure stable operation.
Prerequisite
None.
Steps:
Step 1.Login to the SCP platform, navigate to Resources and look for Management, click into System and select Services.
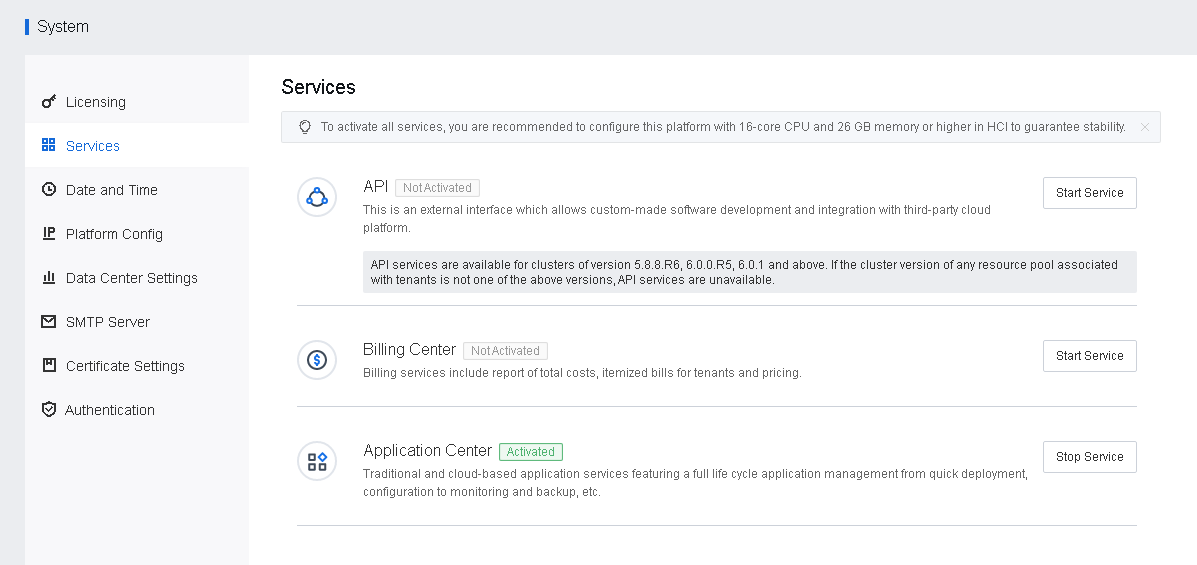
Step 2.Click Start Service or Stop Service to start or stop service.
Features:
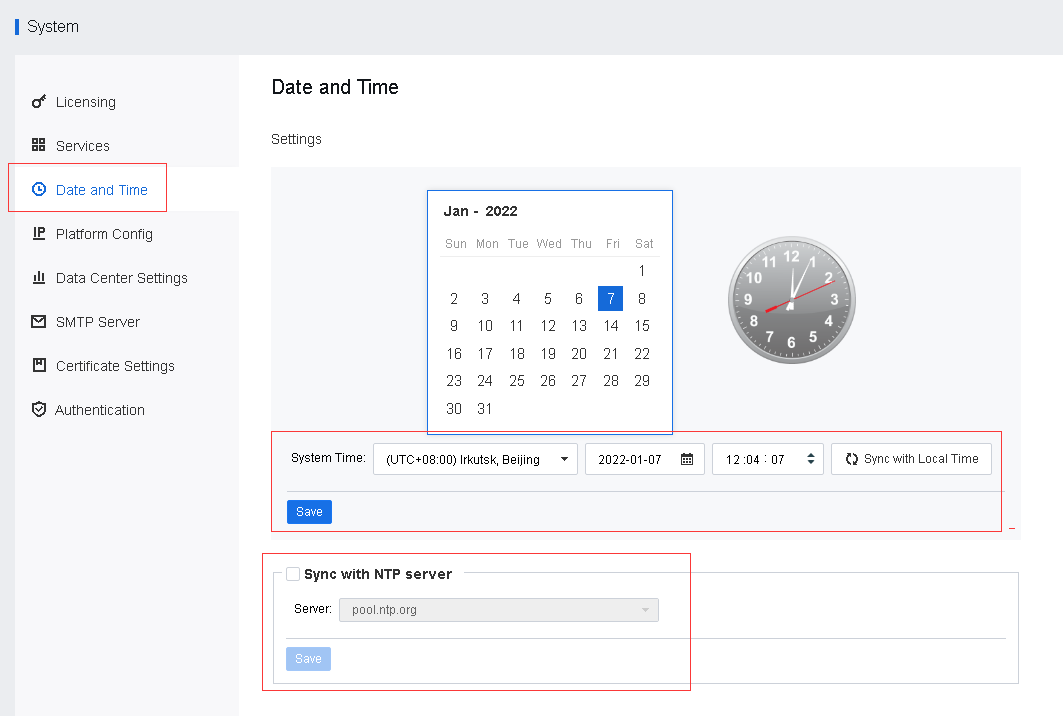
Sangfor SCP supports time customization and the automatic acquisition of NTP time.
Precautions:
N/A.
Prerequisite
N/A:
Steps
Step 1.Login to the SCP platform, navigate to Resources > Management > System, and select Date and Time to enter the date and time page for modification.
Features:
SCP supports changing IP on demand and can configure DNS and routing for SCP to meet the network requirements of different scenarios.
Precaution:
N/A.
Prerequisites
The IP information, routing configuration, and DNS configuration of the platform have been properly planned.
Steps:
Step 1.Login to the SCP platform, navigate to Resources > Management > System, and click Platform Config.
Step 2.Configure the IP information, routing configuration, and DNS according to actual requirements.
Function Description:
Sangfor SCP supports docking with managed cloud accounts, and the local data center information needs to be configured before docking.
Precautions:
Port 443 of the local data center must be able to communicate with the Sangfor SCP. In NAT scenarios, kindly ensure that port 443 has been allowed.
Prerequisite
None.
Steps:
Step 1.Login to the SCP platform, navigate to Resources > Management > System, and click Data Center Settings to enter the configuration page.
Step 2.Fill up the Data Center Settings:
• Fill up the Local Data Center Name.
• Fill up the HTTPS address of the local data center for communication between the local data center and the SCP, and it must be using port 443.
• Fill up the Tenant Login URL.
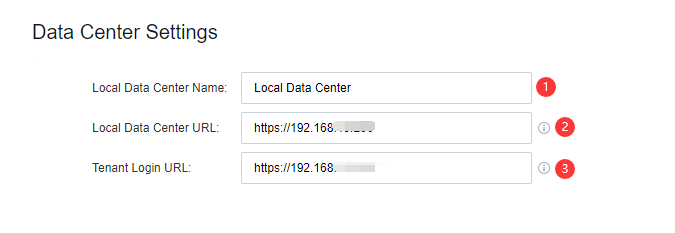
Step 3.Click Save to save the configuration.
Features:
Sangfor SCP supports configuring the SMTP server. Alerts can be sent by email and allow customers to keep track of the cluster's running status at any time.
Precautions:
Prerequisite
N/A.
Steps:
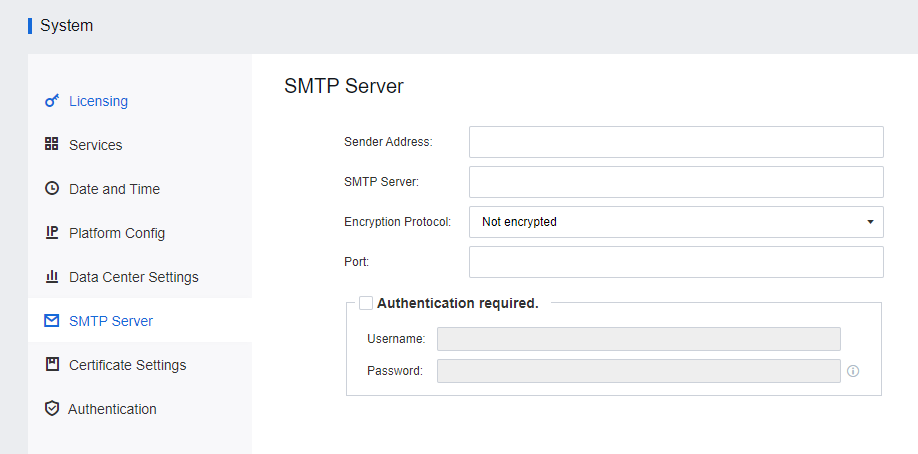
Step 1.Login to the SCP platform, navigate to Resources > Management > System, and click the SMTP Server to enter the configuration page.
Step 2.Fill in the Sender Address and SMTP Server information according to the actual requirement. If the sending server needs to verify the username and password, enable the Authentication required, fill in the corresponding username and password, and click Send Test Email for testing.
![]()
If the verification using the email password fails, you may try to use the email client authorization code for verification.
Features:
The SSL certificate establishes an SSL secure layer between the client and the SCP platform. When the client’s browser marks an insecure warning on the HTTPS website, installing the SSL certificate can make the client trusted by the browser and remove the insecure warning. Sangfor SCP supports the manual import of trusted certificates.
Precautions:
N/A.
Prerequisite
N/A.
Steps:
Step 1.Login to the SCP platform, navigate to Resources > Management > System, and click Certificate Settings to enter the configuration page. Currently, four certificate types are supported: pfx, p12, crt+key, and pem.
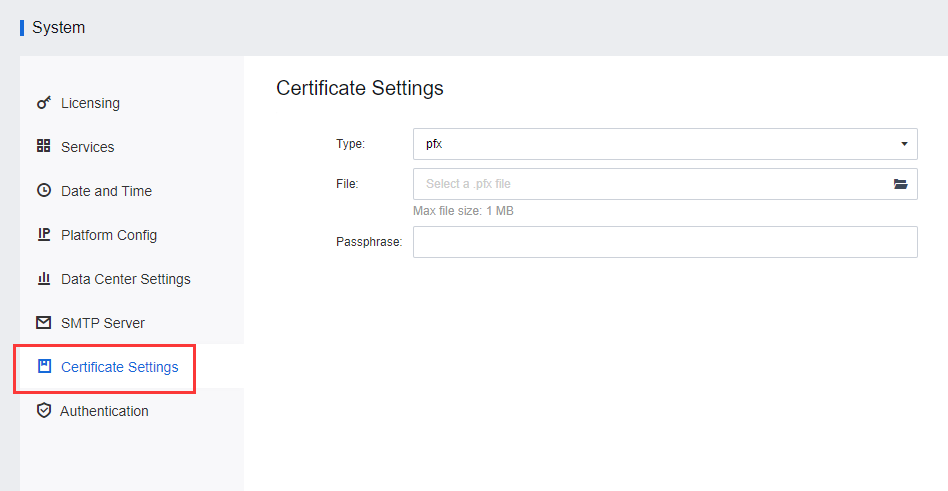
Step 2.After a trusted certificate has been imported, the client's web browser is trusted now, and the connection alert has been resolved.
Feature Description:
Precautions:
Prerequisite
Steps:
LDAP Authentication
Step 1.Login to the SCP platform, navigate to Resources > Management > System, and click Authentication to enter the configuration page.
Step 2.Configure the Server Name, IP Address, Port, Distinguished Name (DN), and Admin Password, as shown in the below figure.
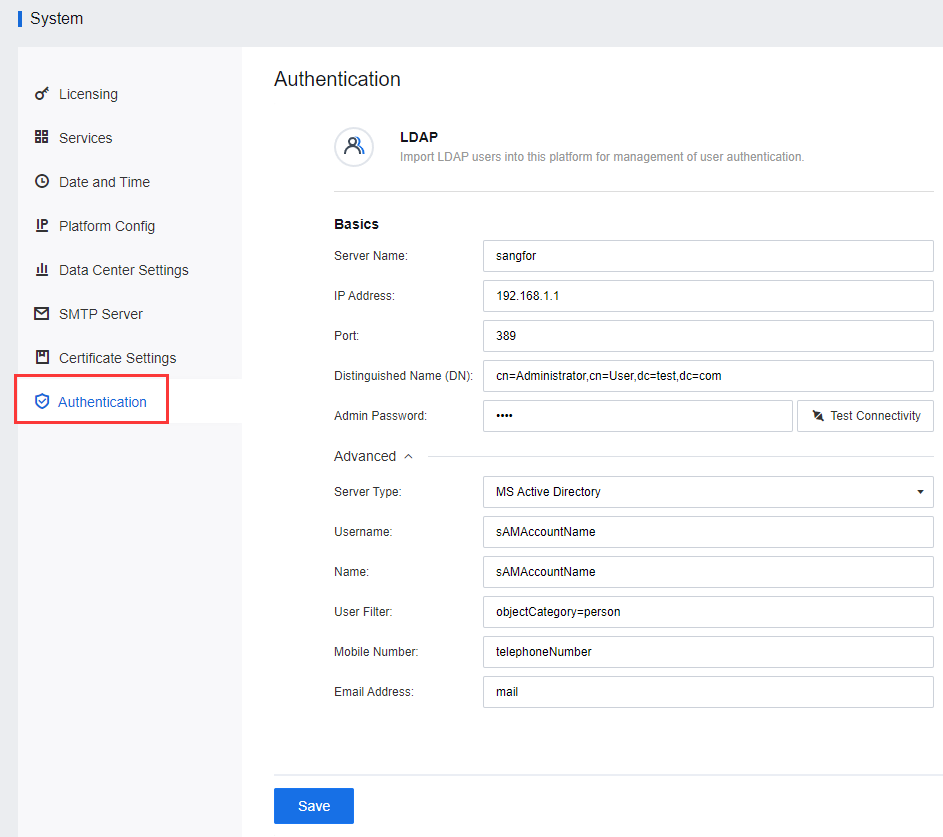
Step 3.After the configuration is complete, click Test Connectivity to verify the configuration. Finally, click Save to save the configuration.
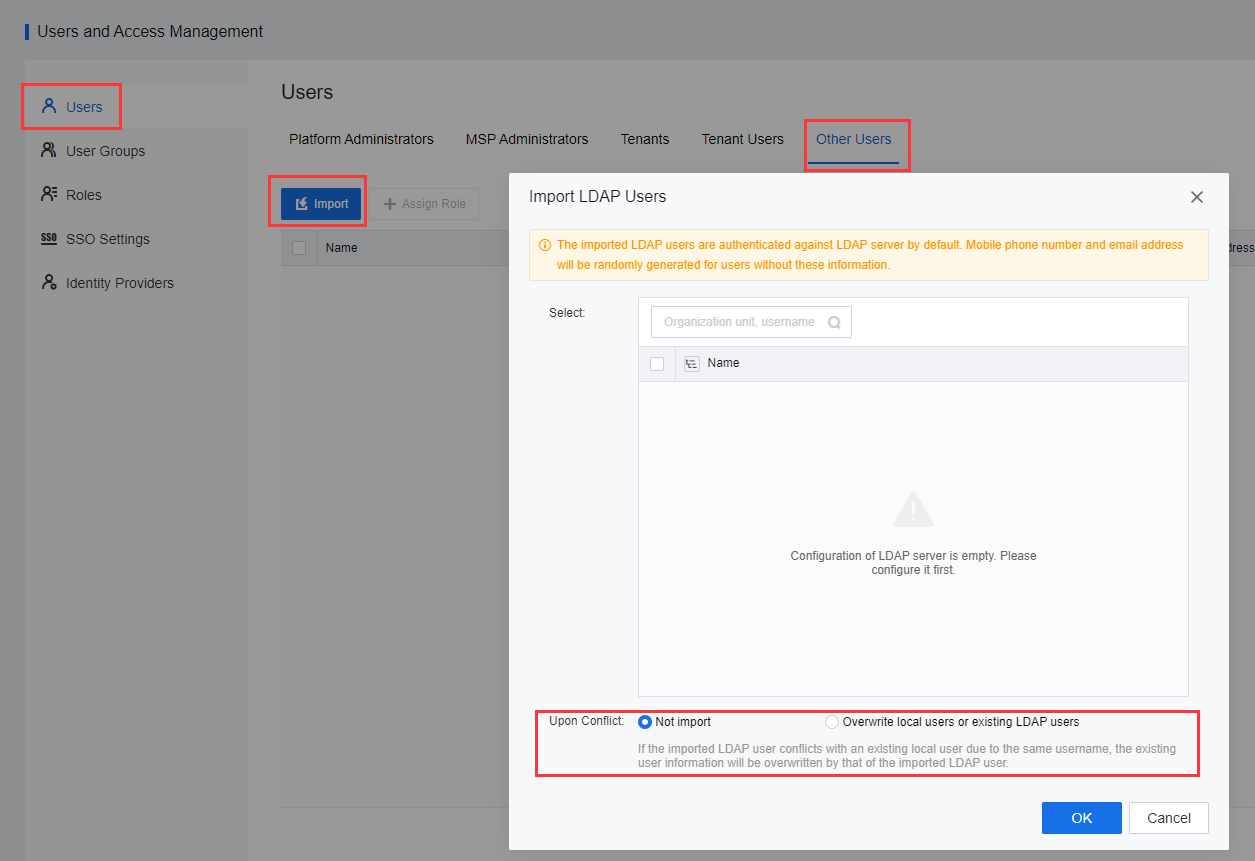
Step 4.Navigate to Users and Access Management > Users > Other Users, click Import, select Import LDAP Users, and configure the Upon Conflict. Click OK to import users.
Step 5.After completing the import, click Assign Role to the corresponding users and configure the corresponding role. The imported user can be configured as a tenant or tenant user role.
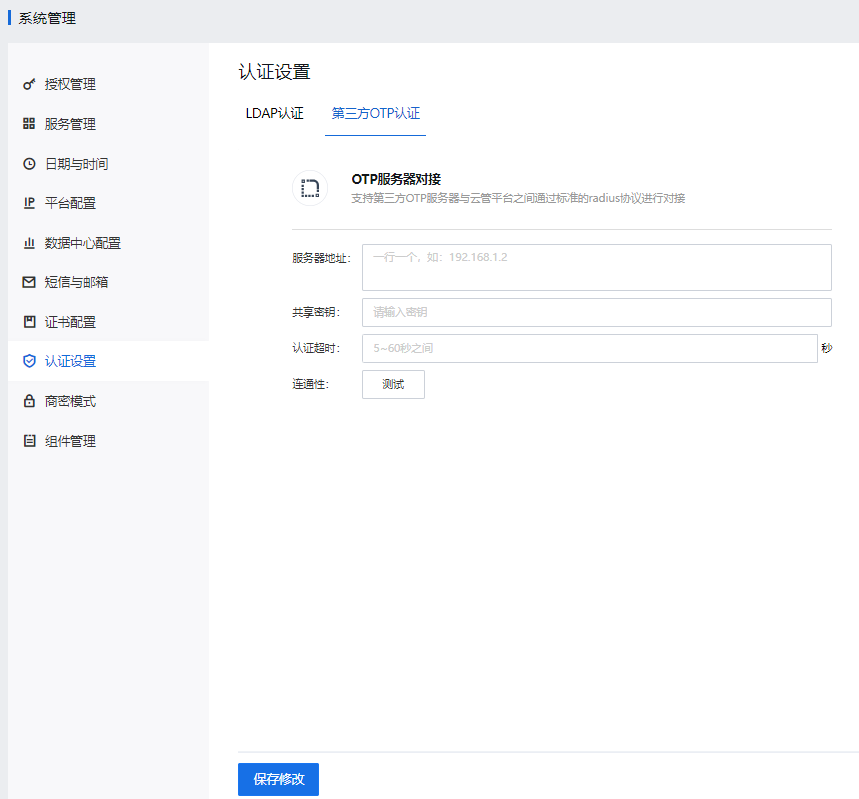
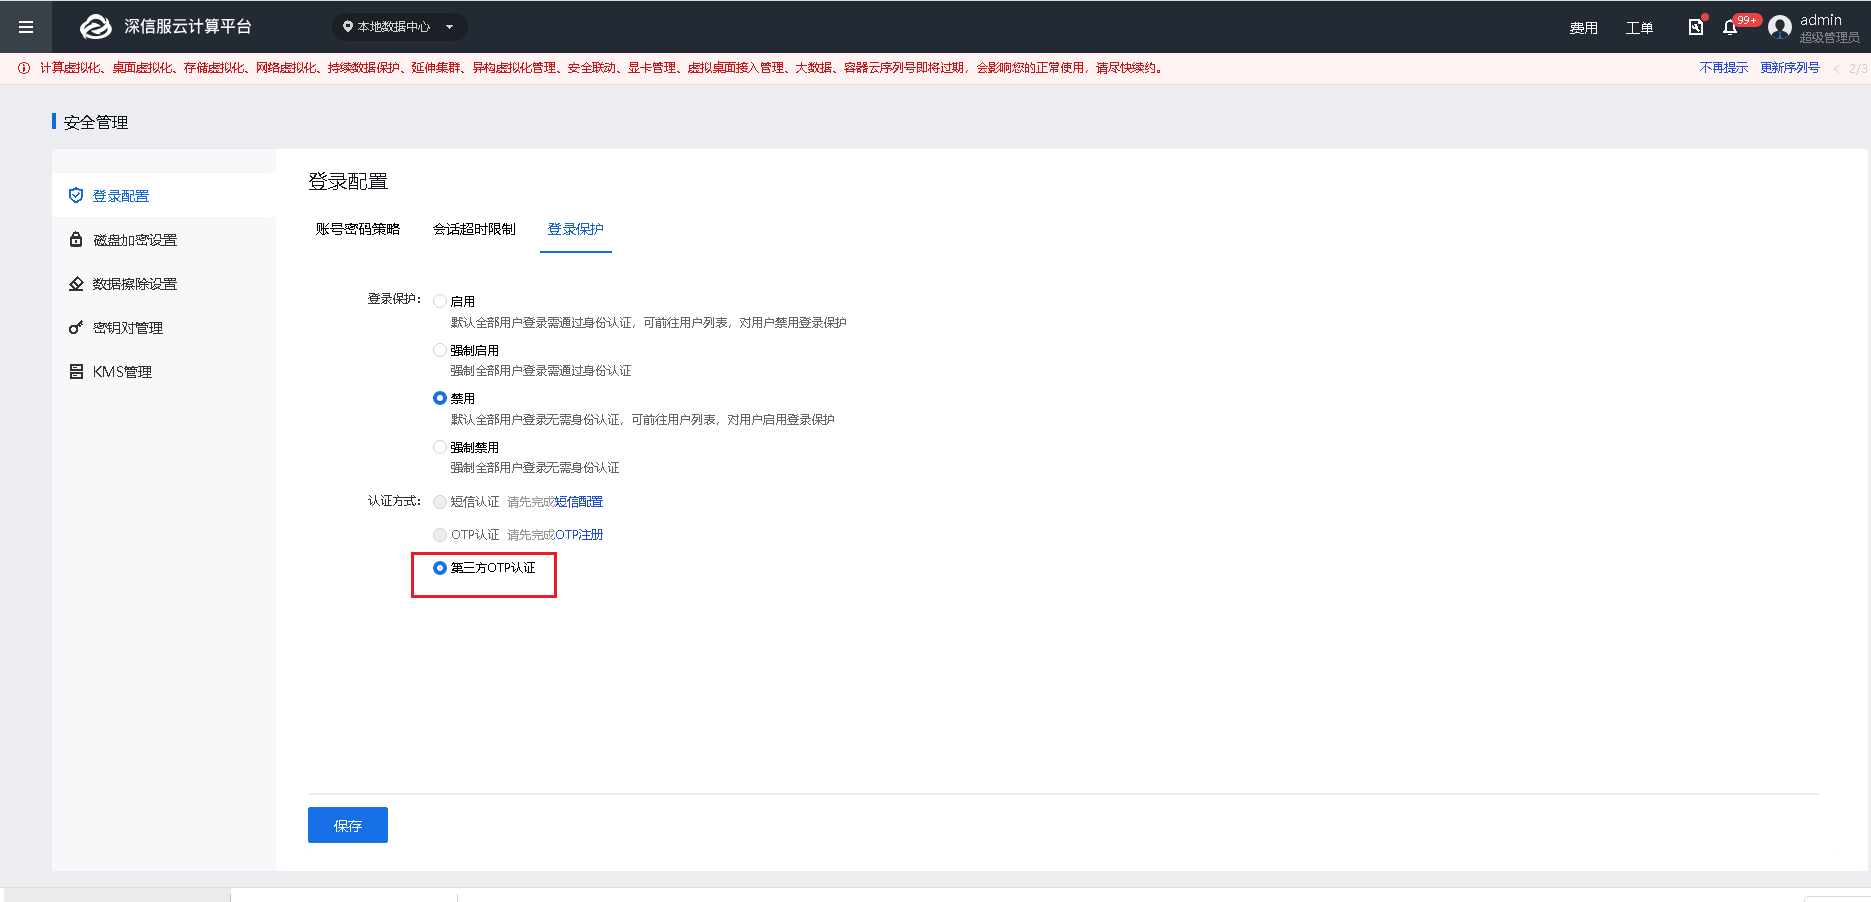
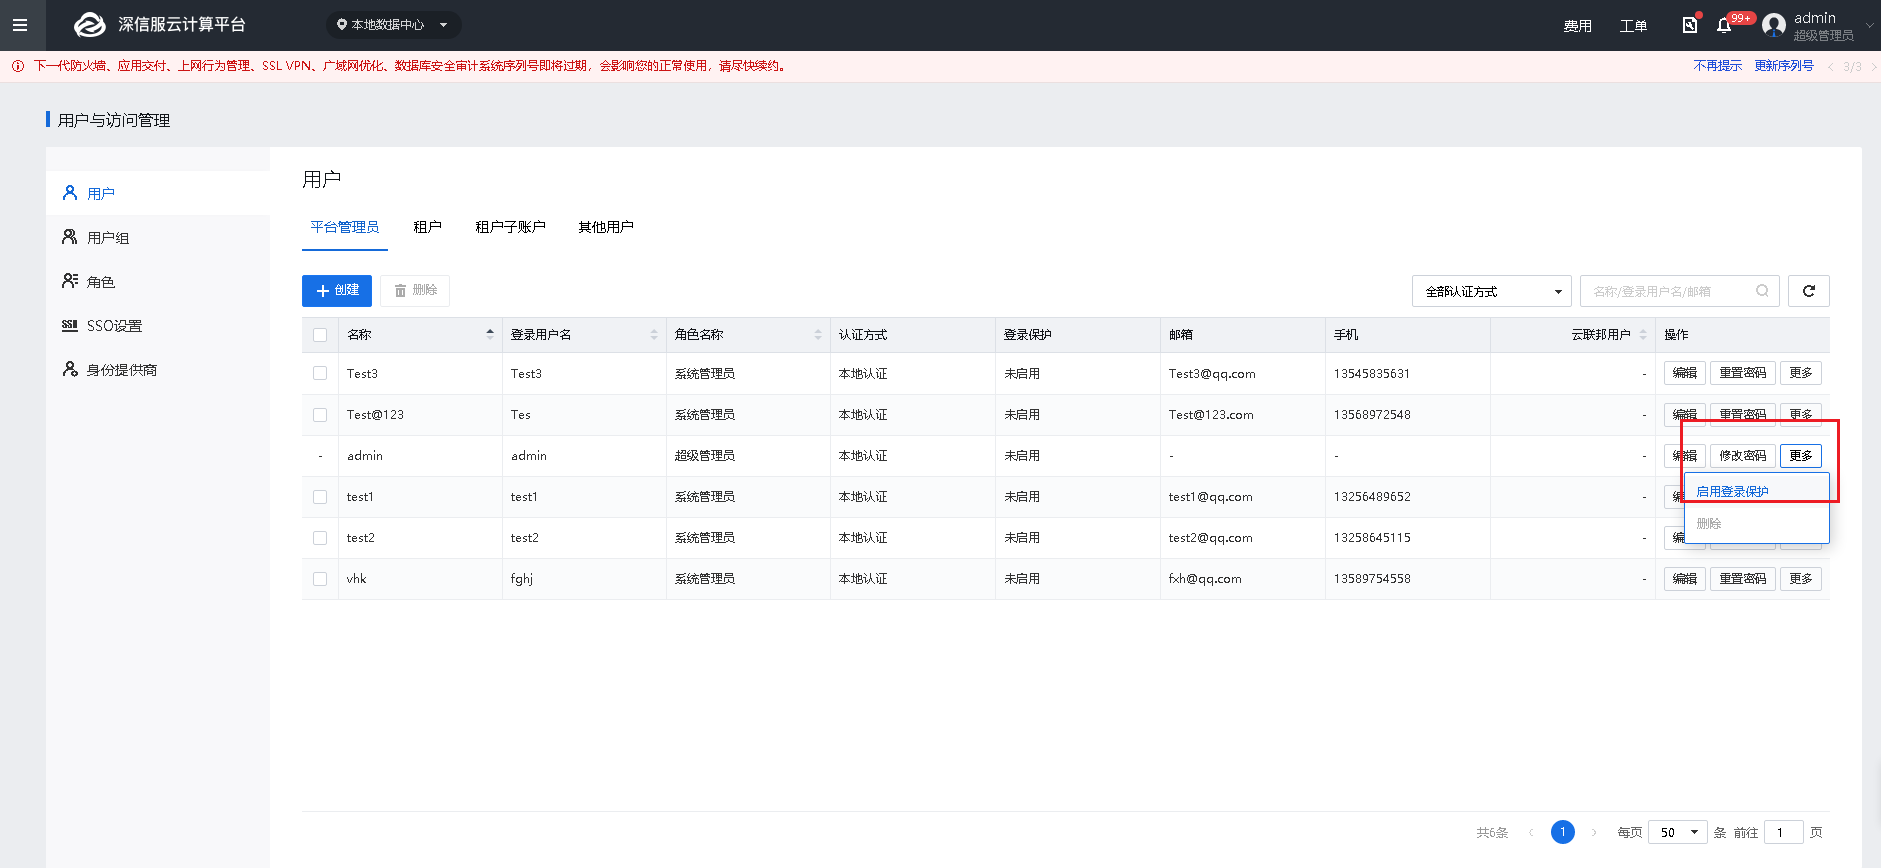
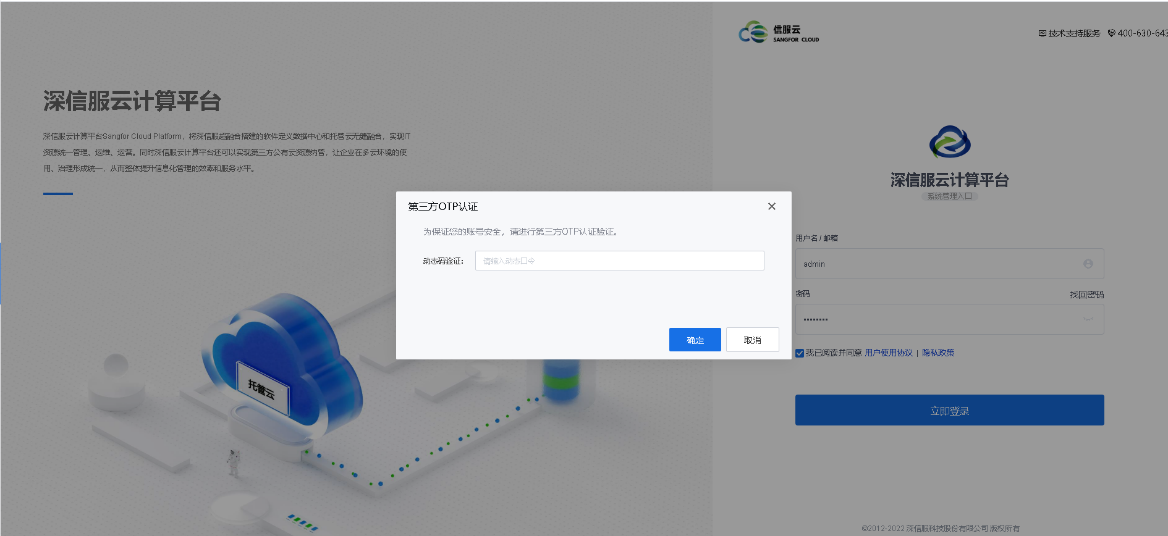
Third-Party OTP Authentication[16]
Features:
Single sign-on (SSO) is a one-time authentication login through the user. After the user logs in once on the authentication server, the user has the right to access other related systems and application software in the single sign-on system.
Sangfor SCP supports docking with the customer's existing CAS system. When logging in to the SCP, the customer's existing account information is used for logging in. After assigning roles, single sign-on can be realized, reducing the customer's burden of operation and maintenance.
Prerequisite
Precautions:
After the user is single sign-on, if it conflicts with the existing user of the SCP platform (the login username is the same), the new user information will be imported, and the existing information will be overwritten. Otherwise, the user will be registered and displayed in the Other Users list. Available after assigning role.
Steps:
Step 1.Login to the SCP platform using the admin account, navigate to Users and Access Management, and then click SSO Settings.
Step 2.Configuring the basic settings:
• SSO: check the Enable CAS SSO checkbox.
• Entry & Text: Can customize, for example, CAS login.
• Version: Select the appropriate version.
• Login URL: https://cas.example.com/cas/login?service=https://SCP.com/sso/cas/callback.
For example, if the CAS server IP address is 192.168.1.1 SCP platform IP address is 192.168.10.1, the login URL will be https://192.168.1.1/cas/login?service=https://192.168.10.1/sso/cas/callback.
• Ticket Verification URL: https://CAS server IP/cas/p3/serviceValidate?ticket={ticket}&service=https://SCP IP/sso/cas/callback
Take the above IP addresses as example:
Step 3.Advanced Settings
• Username: Obtain from the client.
• Name: Obtain from the client.
• Email Address: Obtain from the client.
• Mobile Number: Obtain from the client.
• Auto Registration: check the Enable checkbox to enable auto registration. Auto Registration: check the Enable checkbox to enable the auto registration. It will convert the uppercase letters in a username returned from the CAS server into lowercase letters to create an associated user account on the platform with data synchronized.
Step 3.Click Save to save the configuration.
Step 4.Through the IP address of SCP with https://SCP IP, visit the self-service portal and log in.
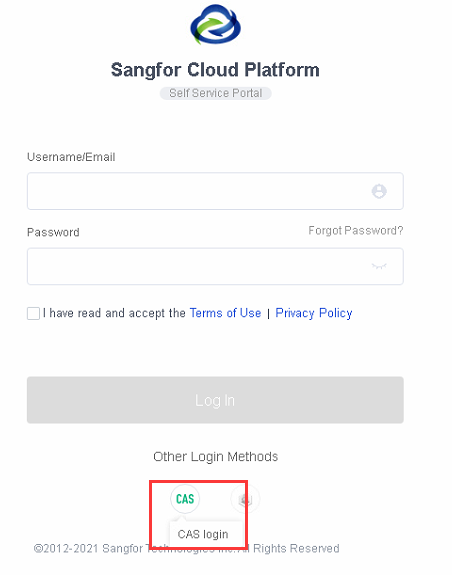
Step 5.At this time, it will prompt the account has no access rights. Please contact the administrator. Use admin to login to the SCP platform, navigate to Users and Access Management under Users, select Other Users, and add the role of the tenant to the imported CAS User.
Step 6.Login through the CAS login portal of the self-service portal again, enter the username and password, and log in to the tenant interface.
Step 7.When the client CAS server has multiple users, it is also possible to manually import users in batches.
Function Description
You can configure the display status of a component on SCP.
Prerequisites
N/A
Precautions
VMs whose components can be managed are VDC, aSecurity, aNI, and more.
Steps
Go to Management > System > Component Management and select or deselect Display component VMs.

 {{ $t('index.defaultHeader.chromeBrowserTip') }}