{{ secondMenu.name }}


Features:
Sangfor SCP platform supports account login rules, including account and password, session timeout options, SMS authentication, and other functions.
Precautions:
Prerequisite
An SMS gateway configuration is required if the SMS authentication function is enabled.
Steps:
Step 1.Login to the SCP platform, navigate to Resources > Management > Security, and select Login Policies for the account and password configuration.
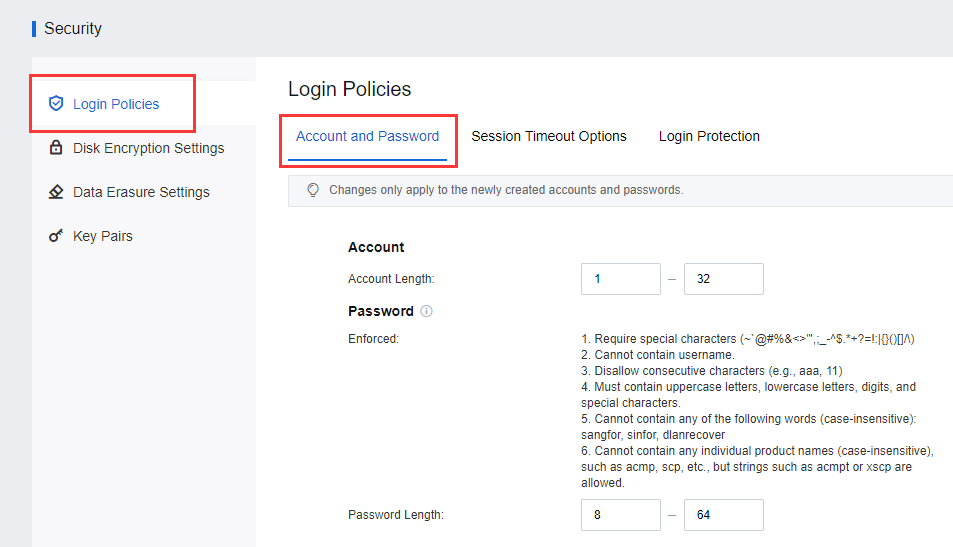
Step 2.Supports configuring Account, Password, Account Lockout Options, and Require Users to Change Password.
• Enforced policy: Require special characters, cannot contain username and disallow consecutive characters, etc. Login policies are only effective for local users, not SSO and LDAP authentication.

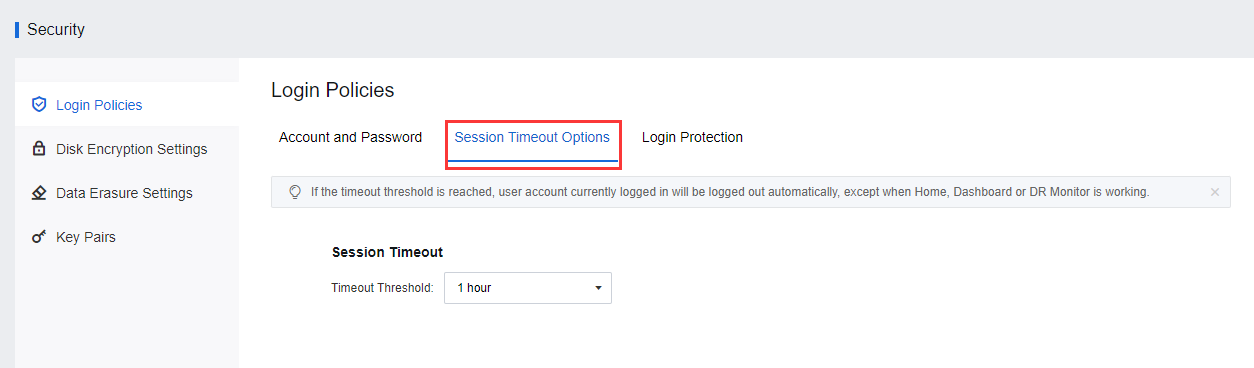
Step 3.If the session timeout options are configured, if the timeout threshold is reached, the user account currently logged in will be logged out automatically, except when Home, Dashboard, or DR Monitor is working.
Features:
Sangfor SCP platform supports the two-factor authentication of user/password + SMS authentication or OTP authentication to improve user security.
Precautions:
Prerequisite
Steps:
Google OTP
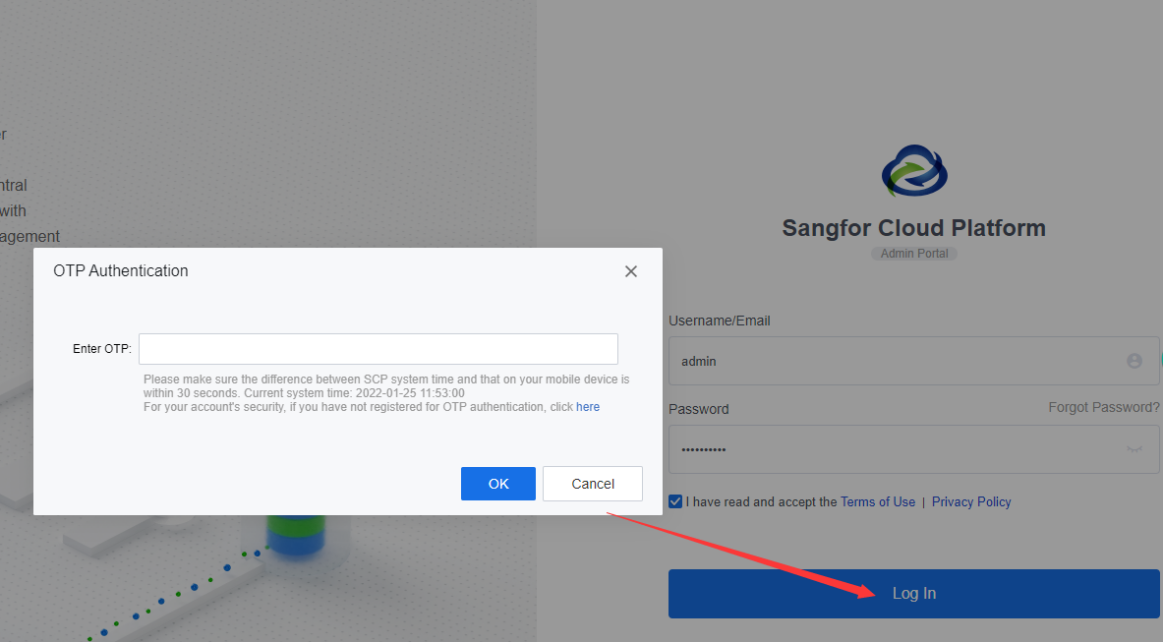
Step 1.Login to the SCP platform, and navigate to Resources > Management > Security. Under Login Policies, select Login Protection for the configuration.
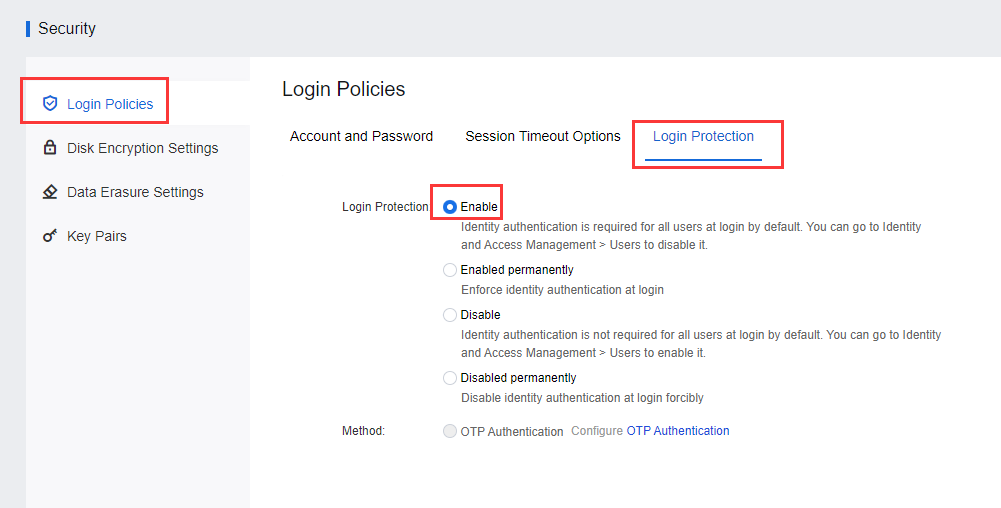
Step 2.Select OTP Authentication to set up the OTP authentication docking. Configure the SMTP server as an alternative in case the mobile phone is unavailable and may obtain the OTP via email.

Step 3.In Users and Access Management, click More to enable login protection.
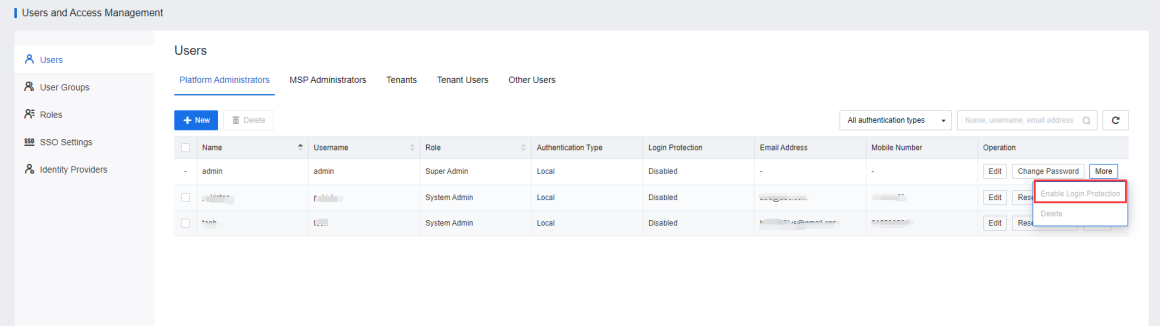
Step 4.After the configuration is complete, OTP authentication or registration can be performed when the admin or tenant login to the SCP platform.
RADIUS OTP
For more information, see Third-party OTP authentication in section 4.13.6.9 "Authentication Settings."
Function Description:
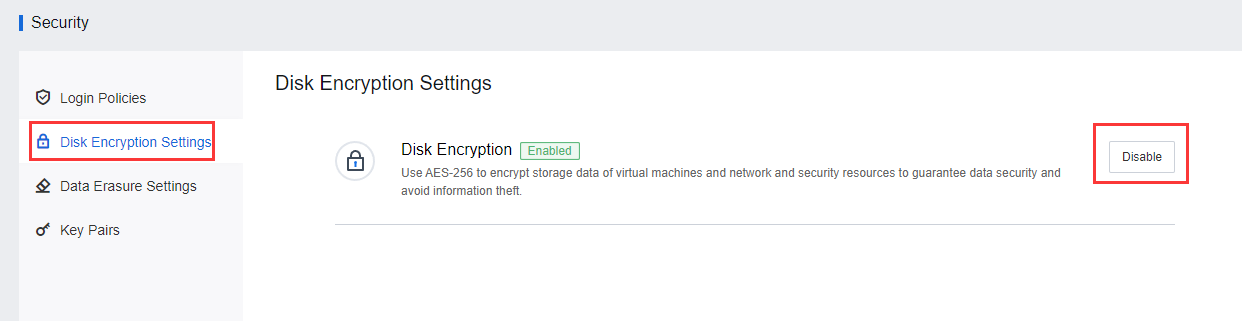
Sangfor SCP platform can enable disk encryption settings. After enabling, it supports the encryption of storage data of virtual machines, networks, and security resources to guarantee data security and avoid information theft.
Precautions:
Prerequisite
Disk encryption setting must be enabled for the virtual machine.
Steps:
Step 1.Login to the SCP platform, and navigate to Resources > Management > Security. Select Disk Encryption Settings to enable the feature.
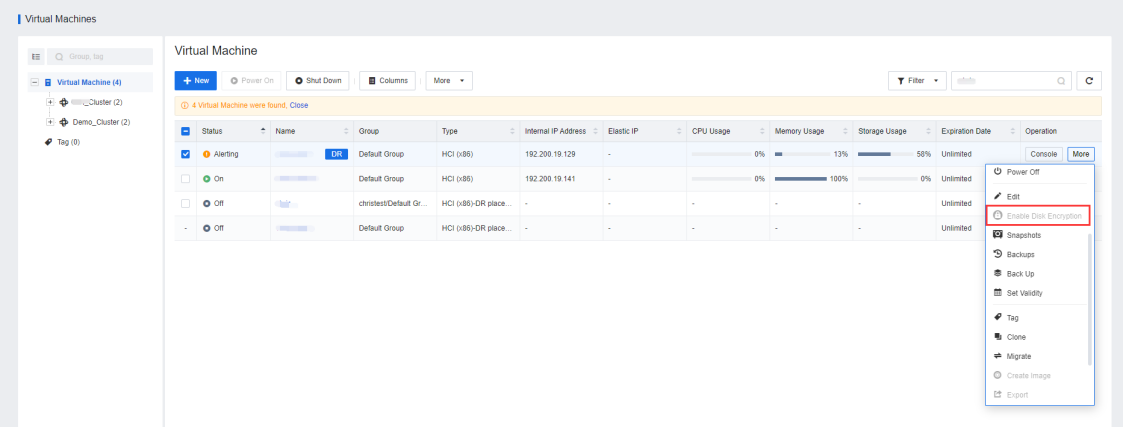
Step 3.After enabling the disk encryption settings, navigate to Compute > Virtual Machines, locate the appropriate virtual machine, click More, and select Disk Encryption.
Function Description
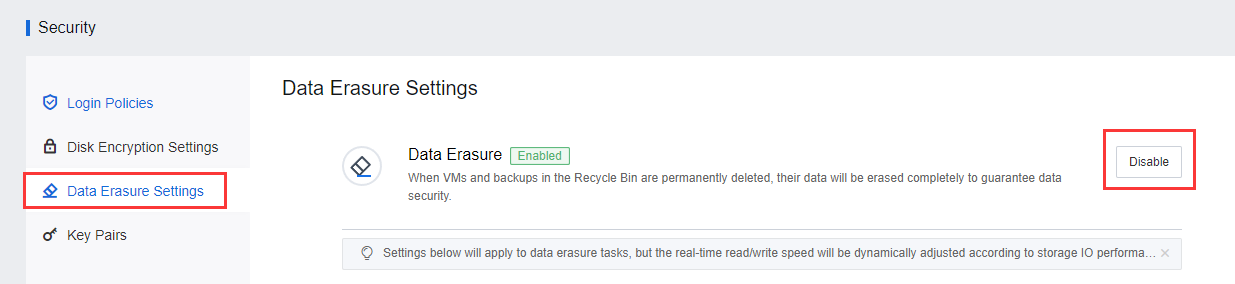
When VMs and backups in the Recycle Bin are permanently deleted, their data will be erased to guarantee data security.
Precautions:
None.
Prerequisite
None.
Steps:
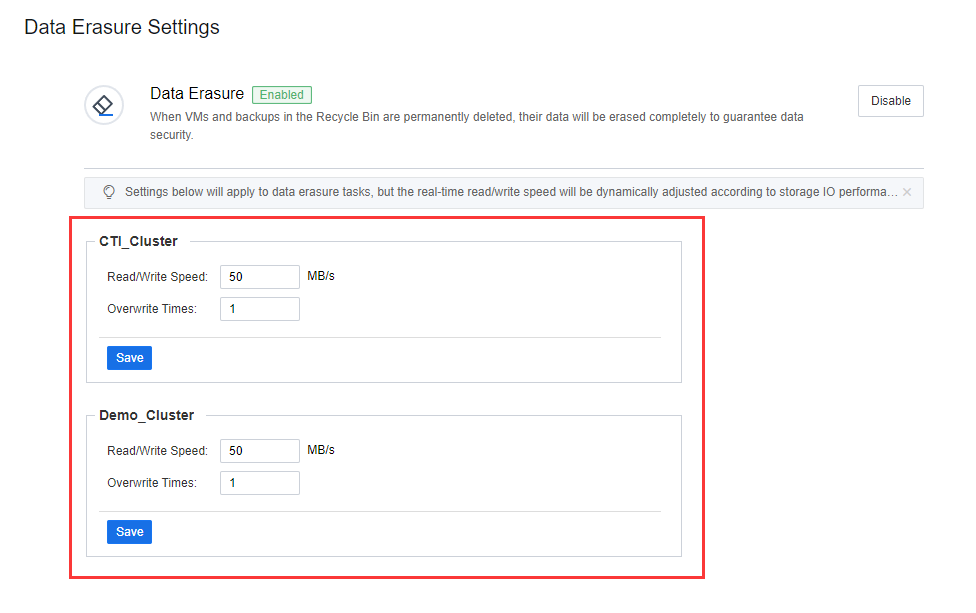
Step 5.Login to the SCP platform, navigate to Resources > Management > Security, and click Data Erasure Settings to enable the data erasure feature.
Step 6.It supports configuring the real-time Read/Write Speed and the Overwrite Times separately for resource pools.
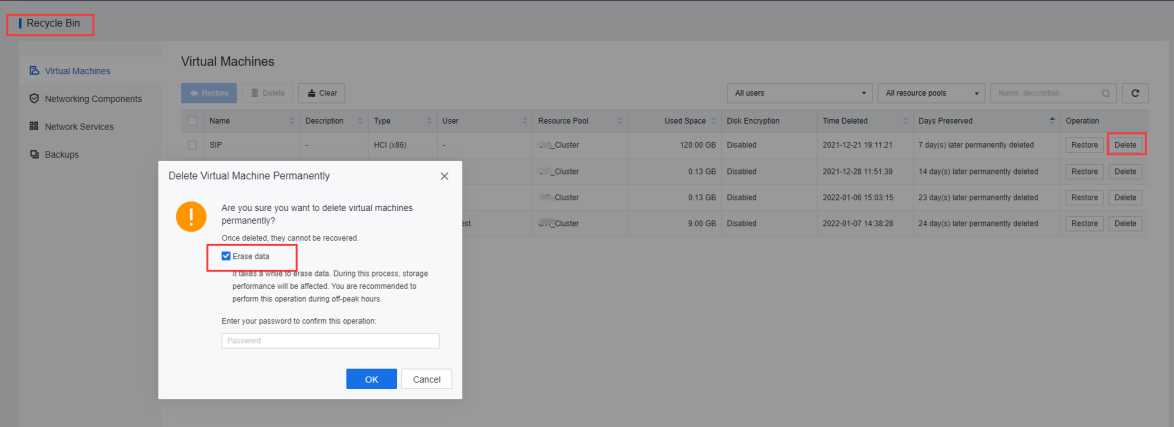
Step 7.After configuring the data erasure settings, navigate to Management and go to Recycle Bin, select the deleted virtual machine, click Delete, and check the Erase Data checkbox to delete all the residual data permanently.
Function Description:
Using the account password to log in to the virtual machine is a relatively weak authentication method. There is a risk of brute force attack, and security cannot be guaranteed. The key pair is a safe and convenient login authentication method. The SCP platform provides the virtual machine key pair management. Users can log in to the virtual machine remotely through the private key.
After the SCP platform creates a key pair, it will generate a public key and a private key. When binding the key pair to the virtual machine, the public key will be pushed down to the virtual machine. Users can securely log in to the virtual machine via SSH using the private key.
Precautions:
Prerequisite
None.
Steps
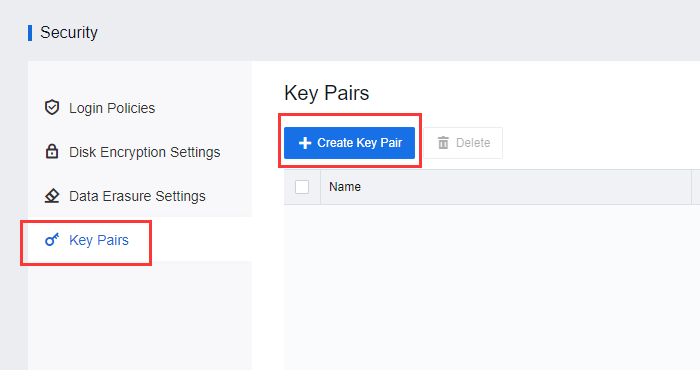
Step 1.Login to the SCP platform, and navigate to Resources > Management > Security. On the Security page, click Key Pairs and click Create Key Pair to create key pair.
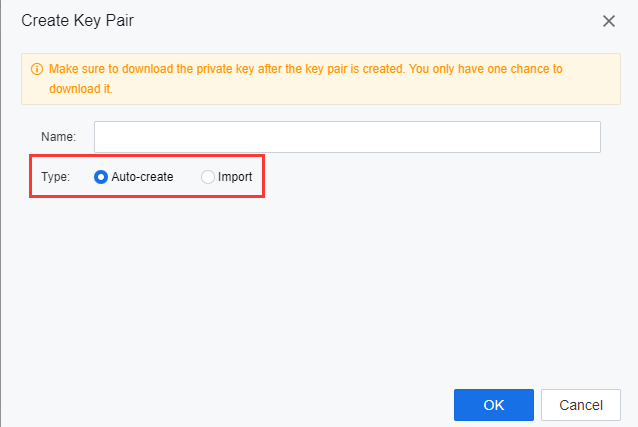
Step 2.Select Auto-Create. Select Auto-Create. Please note that after the key pair creation is complete, download the private key and save it. Unfortunately, the SCP platform does not save the private key, and you cannot download the private key again. Or select Import to import the existing public key to the SCP platform for use.
Step 3.After creating a new key pair, locate the specific virtual machine that needs to be bound, clicks More, and select Bind Key Pair to bind the key pair.
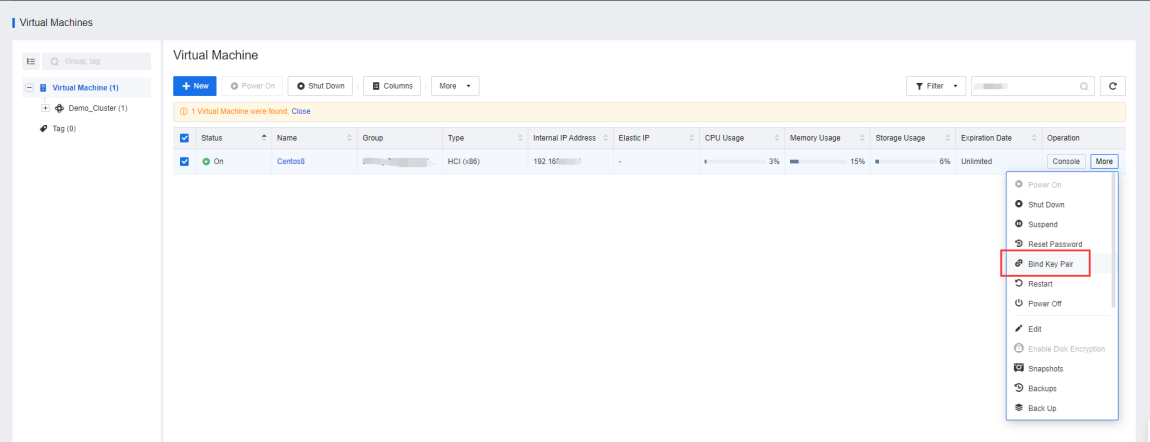
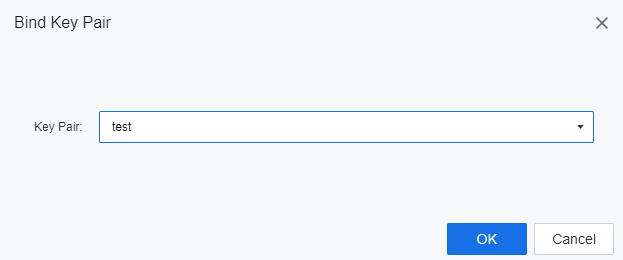
Step 4.Click OK to bind the key pair.
Feature Description:
Instruct the administrator to encrypt the virtual machine's disk in the shutdown state, which is often used in improving the security protection of the important virtual machine.
Precautions:
1. The virtual machine encryption needs to be operated on the SCP side. The user master key is stored on the SCP side, and the data key is stored on the HCI side. When the SCP and HCI communication is abnormal, the encrypted virtual machine cannot be powered on. It needs to solve the communication abnormality before it can be powered on.
2. The encrypted virtual machine does not support export, clone, template deployment, cross-cluster migration, migration to VMware, backup, new, and restore operations.
3. The encrypted virtual machine supports decryption on the SCP platform.
4. During encryption of the virtual machine that uses KMS encryption, if the connection between SCP and KMS is disconnected, the connection between SCP and HCI cluster is disconnected, and the HCI node at the running location is out of SCP management, the virtual machine will be shut down after being shut down. Unable to use because there is no key to decrypt.
5. The virtual machine's performance with encryption enabled will drop by 30%-50% compared to when it is not encrypted.
6. Virtual machines with encryption enabled will not be able to use CDP, disaster recovery, cloning, exporting, and mirroring.
7. The encryption process takes a period, and operations such as booting are not supported. It is recommended that you handle it when your business is idle.
Prerequisite
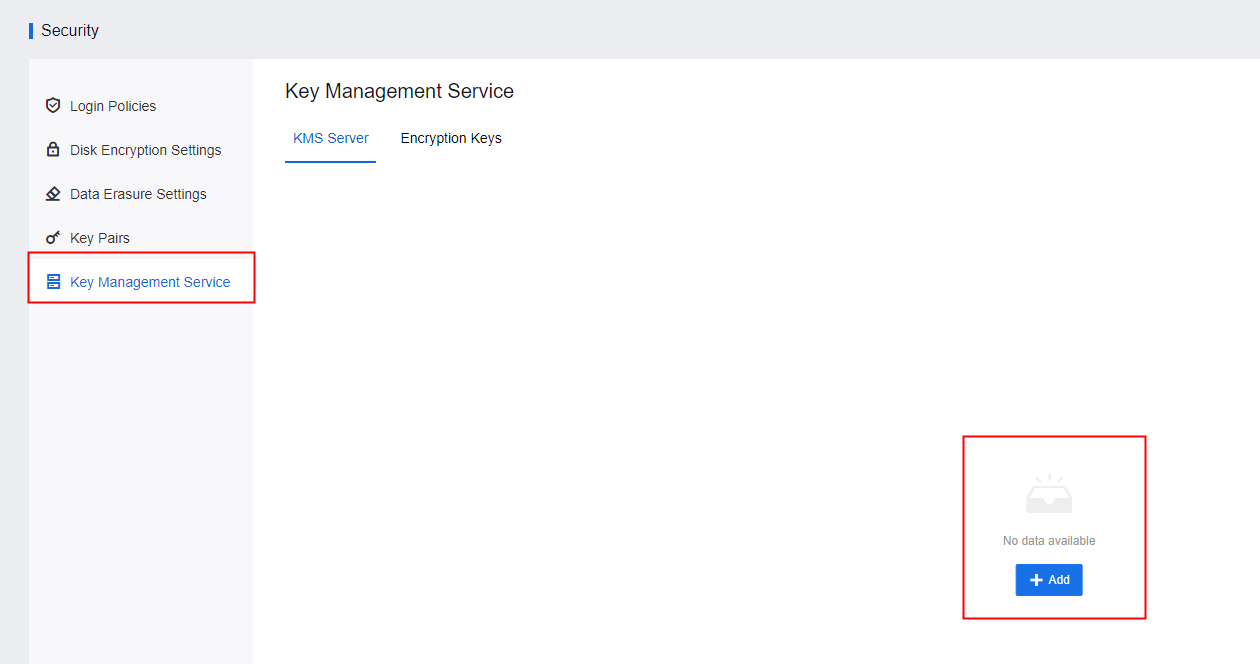
The SCP must activate the KMS service, which can be activated on the SCP platform.
Steps:
Step 1.Login to the SCP platform and navigate to Resources > Management > Security. Click Add to add a KMS server to the SCP platform.
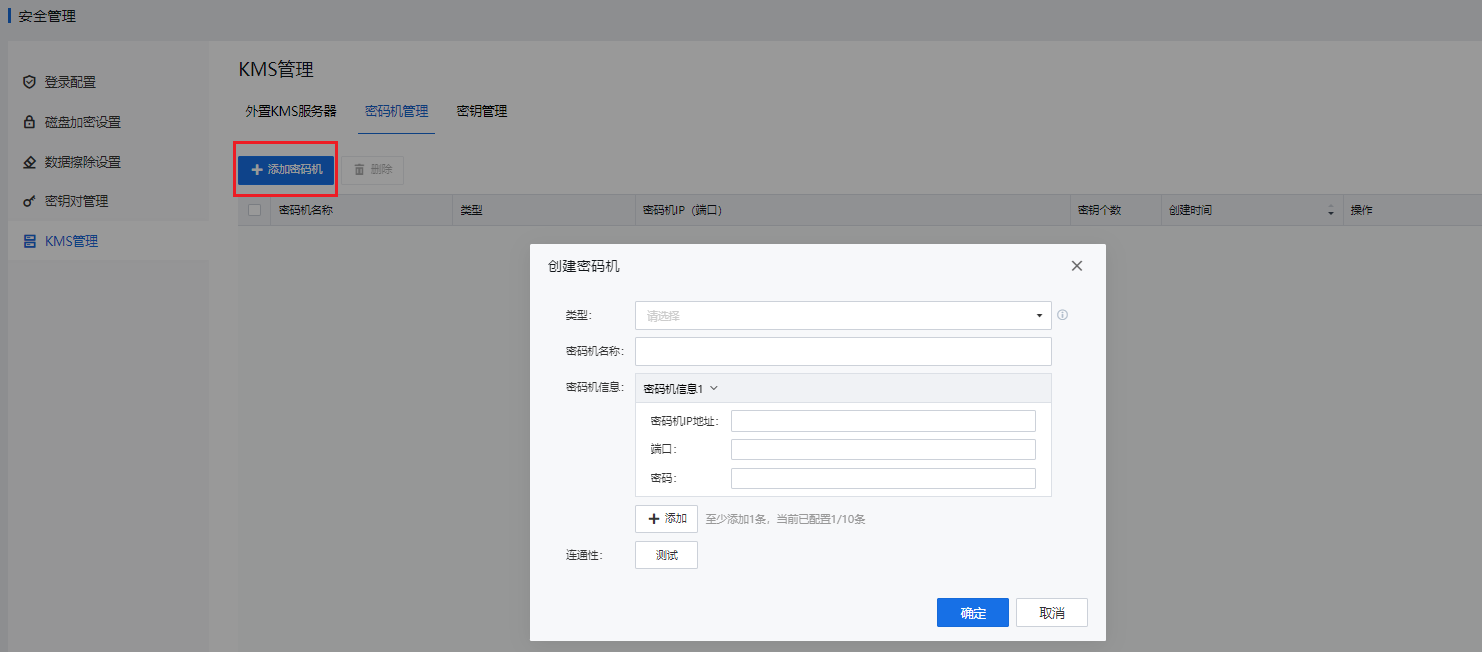
HSM Management
On the HSMs tab, click Add.
• Type: You can select type A (for Sansec) or B (for JIT).
• Information: Configure the IP address, port number, and password for the HSM. You can add up to 10 HSMs.
Step 1.Enter the Compute > Virtual Machines interface, select the virtual machine that needs to be encrypted, and click More > Enable Disk Encryption to convert the ordinary virtual machine into an encrypted virtual machine.


Step 1.Enter the Compute > Virtual Machines interface, select the virtual machine that needs to be decrypted, and click More > Disable Disk Encryption to convert the encrypted virtual machine into an ordinary virtual machine.

 {{ $t('index.defaultHeader.chromeBrowserTip') }}