{{ secondMenu.name }}


Function Description:
Provide scheduled backup services for the virtual machine to regularly back up data.
Precautions:
• This feature takes effect only when you create, clone, or import VMs on SCP. The backup policy does not change for original VMs in the group or when VMs are moved to other groups.
• A VM group can be added to the group list with only one backup policy.
• VMs of a tenant user are VMs in the default group of the tenant.
| Windows 7 32-bit/64-bit |
Windows 8 32-bit/64-bit |
Windows 10 |
| Windows 11 |
Windows Server 2003 32-bit/64-bit |
Windows Server 2008 32-bit/64-bit |
| Windows Server 2008 R2 |
Windows Server 2012 |
Windows Server 2016 |
| Windows Server 2019 |
Windows Server 2022 |
|
• The COM+ System Application service has been started, with the startup type set to Manual.
• The COM+ Event System service has been started, with the startup type set to Automatic.
• The Volume Shadow Copy service is not running, with the startup type set to Manual.
Prerequisite
Steps:
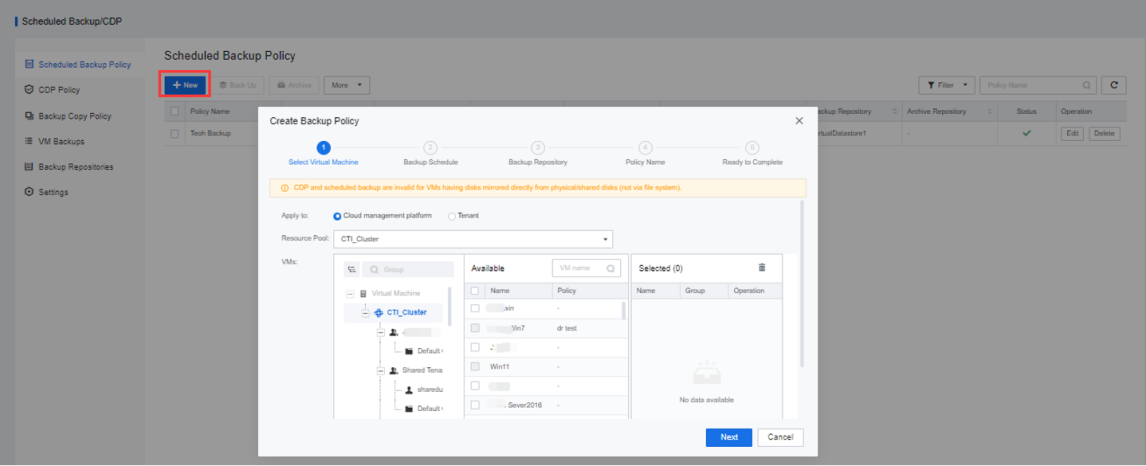
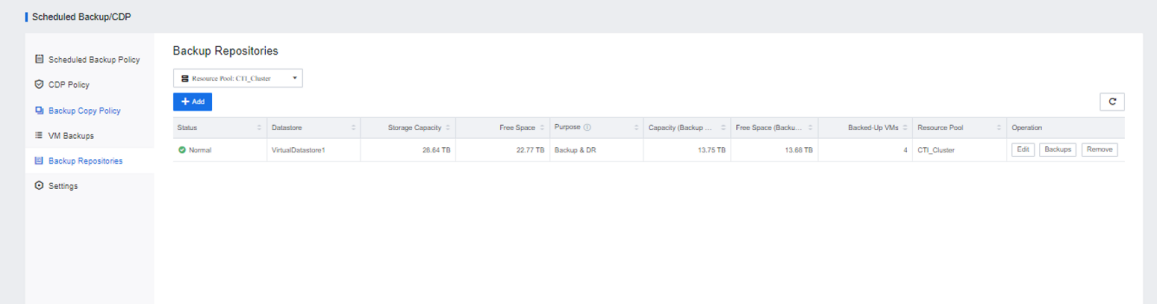
Step 1.Log in to the SCP platform, select Reliability > Scheduled Backup/CDP, and click New to add the planned backup repository to the backup repositories.
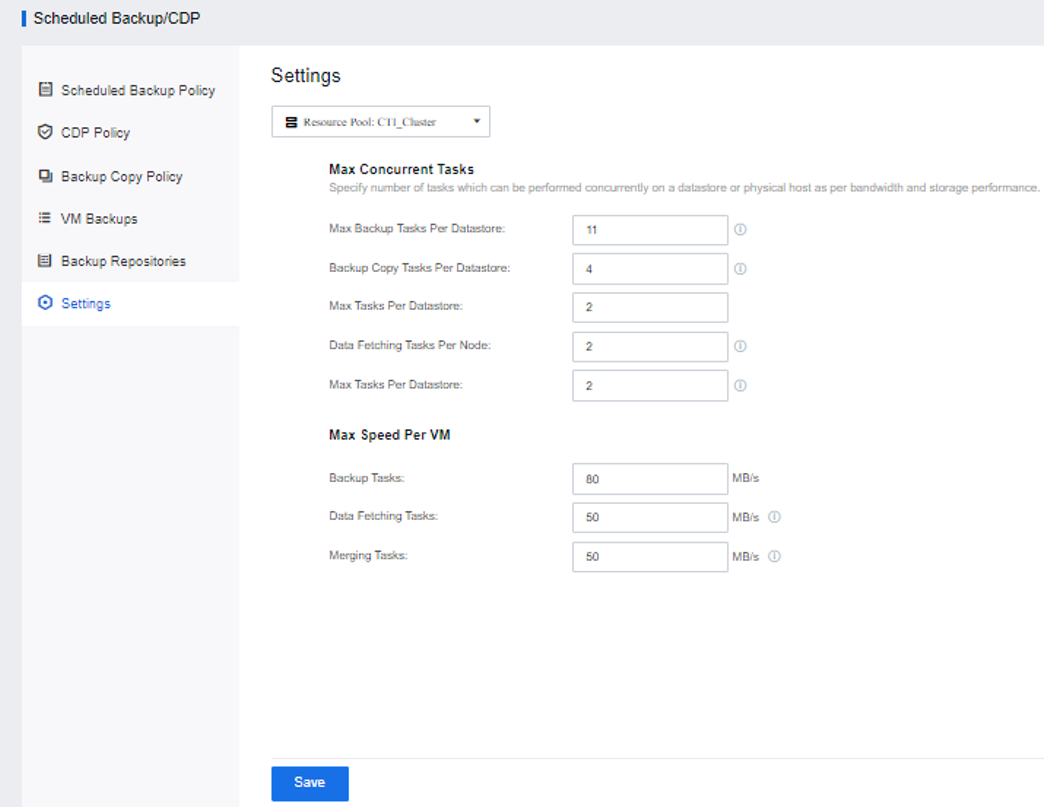
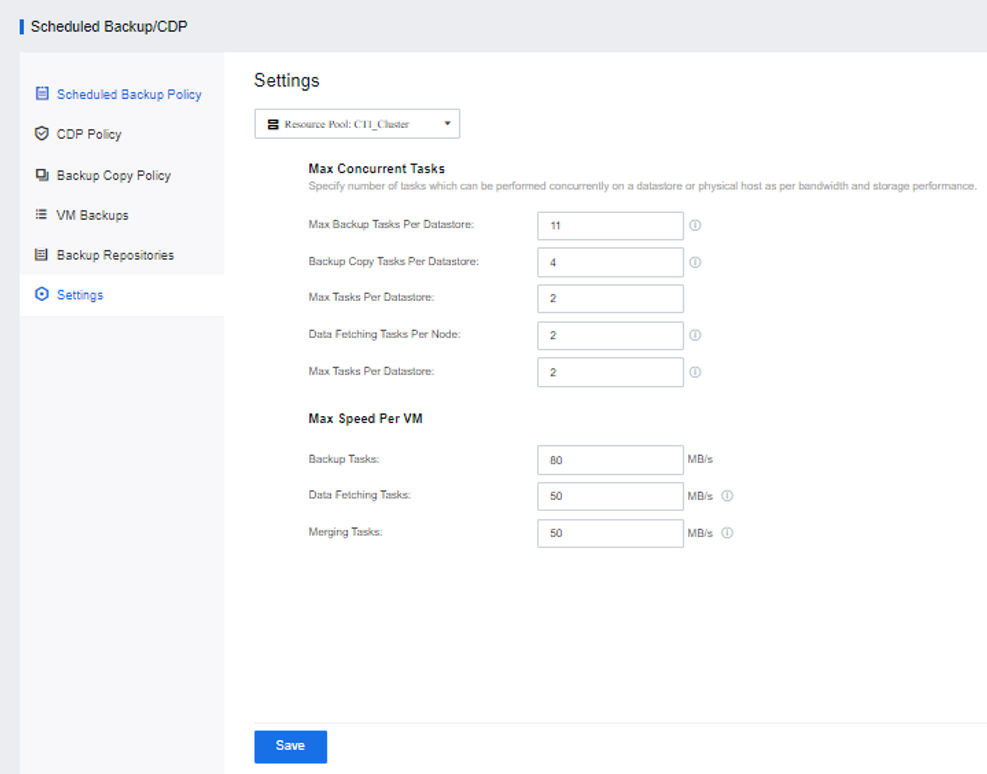
Step 2.Click Settings to limit the number of concurrent backups for the resource pool.
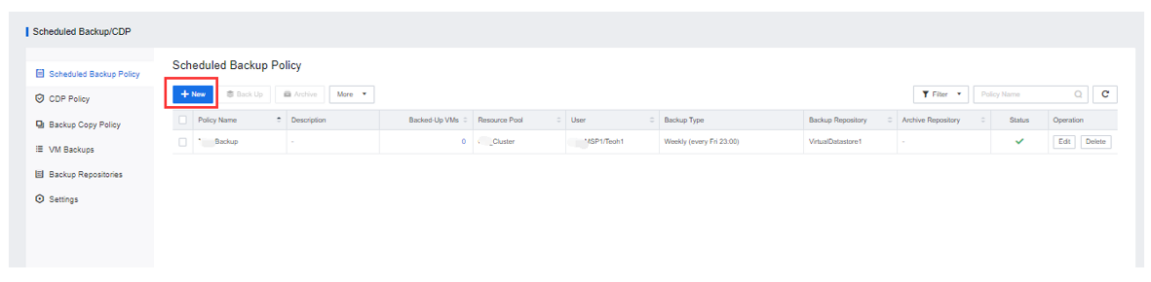
Step 3.Enter the Scheduled Backup/CDP interface and click New to add a new local backup policy.
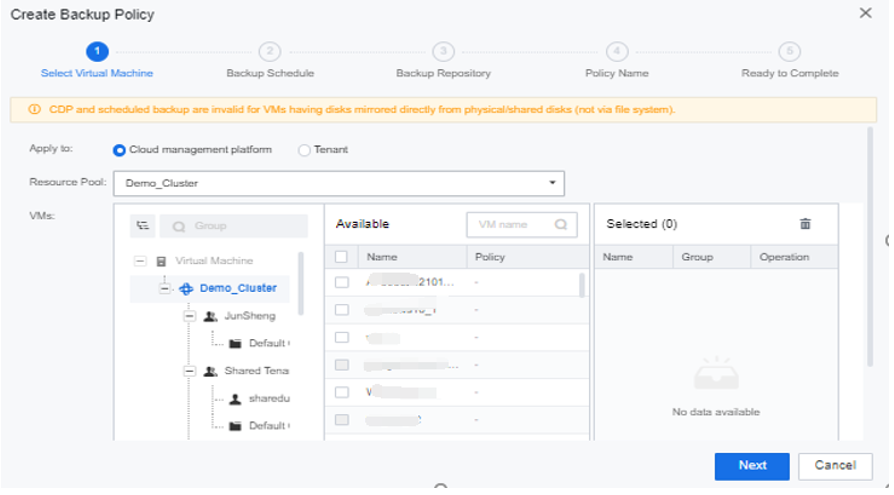
Step 4.Select the target resource pool, select the virtual machine to be backed up, and click Next.Or select Auto add VMs in specified groups as needed. If it is selected, newly created, cloned, and imported VMs in the group will be automatically added to the backup policy.
Step 5.Set the backup schedule, backup date, and duration. Choose to Enable the Full Backup according to actual needs.Or select Enable for Quiesce Guest File System as needed.
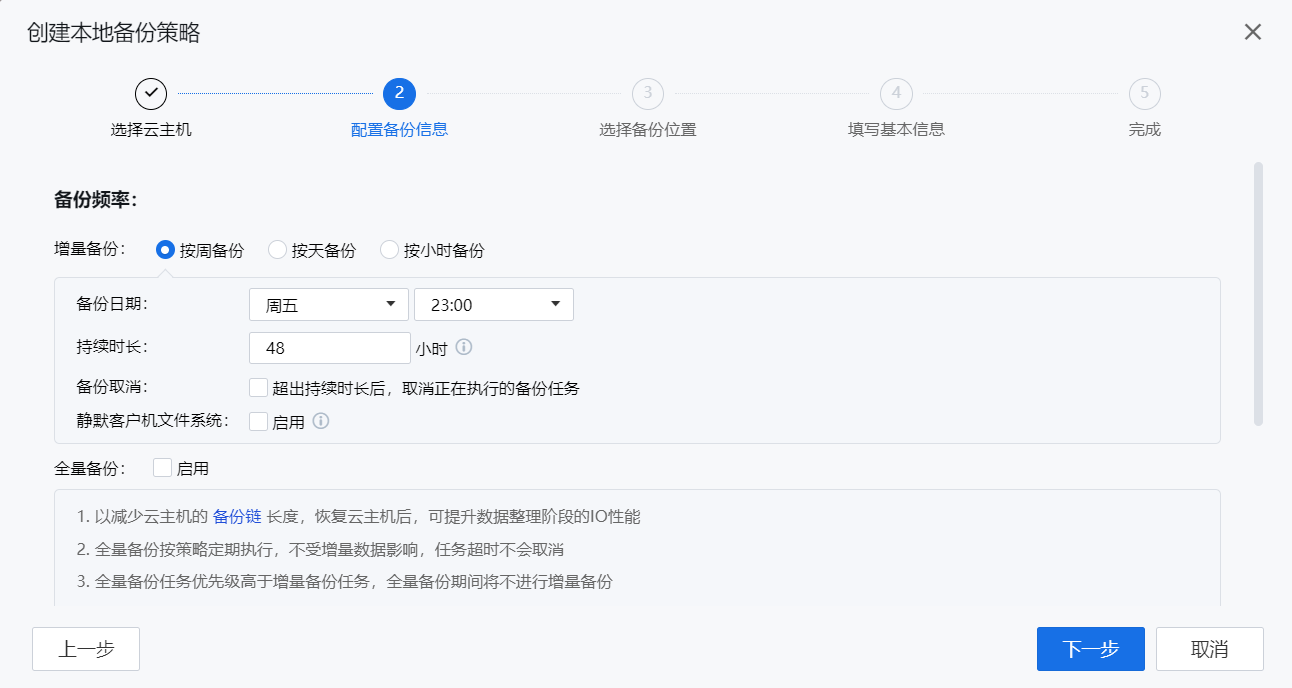 [7]
[7]
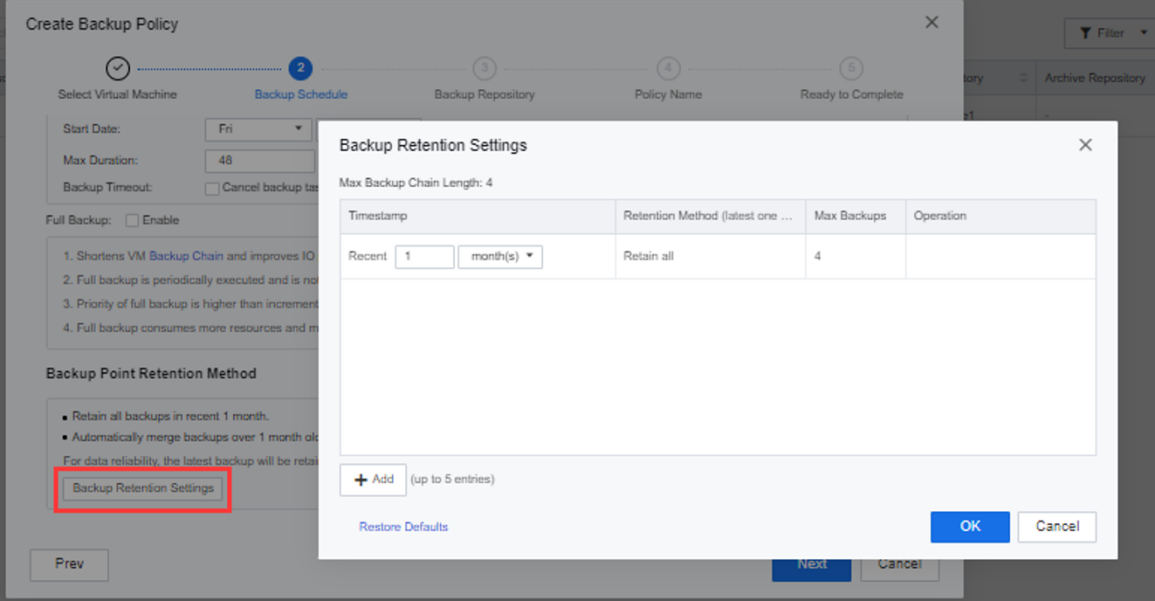
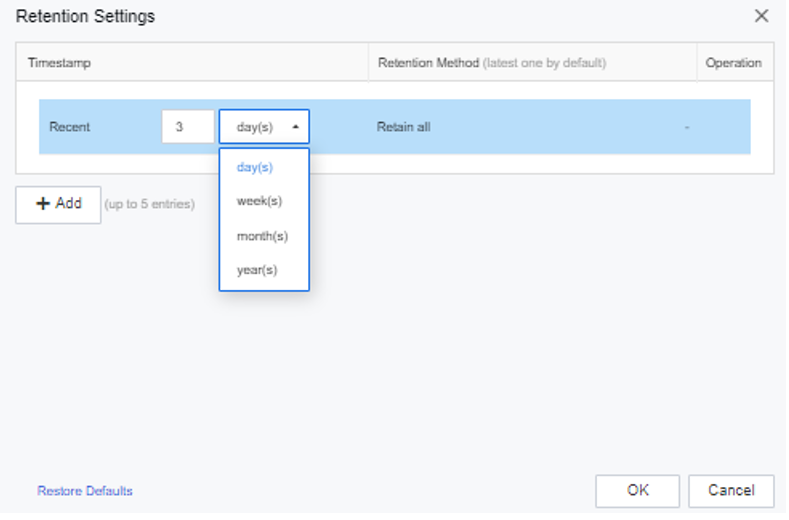
Step 6.Click Backup Retention Settings to manually set the backup retention mode as follows: keep all the backups of the last month, keep one backup per month for one month to six months, and keep backups over six months to two years. Keep one copy per year. Keep one copy per year.
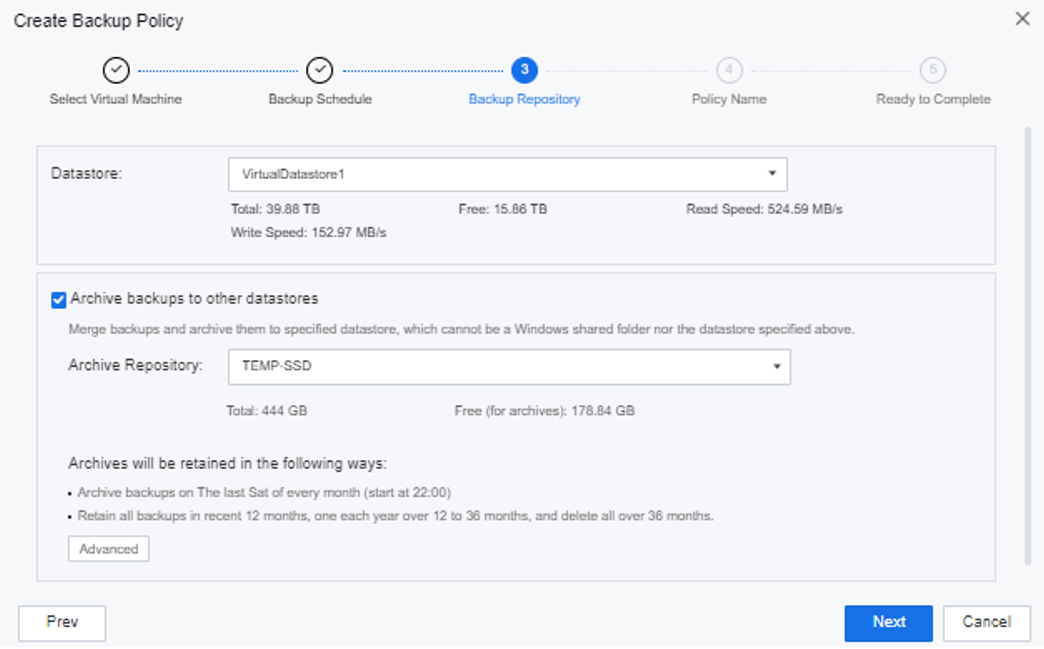
Step 7.Manually specify the backup repository, and choose virtual storage or external storage. Archiving is not allowed when there is only one backup datastore.
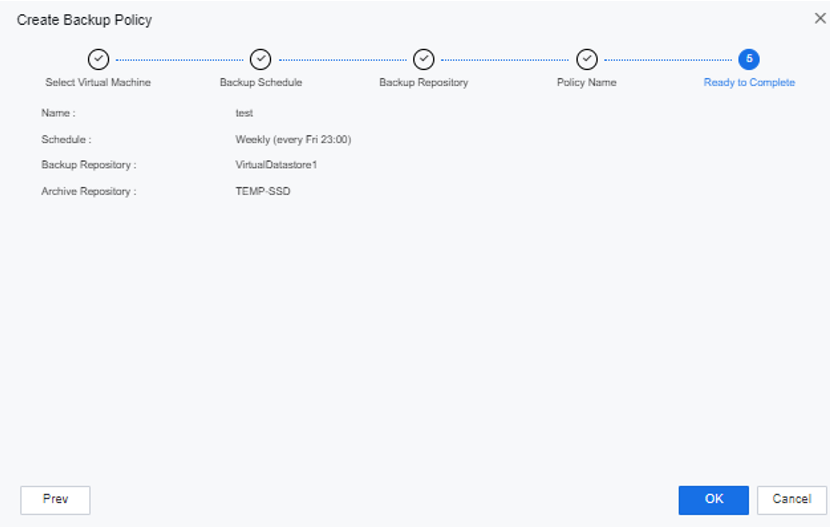
Step 8.Complete backup configuration.
Step 9.Select the created backup policy to enable, disable, and backup now.

Step 10.After the backup policy is added, you can see the backup virtual machine list and status on the VM Backups interface.
Function Description:
This task guides administrators in restoring backup files.
Precautions:
After restoring the virtual machine (whether it is a new one or overwriting the original virtual machine), the disk allocation mode changes to thin provisioning, which will lead to performance degradation. You can manually go to Virtual Machine > More > Edit > Configuration > Storage to adjust the disk settings to pre-allocation.
Prerequisite
Steps:
Step 1.On the virtual machine page, click More in the virtual machine list, and then click More > Backups.
Step 2.Click Backup and DR to find the backup file of the virtual machine.
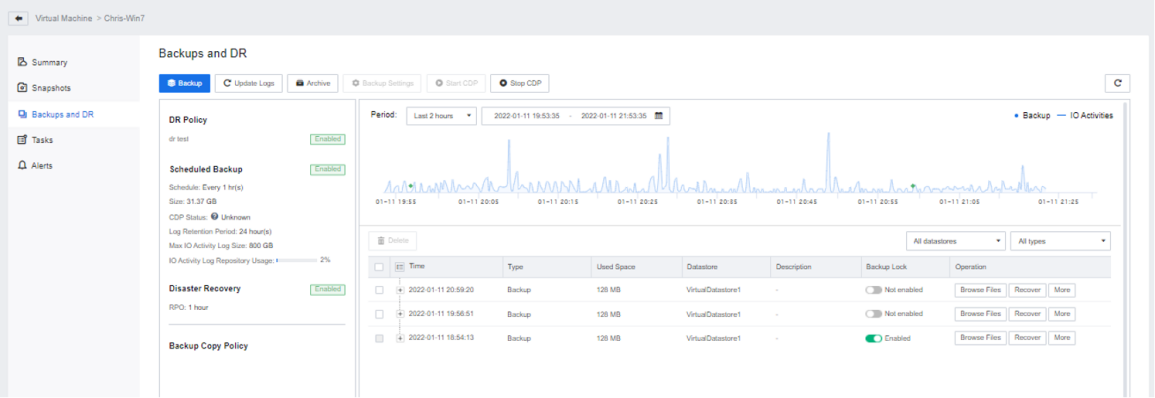
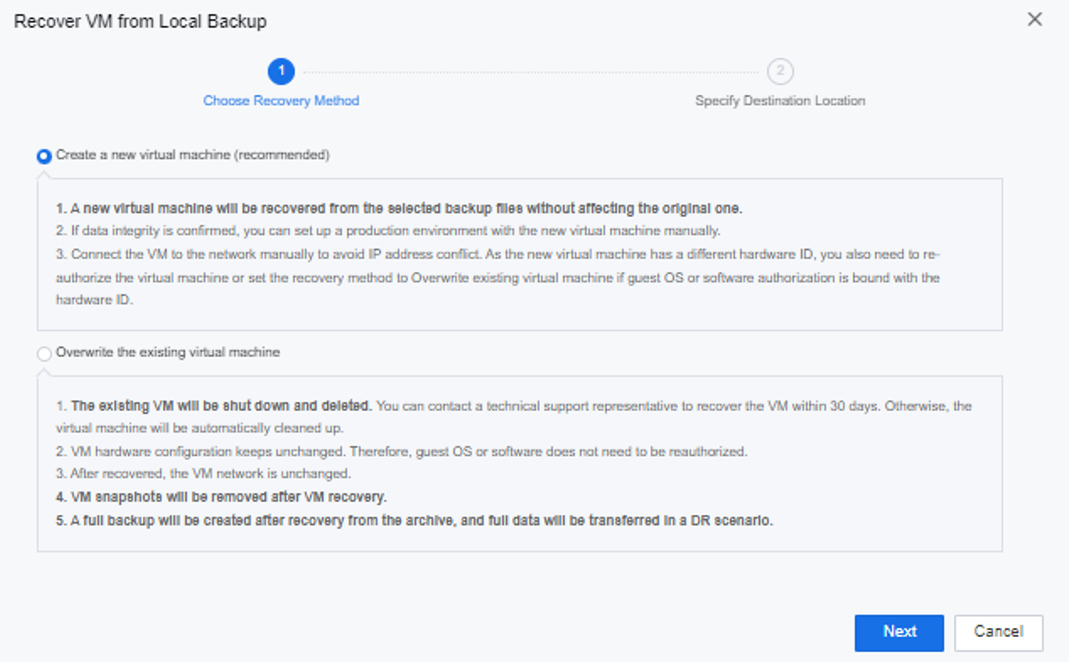
Step 3.Click Restore under Operation to restore the corresponding backup file. You can choose to Create a new virtual machine or Overwrite the existing virtual machine.

Function Description:
Provide backup replication policy services for the virtual machine and regularly replicate backups. Backups have copies on multiple storages to meet the data security requirements of some customers.
Precautions:
Prerequisite
A local backup policy has been created for the virtual machine that needs to be backed up and replicated.
Steps:
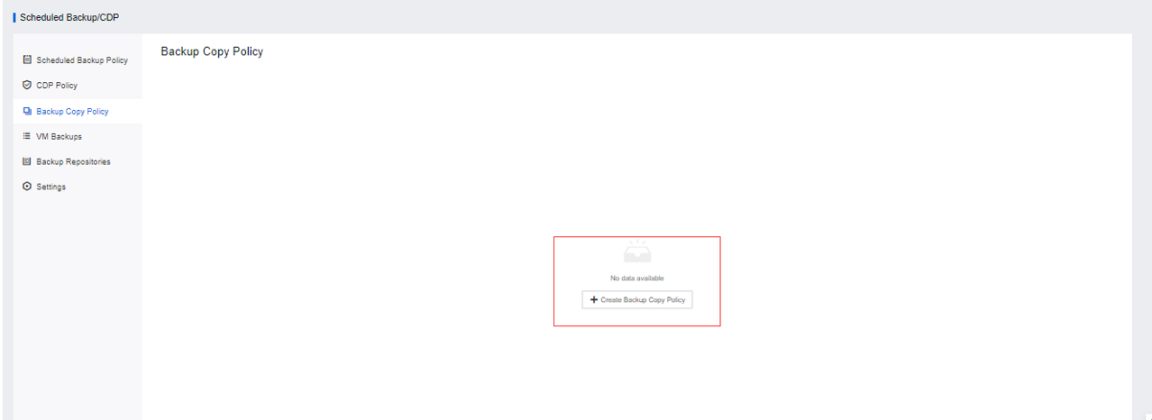
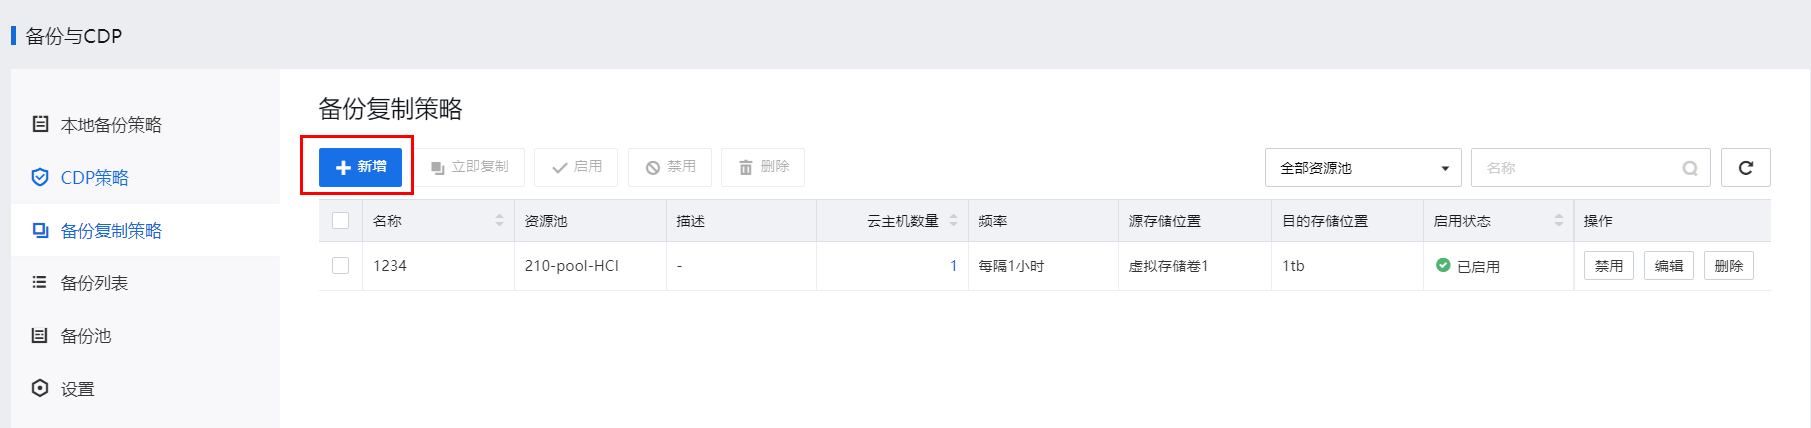
Step 1.Log in to the SCP platform, go to Reliability > Scheduled Backup /CDP > Backup Copy Policy, and click New to create a backup copy policy.
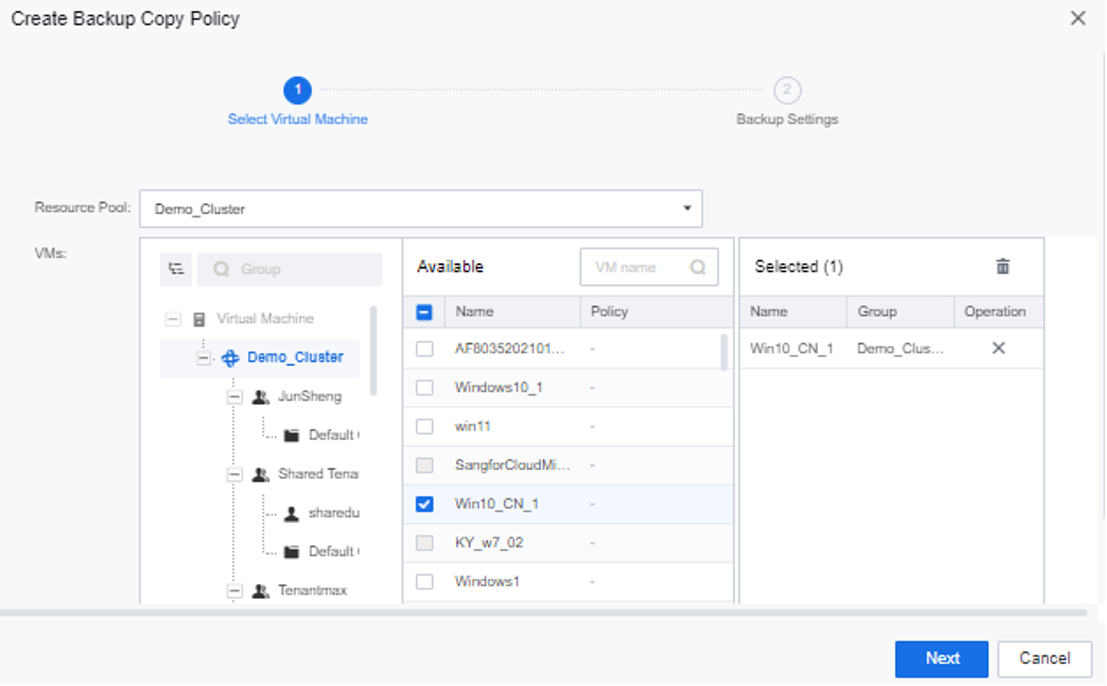
Step 2.Select the Resource Pool, select the VMs to which the backup replication policy needs to be added, and click Next.
Step 3.Select the Source and Destination Datastore and set the Interval. The backup replication frequency supports hourly or daily.
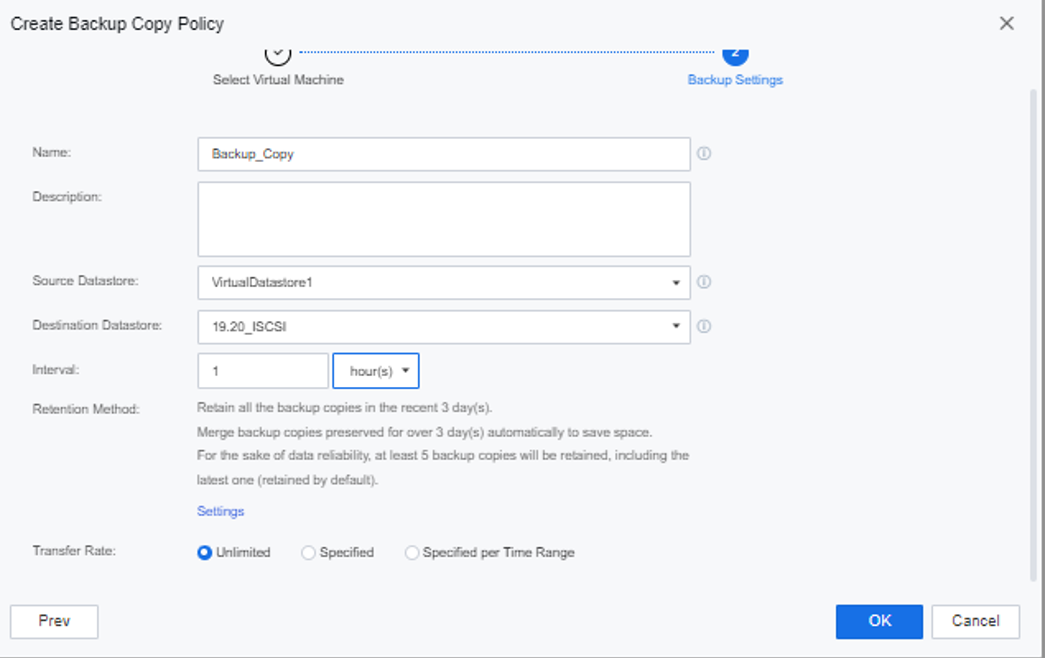
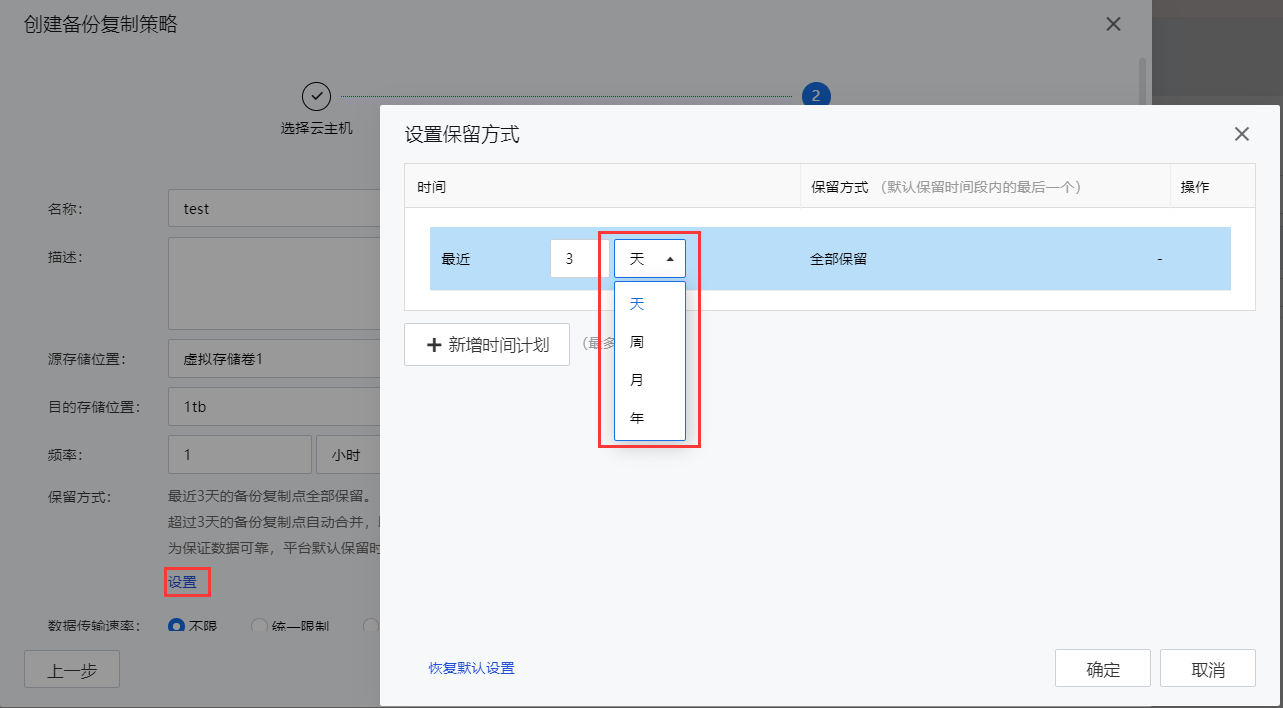
Step 4.You can manually set the backup retention mode, click the Settings button, and support setting the backup replication cycle by day, week, month, and year. Click the Add button to set up to 5-time plans. The last backup within the time plan will be retained by default if multiple time plans are added.
Step 5.Select whether to limit the data Transfer Rate according to the actual needs and click the OK button after the setting is complete.
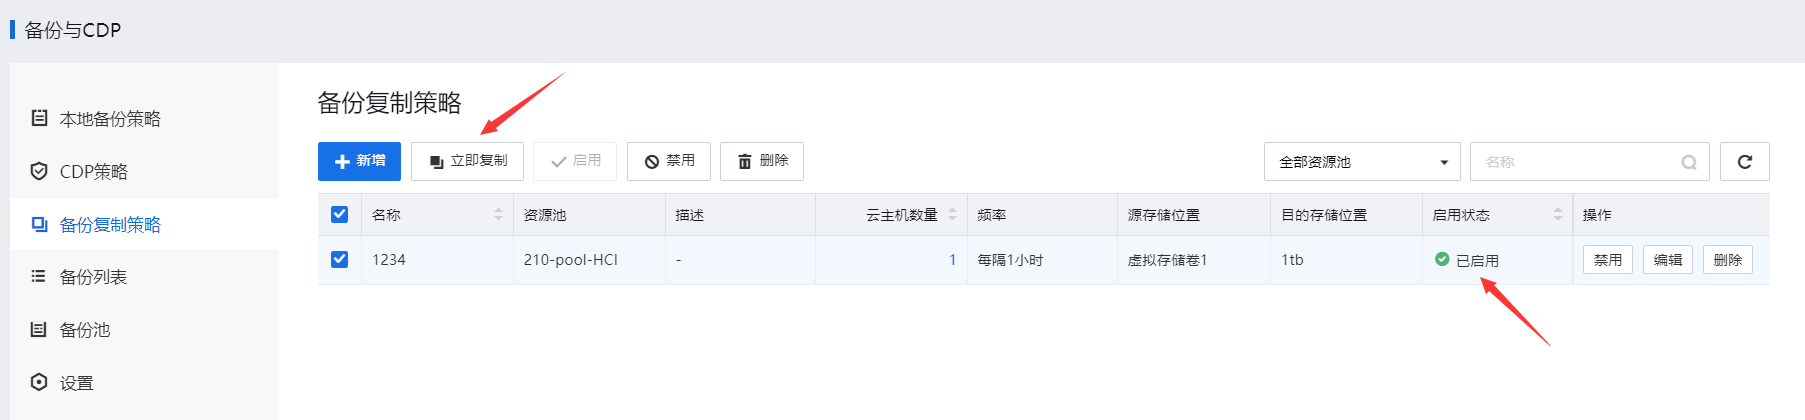
Step 6.Select the created backup copy policy to Enable, Disable, and Copy now.
Function Description:
By distinguishing different service levels, provide CDP services for virtual machines and real-time data protection for businesses.
Precautions:
| Windows 7 32-bit/64-bit |
Windows 8 32-bit/64-bit |
Windows 10 |
| Windows 11 |
Windows Server 2003 32-bit/64-bit |
Windows Server 2008 32-bit/64-bit |
| Windows Server 2008 R2 |
Windows Server 2012 |
Windows Server 2016 |
| Windows Server 2019 |
Windows Server 2022 |
|
• The COM+ System Application service has been started, with the startup type set to Manual.
• The COM+ Event System service has been started, with the startup type set to Automatic.
• The Volume Shadow Copy service is not running, with the startup type set to Manual.
Prerequisites
Steps:
Step 1.Log in to the SCP platform, select Reliability > Scheduled Backup/CDP > Backup repositories, and click Add to add the planned backup location to the backup repositories.
Step 2.Click Settings to limit the number of concurrent backups for the resource pool.
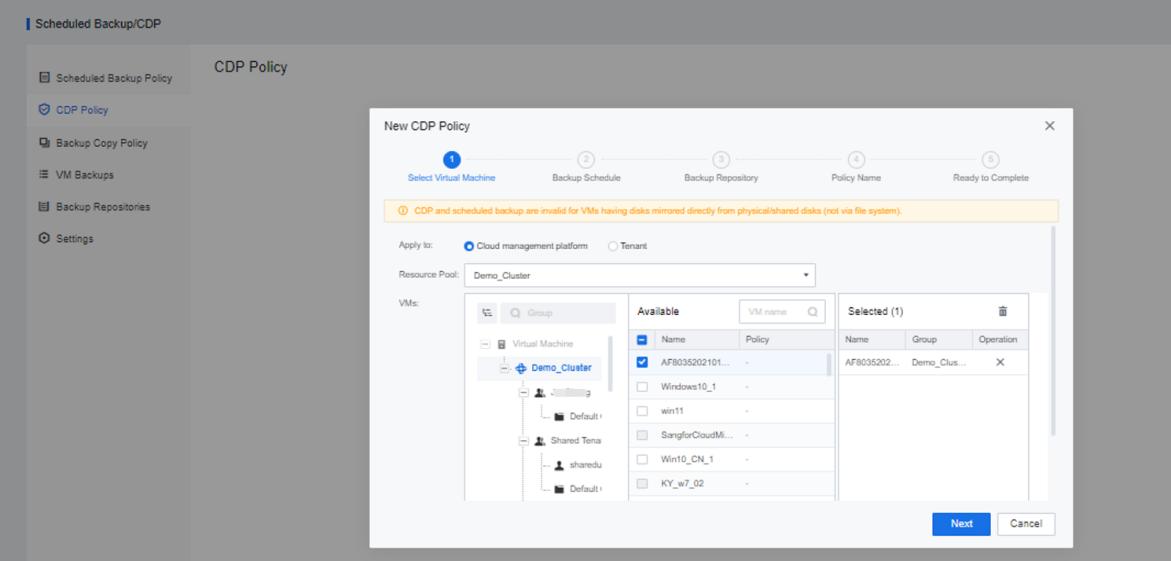
Step 3.Enter the CDP Policy interface, click New, and select the virtual machine to be backed up.
Step 4.Configure the backup schedule, backup date, and duration. Then, select whether to check the Enable checkbox according to the actual needs to start a regular Full Backup or select Enable for Quiesce Guest File System as needed.
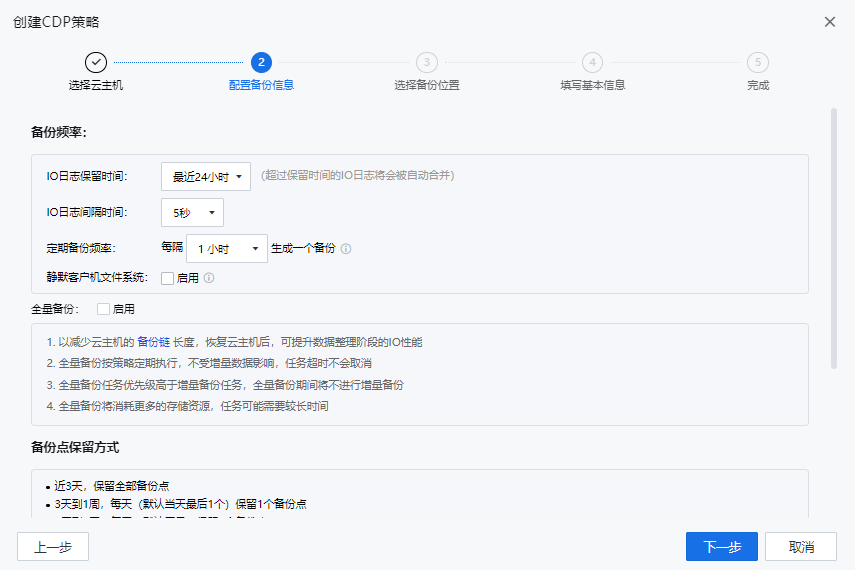 [8]
[8]
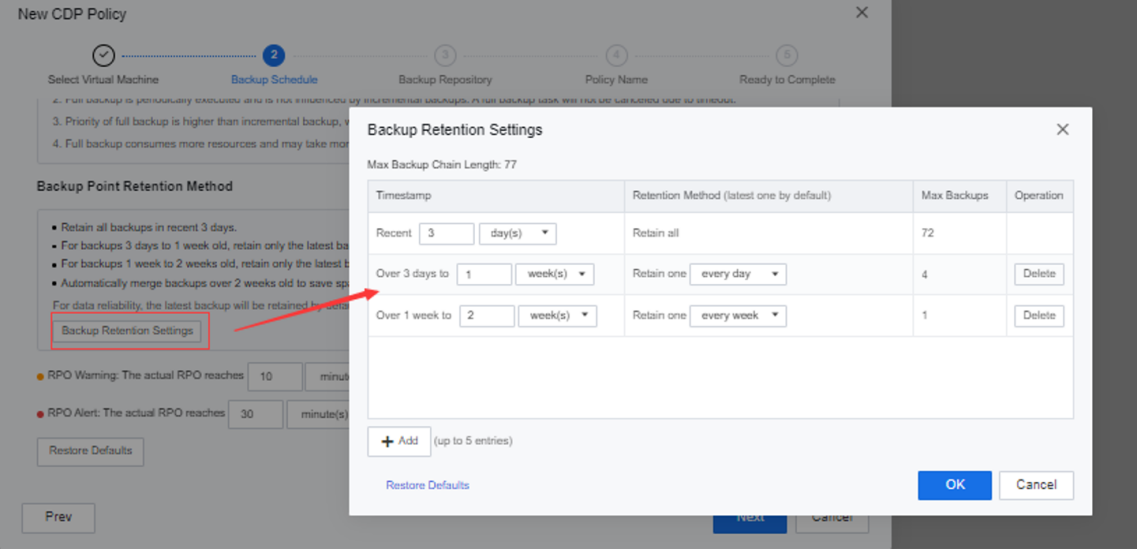
Step 5.Click Backup Retention Settings to manually set the backup retention mode as follows: keep all the backups of the last month, keep one backup per month for one month to six months, and keep backups over six months to two years. Keep one copy per year.
Step 6.Configure the early warning and alarm thresholds for RPO in CDP.

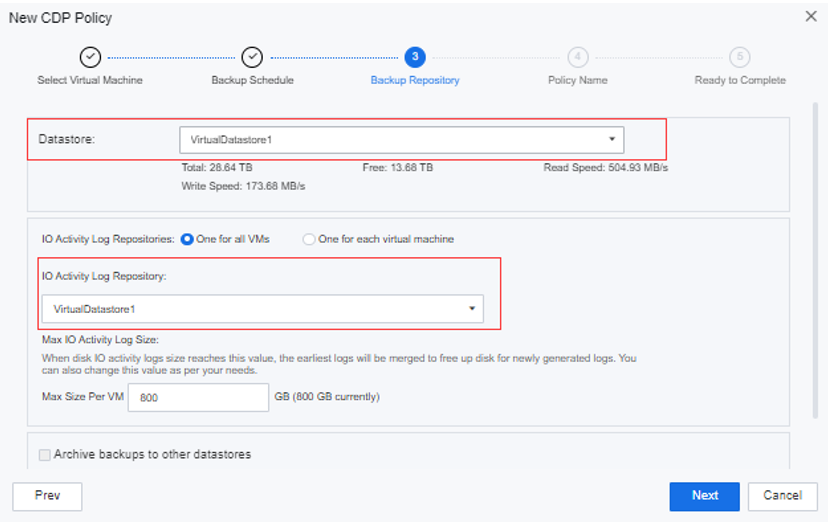
Step 7.Define the backup repository and IO Datastore for the CDP Policy.
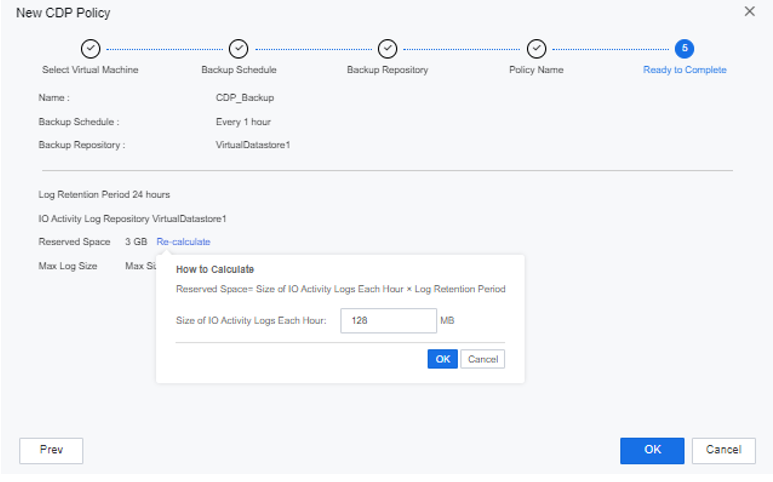
Step 8.Complete the backup policy configuration. At this time, manually writing business increments will automatically calculate the estimated backup space.
Step 9.After the backup policy is added, you can see the backup virtual machine list and status on the VM Backups interface.

Function Description
The backup copy policy service is provided for VMs to regularly copy backups to multiple datastores for data security.
Precautions
Prerequisites
A local backup policy is created for the target VM.
Steps


Function Description:
This task guides the administrator in restoring the backup file. CDP supports recording every IO of the business system and supports restoring to the business system state 5 seconds ago.
Precautions:
Prerequisite
The virtual machine that needs to be backed up has a CDP backup file.
Steps:
Step 1.On the Virtual Machine page, click the virtual machine name in the virtual machine list and click More > Backup.
Step 2.Click Backups and DR to find the backup file point of the virtual machine, and click the arrow of the backup file point to see the recovery point.
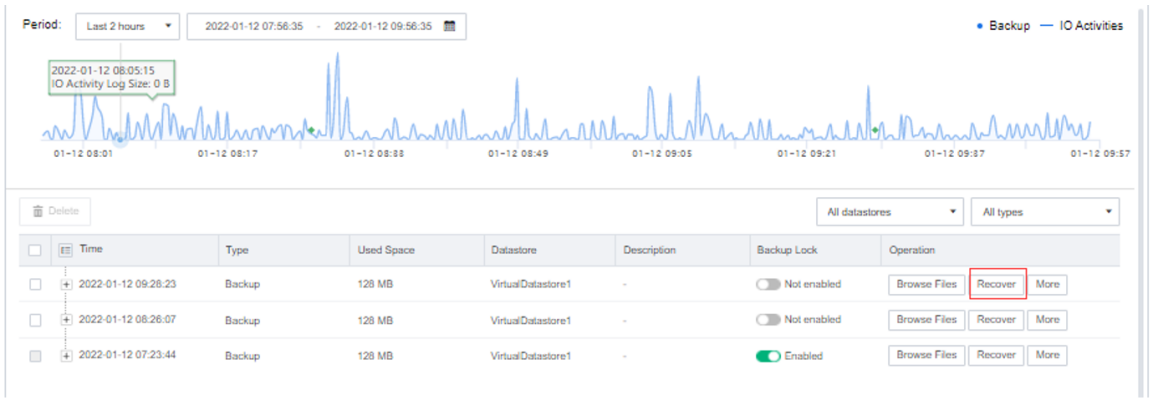
Step 3.Click Restore under Operation to restore the corresponding backup file. You can choose to Create a new virtual machine or Overwrite the existing virtual machine.

 {{ $t('index.defaultHeader.chromeBrowserTip') }}