{{ secondMenu.name }}


Function Description:
Sangfor SCP supports AWS management and can add the resources on Alibaba Cloud to SCP in the form of a cloud environment. After adding a cloud environment, you can directly use the SCP on the AWS cloud server (EC2). Besides, assigning it to the tenant is supported.
Precautions:
Prerequisite
Steps:
Step 1.Use the admin account to log in to the system management interface of SCP and navigate to Hybrid Cloud > Third-Party Public Cloud. 
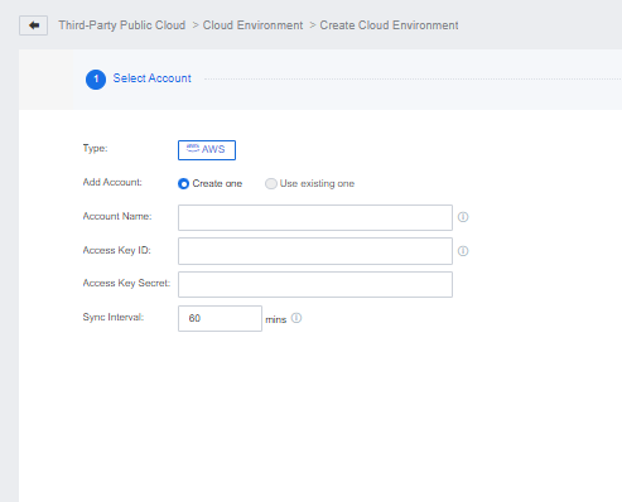
Step 2.Click New to add a new cloud environment:
• Type: AWS
• Add Account: Select between Create One or Use existing one (for the user who previously added the account).
• Account Name: Custom cloud account.
• Access Key ID: Obtained from the client.
• Access Key Secret: Obtain from the client.
• Sync Interval: 60 minutes (the new resources added by the cloud account on the AWS platform will be automatically updated within the specified cycle. It is recommended to keep the default cycle. The shorter the cycle, the higher the SCP platform resources will be occupied).
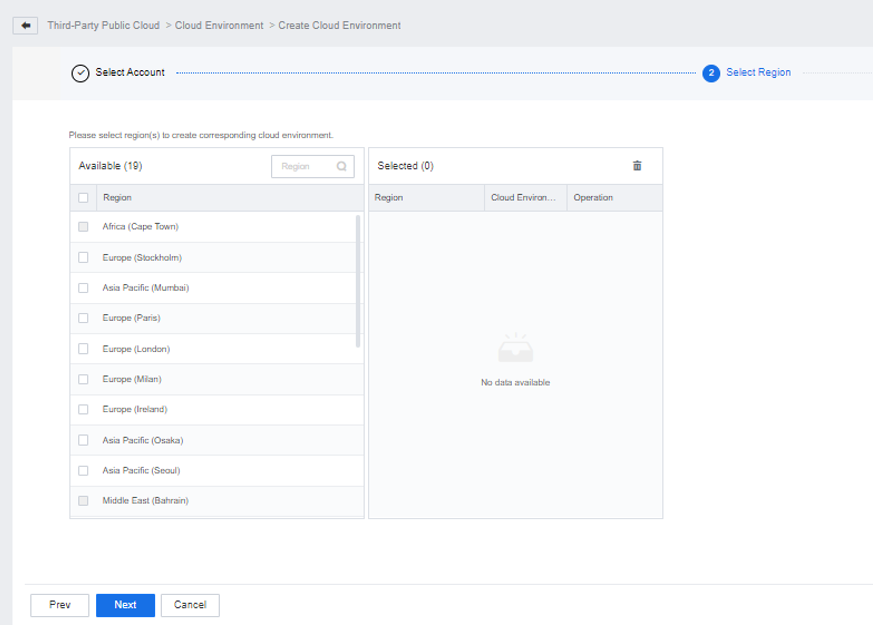
Step 3.Click Next and select a region to create the corresponding cloud environment. For example, if a customer has a virtual machine in Tokyo AWS, he can select Asia Pacific (Tokyo) and add it as a cloud environment.

Function Description:
The added cloud environment can be allocated to tenants according to actual needs. The cloud environment can be regarded as the tenant's exclusive resource pool, and other tenants cannot use the cloud environment.
Prerequisite
After a cloud environment is allocated to a tenant, the virtual machine in the cloud environment cannot be allocated to other tenants.
Precautions:
The cloud environment has been added successfully.
Steps:
Step 1.Use the admin account to log in to the system management interface of SCP and navigate to Hybrid Cloud > Third-Party Public Cloud > Cloud Environment.
Step 2.Select a cloud environment, click More > Allocate, select the tenant’s name to be assigned to, and then complete the assignment of the cloud environment.
Function Description:
After a cloud environment is assigned to a tenant, the platform administrator can deallocate it.
Prerequisite
After the cloud environment is de-allocated, the tenant will not be able to use the cloud environment.
Precautions:
The cloud environment has been successfully assigned to the tenant.
Steps:
Step 1.Use the admin account to log in to the system management interface of SCP and navigate to Hybrid Cloud > Third-Party Public Cloud > Cloud Environment.
Step 2.Select a cloud environment, click More > Deallocate, and confirm to complete the cloud environment deallocate.
Function Description:
After a cloud environment is added to the platform, platform administrators can delete it.
Prerequisite
After the cloud environment is deleted, all cloud resources synchronized to the local cloud environment will be cleared, and cloud resources will not be affected.
Precautions:
None.
Steps:
Step 1.Use the admin account to log in to the system management interface of SCP and navigate to Hybrid Cloud > Third-Party Public Cloud > Cloud Environment.
Step 2.Select a cloud environment, click Delete, and delete the cloud environment after confirming.

 {{ $t('index.defaultHeader.chromeBrowserTip') }}