{{ secondMenu.name }}


Function Description:
• The user used the traditional physical architecture but wants to virtualize the business now. On HCI, a few businesses, such as GIS, required graphics card support. Now they need to be virtualized together. Therefore, the virtualization platform needs to support the configuration of graphics cards.
• Users have large-scale applications that require graphics card support, and the use of GPU resources will encounter idle waste and inflexible allocation. It would be better to use the GPU flexibly, allocate on demand and share the resources.
• When the graphics card resources of the platform are allocated, used, and adjusted, they need to be visualized so that the administrator can better manage the graphics card resources.
Prerequisite:
Precautions:
Steps:
HCI environment deployment:
In terms of hardware, plug in the graphics card on the server, and pay attention to the power supply line of the graphics card so that the graphics card will work (the power of the graphics card is high, and there is a special power supply line).
In terms of software, the platform detects whether the hardware has a graphics card during the installation of HCI on the server or whether a cluster is plugged in with a graphics card. The interface will automatically display whether to enable IOMMU, and you may select Enable (the host needs to restart to take effect after it is enabled).
Function Description:
Deploy the NVIDIA vGPU license server to provide licenses for 3D vGPU virtual machines. To use vGPU, you need to grant NVIDIA's license key. Otherwise, the performance of vGPU will not be able to play out. The licensing server is a virtual machine template installed on the HCI platform and used as a virtual machine. Fill in the applied vGPU test license key on the licensing server, and then fill in the IP of the licensing server on the graphics card driver of the virtual machine that needs to use vGPU. Then, the virtual machine can use the vGPU.
Prerequisite
None.
Precautions:
Download the license server image.
Steps:
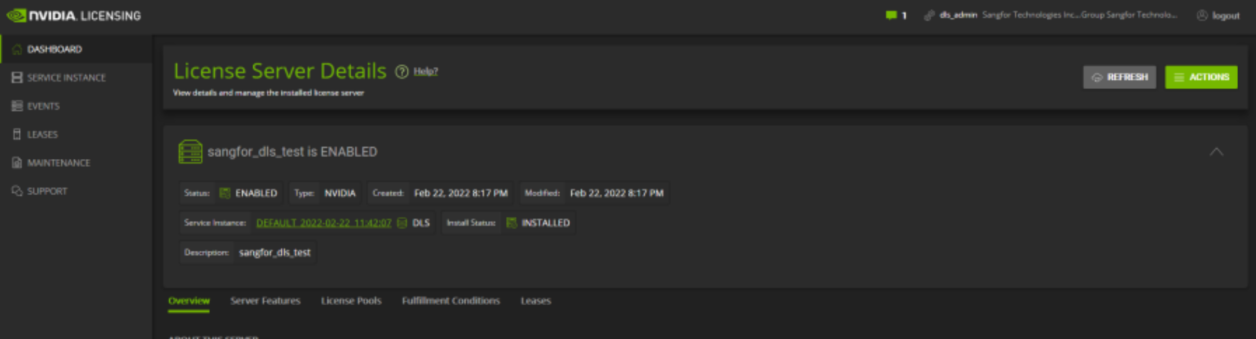
Step 1.Log in to the SCP platform, click Compute > Virtual Machines > New > Import Virtual Machine, and select the NVIDIA licensing server vma image to import.

Step 2.Enter the page for importing virtual machine, and a page for importing virtual machine files from local will pop up. Configure the following parameters: Resource Pool, File Type, File, Select Group, Run Location, Storage Tag, and NIC. 
Step 3.Click Specify IP to configure the IP address of the licensing server, and click OK.

Step 4.After clicking Import, it will start the import process.
Step 5.After the import is complete, enter the virtual machine console interface and log in. Enter dls_system in the following interface and press Enter.
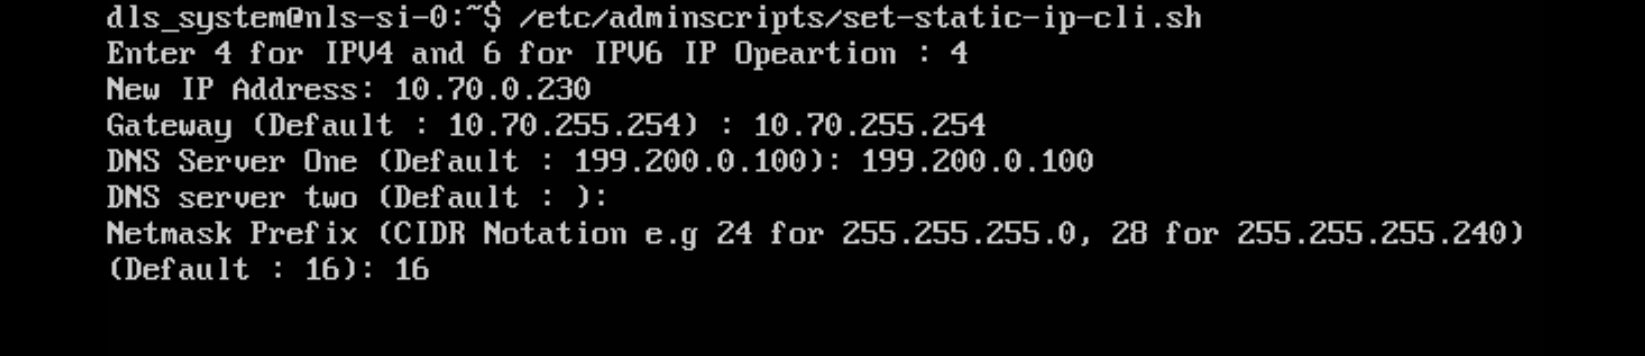
Step 6.Execute /etc/adminscripts/set-static-ip-cli.sh to set a static IP, as shown in the following figure.
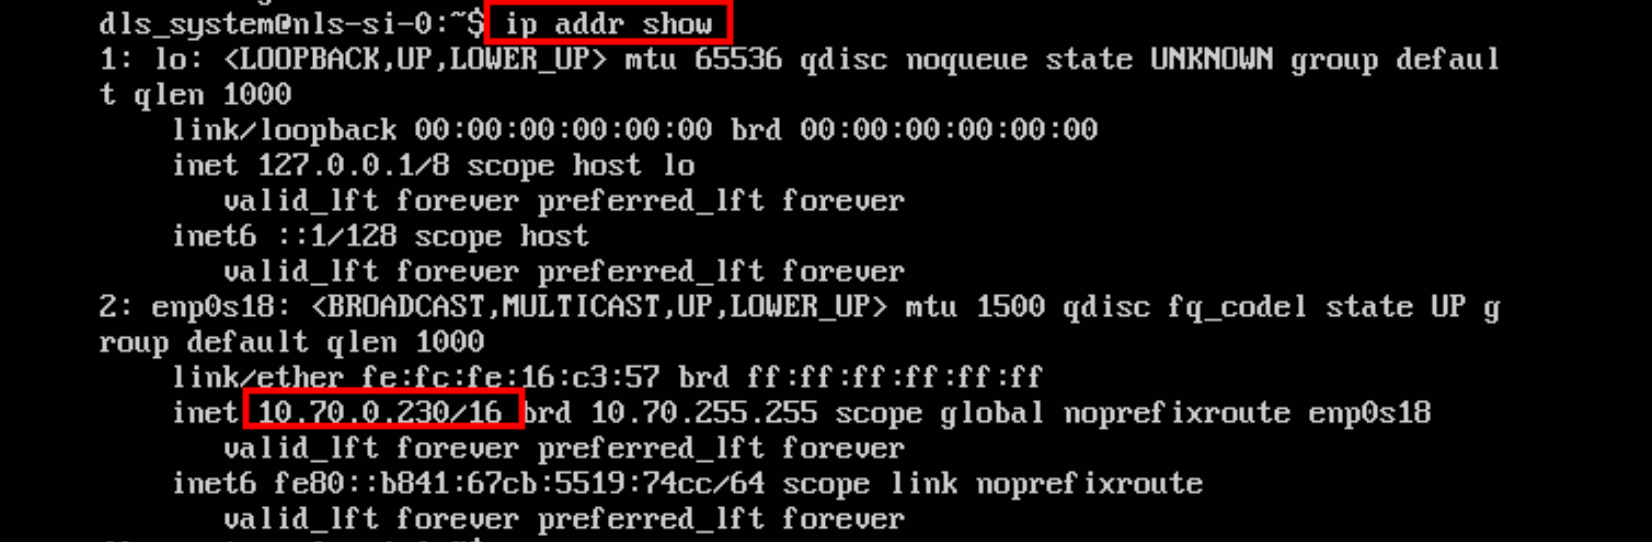
Step 7.Execute ip addr show to confirm that the IP takes effect.
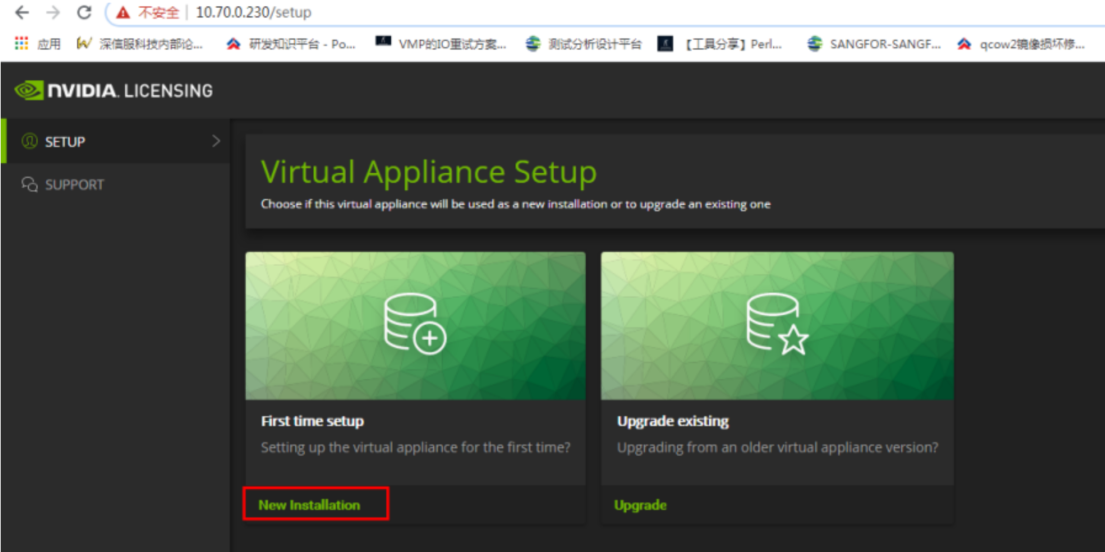
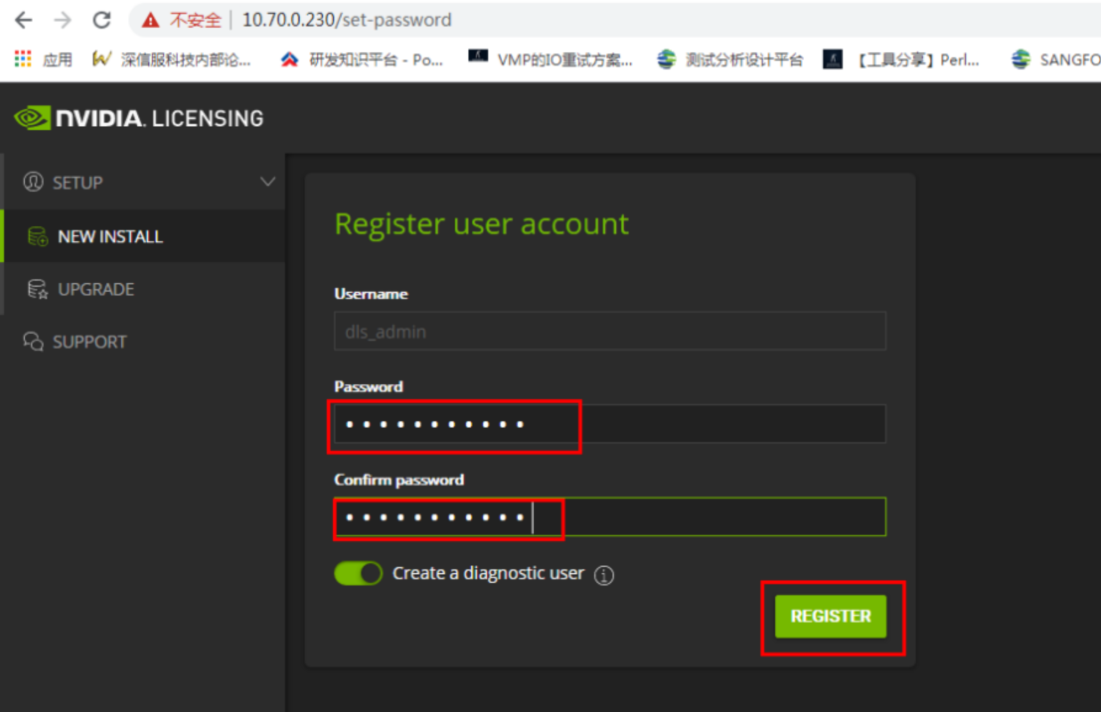
Step 8.Enter the fixed IP in the browser (as above, directly enter 10.70.0.230) to access the licensing server web page, and select New Installation.
Step 9.Enter the password to be set and click REGISTER to register an account.
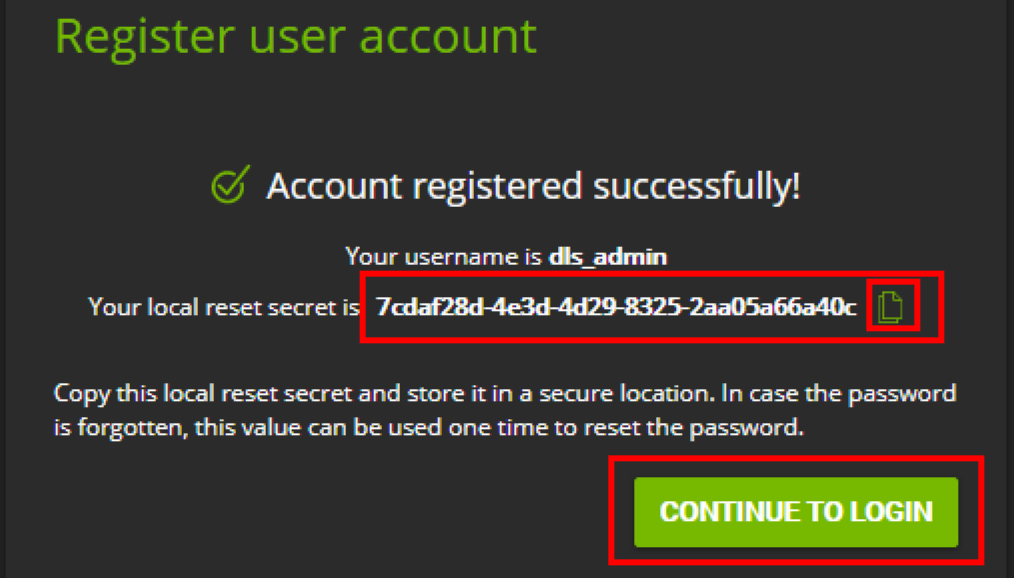
Step 10.Save the string in the figure to a local file. This string can reset the password. Click CONTINUE TO LOGIN.
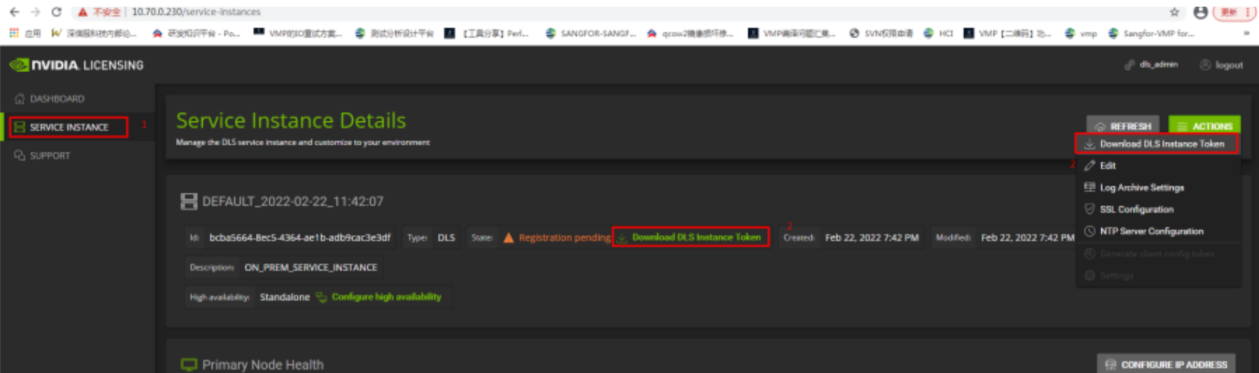
Step 11.Select SERVICE INSTANCE, click Download DLS Instance Token, and download the DLS instance Token file. If you need to test authorization, pass the file to Sangfor technical service to obtain the authorization file.
Step 12.After obtaining the licensing file, click SELECT LICENSE SERVER FILE to upload the file.
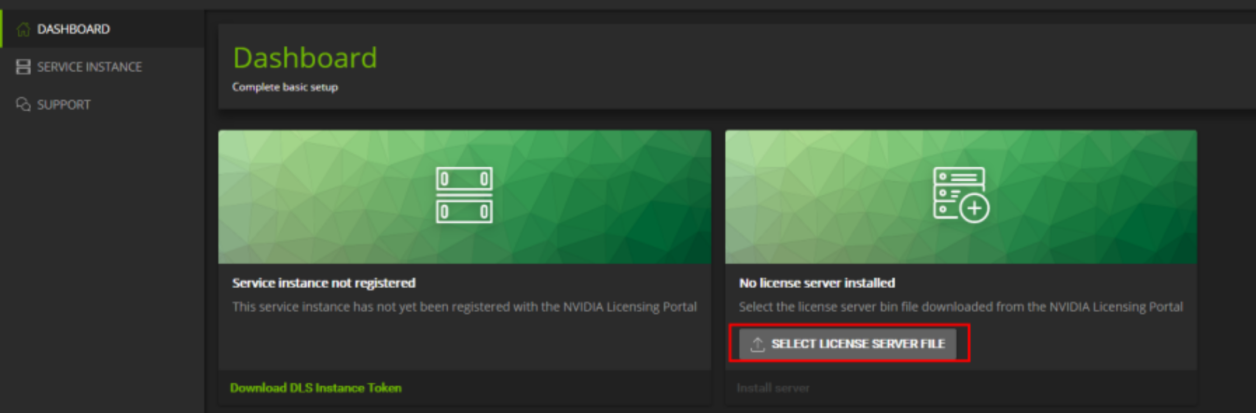
Step 13.Click Install server to configure the authorization service.

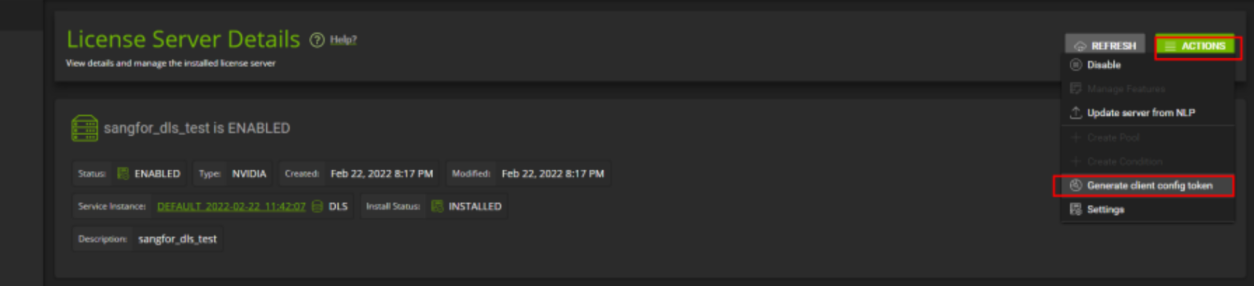
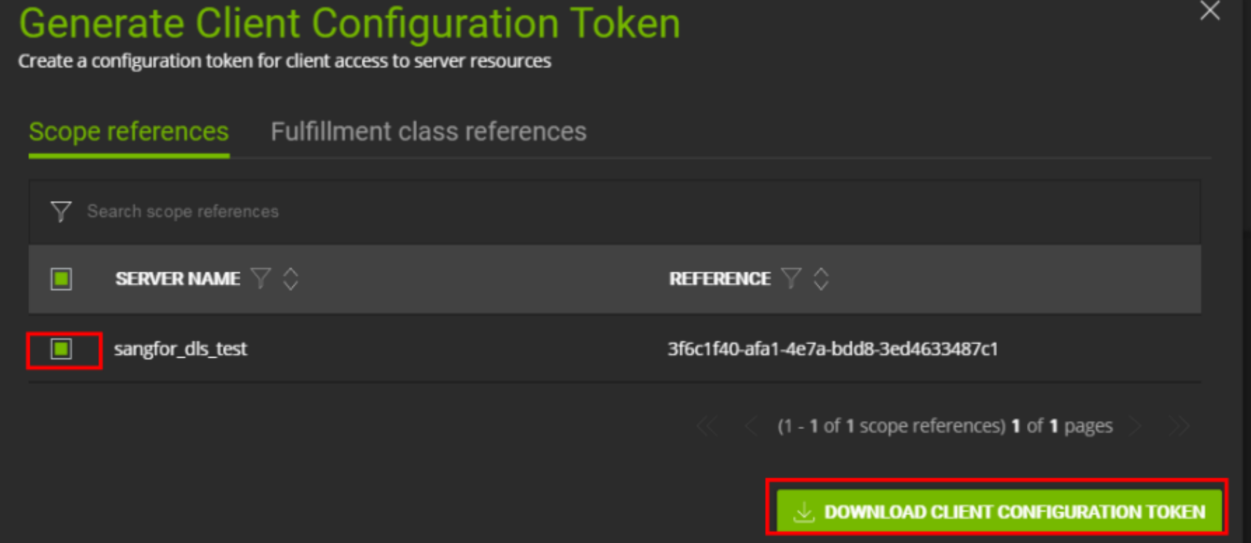
Step 14.Download the client config token to authorize the GPU virtual machine.
Function Description:
The graphics card core of the server can be configured to passthrough mode or to specify the segmentation type automatically or manually. By default, the system automatically configures the segmentation type. Supports splitting graphics cards into Q-series or C-series vGPUs.
The Q-Series is a virtual workstation for creative and technical professionals who need the performance and functionality of Quadro technology.
The C-Series is suitable for compute-intensive server jobs such as artificial intelligence (AI), deep learning, or high-performance computing (HPC).
Prerequisite
1. For passthrough graphics cards, it will default to passthrough mode. For graphics cards that support vGPU, it will default to automatic mode. You can adjust the split mode according to the test needs.
2. It supports the direct connection of 2 graphics cards to one virtual machine, of which T4 and 2080Ti can support up to 8 graphics cards, and does not support assigning multiple vGPUs to one virtual machine.
3. The vGPU versions 10.2 and 13.2 are supported. The compatibility list of related software can be found on the NVIDIA official website. For fresh installation or upgrade to HCI6.8.0, you need to re-import the GRID driver and restart the node to take effect.
4. Virtual machines on HCI that have graphics cards assigned do not support live migration.
5. In the vGPU scenario, the video memory resources of the graphics card are allocated and exclusive. The computing resources of the graphics card will be scheduled according to the scheduler. This version supports three schedulers: Best Effort (preemption), Equal Share (equal share), and Fixed Share (fixed ratio).
Best Effort: When a multiple VM runs on the graphics card, it will preempt computing resources according to the workload.
Equal Share: When multiple VM runs on the graphics card, the computing resources will be equally divided.
Fixed Share (fixed ratio): When a multi-virtual machine runs on the graphics card, computing resources will be allocated according to the proportion of video memory configured by the virtual machine.
6. A single server is prohibited from using two different types of graphics cards. Different nodes in the same cluster can support different types of GPUs.
7. When two graphics cards, A and B, are inserted into the two adjacent PCI slots, and the core of graphics card B is damaged, graphics card B will be recognized as that of graphics card A. Therefore, please replace the damaged graphics card in time.
Precautions:
When adjusting the graphics card split mode, the virtual machine that occupies the graphics card resources needs to be shut down.
Steps:
Step 1.Click Compute > GPU. In the GPU window, you can view the overview of graphics card usage, resource pool overview, and tenant overview.
Step 2.Click the number of graphics cards corresponding to the number of Graphics Cards to view the graphics card information on each node in the resource pool.
Step 3.Click the Edit button on the right side of the target graphics card to edit the graphics card:
• The name of the graphics card to be edited.
• How to use the graphics card: You can choose straight-through or split. When the use mode is "Segmented", if the graphics card has multiple cores, it supports splitting the video memory size according to different cores.
• Choose whether to enable video memory ECC: Turning on can improve the running stability of the GPU
• Select the split method, which can be split into Q series or C series vGPU
• Select GPU computing scheduler
Step 4.Click OK, you can see the configuration information of the graphics card on the interface.
Function Description:
Add graphics card hardware to the virtual machine to transform it into a 3D virtual machine, improving the support for scenes with high image processing requirements.
Prerequisite
1. After the graphics card is added to the virtual machine that is powered on, it will take effect after restarting.
2. Only Windows 10 and Windows 2016 can view the 3D virtual machine desktop through the virtual machine console. Other Windows operating system versions do not currently support viewing in the virtual machine console. Therefore, when installing the graphics card driver, you need to access the virtual machine through the client or remote desktop. system. The 3D virtual machine desktop of the Linux system supports console viewing.
Precautions:
Pass-through graphics cards require the platform to have a graphics core locked in pass-through mode in order to be used.
Steps:
Step 1.Select the virtual machine to be configured, enter the edit virtual machine page, select Configuration and Network, and click Add Graphics Card.
Step 2.Select the model of the graphics card to be configured, and then click OK.
• Add a graphics card to the virtual machine.
• Select the direct or split mode for the graphics card.
• When there are multiple graphics cards on the host, select the graphics card model.
• Select the segmentation method that has been set for the graphics card.
• Display the video memory capacity in this split mode.
• Select the scheduler. When multiple graphics cards of the same model have different scheduler policies, the virtual machine will select the graphics card according to the scheduler policy.
Function Description:
After configuring a vGPU for a virtual machine, you need to install a graphics card driver on the virtual machine before the virtual machine can be used normally.
Prerequisite
None.
Precautions:
If the GPU graphics card hardware is compatible, the Windows system compatibility is subject to the NVIDIA official website.
Steps:
Step 1.Configure the corresponding IP address, subnet mask, gateway and other information for the Windows virtual machine.
Step 2.Install the corresponding version of the graphics card driver for the template virtual machine, run the installer, and select the default installation all the way. After installation, restart the virtual machine.
Step 3.In the device manager, you can check whether the driver is installed successfully, as shown in the figure below.
Step 4.Right-click on the desktop and select NVIDIA Control Panel. Configure the licensing server IP and port in the NVIDIA control panel.
![]()
After the configuration, confirm that the virtual machine can successfully obtain the authorization. Otherwise, it means that there is a problem with the deployment and needs to be checked, and the screen will not be black because the authorization is not obtained.
Function Description:
After configuring a vGPU for a virtual machine, you need to install a graphics card driver on the virtual machine before the virtual machine can be used normally.
Prerequisite
None.
Precautions:
If the GPU graphics card hardware is compatible, the Linux system compatibility is subject to the NVIDIA official website.
Steps:
Step 1.Configure the corresponding IP address, subnet mask, gateway and other information for the Linux virtual machine.
Step 2.Disable the nouveau driver. nouveau is an open source NVIDIA driver that may interfere with subsequent driver installations. The method of disabling is as follows.
blacklist nouveau
options nouveau modeset=0
blacklist nouveau
options nouveau modeset=0
Execute the command: $ sudo update-initramfs –u
dracut --force
reboot
Step 3.Close the X window. This can be done with the command: "init 3". (Not the only way)
Step 4.Install the driver.
• Copy the correct version of the vGPU driver runfile to the system. For example: the corresponding driver file in centOS is: NVIDIA-Linux-x86_64-390.75-grid.run In the following, this file is used as an example to explain.
• Modify the file permissions as super user and execute it. Note that the following parameters need to be added during execution.
sudo chmod +x NVIDIA-Linux-x86_64-390.75-grid.run
./NVIDIA-Linux-x86_64-390.75-grid.run -Z --no-opengl-files
• When the installation starts, a blue dialog box will be displayed. Follow the prompts to install, all options are selected by default. The specific process is shown in the figure below.

• Whether to install: Yes.

• Whether to automatically upgrade the X configuration file, NO.

• The installation is complete.
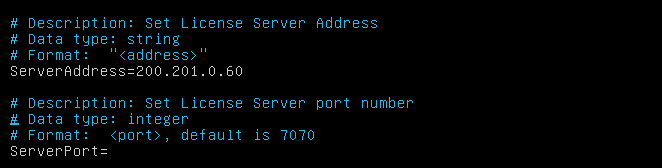
Step 5.Obtain authorization. Ubuntu recommends authorizing directly through the configuration file /etc/nvidia/gridd.conf (this file may not be available when you use it for the first time, but there will be a gridd.conf.template file in this directory, and you can copy a copy from this file directly. ). Here, fill in the ServerAddress item (you can also ignore ServerPort if it is not necessary).
![]()
After modification, restart the service: systemctl restart nvidia-gridd.
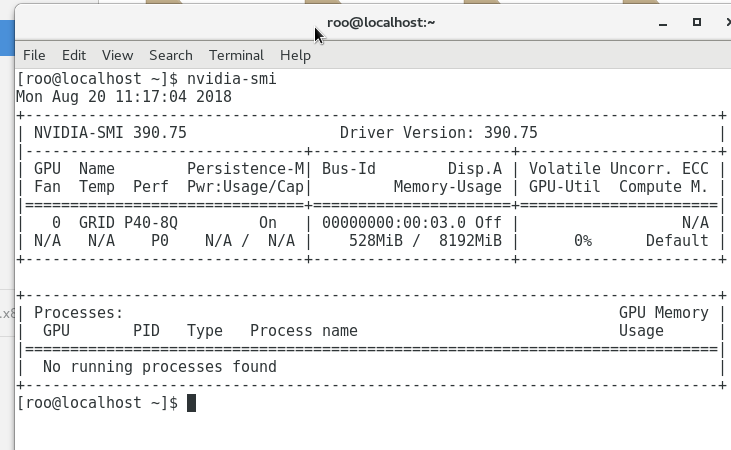
Step 6.During the testing, enter the command: init 5 to enter the graphical interface, and the display is normal. Open the command line and enter the command nvidia-smi to view the graphics card usage. It will display the graphics card model, driver model, resource usage, etc.
Function Description:
Modify the graphics card hardware for the virtual machine to flexibly adjust the use of the graphics card.
Prerequisite
After the graphics card type is changed in the power-on state, the virtual machine restarts to take effect.
Precautions:
None.
Steps:
Step 1.Enter the virtual machine interface, find the virtual machine whose graphics card type needs to be modified, and click More > Edit.
Step 2.Click the original graphics card, modify the graphics card model to the desired model, and then confirm.

 {{ $t('index.defaultHeader.chromeBrowserTip') }}