{{ secondMenu.name }}


Sangfor SCP supports docking with the Sangfor aDesk, manages aDesk resources in a unified way, realizes the DAAS of the aDesk platform, and provides aDesk services for multiple tenants.
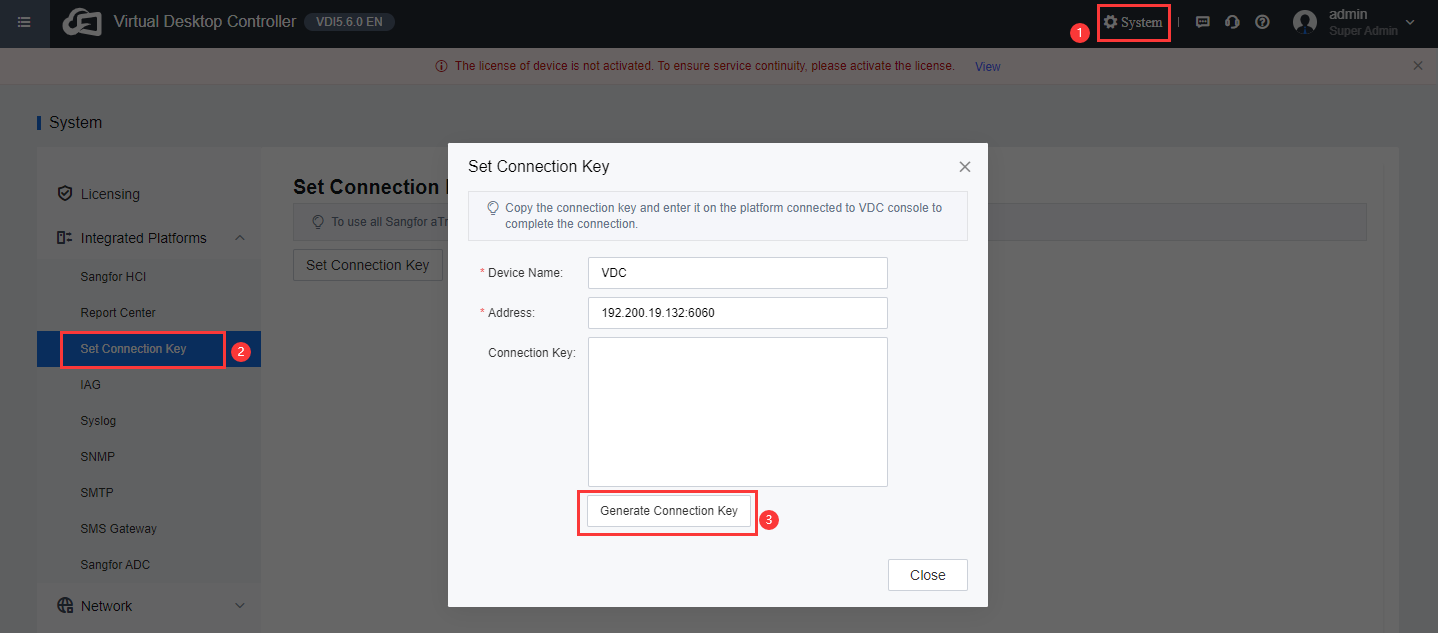
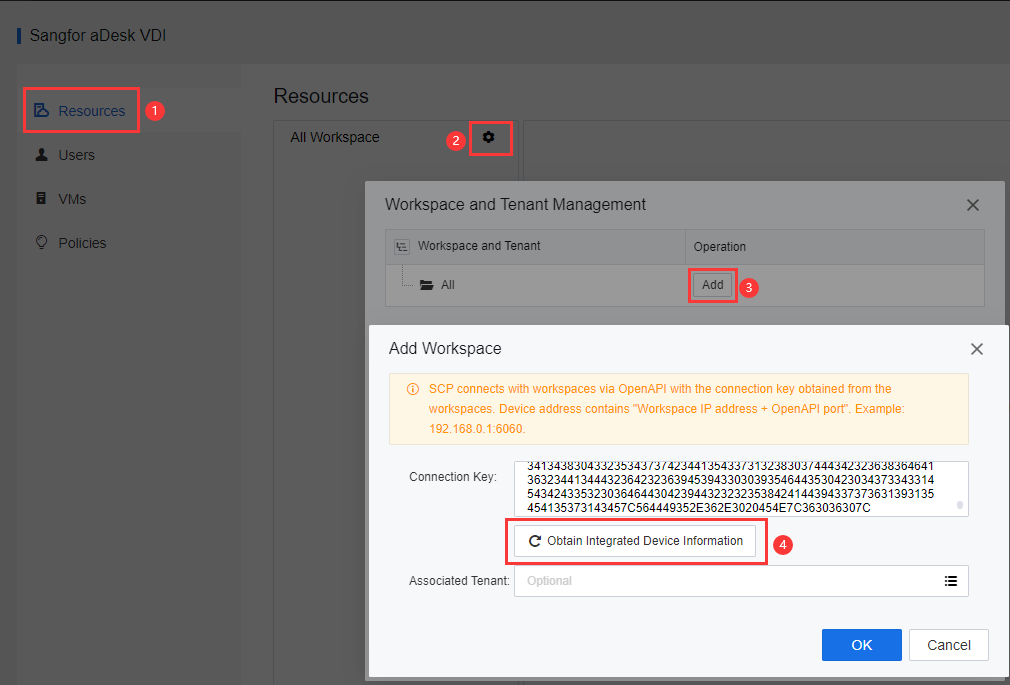
The SCP regards VDC as a workspace. A workspace on the SCP corresponds to a set of VDC clusters managed by the SCP. The SCP administrator can manage the corresponding VDC cluster in the workspace.
4.2.4.1.1Add a new workspace
Function Description:
Sangfor SCP cloud management platform realizes the connection and management of SCP and the corresponding VDC cluster by adding a new workspace.
Precautions:
None.
Prerequisite
SCP has activated the aDesk VDI service.
Steps
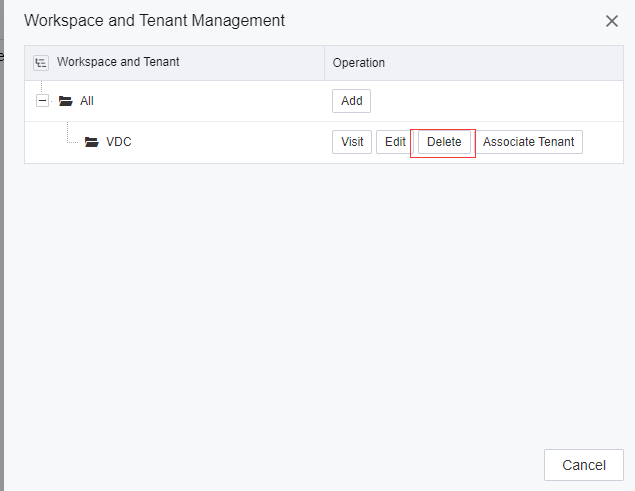
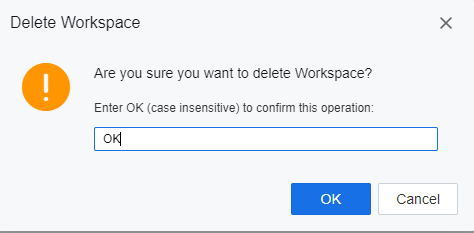
4.2.4.1.2Delete workspace
Function Description:
Sangfor SCP platform removes the association with the VDC cluster that is no longer used by deleting the workspace.
Precautions:
This operation will delete related data and cannot be recovered. Please operate with caution.
Prerequisite
None.
Steps:
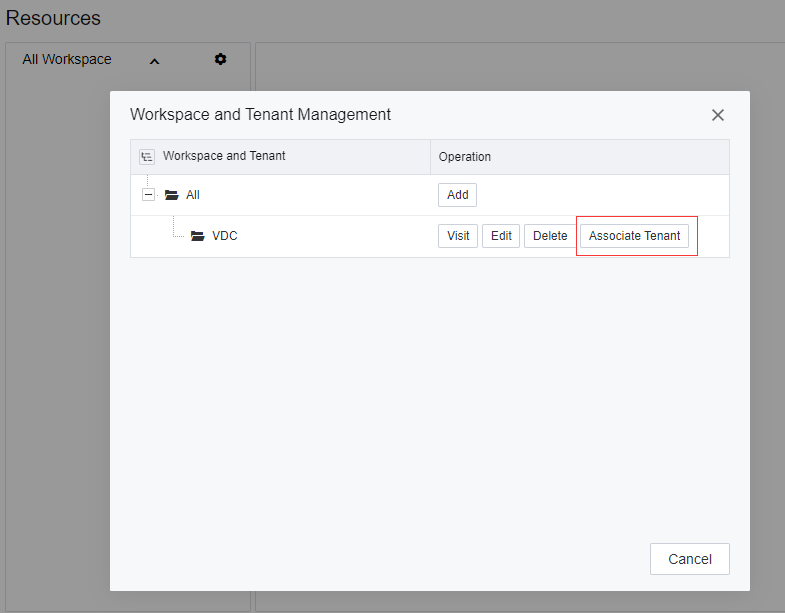
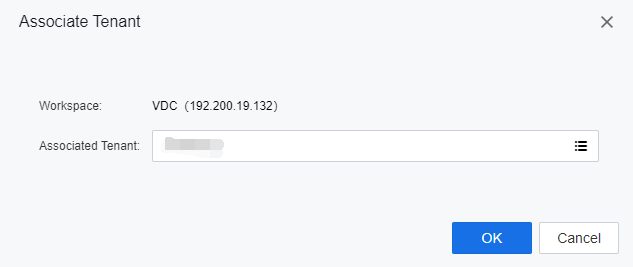
4.2.4.1.3Associate tenant
Function Description:
The Sangfor SCP platform authorizes tenants to use the corresponding VDC by associating tenants for the workspace.
Precautions
None.
Prerequisite
A workspace has been built in SCP.
Steps:
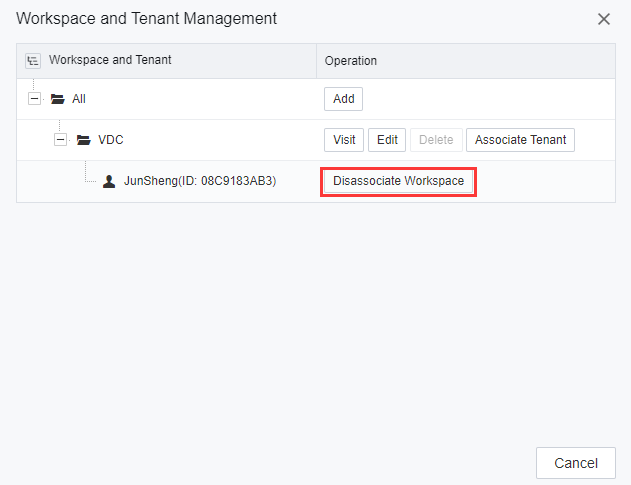
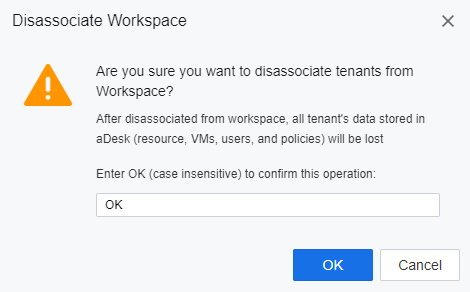
Function Description:
Sangfor SCP reclaims the tenant's permission to use VDI resources by disassociating related tenants under the workspace.
Precautions
This operation will delete related data and cannot be recovered. Please operate with caution.
Prerequisite
To disassociate a tenant, you must delete all tenant resources in the corresponding workspace.
Steps:
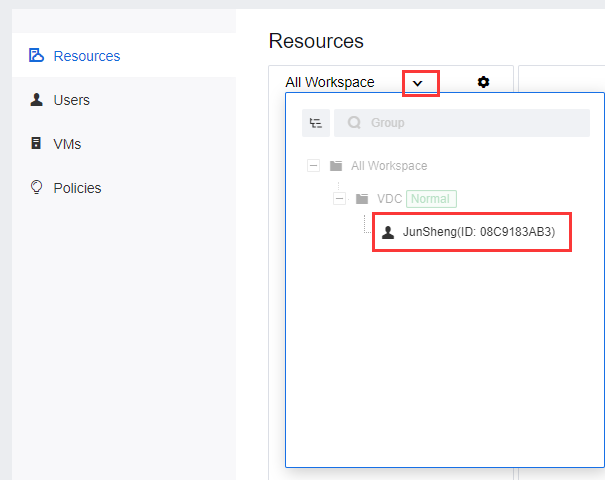
4.2.4.1.5Switch workspace tenant management
Function Description:
Sangfor SCP platform realizes the management of tenants' VDI resources under the workspace by selecting different tenants associated with the workspace.
Prerequisite
None.
Precautions:
None.
Steps:
Function Description:
Sangfor SCP cloud management platform supports the creation of Persistent, Nonpersistent, and Floating Pool VM for tenants in the corresponding workspace.
Prerequisite
Precautions:
None.
Steps:
| Parameters |
Description |
Remark |
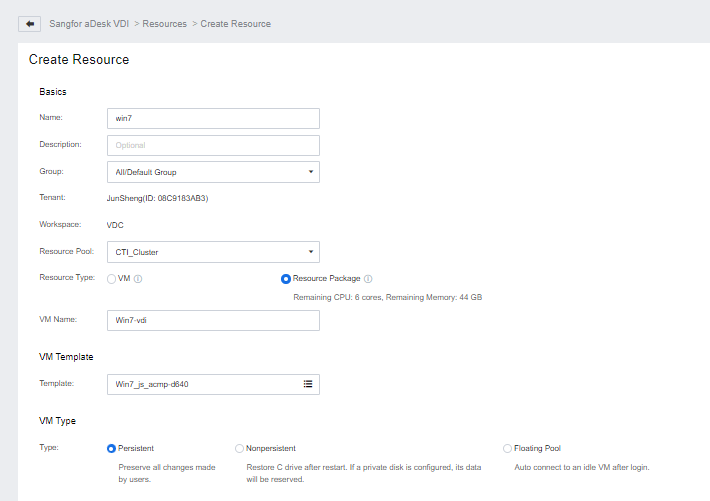
| Name |
Used to name the desktop resource, the filled-in text will be displayed in the resource list after the user successfully logs in. |
Compulsory |
| Description |
To note resource usage, type, etc. |
Optional |
| Group |
The resource can be assigned to the corresponding resource group and can be created manually. |
Default belongs to the default group. |
| Tenant |
Shows which tenant the current resource belongs to. |
Cannot be changed |
| Workspace |
Displays which workspace (VDC cluster) the current resource belongs to. |
Cannot be changed |
| Resource Pool |
Select which HCI cluster to create the desktop resource in the background. |
A resource can only select one HCI cluster. |
| Resource type |
Sets the type of tenant quota that this resource consumes when creating virtual desktops. Virtual Machine: Select the SCP built-in fixed virtual machine specifications (CPU, memory) configuration to create a virtual machine, and consume the quota of the number of virtual machines corresponding to the specification of the VDI allocated by SCP to the tenant. Resource package: Administrators can customize virtual machine specifications to create virtual machines and consume the virtual machine resource package quota allocated by SCP to tenants. |
|
| VM Name |
Specify the computer name prefix of the virtual desktop. The platform will automatically add the corresponding four-digit number after the name prefix according to the number of derived virtual desktops. It is recommended to add -, such as "demo-" to the first derived virtual desktop. The computer's name is "demo-0001". |
- |
| Template |
Select the template on the HCI as the derived virtual desktop. When the virtual desktop is derived, the template must be disabled. |
- |
| VM work mode |
Persistent: After the desktop restarts, all user data is preserved. Non-Persistent: Restore the C drive after a restart. If a private disk is configured, its data will be reserved. Floating Pool: Auto connect to an idle VM after login. |
Adjust according to needs. |
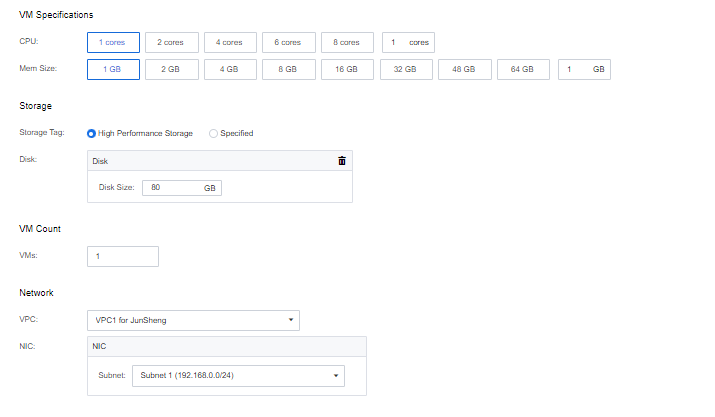
| VM Specifications |
To configure the CPU and memory hardware configuration of the derived virtual desktop. |
|
| Storage Tag |
To set the storage type of virtual desktop storage. The selectable items are related to the storage authorization obtained by the tenant. |
|
| Disk |
Set the capacity of the virtual desktop personal disk. |
|
| VM Count |
Set the number of virtual desktops that need to be derived. |
|
| VPC |
Set which VPC the resource virtual desktop belongs to. |
|
| NIC |
Set which virtual switch in the tenant VPC the resource virtual desktop is connected to. |
|
Function Description:
Sangfor SCP cloud management platform's existing VDI (desktop) resources can add new virtual desktops when tenants have a remaining quota.
Prerequisite
None.
Precautions:
Steps:
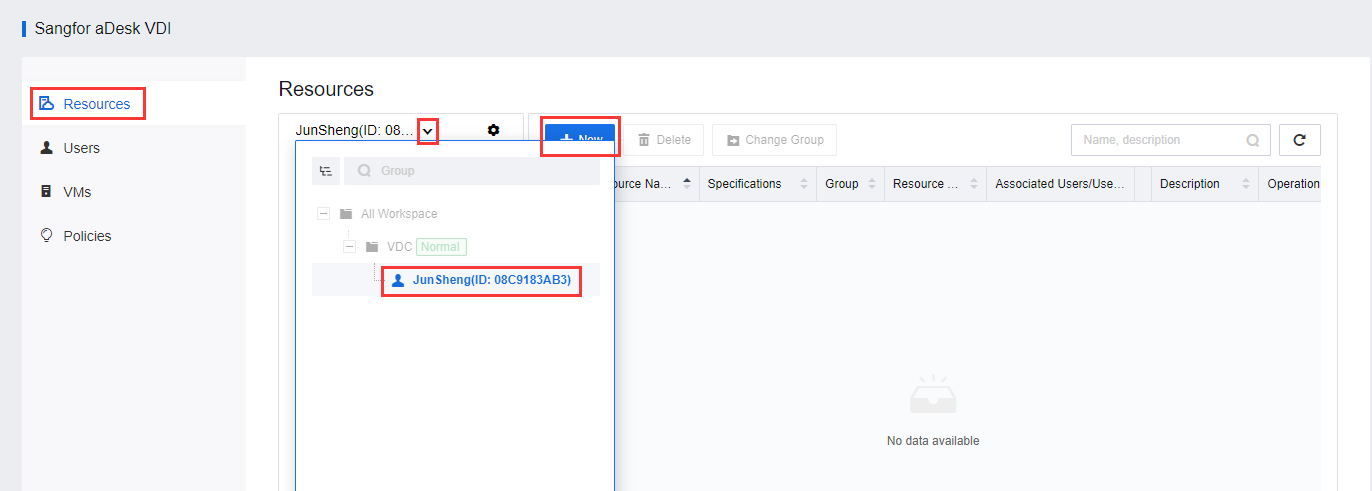
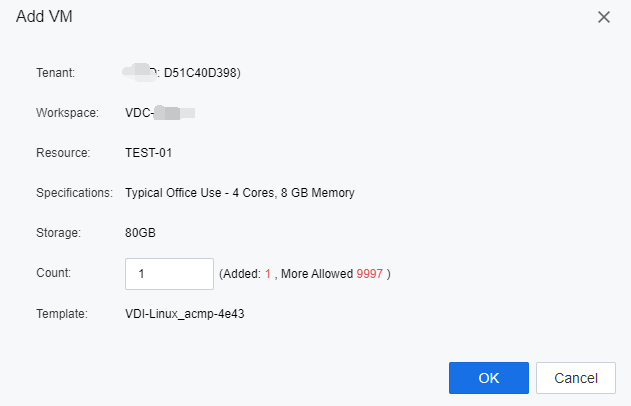
Step 1.Log in to the SCP platform as admin, select Compute > aDesk VDI > Resource, click the drop-down arrow, select the tenant under the workspace to be managed in the drop-down menu that appears, and enter the corresponding tenant resource management page.
Step 2.Click Add corresponding to the virtual machine resource that needs to add virtual desktops, enter the number to be added in the pop-up Add VM window, and click OK. 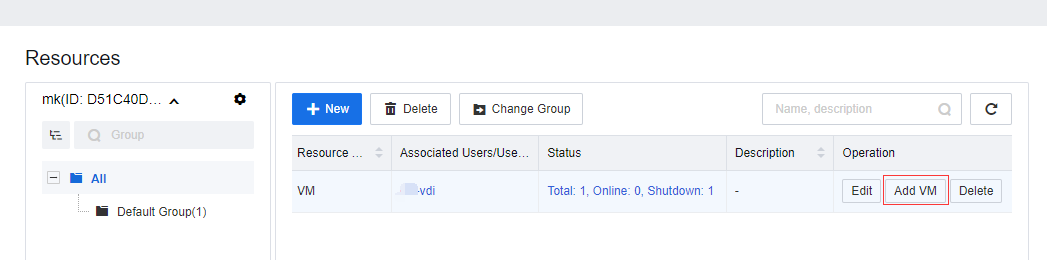
4.2.4.2.3Delete VDI resources
Function Description:
When the existing VDI resources of the Sangfor SCP cloud management platform are no longer in use, the relevant resources can be deleted to release the resource quota of the corresponding tenant.
Prerequisite
This operation will delete relevant data and cannot be restored. Please proceed with caution.
Precautions:
The tenant has created virtual machine resources on the SCP.
Steps:
Step 1.Log in to the SCP platform as admin, select Compute > aDesk VDI > Resource, click the drop-down arrow, select the tenant under the workspace to be managed in the drop-down menu that appears, and enter the corresponding tenant resource management page.
Step 2.Click Delete corresponding to the virtual machine resource to be deleted, enter OK in the pop-up Delete Resource window, and click OK. 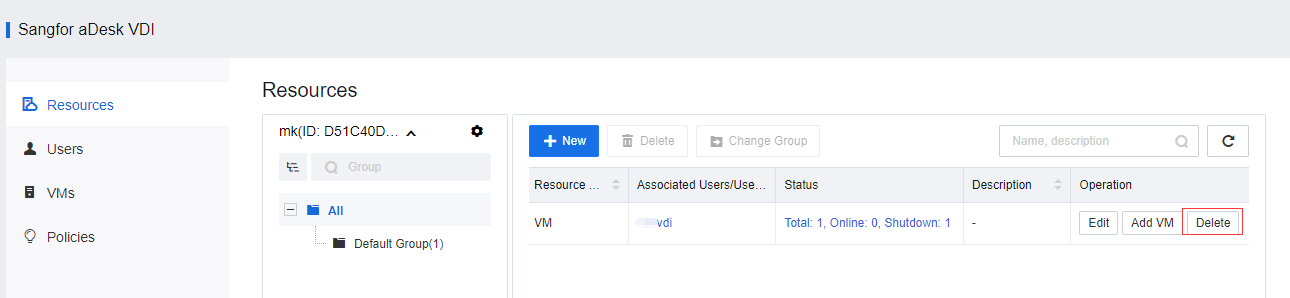
4.2.4.3.1Create and manage user groups
Function Description:
Group users during initial deployment or add user groups later.
Prerequisites:
None.
Precautions:
None.
Steps:
Step 1.Log in to the SCP platform as admin, select Compute > aDesk VDI > Users, click the drop-down arrow, select the tenant under the workspace to be managed from the drop-down menu that appears, and enter the user management page of the corresponding tenant.
Step 2.Click the drop-down arrow corresponding to the location where the user group needs to be created in the user group list on the left side of the user management page, and click New Group in the drop-down menu. 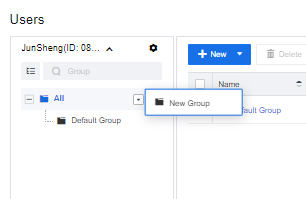
First-level user group creation 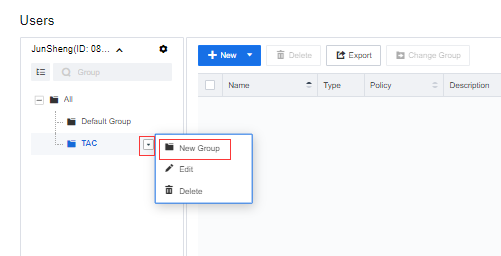
Subordinate user group creation
![]()
User groups are divided into first-level user groups and lower-level user groups. The user groups created under the All item are first-level user groups, and those created under the first-level user groups are lower-level user groups.
Step 3.On the New Group page, as shown in the figure below, fill in the corresponding information as required.
The first-level user group creation window: 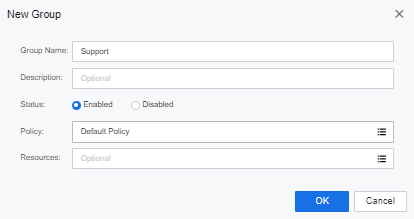
Subordinate user group creation window: 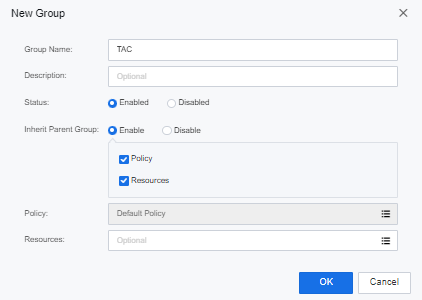
| Parameters |
Description |
| Group Name |
Name that identifies the VDI user group and must be filled in. |
| Description |
You can optionally fill in the relevant description information of the user group. |
| Status |
Check Enable to activate this user group; check Disable to disable this user group. The platform is enabled by default. |
| Inherit Parent Group |
Only lower-level user groups can set whether to inherit policies and resources associated with upper-level user groups. Policy: Checked by default. After checking, this user group inherits the policy associated with the upper-level user group. It can no longer configure the policy independently (the associated policy option below is grayed out). After unchecking, it can be associated with the different upper-level user groups. Resources: Checked by default. After checking, the users in this user group automatically have the virtual desktop resource of the upper-level user group. After unchecking, the users in this user group only have the virtual desktop resource associated with this user group. |
| Policy |
A user group can be bound to the corresponding policy group so that users in the user group can use the corresponding policy, and a policy group must be associated with it. |
| Resources |
The optional configuration specifies the virtual desktop resources the user group can use. |
Function Description:
Modify the policies and resources associated with existing user groups.
Prerequisites:
None.
Precautions:
None.
Steps:
Step 1.Log in to the SCP platform as admin, select Compute> aDesk VDI > Users, click the drop-down arrow, select the tenant under the workspace to be managed from the drop-down menu that appears, and enter the user management page of the corresponding tenant.
Step 2.Click the drop-down arrow corresponding to the user group to be edited in the user group list on the left side of the user management page, and click Edit in the drop-down menu.
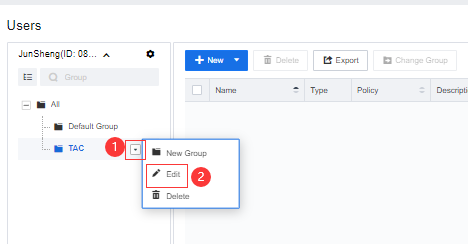
Step 3.The Edit Group window is shown in the figure below, and its content is the same as the newly added user group. You can modify the corresponding information as required. For specific item descriptions, please refer to the newly created user group.
Function Description:
Delete unused user groups.
Prerequisite
None.
Precautions:
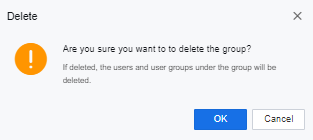
Deleting a user group will delete all users and subgroups under this group and cannot be restored. You need to confirm that there is no need to retain users or subgroups.
Steps:
Step 1.Log in to the SCP platform as admin, select Compute> aDesk VDI > Users, click the drop-down arrow, select the tenant under the workspace to be managed from the drop-down menu that appears, and enter the user management page of the corresponding tenant.
Step 2.Click the drop-down arrow corresponding to the user group to be deleted in the user group list on the left side of the user management page, click Delete in the drop-down menu, and click OK in the pop-up Delete window. 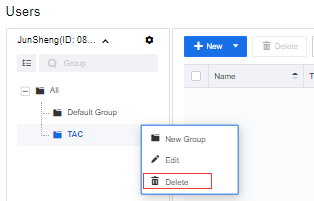
4.2.4.3.2User creation and management
Function Description:
Create local users during the initial deployment or add new users later.
Prerequisite
None.
Precautions:
None.
Steps:
Step 1.Log in to the SCP platform as admin, select Compute > aDesk VDI > Users, click the drop-down arrow, select the tenant under the workspace to be managed from the drop-down menu that appears, and enter the user management page of the corresponding tenant.
Step 2.Select the user group to be created in the user group list on the left side of the user management page, click New, and select Create User. 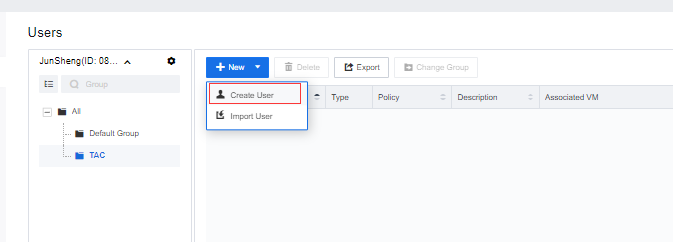
Step 3.In the pop-up Create User window, fill in the relevant information of the user account and click OK. 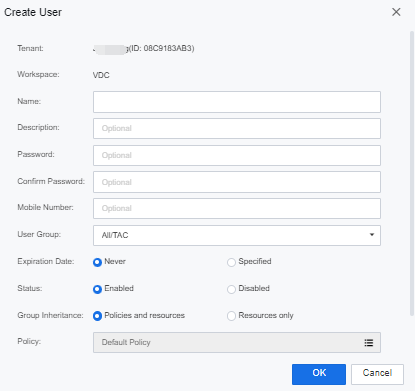
| Parameters |
Description |
| Tenant |
Unmodifiable, automatically displayed by the system to indicate which tenant the currently created account belongs to. |
| Workspace |
Unmodifiable, the system automatically displays it to indicate which workspace (VDC) the currently created account belongs to |
| Name |
The account used by the VDI user to log in to the cloud desktop. |
| Description |
You can optionally fill in the relevant description information of the user. |
| Password. |
It is used to set the password of the VDI login account. |
| Confirm Password |
Password for reconfirming the VDI login account. |
| Mobile Number |
Fill in the user's mobile phone number. |
| User Group |
Set which user group the user belongs to. |
| Expiration Date |
Including Never Expires and Specified. 1. If Never expires is selected, the user can always use it. 2. If Specified is selected, then select the date in the following box. If this time is reached, the user will be disabled. |
| Status |
Can choose Enabled or Disabled. 1. If Enable is selected, the account can be used normally; 2. If Disable is selected, the account is disabled and cannot be used. |
| Group Inheritance |
Set the user group association policy and resource mode the user inherits. Policies and Resources: This option is selected by default. The user inherits the policies and resources associated with the user group to which he belongs and can no longer configure the policies individually (the associated policy option below is grayed out) but can associate with other virtual desktops resource. Resources only: After selecting this option, this user will only inherit the resources associated with the user group to which he belongs, and the associated policy needs to be set in the associated policy. |
| Policy |
Users can be bound to corresponding policy groups so that users in the user group can use corresponding policies. |
| Resources |
Optional configuration to specify the virtual desktop resources available to this user. |
Function Description:
For scenarios where users need to be created in batches, SCP supports batch creation of users by importing from a CSV file.
Prerequisite
None.
Precautions:
None.
Steps:
Step 1.Log in to the SCP platform as admin, select Compute > aDesk VDI > Users, click the drop-down arrow, select the tenant under the workspace to be managed from the drop-down menu that appears, and enter the user management page of the corresponding tenant.
Step 2.Select the user group to be created in the user group list on the left side of the user management page, click New, and select Import User. 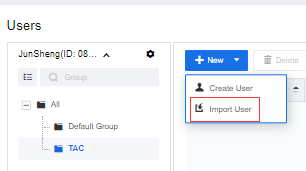
Step 3.In the pop-up Import User window, select the CSV file where the user account information is configured. After setting the conflict handling rules, follow the guidance and click Next until it is complete.
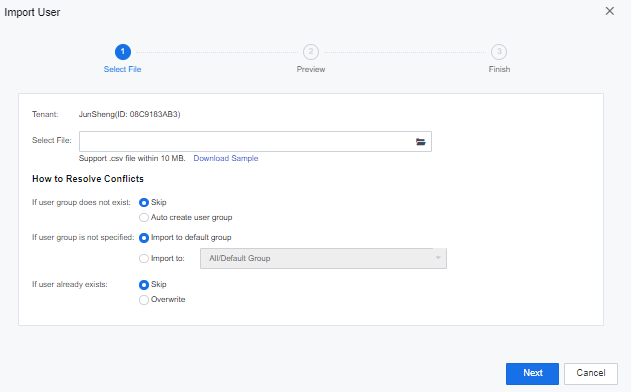
The description of each function of conflict handling rules is shown in the following table:
| Conflict Scenario |
Description |
| If the user group does not exist. |
Set the processing rules for the user group to which the user set in the CSV file belongs when the workspace corresponding to the SCP tenant does not exist. You can choose one of the following two processing methods. Skip: The default option. SCP will skip this user and not import it. Auto create user group: SCP will automatically create a new user group with the same name in the workspace of the corresponding tenant for related users to import. |
| If user group is not specified |
To set the processing rules of SCP for the user accounts of the specified user group in the CSV file, you can choose one of the following two processing methods: Import to default group: the default option. SCP will import all user accounts in the CSV file that does not specify the user group to which they belong to the default user group. Import to: The administrator needs to specify the target user group to be imported into. SCP will import all user accounts in the CSV file that does not specify the user group to which they belong to the specified user group. |
| If user already exist |
To set the processing rules for the user account with the CSV file that already exists in the tenant's workspace on the SCP. You can choose one of the following two processing methods: Skip: The default option. SCP will skip this user and not import it. Overwrite: SCP will overwrite the existing account with the same name in SCP with the user information recorded in the CSV file. |
![]()
You can import user accounts in batches through CSV files and support the import of Username, Added to Group, Password, Mobile Number, and Description, where Username is a required item, others are optional. Click the Download Sample to download the sample CSV file format.
Function Description:
Modify the attributes of existing users.
Prerequisite
None.
Precautions:
None.
Steps:
Step 1.Log in to the SCP platform as admin, select Compute > aDesk VDI > Users, click the drop-down arrow, select the tenant under the workspace to be managed from the drop-down menu that appears, and enter the user management page of the corresponding tenant.
Step 2.Select the user account to be edited and click Edit. 
Step 3.The Edit User window is shown in the figure below, and its content is the same as that of the newly added user (excluding setting passwords). You can modify the corresponding information according to your needs. For specific item descriptions, please refer to Create New User. 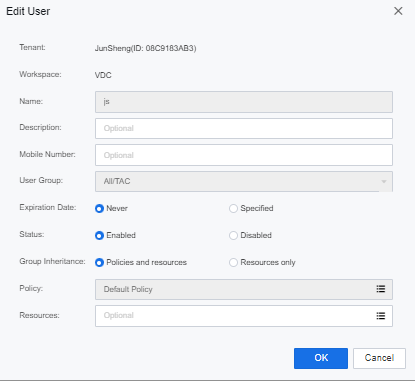
Function Description:
When a VDI user forgets his password, the administrator can reset it on the SCP.
Prerequisite
None.
Precautions:
None.
Steps:
Step 1.Log in to the SCP platform as admin, select Compute > aDesk VDI > Users, click the drop-down arrow, select the tenant under the workspace to be managed from the drop-down menu that appears, and enter the user management page of the corresponding tenant.
Step 2.Select the user account to be edited and click Reset Password. 
Step 3.Enter OK in the pop-up window and click OK to confirm the password that needs reset.
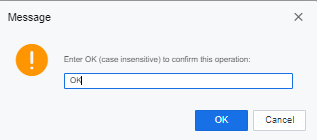
Step 4.In the Reset Password window, enter the user's new password after resetting and click OK. 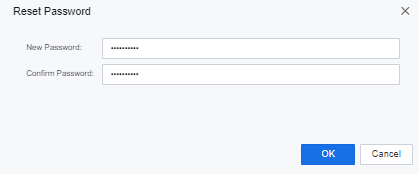
Function Description:
Export the user information of the tenant in the corresponding workspace on the SCP for the administrator's statistical use.
Prerequisite
None.
Precautions:
None.
Steps:
Step 1.Log in to the SCP platform as admin, select Compute > aDesk VDI > Users, click the drop-down arrow, select the tenant under the workspace to be managed from the drop-down menu that appears, and enter the user management page of the corresponding tenant.
Step 2.Click Export, select the range of user groups to be exported in the pop-up Export Users window, and click OK to export and download the user information under the corresponding user group as a CSV file to the local. 
Step 3.The Export User Groups window is shown below. 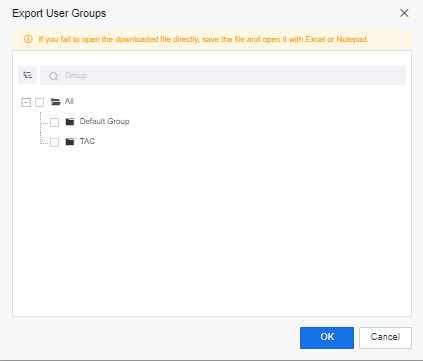
Function Description:
Delete users that are no longer in use.
Prerequisite
None.
Precautions:
None.
Steps:
Step 1.Log in to the SCP platform as admin, select Compute > aDesk VDI > Users, click the drop-down arrow, select the tenant under the workspace to be managed from the drop-down menu that appears, and enter the user management page of the corresponding tenant.
Step 2.Select the user accounts to be deleted, click Delete, and click OK in the pop-up Delete User/User Group window. 
4.2.4.4.1VM password recovery
Function Description:
Applicable to scenarios where virtual machine passwords need to be recovered.
Prerequisite
None.
Precautions:
User credentials related to passwords may be lost. For example, NTFS encrypted files will be lost.
Steps:
Step 1.Log in to the SCP platform as admin, select Compute > aDesk VDI > VMs, click the drop-down arrow, select the tenant under the workspace to be managed from the drop-down menu that appears, and enter the VMs management page of the corresponding tenant.
Step 2.Find the virtual machine whose password needs reset, click the corresponding … button in the virtual machine entry, and select Reset Password. 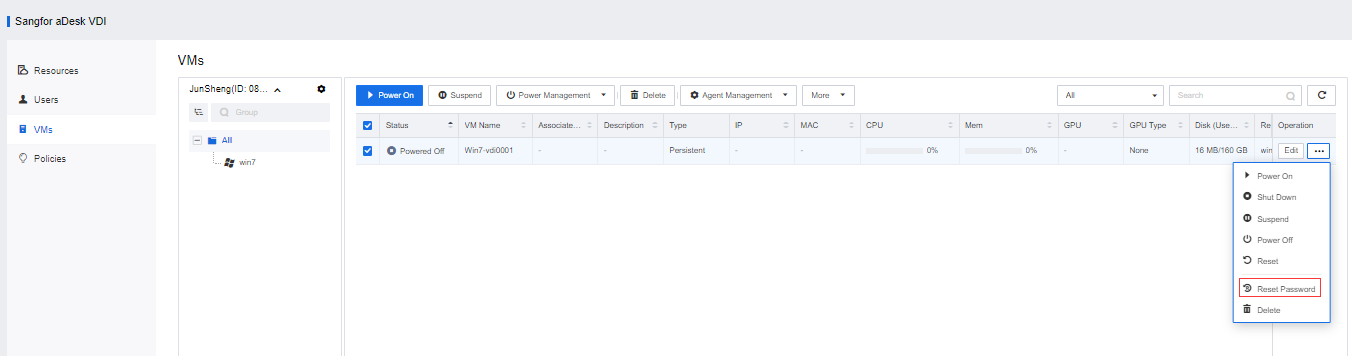
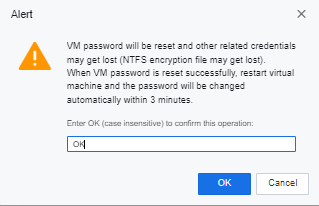
Step 3.At this point, the system will display the following alarm. After understanding the risks in detail, enter OK, and then click OK.
Step 4.The system will pop up a reset password input box. After the administrator enters the Windows login user name and password corresponding to the reset virtual machine, the user restarts the virtual machine to take effect. 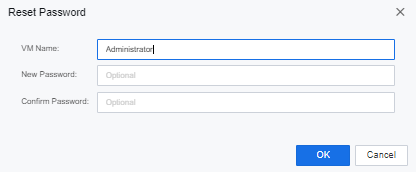
4.2.4.4.2Modify VM computer name
Function Description:
It is suitable for scenarios where the computer name of the virtual machine needs to be modified or user-defined.
Prerequisite
None.
Precautions:
The credential information related to the password may be lost, such as NTFS encrypted files will be lost.
Steps:
Step 1.Log in to the SCP platform as admin, select Compute > aDesk VDI > VMs, click the drop-down arrow, select the tenant under the workspace to be managed from the drop-down menu that appears, and enter the VM management page of the corresponding tenant.
Step 2.Find the virtual machine whose computer name needs to be modified, and click the Edit button in the corresponding virtual machine entry. 
Step 3.In the pop-up Edit Virtual Machine window, under the Basic tab, select one of the following three methods to modify:
• Computer name specified by admin: Fill in the new name.
• Specified by user: The user can modify it in the virtual machine.
• Same as username: After the virtual machine is associated with the user, it will be automatically changed to the user account name
Step 4.Check Restart VM now (new IP address and computer name take effect after the VM restarts) checkbox, and click OK to restart the virtual machine immediately to take effect of the modified configuration. 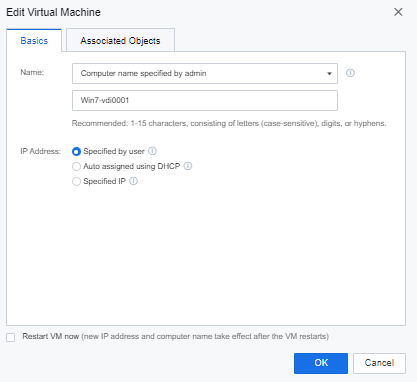
4.2.4.4.3Virtual machine binding user
Function Description:
It is suitable for scenarios where virtual machines and users need to be manually bound.
Prerequisite
None.
Precautions:
After the bound user of the virtual machine is changed, the original bound user cannot log in to the virtual machine.
Steps:
Step 1.Log in to the SCP platform as admin, select Compute > aDesk VDI > VMs, click the drop-down arrow, select the tenant under the workspace to be managed from the drop-down menu that appears, and enter the VM management page of the corresponding tenant.
Step 2.Find the virtual machine whose computer name needs to be modified, and click the Edit button in the corresponding virtual machine entry. 
Step 3.In the pop-up Edit Virtual Machine window, under the Associated Objects tab, under Associated User, select Associated User and select the user to be bound. 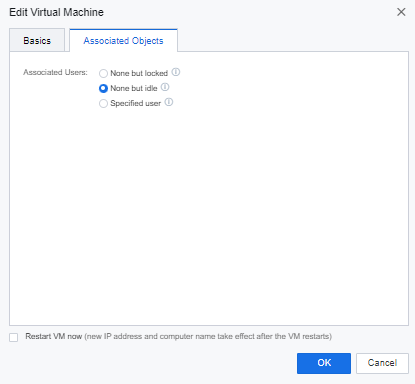
Step 4.Check Restart VM now (new IP address and computer name take effect after the VM restarts) checkbox and click OK to restart the virtual machine immediately to take effect of the modified configuration. 
4.2.4.4.4Specify the IP address of the virtual machine
Function Description:
It applies to scenarios where a single IP address of a virtual machine needs to be specified or modified.
Prerequisite
None.
Precautions:
None.
Steps:
Step 1.Log in to the SCP platform as admin, select Compute > aDesk VDI > VMs, click the drop-down arrow, select the tenant under the workspace to be managed from the drop-down menu that appears, and enter the virtual machine management page of the corresponding tenant;
Step 2.Find the virtual machine whose computer name needs to be modified, and click the Edit button in the corresponding virtual machine entry.
Step 3.In the pop-up Edit Virtual machine window, under the Basic tab > IP Address, select Specify IP, and modify the IP address, subnet mask, and other information. 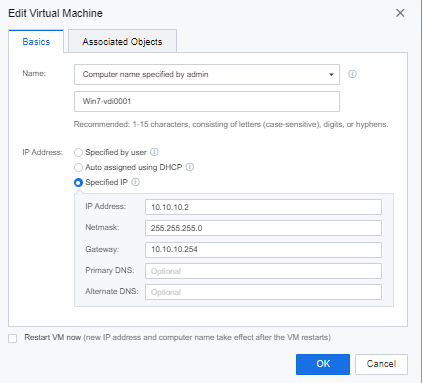
Step 4.Check Restart VM now (new IP address and computer name take effect after the VM restarts) and click OK to restart the virtual machine immediately to take effect of the modified configuration.
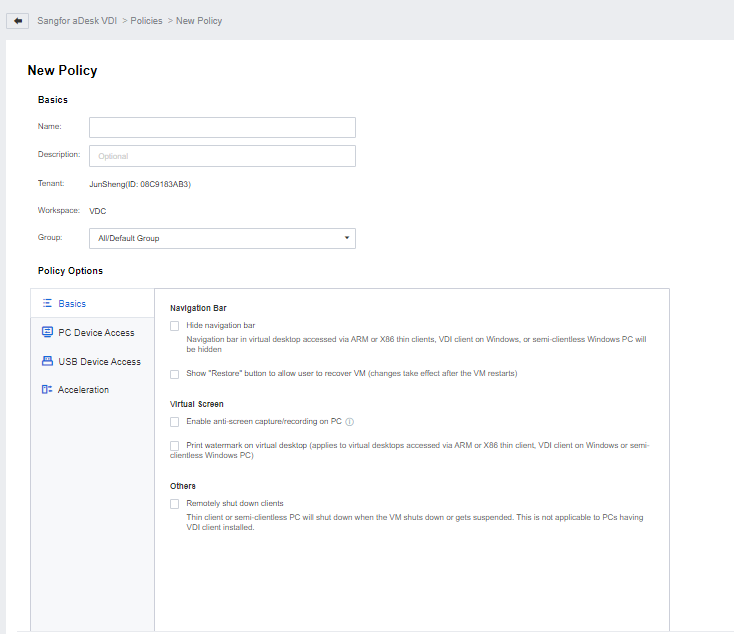
4.2.4.5.1Create Policies
Function Description:
Sangfor SCP cloud management platform requires administrators to manage the platform, and the platform has a built-in super administrator admin. Super administrators can create three administrator roles: system administrator, security administrator, and audit administrator, assign different permissions to manage the cluster, and assist super administrators in managing the SCP platform.
Prerequisite
1. Only one policy group can be associated with the same user/user group;
2. The associated policy group must be configured on the user management and user/user group property pages.
Precautions:
None.
Steps:
Step 1.Log in to the SCP platform as admin, select Compute > aDesk VDI > Policies, click the drop-down arrow, select the tenant under the workspace to be managed from the drop-down menu that appears, and enter the policy management page of the corresponding tenant.
Step 2.2. Click New, fill in the policy-related information as needed on the pop-up New Policy page, and configure each policy. 
4.2.4.5.2Basic Configuration
Function Description:
In the case of using a thin terminal or a PC all-in-one terminal, if you want to operate in the same way as the local PC and do not need additional control functions, you can enable the hidden navigation bar so that the top of the desktop does not display the navigation bar after accessing the virtual desktop.
Prerequisite
None.
Precautions:
Suppose the integration of shutdown is selected, and the Hide navigation bar is not selected. In that case, the navigation bar on the user's desktop does not provide the functions of windowing, minimizing, and closing windows. Other functions, such as restarting, restoring, and locking the navigation bar are provided.
Steps:
Step 1.Log in to the SCP platform as admin, select Compute > aDesk VDI > Policies, click the drop-down arrow, select the tenant under the workspace to be managed from the drop-down menu that appears, and enter the policy management page of the corresponding tenant.
Step 2.To create or edit an existing policy, select Hide Navigation Bar in Navigation Bar on the Basics tab of the policy option. 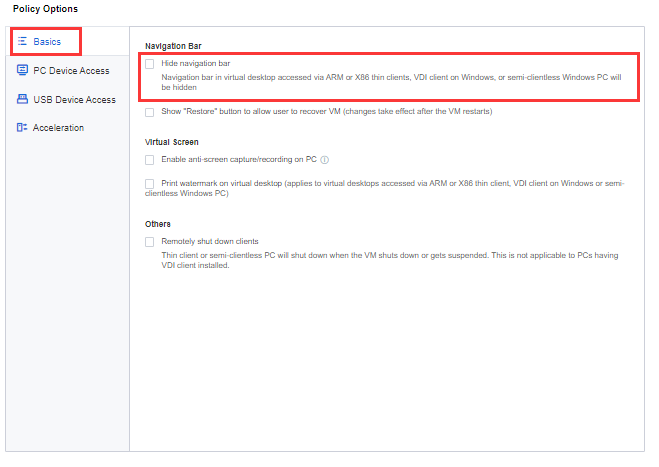
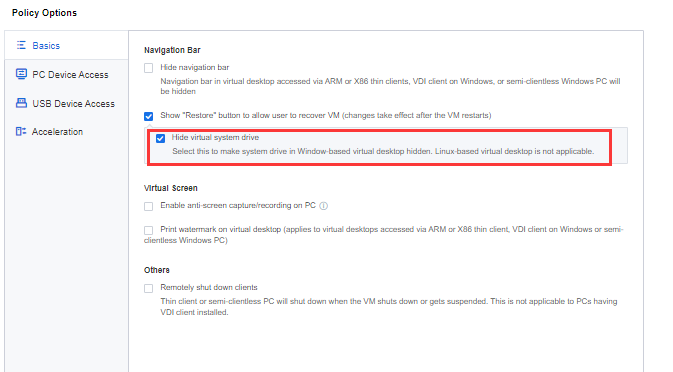
Function Description:
When an administrator configures an automatic snapshot policy for a virtual machine, before enabling the self-recovery snapshot function of users, the user can select a snapshot to perform a restore operation in the virtual machine navigation bar to quickly restore the desktop working state and solve the problem that cannot be solved by restarting.
Prerequisite
At least one snapshot of the user virtual machine already exists.
Precautions:
Steps:
Step 1.Log in to the SCP platform as admin, select Compute > aDesk VDI > Policies, click the drop-down arrow, select the tenant under the workspace to be managed from the drop-down menu that appears, and enter the policy management page of the corresponding tenant.
Step 2.To create or edit an existing policy, select Show "Restore" button to allow user to recover VM under the Basic > Navigation Bar. 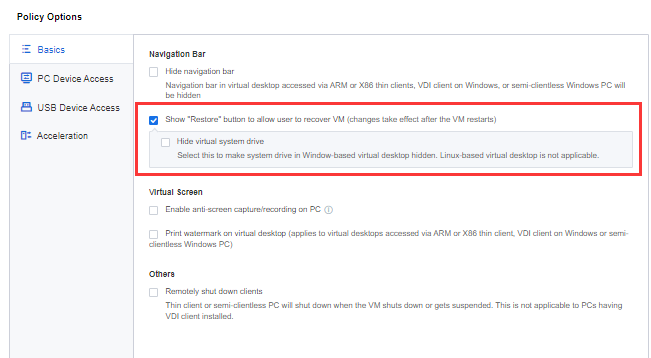
Step 3.After selecting Show "Restore" button to allow user to recover VM, you can further configure Hide virtual system drive to hide the system C drive to prevent users from actively writing personal data to the C drive-related directories to avoid this part of personal data from being lost when restoring snapshots.
Function Description:
For enterprise customers with high data security requirements, the PC anti-screenshot/anti-screen recording function can enable users to access virtual machines through VDI clients, preventing users from capturing virtual desktop images through PC local screen capture/screen recording software. Thereby obtaining confidential data on the virtual desktop.
Prerequisite
Only applicable on Windows endpoints.
Precautions:
1. Anti-screen recording only supports Win10 and Win11 PC terminals, other terminals are not supported.
2. After enabling the PC anti-screenshot/anti-screen recording function, non-win10/11 Windows PC client virtual desktops cannot be windowed and self-service functions cannot be used.
Steps:
Step 1.Log in to the SCP platform as admin, select Compute > aDesk VDI > Policies, click the drop-down arrow, select the tenant under the workspace to be managed from the drop-down menu that appears, and enter the policy management page of the corresponding tenant;
Step 2.To create a new or edit an existing policy, in the Virtual Screen Configuration on the Basics tab, select Enable anti-screen capture/recording on PC. 
Function Description:
For some enterprises or institutions, internal data leakage may bring huge losses. Enable a screen watermark to display information such as user name and IP address on the user's virtual machine. When the user uses the VDI desktop, the screen capture/photograph will be accompanied by a watermark, thereby preventing users from taking screenshots/photographs of intranet data, reducing the risk of data leakage, ensure data security.
Prerequisite
None.
Precautions:
1. The screen watermark supports PC clients, ARM thin terminals, X86 thin terminals, and Windows PC-integrated client access but does not support mobile terminals.
2. The custom location of the screen watermark is not supported at the moment. Therefore, the screenshot and screen recording tools used locally in the virtual machine do not include the watermark.
3. Modifying the configuration related to the screen watermark on the VDC requires the client user to log out and log in again to take effect (there is no need to restart the VM).
4. If Show virtual machine IP address and Show time on virtual machine are configured, the watermark content will be refreshed once a minute without flickering.
Steps:
1. Log in to the SCP platform as admin, select Compute > aDesk VDI > Policies, click the drop-down arrow, select the tenant under the workspace to be managed from the drop-down menu that appears, and enter the policy management page of the corresponding tenant.
2. Under the virtual screen section of the Basic Configuration tab of the Policy Options, select the Print watermark on virtual desktop and set relevant parameters for the watermark display. 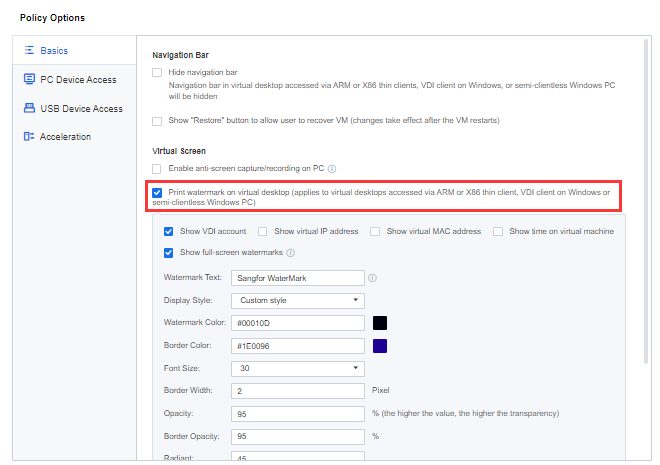
• Optional watermark content: Display VDI account, display virtual machine IP address, display virtual machine MAC address, display virtual machine time, and display full-screen watermark.
• Custom watermark content: Text is supported only and cannot exceed 46 characters (a Chinese or English character occupies width of one character, and so is a space).
• Display style: You can choose one of the four styles that come with the system or a custom style. Only after you choose a custom style can you modify the watermark content color, font size, border color, etc.
• Opacity: The higher the opacity value, the more transparent it is. The same is true for the transparency of the watermark border.
4.2.4.5.3Shutdown integration
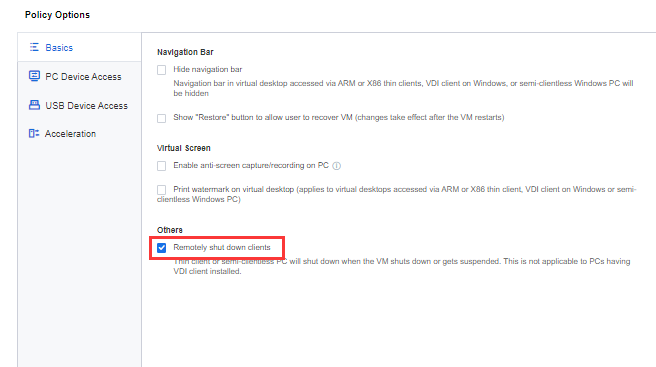
Function Description:
To shut down the thin client and the PC VDI client that accesses the cloud desktop. After the shutdown integration is enabled, the terminal can be shut down synchronously while the dedicated desktop is shut down. To achieve an experience similar to a physical PC, there is no need to shut down twice (one for the dedicated and one for the terminal), improving the product's usability.
Prerequisite
None.
Precautions:
This function only takes effect on dedicated desktop resources and does not take effect on remote applications, remote desktops, and shared desktop resources. PC client scenarios are not supported.
Steps:
Step 1.Log in to the SCP platform as admin, select Compute> aDesk VDI > Policies, click the drop-down arrow, select the tenant under the workspace to be managed from the drop-down menu that appears, and enter the policy management page of the corresponding tenant.
Step 2.To create a new or edit an existing policy, on the Basic tab of the policy option, select Remotely shut down clients under Others.
4.2.4.5.4PC Device Access
Function Description:
Users can use this configuration to set whether to allow the PC clipboard, PC hard drive, PC CD/DVD drive, serial port redirection, and parallel port redirection.
Prerequisite
None.
Precautions:
The PC clipboard currently only supports using Windows and Linux clients to access Windows virtual desktops but not Linux clients or Windows clients to access Linux virtual machines.
Steps:
Step 1.Log in to the SCP platform as admin, select Compute> aDesk VDI > Policies, click the drop-down arrow, select the tenant under the workspace to be managed from the drop-down menu that appears, and enter the policy management page of the corresponding tenant.
Step 2.Create or edit an existing policy. On the PC Device Access tab of the policy option, configure Allow PC Clipboard, PC Hard Drive, PC CD/DVD drive, Serial port redirection, and Parallel Port Redirection as required.
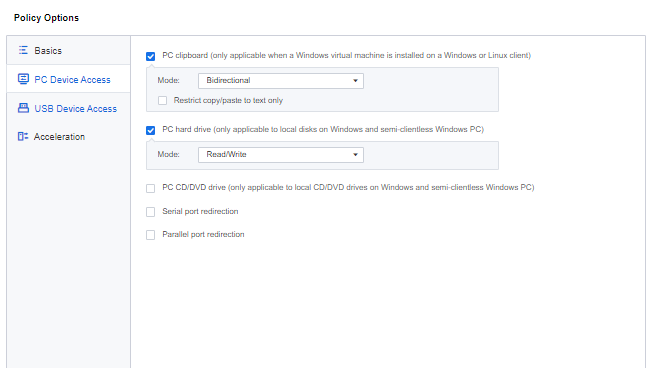
• PC clipboard: Enabling the client clipboard function, and you can choose from Bidirectional, Guest to host, Host to guest three options. If the PC clipboard is not selected, the client clipboard function is not enabled. At this time, users corresponding to the group policy will not be able to use this function.
• Restrict copy/paste to text only: Only text can be copied between the client and the virtual desktop through the clipboard, not files.
• PC hard drive: The client's local disk is mapped to the virtual machine if selected. There are two options: Read/Write and Read-Only. If the PC hard drive is not selected, the client's local disk cannot be mapped to the virtual machine.
• PC CD/DVD drive: The client's local CD-ROM is mapped to the virtual machine if selected. There are two options: Read/Write Mode and Read-Only Mode. Unchecking the PC CD/DVD drive means that the client's local CD-ROM drive cannot map to the virtual machine.
• Serial port redirection, Parallel port redirection: It refers to redirecting the serial port and parallel port of the PC to the virtual machine so that the user can use the serial port and parallel port devices (such as printers, plotters, scanners, other serial port, and parallel port interface devices) plugged into the PC on the virtual machine. Like using on PC. The virtual machine can use serial and parallel devices if selected. It is not allowed to use if not selected.
A. When creating a new policy group, the serial port number and parallel port number mapped to the virtual machine are bound to the PC serial port number and parallel port number, which is the same as those of the PC, for example:
• The local serial port number of the PC is COM3, and the serial port number of the virtual machine is also COM3.
• The parallel slogan of the PC is LPT3, and the virtual machine's parallel slogan is LPT3.
B. When using the default policy group:
• The local serial port of the PC is COM3, and the serial port of the virtual machine is COM2;
• The local parallel port of the PC is LPT3, and the parallel port of the virtual machine is LPT3.
C. Instructions for use and precautions:
• The local PC and virtual machine must install the same corresponding driver. The virtual machine's serial/parallel port settings need to be consistent with the local PC, and the peripherals can be used(the picture shows the printer).
• In the device manager of the PC, check whether the PC's local serial/parallel device state is normal.
• Check the serial port/parallel port device redirection is successful in the device manager of the virtual machine.
• The third-party software has exclusive access to the COM port and does not support multiple software using one COM port simultaneously.
• Repeated printer driver installation will cause driver confusion, so you need to uninstall and reinstall the driver.
4.2.4.5.5USB Device Access
Function Description:
Set whether the virtual machine can use a certain type of USB device and perform special processing on a certain USB device in the exception list during the mapping process. The device permission control in the exception list has a higher priority than the permission control configured on the upper-layer page.
Prerequisite
None.
Precautions:
None.
Steps:
Step 1.Log in to the SCP platform as admin, select Compute> aDesk VDI > Policies, click the drop-down arrow, select the tenant under the workspace to be managed from the drop-down menu that appears, and enter the policy management page of the corresponding tenant;
Step 2.Create or edit an existing policy. Under the USB Device Access tab of the policy option, set allow USB Storage device, USB CD/DVD Drive, USB Printer, USB smart card, USB audio device, USB video device, and Others. 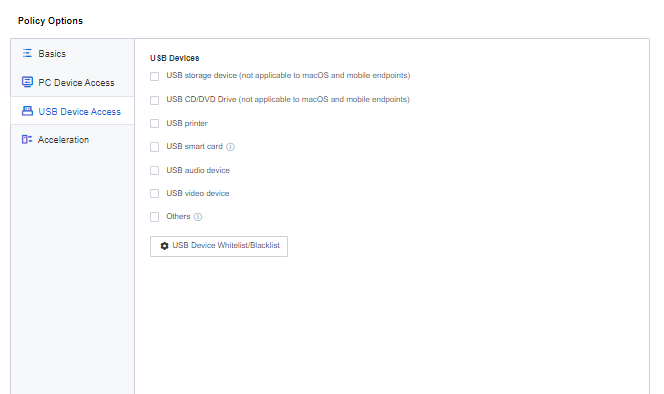
• USB storage device: Check to enable the USB storage mapping function. There are two options: Read-Write Mode and Read-Only Mode. Checking Map USB storage device to hard drive means that the USB storage connected to the PC client will execute the disk mapping mode first. Unchecking the USB storage device means that the USB storage function is not enabled, and users corresponding to the group policy will not be able to use this function.
• Speed up USB storage devices: The USB storage device will not go through the USB channel mapping but will be mapped through the disk channel, equivalent to recognizing the USB device as a disk. In this case, the file reading and writing are faster, but the traffic consumption is higher.
• USB CD/DVD Drive: Check to enable USB CD/DVD drive function, only Read/Write mode. Checking Map USB CD/DVD drive to hard drive means that the USB CD/DVD connected to the PC client is given priority to execute the disk mapping mode. If USB CD/DVD Drive is not selected, the USB optical drive function is not enabled. At this time, users corresponding to the group policy will not be able to use this function.
• USB printer and USB smart card: If selected, it means that printer devices and smart cards using a USB interface are supported. If it is not selected, they are not allowed to be used.
• USB audio device and USB video devices: If selected, the audio and video devices using the USB interface are supported. If not selected, it is not allowed to use.
• Others: If selected, the devices using USB ports other than those listed above are supported. If not selected, it is not allowed to use.
• USB Device Whitelist/Blacklist: The system will perform special processing on the USB devices that meet the VID:PID in the exception list during the mapping process. The device permission control behavior in the whitelist (Reset, MpQuirks, Acc, Camera, Audio, UsbBan, drive mapping blacklist, Usb interrupt non-cached mode) takes precedence over the permission control configured on the upper page. For specific functions of the list, please refer to the configuration interface illustrate.
4.2.4.5.6Acceleration
Function Description:
For users who access through IPSEC VPN (wide area network private line), pure wide area network, and independent private line, the configuration of this function can improve the user's exclusive desktop experience.
Prerequisite
None.
Precautions:
1. The name of the WAN transmission optimization protocol is HEDC. The name of the LAN protocol is SRAP.
2. The maximum resolution in the virtual machine supports 2560*1600.
3. Win10 supports versions 1709, 1809, 1903, 1909, 2004, 21H1, and 21H2, and there may be software compatibility problems in lower versions. Ensure that the operating system patch package is the latest.
4. The installation of Agent has requirements for the operating system. The following operating systems support Agent installation (there is no limit to AGNET upgrade).
5. WIN7: SP1 and above (including SP1).
6. WIN10: 1709 and above (including 1709).
7. The PC client hardware does not support device configurations lower than intel Celeron G550@2.6Ghz and integrated graphics.
Steps:
Step 1.Log in to the SCP platform as admin, select Compute> aDesk VDI > Policies, click the drop-down arrow, select the tenant under the workspace to be managed from the drop-down menu that appears, and enter the policy management page of the corresponding tenant.
Step 2.Create a new or edit an existing policy, and select the corresponding transmission protocol according to the actual environment at 2D-Supported Desktop on the Transfer Protocol tab of the policy option.
• SRAP (applicable to LAN access environment): If the user client associated with this policy uses LAN access, it is recommended to select this option. Compared with the HEDC protocol, the SRAP protocol consumes less CPU and memory on the server but requires higher network quality and bandwidth.
• HEDC (applicable to non-LAN access environment): If the user client associated with this policy uses non-LAN access, it is recommended to select this option. When the network quality of the user client is poor, or the network bandwidth is limited, using the HEDC protocol can reduce the client's network requirements and improve the user's exclusive desktop experience, such as smoother desktop-related operations and smoother video playback, etc. However, the HEDC protocol consumes a lot of server CPU and memory. Compared with the SRAP protocol access, the number of concurrent virtual machines on the server is reduced by about 25%.
• Automatically use HEDC protocol when VDC proxy: If the user client associated with this policy has both LAN and non-LAN access scenarios, and the use of non-LAN access is the VDC proxy scenario, it is recommended to select this option, and select the transfer protocol SRAP (for access over LAN) at the same time, HEDC only supports 2D desktop.
Step 3.Click Advanced to set the compression quality and frame rate of the SRAP and HEDC protocols. It is recommended to keep the default values. 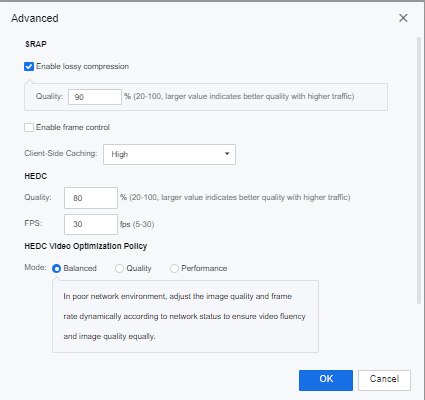
Function Description:
aDesk VDI supports transfer settings for 3D desktop images. You can set the image compression mode, frame rate, and average code stream. In Lossless mode, the picture quality experience is higher, but the data consumption is higher; in Lossy mode, the picture quality experience is slightly worse, but the data consumption is lower.
Prerequisite
None.
Precautions:
3D dual-screen extended scene:
1. STD-500 thin client does not support lossless compression mode. Only lossy compression can be used.
2. STD-600 thin client support both lossy and lossless compression mode.
Use the 2D-supported desktop for 3D-supported desktop scenario:
1. Only supports Win10 virtual desktop.
2. Only ARM, X86, PC client is supported;
3. Supports up to 2K resolution.
Steps:
Step 1.Log in to the SCP platform as admin, select Compute > aDesk VDI > Policies, click the drop-down arrow, select the tenant under the workspace to be managed from the drop-down menu that appears, and enter the policy management page of the corresponding tenant.
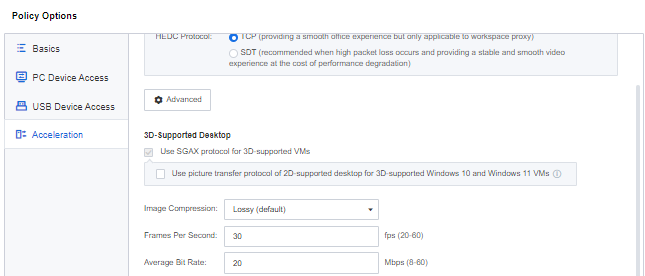
Step 2.Create a new or edit an existing policy, and set the image compression mode according to the actual environment in 3D-Supported Desktop on the Acceleration tab of the policy option. The default is lossy compression.
![]()
1. Lossy compression: The source data is encoded in YUV420 format, converted into an H264 stream for decoding at the terminal, and supports Android client, X86 client, and PC client.
2. Lossless compression: The source data is encoded in YUV444 format and converted into an H264 stream for decoding at the terminal, which only supports the X86 client and PC client. Lossless compression picture quality is higher than lossy compression.
• Set the frame rate and average bit rate of 3D images. 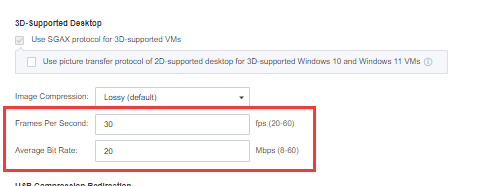
![]()
1. Frame Per Second: The graphics acceleration frame rate is used to control the number of encodings per second of the graphics card (that is, the number of screenshots sent to the box per second. If the Frames Per Second is set to 30, 30 screenshots will be sent to the box per second), and increase appropriately. The frame rate will make the 3D picture smoother, but it will increase the load on the graphics card and the client.
2. Average Bit Rate: The average code stream controls the average traffic per second encoded. Properly increasing the code stream will improve the picture quality and increase the traffic from the server to the terminal.
• 3D Win10 virtual machine enables 2D desktop image protocol transmission.
When there is a need to access 3D desktops through the WAN, 2D desktop protocol access can be enabled to reduce the bandwidth requirements for accessing cloud desktops and improve the WAN experience. Select the HEDC protocol as the transfer protocol at 2D-Supported Desktop, and check the Use picture transfer protocol of 2D-supported desktop for 3D-supported Windows 10 and Windows 11 VM as the HEDC protocol. 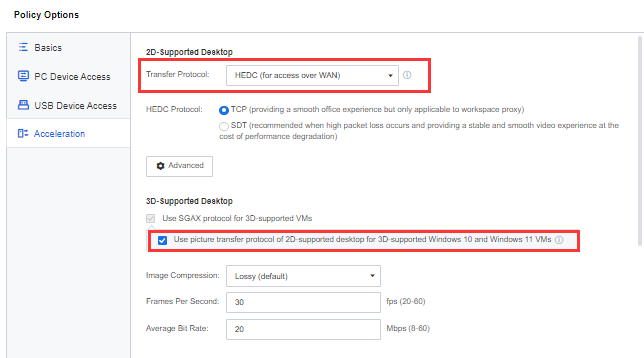
Function Description:
It is suitable for scenarios like WAN access with limited bandwidth and using USB mobile storage devices. By compressing the data traffic when using USB devices, the bandwidth occupancy is reduced, and the bandwidth is avoided when using USB storage devices, improving the desktop operation experience.
Prerequisite
None.
Precautions:
None.
Steps:
Step 1.Log in to the SCP platform as admin, select Compute > aDesk VDI > Policies, click the drop-down arrow, select the tenant under the workspace to be managed from the drop-down menu that appears, and enter the policy management page of the corresponding tenant.
Step 2.To create or edit an existing policy, select USB Compression Redirection in the Acceleration tab of policy options. 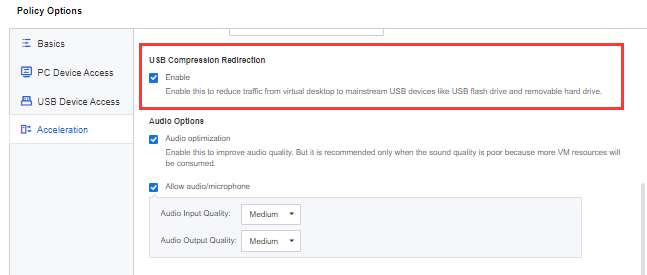
Function Description:
Turn it on when there is noise in the audio to optimize the cloud desktop audio effect.
Prerequisite
None.
Precautions:
Enabling audio optimization will increase virtual machine performance consumption.
Steps:
Step 1.Log in to the SCP platform as admin, select Compute > aDesk VDI > Policies, click the drop-down arrow, select the tenant under the workspace to be managed from the drop-down menu that appears, and enter the policy management page of the corresponding tenant.
Step 2.Create a new or edit an existing policy, and configure the relevant parameters in Audio Options on the Acceleration tab of the policy option. 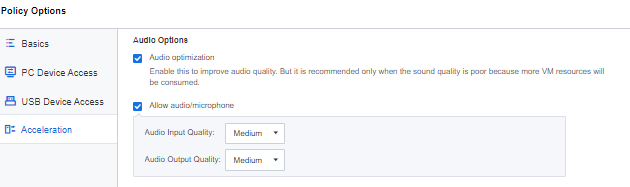
Function Description:
In the case of ordinary private line or wide area network access to the VDI, configuring the traffic optimization mode can ensure the normal and smooth use of camera peripherals / high-speed cameras without increasing the cost of bandwidth; and the need to set high-speed camera frame rate and definition level parameters Scenes.
Prerequisite
None.
Precautions:
1. The resolution range supported by the ARM-based terminal box traffic optimization mode high-speed meter is the width and height must exceed 32 and less than 4 * 1920 * 1080.
2. If the resolution of the high-speed camera is higher than 4 * 1920 * 1080, the encoding mode will automatically switch to the dynamic optimization mode.
3. The ARM box high camera cannot be used in the OTG port. Due to the limited bandwidth of the OTG port, there may be a phenomenon that the screen is blurred or the camera cannot be turned on.
4. The traffic optimization mode is not recommended for dual-core ARM boxes. Using dual-core may cause insufficient CPU performance and abnormal phenomena such as freezing.
Steps:
Step 1.Log in to the SCP platform as admin, select Compute > aDesk VDI > Policies, click the drop-down arrow, select the tenant under the workspace to be managed from the drop-down menu that appears, and enter the policy management page of the corresponding tenant.
Step 2.To create a new or edit an existing policy, go to Webcam Traffic Optimization on the Acceleration tab of the policy options and configure the relevant parameters as needed. 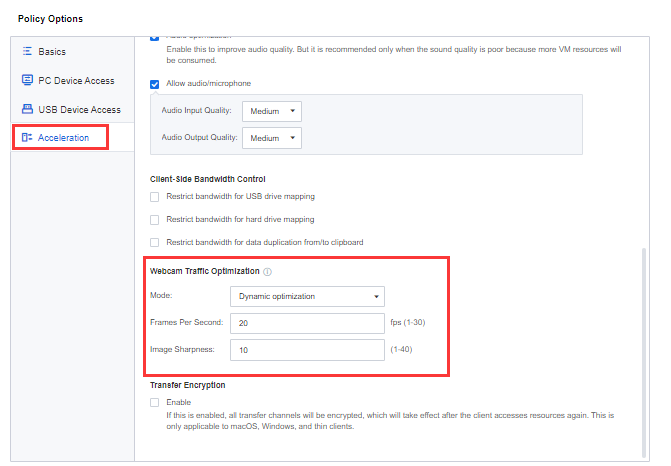
• Traffic optimization mode: Consume less traffic under the same conditions.
• Dynamic optimization mode: Encode the whole picture, and the picture has the advantage of being lossless.
• Image Sharpness: The higher the definition level, the clearer the picture and the more data consumption.
Function Description:
After the disk mapping and clipboard are released, when copying files between the PC client's local disk and the exclusive desktop's local disk, flow control needs to be performed to avoid the situation where copying large files will occupy the bandwidth of the entire host.
Prerequisite
None.
Precautions:
It only supports PC client access.
Steps:
Step 1.Log in to the SCP platform as admin, select Compute > aDesk VDI > Policies, click the drop-down arrow, select the tenant under the workspace to be managed from the drop-down menu that appears, and enter the policy management page of the corresponding tenant.
Step 2.To create a new or edit an existing policy, select the corresponding control channel as needed in Client-Side Bandwidth Control on the Acceleration tab of the policy option and limit the flow rate according to the actual situation in the network. 
Function Description:
For WAN access or scenarios with high access security requirements, protocol encryption can be enabled to encrypt and transmit VDI access traffic to improve security.
Prerequisite
None.
Precautions:
It only supports thin clients, Windows PC clients, and MAC OS terminals.
Steps:
Step 1.Log in to the SCP platform as admin, select Compute > aDesk VDI > Policies, click the drop-down arrow, select the tenant under the workspace to be managed from the drop-down menu that appears, and enter the policy management page of the corresponding tenant.
Step 2.To create or edit an existing policy, select Transfer Encryption in the Acceleration tab of the policy option. 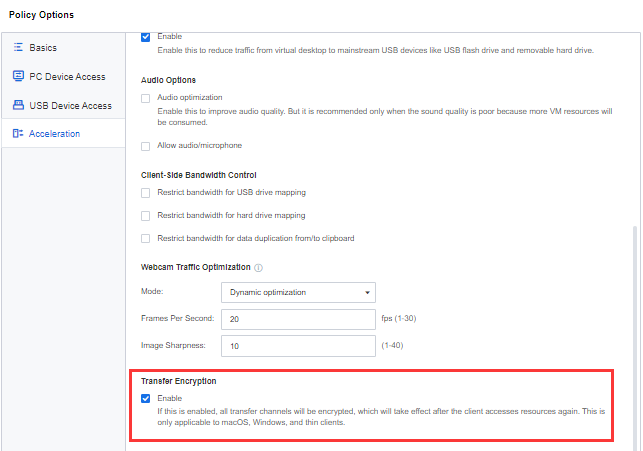

 {{ $t('index.defaultHeader.chromeBrowserTip') }}