{{ secondMenu.name }}


Function Description
SCP supports public, private, and network function virtualization (NFV) images. Public images are uploaded by platform administrators and used by platform administrators, tenants, and tenant users. Private images are uploaded by tenants and used by tenants and tenant users. Platform administrators can delete private images. NFV images are uploaded by administrators and used by administrators and tenants.
Public and private images are ISO or built-in images (HCI images). ISO images indicate that the image files are in the .iso format, and built-in images are converted from VMs.
Precautions
| Source HCI Cluster Version |
Destination HCI Cluster Version |
| 6.0.0 R5 |
6.0.0 R5, 6.3.0 (R1 and R2), and 6.9.0 |
| 6.2.0 |
6.2.0, 6.3.0 (R1 and R2), and 6.9.0 |
| 6.3.0 (R1 and R2) |
6.0.0 R5, 6.2.0, 6.3.0 (R1 and R2), 6.7.0 (R1, R2, and R3), 6.8.0, and 6.9.0 |
| 6.7.0 (R1, R2, and R3) |
6.3.0 (R1 and R2), 6.7.0 (R1, R2, and R3), and 6.9.0 |
| 6.8.0 |
6.3.0 (R1 and R2), 6.8.0, and 6.9.0 |
| 6.9.0 |
6.0.0 R5, 6.2.0, 6.3.0 (R1 and R2), 6.7.0 (R1, R2, and R3), 6.8.0, and 6.9.0 |
(1)Distribution to HCI 6.9.0 or earlier versions is not supported for VMs with 4K or 8K resolution enabled.
(2)Distribution to HCI 6.8.0 or earlier versions is not supported for multi-disk VM templates.
(3)Distribution to HCI 6.8.0 or earlier versions is not supported for VMs with more than one graphics card.
(4)Distribution to HCI 6.8.0 or earlier versions is not supported for VMs whose OS is Linux Kernel 4.X, Linux Kernel 4.X 64-bit, Linux Kernel 5.X 64-bit, Windows 11 64-bit, or Windows 2022 64-bit.
(5)Distribution to HCI 6.8.0 or earlier versions is not supported for VMs whose description has more than 100 characters.
(6)Distribution to HCI 6.8.0 or earlier versions is not supported for VDI VMs.
(7)Distribution to HCI 6.8.0 or earlier versions is not supported for VMs that use the Q35-based motherboard.
(8)Distribution to HCI 6.0.0 R5 or 6.0.0 R5 (EN) is not supported for HCI VMs that use the AMD or Hygon CPU.
(9)Distribution to HCI 6.8.0 or earlier versions is not supported for VMs that use the VirtIO NIC without vmTools installed.
Function Description:
The public VM image is uploaded or produced by the admin administrator and can be used by the admin administrator, tenants, and tenant users.
Precautions:
Prerequisite
Upload ISO image
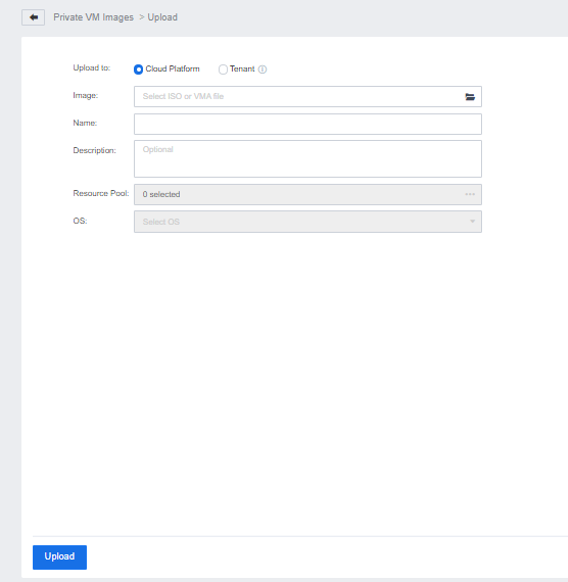
Step 1.Log in to the SCP platform, select Compute > Images, click the Upload button, and select the ISO file to be uploaded. Then, add a description according to the actual situation, select the corresponding operating system, select the resource pool to which the mirror is uploaded, and click the Upload button.

Step 2.After the upload is complete, click the Finish button to continue uploading or click the Close page button.
Make built-in image
Step 1.Log in to the SCP platform, select Compute > Virtual Machines, select the virtual machine that needs to be used to make the image, click More, enter the console, install the vmTools, and shut down the virtual machine.
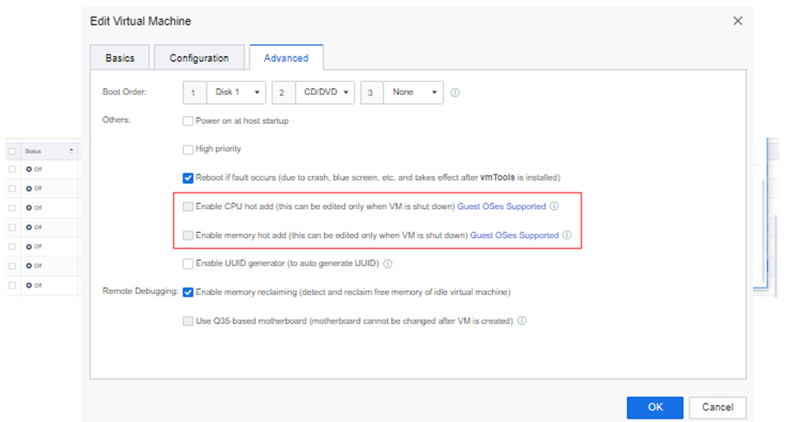
Step 2.Click More and select Edit, then click Advanced. It is recommended to check the Enable CPU hot add and Enable memory hot add checkboxes.
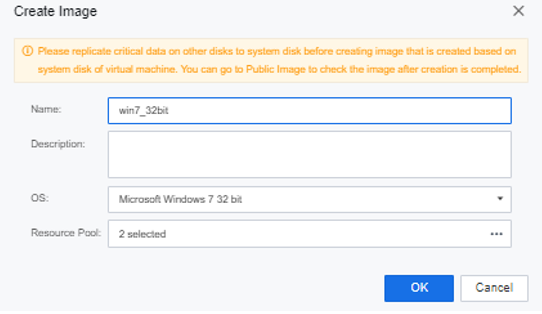
Step 3.Click More, select Create Image, enter the name and description of the mirror, select the type of operating system, select the resource pool to be distributed by the mirror, and click OK to start creating an image.
Function Description:
Precautions:
When a private VM image is a built-in image type, it cannot be allocated to resource pools of different versions.
Prerequisite
Steps:
Step 1.Log in to the SCP platform, select Compute > Images > Network Device Images, and click the Upload button. Then, select the platform or the specified tenant, upload the ISO file, add the description according to the actual situation, select the corresponding operating system, select the image to upload to the Resource pool, and click the Upload button.
Step 2.After successfully uploading the image to the cloud platform, the admin can delete and convert the tenant's private VM image to a public VM image. All tenants can use the image after the image is converted to a public VM image.

Function Description:
Precautions:
In the SCP 6.7.30 version, the classic and VPC use the same image templates. The specific NFV versions are as follows: vAF8.0.17, vAD7.0.9R1, vSSL 7.6.8R2.
![]()
The classic network also supports vIAG12.0.14.
Prerequisite
Steps:
Step 1.Log in to the SCP platform, select Compute > Images > Network Device Images, and click the Upload button.
Step 2.Select the local network device image file (vma format) to be uploaded, select the resource pool to be allocated, and click the Upload button.
Step 3.After the upload is complete, click the Finish button to continue uploading or click the Close button.
Function Description:
When using the aSecurity service platform and database services, the admin administrator needs to upload the advanced service image to deploy the corresponding aSecurity service platform components or database platform components.
Prerequisite:
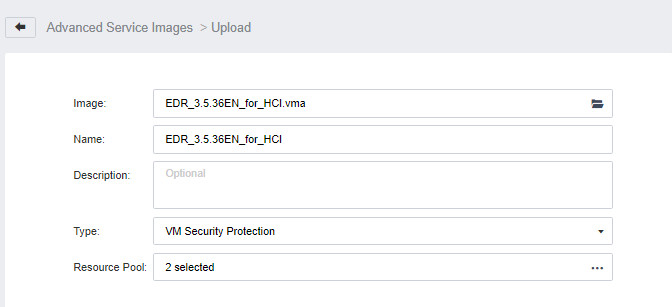
aSecurity service platform image version: EDR_3.5.36EN_for_HCI.vma
Precautions:
Steps:
Step 1.Log in to the SCP platform, select Compute > Images > Advanced Service Image, and click the Upload button (you can download the image file from Sangfor Community).
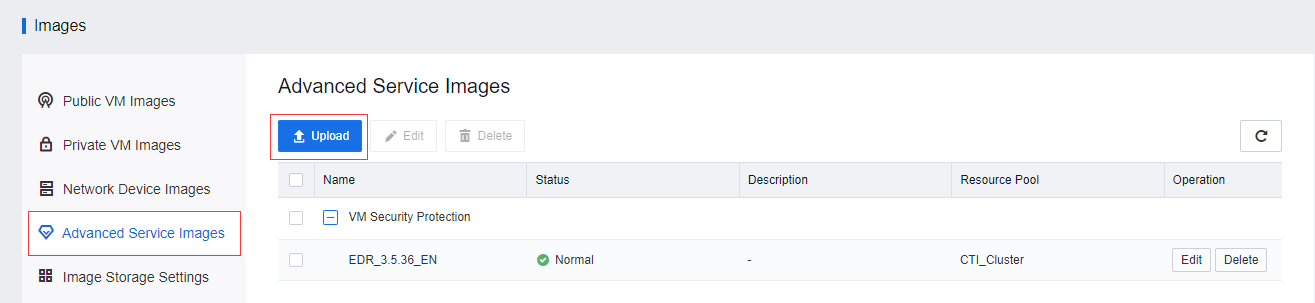
Step 2.Select the local advanced service image file (vma format) to be uploaded, select the service type, resource pool, and click the Upload button, as shown below.
Step 3.After the upload is complete, click the View Image button to return to the Advanced Service Image page, or click the Close button.
Function Description:
After uploading or creating an image, the system will allocate the image to the designated datastore of each resource pool according to the configuration.
Prerequisite
None.
Precautions:
None.
Steps:
Log in to the SCP as admin, select Compute > Images > Image Storage Settings, select the corresponding resource pool and click Enable or Disable to set the datastore of the image. 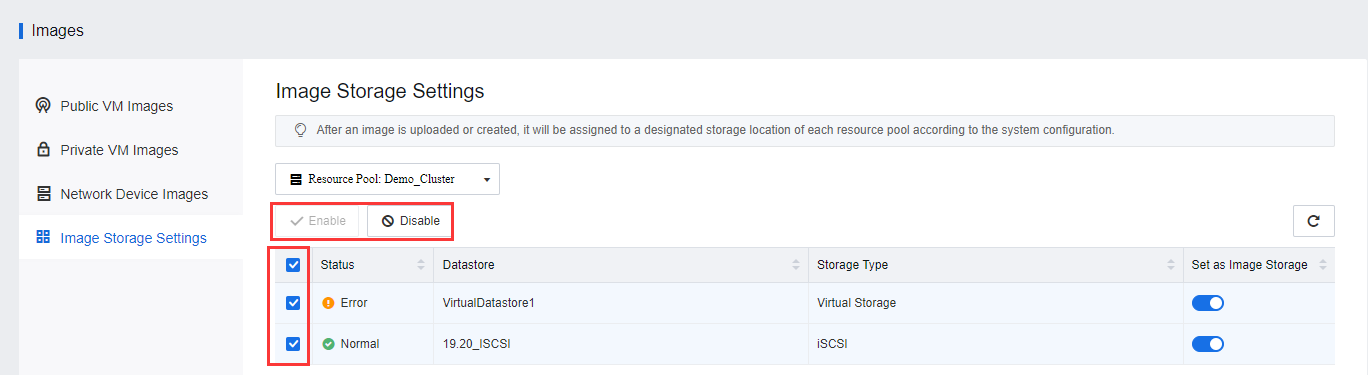

 {{ $t('index.defaultHeader.chromeBrowserTip') }}