


{{ secondMenu.name }}






To manage all users accessing the internet. The user refers to the subject "who" accesses network resources and is the important identifier of online activity.
On the Group/User page, the administrator can manage online users in a unified manner. Users on NGAF include online users and accessed users:
• Online user
It refers to the subject who accesses network resources, such as the internal staff at headquarters. The online user can directly access the network resources via NGAF.
• Accessed user
It refers to the subject who accesses network resources, such as the internal staff at branches and staff on business trips. The accessed user shall access the NGAF via SSL VPN, IPSec VPN, or PPPoE before accessing the network resources of headquarters.
To realize user-based management, it is necessary to authenticate users who access the network to manage all users' online behaviors.
User Type
• Automatically discovered and created by the device.
• Manually created by the administrator.
• Imported from the CSV file.
• Imported from the external LDAP server.
• Imported after scanning the computer on the network.
2. Based on the authentication method, the users can be divided into the following types:
• Open authentication (binding IP/MAC).
• Local password authentication.
• External password authentication.
• Single sign-on (combined with the external authentication system for authentication).
Group/User
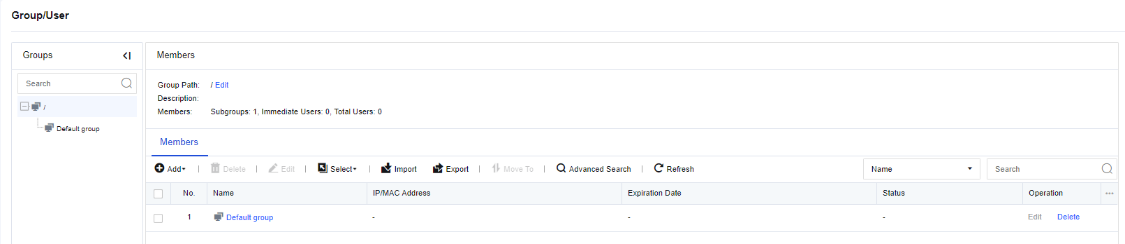
To view users or groups that already exist on the device, select the user group to be viewed in the Groups pane. The Members page on the right shows the user group's information, including the group path, description, group information, etc.
Members: On this page, you can view the details of all subgroups and users, including the group path, binding information (IP and MAC addresses bound to the user), expiration date (user), description, status (enabled or disabled), etc. You can also decide the information to be displayed by selecting the columns.
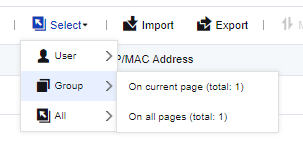
Select: To quickly select the users and user groups on the current page or all pages. Click Select. Then, the following page appears.
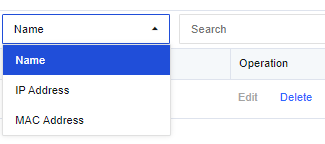
Search: To quickly find a user or user group. Click Search and select Name, IP Address, or MAC Address. Enter the content in the search box and press Enter to search.
Advanced Search: Click  and click Advanced Search, which is only applicable to search users. When you need to query a user through multiple search terms, you can select Advanced Search.
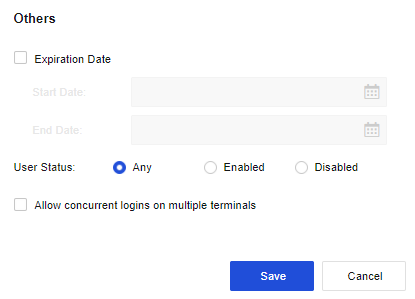
  The search terms include Basic Search Terms and Others. When you set multiple search terms, the terms follow the AND relation, which means all the terms shall be met.
The Basic Search Terms section includes Username, IP, and MAC address. These parameters are optional.
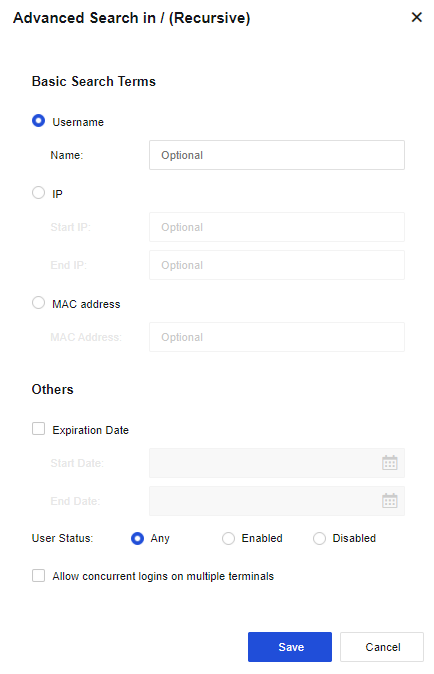
The Others section includes Expiration Date, User Status, and Allowed concurrent logins on multiple terminals.
The administrator can add, delete, batch edit, import, or export user groups and users.
| Function |
Note |
| Delete group/user |
If you need to delete the unnecessary group or user, select the group or user to be deleted on the Group/User page and select Delete. If you have navigated to Authentication Policy > LDAP User Sync > Application Control Policy > Bandwidth Management > Policies and associated the user or group to be deleted, the user or group cannot be deleted directly. The user or group can be deleted only after the reference relationship is removed. |
| Edit/Batch edit |
Batch edit differs from single-user edit in the editable attributes. Batch edit can be used to edit multiple users or groups. When editing users in batch, you cannot set the endpoint binding in the advanced attribute, i.e., IP and MAC binding, because this option is unique and cannot be set when you edit multiple users. |
| Import/Export |
It can be used to import or export the data of a a group or user to (from) the device. You can import users from a CSV file, and import display name, group, password, IP address range allowed to log in, public account, a custom attribute, etc. at the same time. A user group will be created automatically if the specified group to which the user is imported does not exist. Select the groups and users to be exported. The user group containing no user cannot be exported alone. |
| Advanced Search |
Search terms and ranges: IP and MAC addresses can be set for filtering. Others can be customized for searching. |
| Move up/move down/move to |
You can move local users and user groups to change their positions. The existing users or groups can be moved to another group. After a successful move, the users are moved from the original group to the destination group and use the internet access policy of the destination group. Common administrators may only have administrative permission on part of the groups. Therefore, they cannot move the users or groups to a user group beyond their administrative permission. |
Table 17:Description of Group/User Management Functions
Add User
When you add a user, you can select Single User and Multiple Users.
To add a user, set the username, group, password, IP/MAC address, and other attributes, but not the authentication method. The authentication method of LAN users is set by going to User Authentication > Authentication Policy and setting the IP or MAC address. The authentication method is used by the device to identify users.
Add Subgroup
The default group is the root group, and cannot be deleted or edited. All new groups are subgroups of the root group. The root group is the first level group, the new group under the root group is the second level group, and so on. The local group supports an organizational structure with up to 16 groups, including the root group. Such design is more consistent with the organizational structure of the Company and is convenient for management. For example, add an engineering group under the root group by performing the following steps:
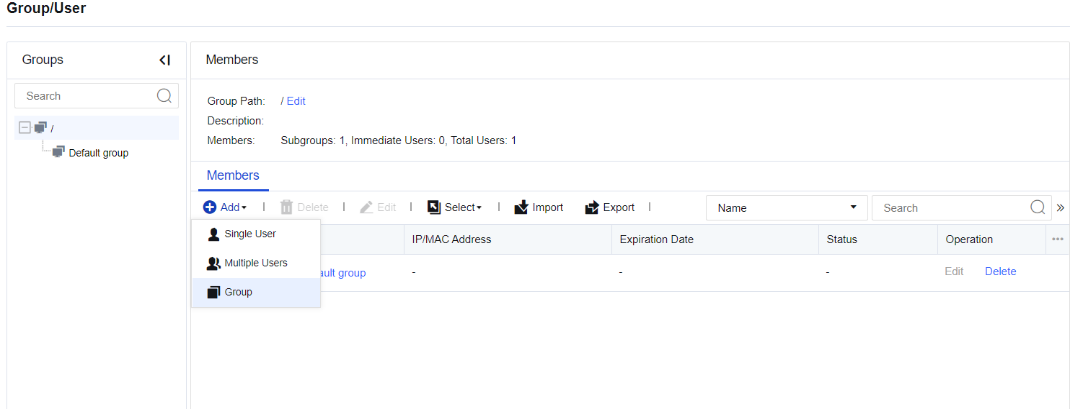
Step 1.In the Groups pane, select the user group to which the subgroup will be added, and go to the management page on the right. On the Members page, click Add and select the type of group to be added.
Step 2.Go to the Add page. Set the Group Name parameter, that is, the name of the user group. Set the Description parameter, that is, the description of the user group.
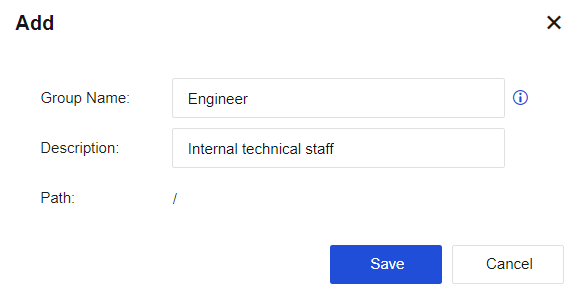
Step 3.Click Save. The subgroup is added.
Example 1
All PCs in the enterprise LAN 192.168.1.0/255.255.255.0 network segment use the user name and password authentication method. A new user (common user) is added to the engineering group, authenticated based on username and password, bind uni-directionally to the IP range (i.e., the IP range that limits login) 192.168.1.2 – 192.168.1.100, and allowed concurrent logins on multiple terminals.
Step 1.The enterprise requires that all PCs in the 192.168.1.0/255.255.255.0 segment shall be authenticated based on username and password. Therefore, the first thing to do is set the authentication method of users in this network segment.
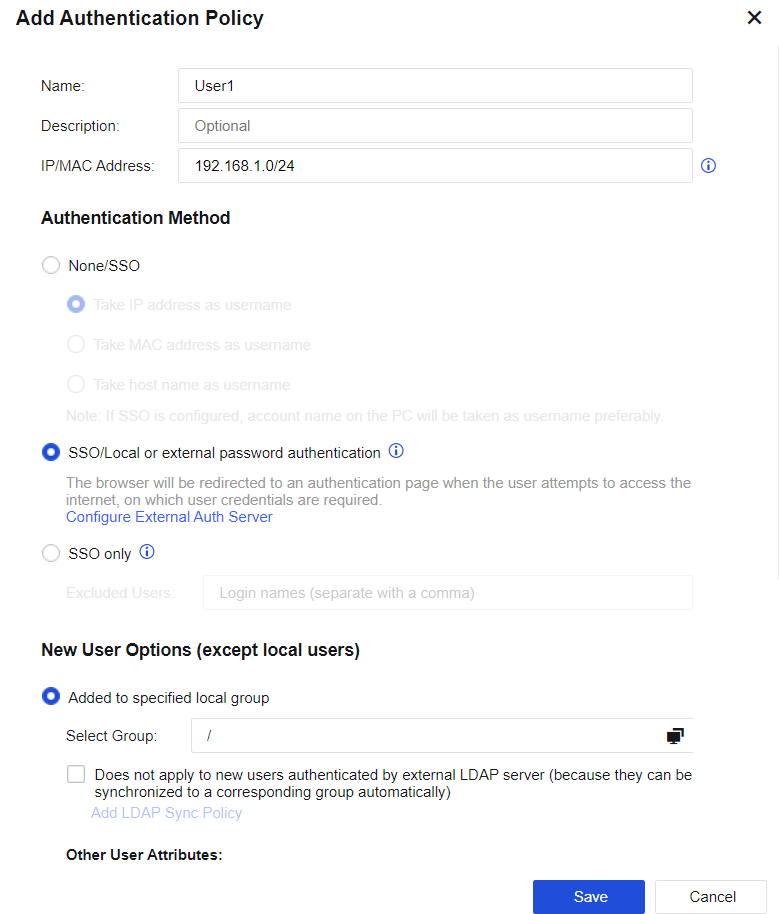
Go to User Authentication > Authentication Policy, and set the authentication policy. Set the IP or MAC address range of this user. Select SSO/Local or external password authentication in the Authentication Method section. Before setting the authentication policy, set the authentication zone. This example shows you how to select the authentication zone of LAN, as shown in the following figure. For more information about the zone, see Section 5.2 Zone.

Step 2.In the Groups pane, select the user group to which the user will be added, and go to the management page on the right. On the Members page, click Add and select the type of user to be added.
Step 3.Go to the Add Single User page. Select Enable and set the Name, Description, Display Name and Add to Group parameters.
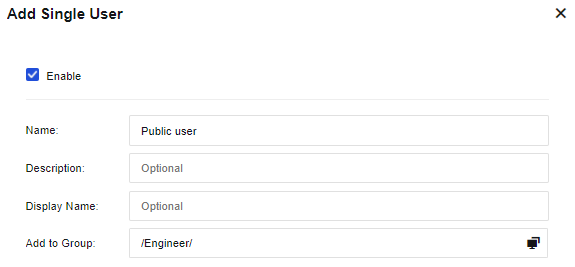
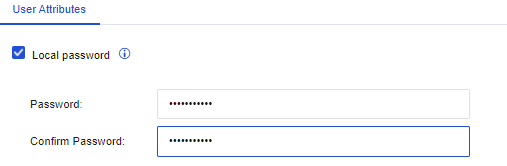
Step 4.On the User Attributes tab, set the user authentication method, public account, and expiration date. Select Local password and enter the user login authentication password in the Password field.
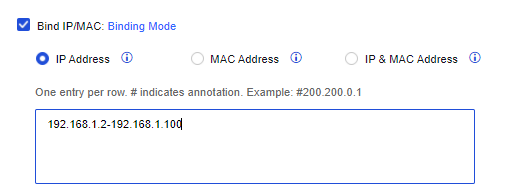
Bind IP/MAC: Bind the user to an IP/MAC address. In this example, the unidirectional binding IP range (i.e., the IP range that limits login) is 192.168.1.2 – 192.168.1.100.
Click Binding Mode. Select the Unidirectional User and Address Binding on the page that appears.
Select IP Address and enter 192.168.1.2-192.168.1.100 in the field.
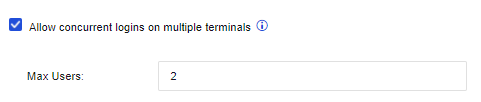
Allow concurrent logins on multiple terminals: Set whether concurrent logins on multiple terminals are allowed for the user authenticated based on username and password. If this option is selected, concurrent logins on multiple terminals are allowed. In this example, this option is selected as two users are allowed to log in concurrently.
Select Show logout page if users are authenticated based on password. This option is for the users authenticated based on username and password, and a logout page appears after the users logged in.

Select Auto-log out users who are idle for a specified period of time to set an idle time so that users who are idle beyond this period will be logged out automatically.

Expiration Date: Set the expiration date of the user.
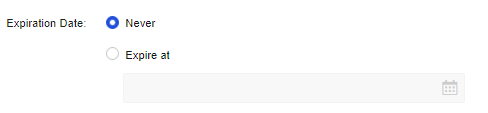
Step 5.After editing user attributes, click Save. Then, the user is added.
Step 6.When a user in the corresponding network segment opens a webpage, the webpage is redirected to the authentication page of the device. Enter your username and password and click Login. If the username and password are authenticated to be valid and conform to the rule of bound IP addresses, the authentication is successful.
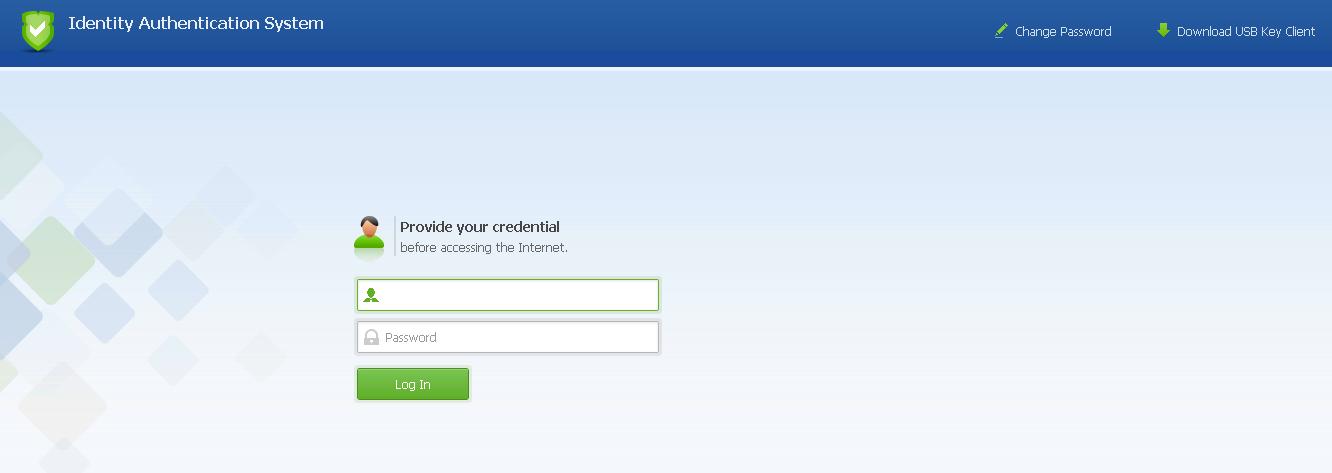
If the username and password are valid but the IP address for login is not in the bind IP address range, the authentication fails.
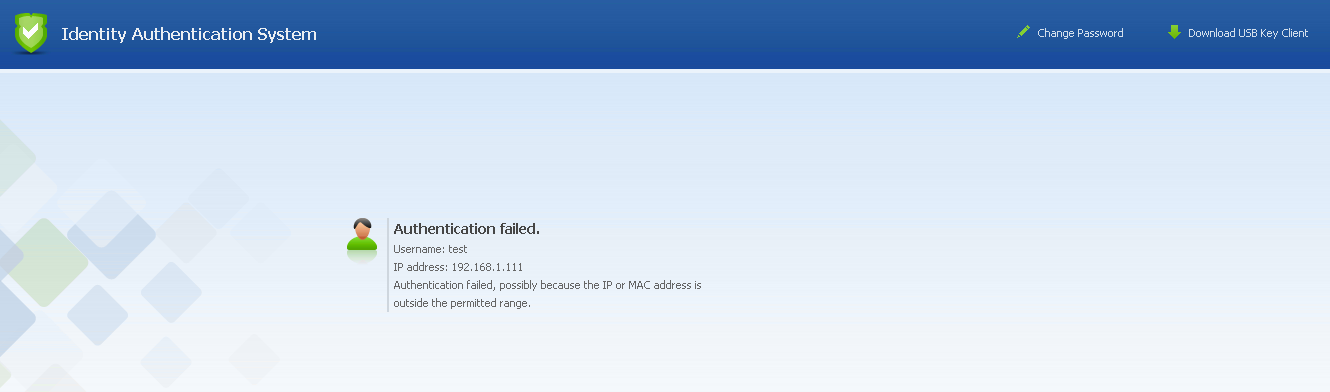

Bind IP/MAC: Two binding modes include uni-directional binding and bi-directional binding.
Uni-directional binding: The user can only use the specified address for authentication, but other users can also use this address for authentication.
Bi-directional binding: The user can only use the specified address for authentication, and this user can only use this address.
Example 2
All PCs in the enterprise LAN 192.168.1.0/255.255.255.0 network segment use the user name and password authentication method. A new user (Lee Engineer) is added to the engineering group, authenticated based on username and password, bound bi-directionally to the IP/MAC address 192.168.1.117/00-0C-29-7F-0B-47. (This user must use this IP/MAC address for authentication, while other users cannot.)
The enterprise requires that all PCs in the 192.168.1.0/255.255.255.0 segment shall be authenticated based on username and password authentication. Therefore, the first thing to do is to set the authentication method of users in this network segment.
Step 1.Go to User Authentication > Authentication Policy, and set the authentication policy. Set the IP or MAC address range of this user. Select SSO/Local or external password authentication in the Authentication Method section. Before setting the authentication policy, set the authentication zone. This example shows you how to select the authentication zone of LAN, as shown in the following figure.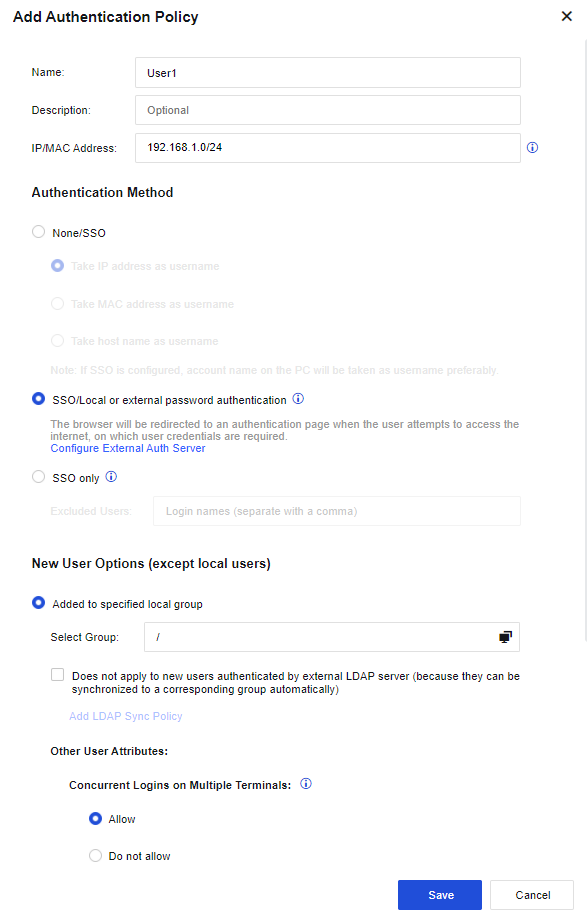
Step 2.In the Groups pane, select the user group to which the user will be added, and go to the management page on the right. On the Members page, click Add and select the type of user to be created.
Step 3.Go to the Add Single User window. Select Enable and set the Name, Description, Display Name, and Add to Group parameters.
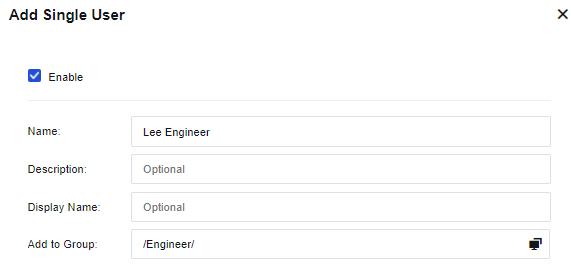
Step 4.On the User Attributes tab, Select Local password and enter the user login authentication password in the Password field.
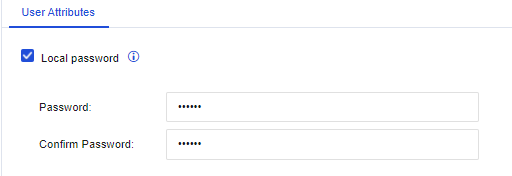
Bind IP/MAC: Bind the user to an IP/MAC address. In this example, the IP/MAC address of bidirectional binding is 192.168.1.117/ 00-0C-29-7F-0B-47. (That is, this user must use this IP/MAC address for authentication, while other users cannot).
Step 5.Click Binding Mode and select Bidirectional User and Address Binding on the page that appears. Select IP & MAC Address, and enter 192.168.1.117 (00-0C-29-7F-0B-47) in the field.
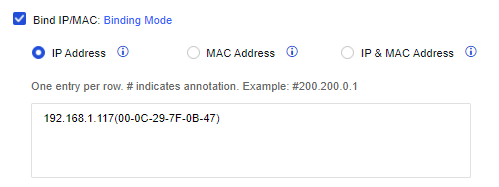
The user is considered a private account by default because it is only bound to a single IP/MAC address.
Select Show logout page if users are authenticated based on password. This option is for the users authenticated based on username and password, and a logout page appears after the users logged in.

Select Auto-log out users who are idle for a specified period of time to set an idle time so that users who are idle beyond this period will be logged out automatically.

Expiration Date: Set the expiration date of the user.
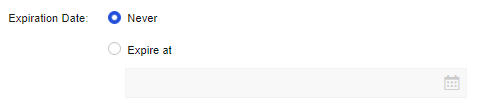
Step 6.After editing user attributes, click Save. Then, the user is added.
Step 7.When a user in the corresponding network segment opens a webpage, the webpage is redirected to the authentication page of the device. Enter your username and password and click Login. If the username and password are authenticated to be valid and conform to the rule of bound IP addresses, the authentication is successful.
If the username and password are valid but the IP/MAC address for login is not the bound IP/MAC address, the authentication fails. The prompt message is as follows.
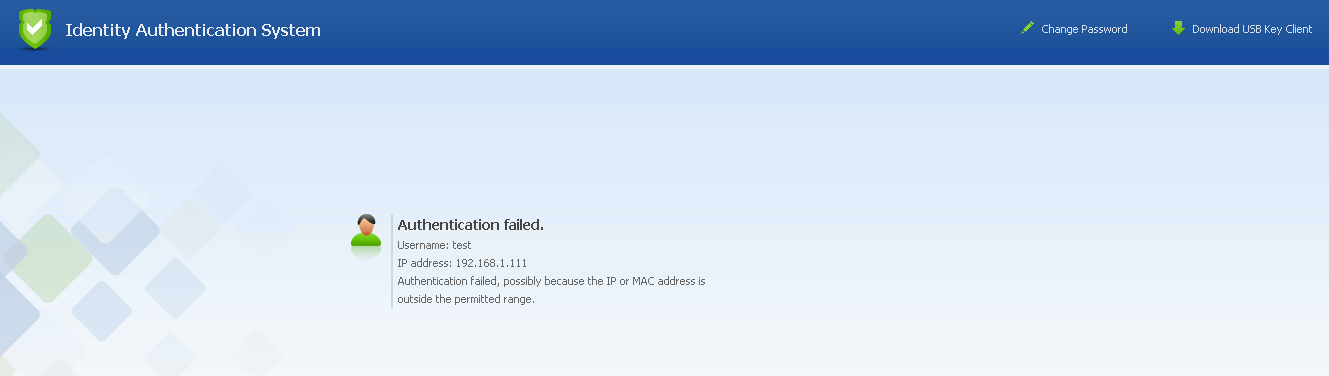
If other users use this IP/MAC address to authenticate, the Authentication Failed page will also appear.
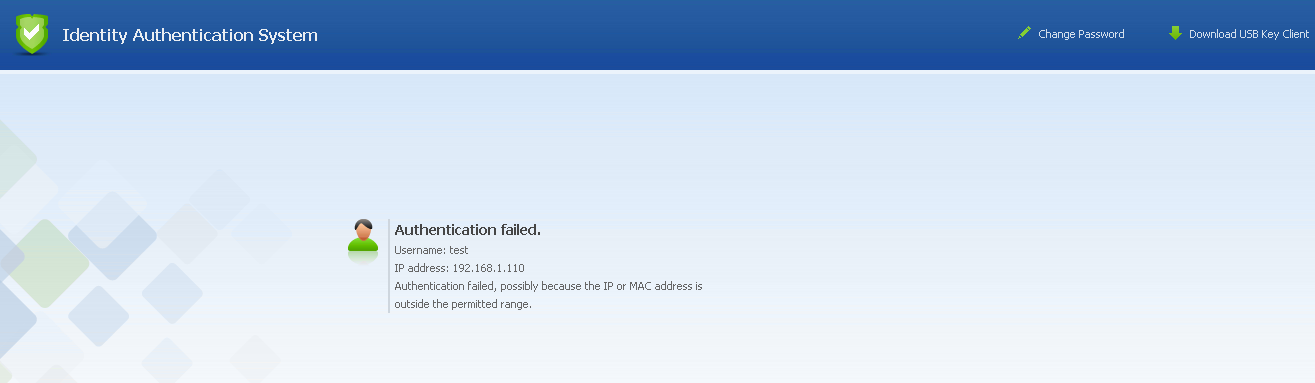
If users from the addresses that require no authentication are set under User Authentication > Authentication Policy, the users can directly access the internet without entering the username and password. In this case, the device identifies the user based on the IP address, MAC address, or hostname. The common settings are:
1. When creating a user, bi-directionally bind the user to an IP/MAC address. Because there is a one-to-one correspondence between IP/MAC address and user during bi-directional binding, the user can be identified based on the IP/MAC address.
2. Go to User Authentication > Authentication Policy, set Authentication Zone to None, and take the IP address, MAC address, or hostname as the username. For authentication of LAN users, their usernames are matched based on the IP address, MAC address, or hostname.
Example 3
Set a user as the supervisor in the "/Engineer" group. This user requires no authentication. Bi-directionally bind the user and the IP/MAC address of the supervisor's PC. In this way, only the supervisor's PC can use this account to access the Internet. The IP/MAC address of the supervisor's PC is 192.168.1.117(00-0C-29-7F-0B-47).
Step 1.Go to User Authentication > Authentication Policy, set the authentication policy. Set the IP or MAC address range of this user. Select None/SSO in the Auth Method section. Before setting the authentication policy, set the authentication zone. This example shows you how to select the authentication zone of LAN, as shown in the following figure.

Step 2.In the Groups pane, select the user group to which the user will be added, and go to the management page on the right. On the Members page, click Add and select the type of user to be added.
Step 3.Go to the Add Single User page. Select Enable and set the Name, Description, Display Name, and Add to Group parameters.
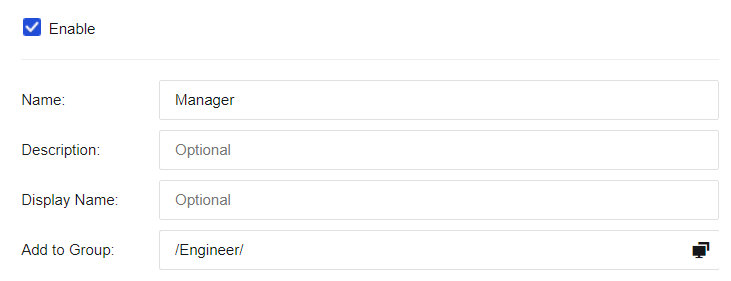
Step 4.Select Bind IP/MAC to bind the user to an IP/MAC address. In this example, the IP/MAC address of bi-directional binding is 192.168.1.117/ 00-0C-29-7F-0B-47. (That is, this user must use this IP/MAC address for authentication, while other users cannot).
Step 5.Click Binding Mode and select Bidirectional User and Address Binding on the page that appears. Select IP & MAC Address, and enter 192.168.1.117 (00-0C-29-7F-0B-47) in the field.
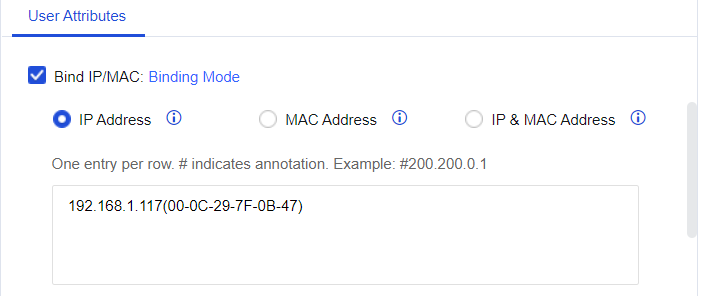
The user is considered a private account by default because it is only bound to a single IP/MAC address.
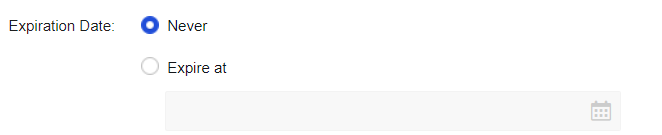
Expiration Date: Set the expiration date of the user.
Step 6.After editing user attributes, click Save. Then, the user is added.
Step 7.When accessing the internet through the device, verify whether the IP and MAC addresses are valid. If so, the authentication is successful, and no authentication page appears on the client. If the IP/MAC address is not the bound one, the authentication fails. At that time, no prompt message appears, but the client cannot access the internet.
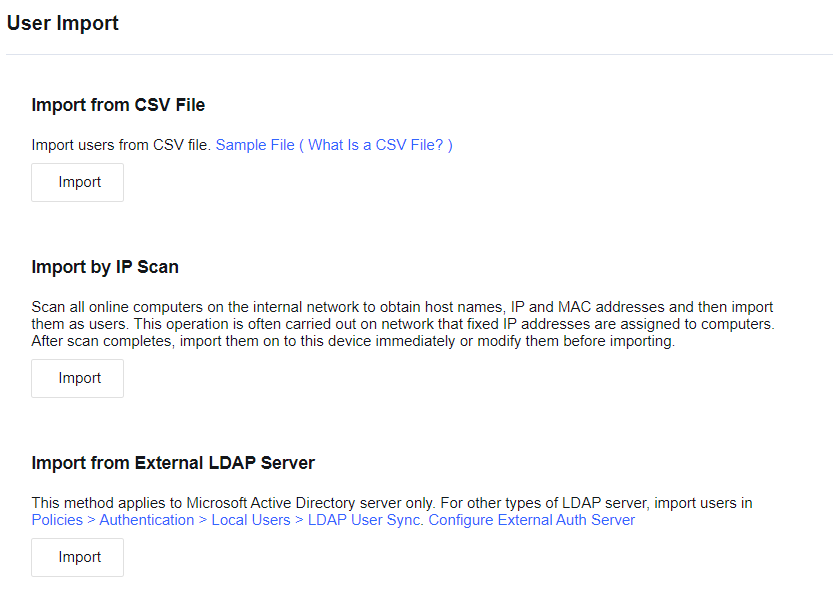
On the User Import page, you can import users at a time, and you can select Import from CSV File, Import by IP Scan, or Import from External LDAP Server.
• Import from CSV File: You can import users from a CSV file, and import the display name, authentication method, IP/MAC address, and password at the same time. A user group will be created automatically if the specified group to which the user is imported does not exist.
• Import by IP Scan: When importing users bound to IP/MAC addresses, you can select this option to scan the MAC addresses of LAN users, which is convenient to import such users. By default, users imported this way belong to the root group and require no authentication. Their bound IP/MAC addresses and usernames are device names generated after the scan. You cannot import a user having an IP address that conflicts with those bound to existing users.
• Import from External LDAP Server: To synchronize users on the LDAP server to the device. It supports importing users from the MS Active Directory server. When the domain users are imported, the security groups of the domain server are imported in the form of user groups and the users are imported to the corresponding security groups.
 x
x
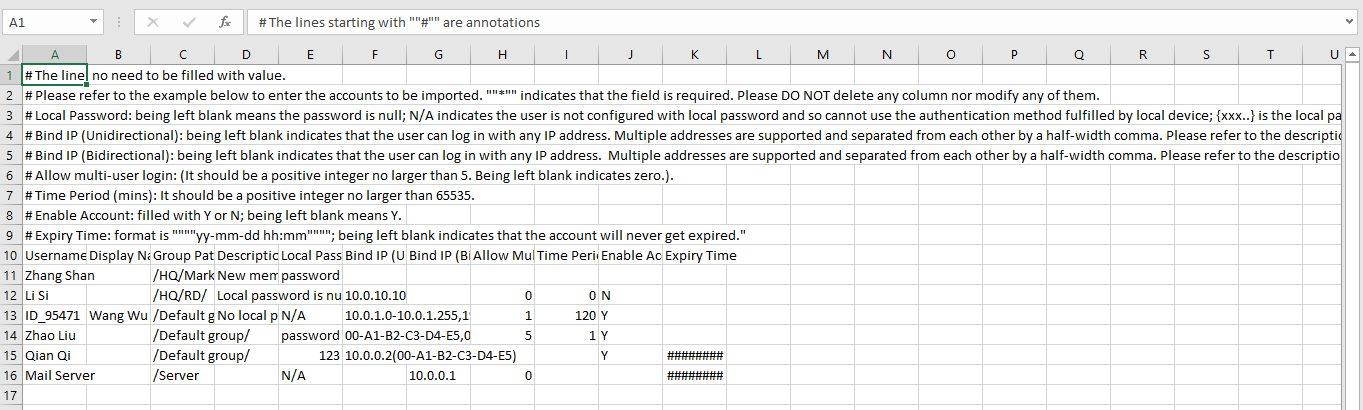
You can import users from a CSV file, and import the display name, authentication method, IP/MAC address, and password at the same time. A user group will be created automatically if the specified group to which the user is imported does not exist.
The CSV table has a very simple format that can be edited and saved by almost all spreadsheet software. For example, Microsoft Excel can edit this file and easily convert XLS tables to CSV tables. Tip: As the CSV file is very simple and does not support setting column widths, fonts, colors, and other attributes, in order to facilitate editing and managing users, you can edit user information in an Excel table first, and then convert it to the CSV file for importing.
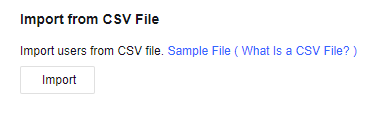
Step 1.Import the format sample of the user. You can click Sample File (What Is a CSV File?) to download it. Set user information to be imported by the format in the sample file.
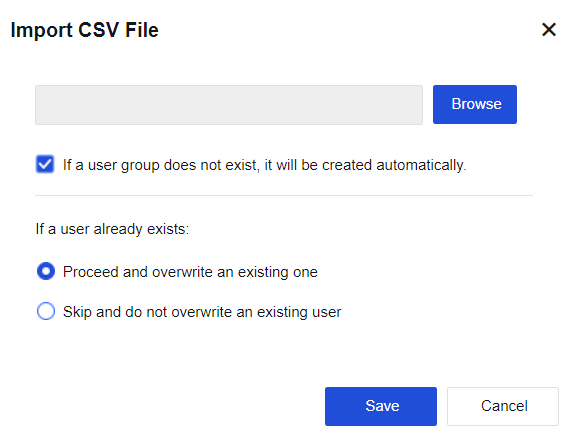
Step 2.Import the set CSV file, click Import and select the file to be imported on the Import CSV File page.
If you select If a user group does not exist, it will be created automatically, a user group will be created automatically if the specified group to which the user is imported does not exist. Otherwise, such a group will not be created and the user will be imported to the root group by default.
If you select Proceed and overwrite an existing one for If a user already exists when the user list already contains users with the same usernames, the attributes of the users will be updated. If you select Skip and do not overwrite an existing user, user attributes will not be updated and the import of this user will be skipped in the same situation.
To scan the MAC addresses of the corresponding IP addresses and import the scanned users named by their respective device names. These users are imported to the root group by default without authentication and their IP and MAC addresses are bound.
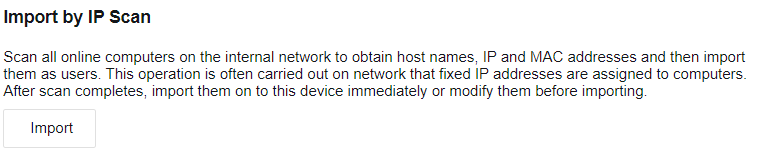
Configuration case of IP scan
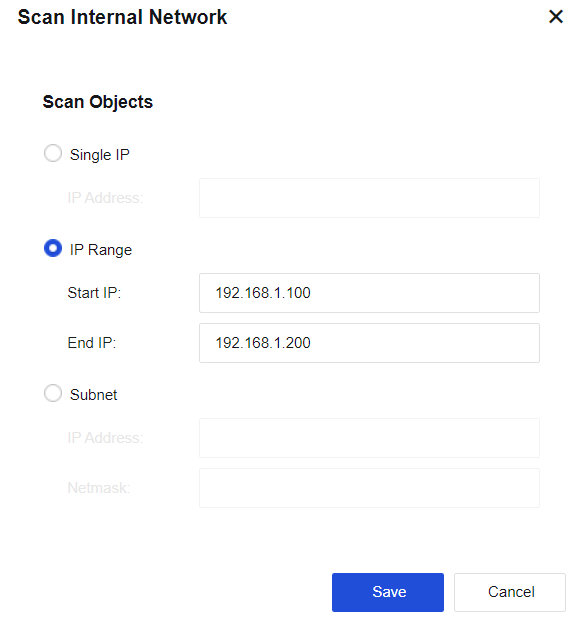
Scan the PCs on the LAN within the range of 192.168.1.100-192.168.1.200 and import them to the user list.
Step 1.Select Import by IP Scan. Click Import. Specify IP Range and click Save.
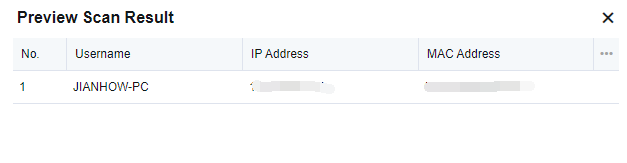
Step 2.Click Save to scan the PCs within the range of 192.168.1.100-192.168.1.200. Only live PCs in that range will be returned. Username is the name of the scanned PC.
Step 3.Click Import to directly import the users to the device. In the dialog box displayed, select Create a group if no such group on local device to create the specified user group automatically if it does not exist. If this option is not selected, users will be imported to the root group by default. If a user already exists, select Proceed and overwrite an existing one to update the attributes of this user if it is on the user list, or select Skip and do not overwrite an existing user to not to update the attributes of this user and skip import.
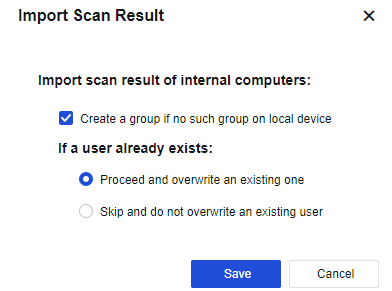
Click Download to Edit to save the user information locally as a CSV file to modify the scan results and user attributes as required. Click Import from CSV File to import the modified file.
Step 4.Click Submit. The users are imported to the root group.
The user name is the device name obtained by the NetBIOS protocol on the PC logged in to the control panel. User name unknown indicates that no device name is found. In this case, check the following:
Whether the NetBIOS protocol is enabled on the target PC
Whether the target PC has configured multiple IP addresses
Whether the NetBIOS protocol has been filtered out by the firewall on the target PC
Whether NetBIOS protocol has been filtered out by a device in the network path
To synchronize users on an external LDAP server to the device. It applies to the MS Active Directory server only. For other types of LDAP servers, please import users in User Management/LDAP User Sync.
To import users from an LDAP server, configure the LDAP server first. (For setting details, see Function Descriptions/User and Policy Management/User Auth/External Auth Server)

Automatic LDAP synchronization
With LDAP User Sync, the device synchronizes users, OUs, and security groups automatically from the domain server once a day at a random time between 0 to 6 a.m.
LDAP User Sync includes two modes: Sync by OU and Sync by Security Group (AD Domain Only).
Sync by OU: Applicable to all types of LDAP servers. In this mode, the OUs, as well as their structures will be synchronized to the device as user groups from the LDAP server. Users remain in the same OU group after synchronization.
Sync by Security Group (AD Domain Only): Only applicable to the Microsoft LDAP server, i.e., the AD domain. In this mode, security groups on the AD domain server are synchronized to the device as user groups. Security groups have no hierarchy and therefore are synchronized at the same level.
Add synchronization policy
To set synchronization parameters, based on which LDAP synchronization is implemented.
Sync by OU
This option applies to all types of LDAP servers. In this mode, the OUs, as well as their structures will be synchronized to the device as user groups from the LDAP server. Users remain in the same OU group after synchronization.
Automatic LDAP synchronization case
An enterprise needs to synchronize the organizational structure of the LDAP server to the device. Automatic LDAP synchronization must be configured on the AF.
Step 1.Set the LDAP server to be synchronized by specifying the IP address, port, login username, and password, etc. For details, see External Auth Server configuration.
Step 2.Go to User Auth/ LDAP User Sync. Click Add. In the LDAP Sync window displayed, specify synchronization parameters.

Step 3.Specify Name, Description, Sync Mode, and Auto Sync. Select Sync by OU for Sync Mode, and Enable for Auto Sync. Automatic synchronization is implemented once a day.
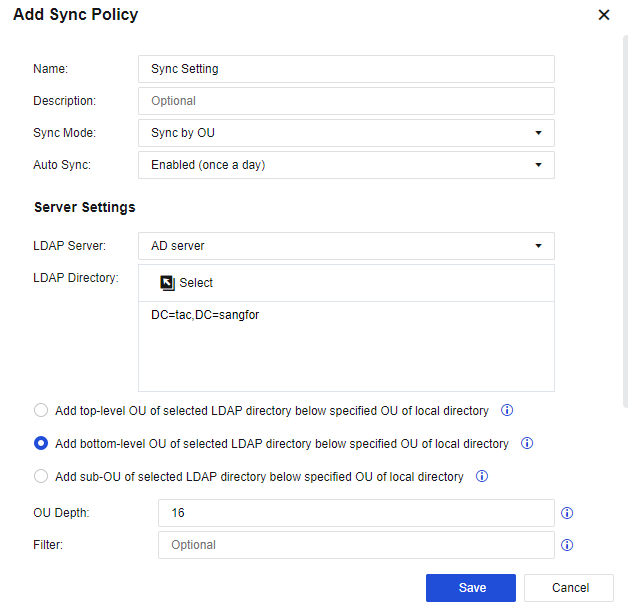
Step 4.In Sync Source Configuration, set information of OUs on the LDAP server to be synchronized.
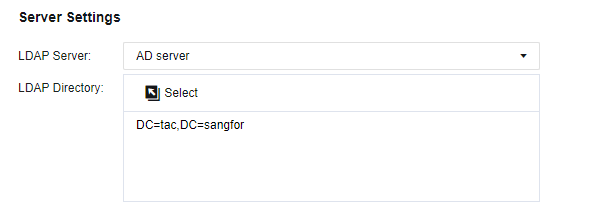
LDAP Server: Enter the LDAP server to be synchronized. In this example, the server configured in the previous step is selected.
LDAP Directory: Specify the OUs to be synchronized on the LDAP server. Click Select to select the OUs to be synchronized in the Select OU window. Click Save.
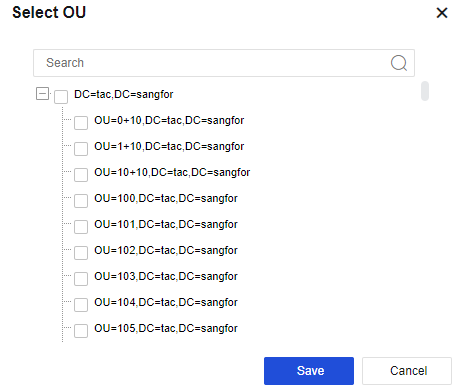
If you check Create local OUs starting from the root node of the remote target, the root domain on the LDAP server will also be synchronized in the form of a group and the OUs synchronized are its subgroups.
If you select Create local OUs from the selected node of the remote target, the synchronization starts from the selected OU.
If you select Create local OUs from the child node of the selected node of the remote target, the synchronization starts from the sub-OU of the selected OU. The selected OU and its affiliated users will not be synchronized to the device.
Maximum depth of imported OUs: Specify the depth of the imported OUs. The value is 10 in this example, indicating that only sub-OUs at level 9 can be synchronized as user groups to the device. However, users of OUs at lower levels can still be synchronized to the device as users under level-9 OUs.
Filter Parameters: Specify the filter parameter for synchronization.
Step 5: In Sync Target Configuration, set the import method, OUs to be synchronized, user location in the organizational structure, and user attributes.
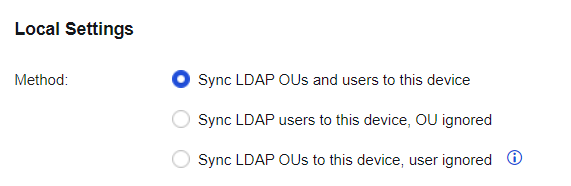
Method: Whether to synchronize OUs and users. Select based on requirements.
Sync LDAP OUs and users to this device: Synchronize OUs as user groups to the device and OU users to the OU user groups.
Sync LDAP users to this device, OU ignored: Synchronize OU users instead of OUs to the device.
Sync LDAP OUs to this device, user ignored: Synchronize OUs but no OU users to the device as user groups. In this example, select Sync LDAP OUs and users to this device.
Allow concurrent logins of the sync local account on multiple terminals by default: The domain account synchronized to the device is a public account by default and can be logged in on multiple PCs. If this option is not selected, the user is a private account and can be logged in on a single PC at a time.
Import remote targets to this location: Select an existing group on the device, to which synchronized OUs will be subgroups. In the Select OU window, select the corresponding group and click Save.
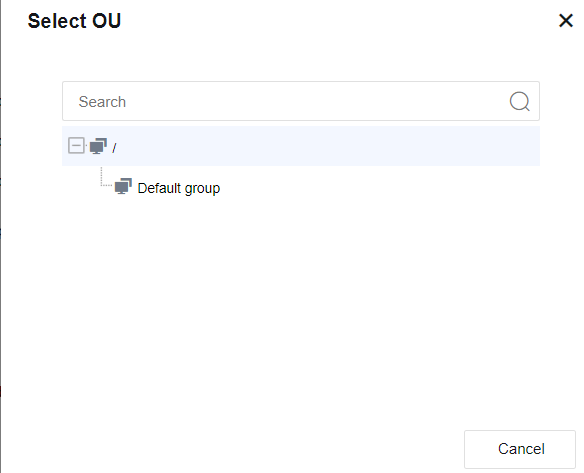
Step 6: Click Save to complete setting the policy. The added synchronization policy is displayed on the LDAP User Sync page. Click Sync Now to perform a synchronization immediately. Or wait for the daily automatic synchronization.

Step 7: Select User Management/Group/User to view the synchronization result under Organization Unit, as shown in the following figure. It can be seen that the imported OUs and users are consistent with those on the LDAP server.
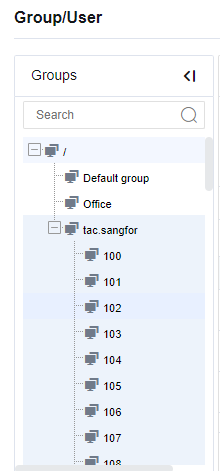
If the names of OUs or users to be synchronized duplicate with existing user groups or users on the device, the synchronization will fail.
Delete synchronization policy
When a synchronization policy is unwanted, you can delete it. Specifically, enter the LDAP Sync page. Select the synchronization policy to be deleted and click Delete. The deletion of a synchronization policy will not affect the groups and users already synchronized to the device.

View synchronization report
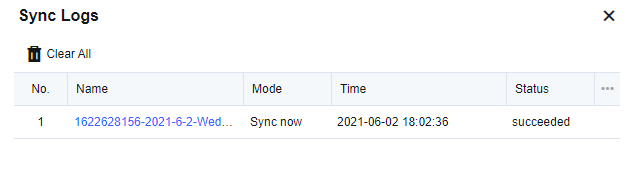
The device generates a synchronization report every time it synchronizes from LDAP to inform you of the synchronization status. Click View Sync Report. On the Sync Report page, select and download the synchronization reports you want to view.


 {{ $t('index.defaultHeader.chromeBrowserTip') }}