


{{ secondMenu.name }}






These channels guarantee the use of important applications. By setting the minimum bandwidth, they ensure that the bandwidth occupied by the specified type of data is not smaller than a particular value to ensure that important applications can use the bandwidth properly in a busy line.
Guaranteed Channel Setting
A company leased a 10Mb/s telecommunications line, and there are 1,000 Internet users on its LAN.
They need to ensure that the data of the Finance Department's access to online banking websites and sending and receiving emails will occupy bandwidth not less than 2Mb/s when the line is busy and cannot exceed 5Mb/s.
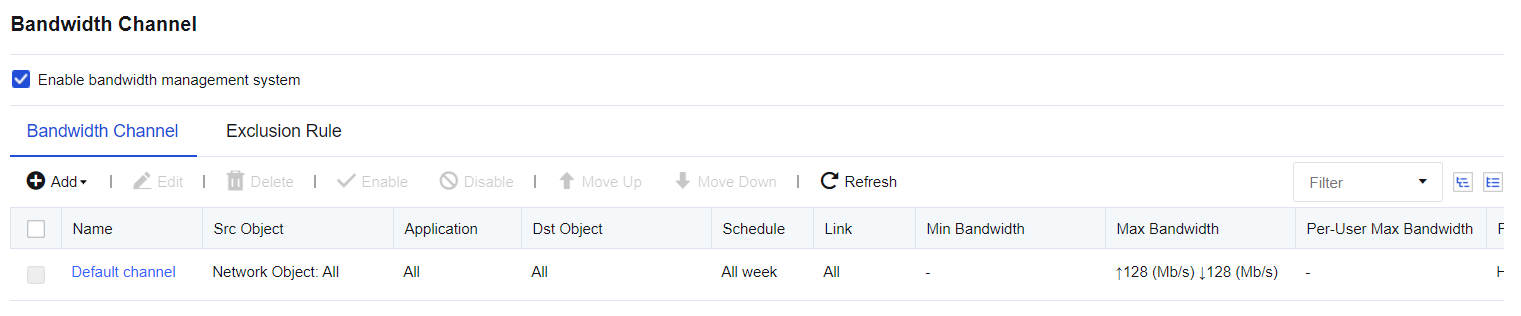
Step 1.Go to Bandwidth Management > Bandwidth Channel, and select Enable bandwidth management system to enable bandwidth management.
Step 2.Go to Bandwidth Management > Link Settings to configure the link list and link rules. For more information about how to configure a virtual line, see Section 7.5.2 Link Configuration.
Step 3.Configure the guaranteed channel. In this example, the channel is used to ensure the bandwidth for the data the staff in the Finance Department use to access online banking websites and receive and send emails.
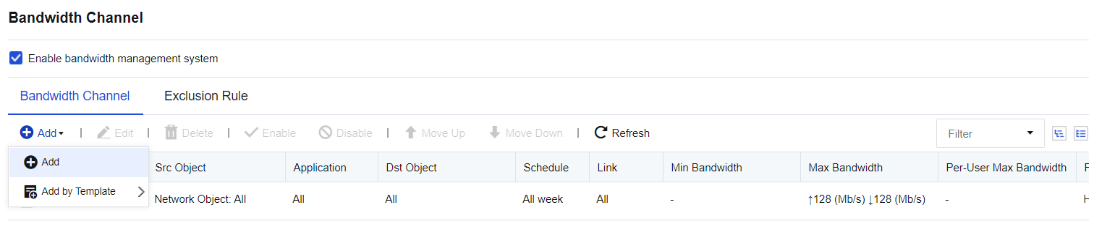
Step 4.On the Bandwidth Channel page, click Add and select Add. Then, the Add Bandwidth Channel dialog box appears.
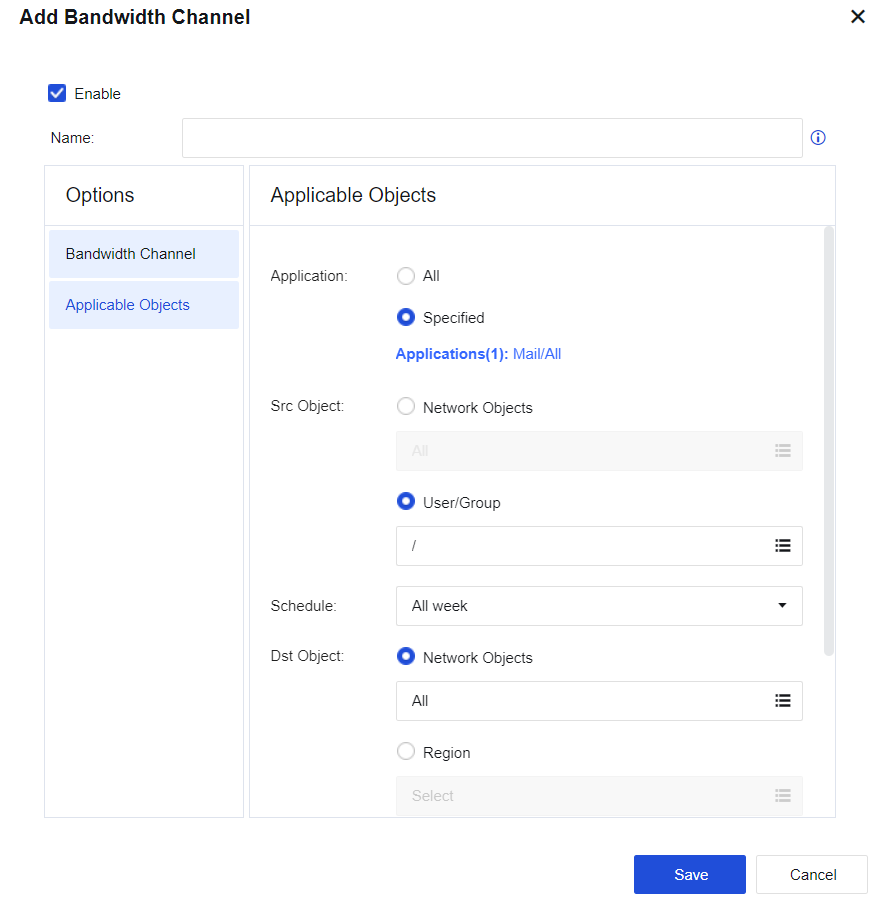
Step 5.Select Enable to enable this channel. Otherwise, the channel is disabled and the bandwidth management function does not take effect.
Name: Enter the name of the channel.
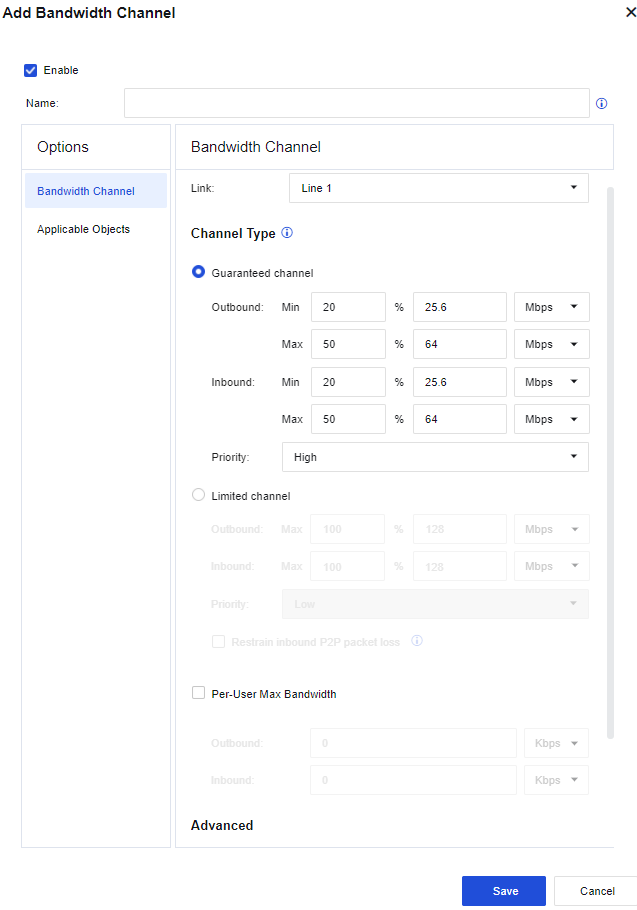
In the Options pane, select Bandwidth Channel, and set relevant attributes of the channel in the right window.
Bandwidth Channel: Set the target line, channel type, bandwidth of the limited or guaranteed channel, and maximum bandwidth per single user, etc.
Link: Select the line applicable for the channel. In this case, the channel is matched only when the data goes through this line. The lines listed in the Link drop-down list need to be set on the Link page in advance. For more information about how to set a link, see Section 7.5.2 Link Configuration.
Channel Type: Select the channel type and specify the bandwidth value. In this example, the bandwidth for the data of the Finance Department staff accessing the online banking websites and sending and receiving emails should be guaranteed at 2 Mb/s (Min) and 5 Mb/s (Max). Select Guaranteed channel, and set the minimum and maximum values of both outbound bandwidth and inbound bandwidth to 20% and 50% of the total bandwidth respectively. The total bandwidth is 10 Mb/s, so the minimum bandwidth is 2 Mb/s and the maximum bandwidth is 5 Mb/s.
Priority: Includes High, Medium and Low, and indicates the priority for the channel to occupy the idle bandwidth when other channels are idle.
Per-User Max Bandwidth: Limits the bandwidth occupied by a single IP address matched to this channel. In this example, there is no need to limit the maximum bandwidth per user, so the option is not selected.
Advanced: If you select this option, each WAN IP address is considered a user in the channel so that the bandwidth is evenly allocated among channel users. Single-user maximum bandwidth' attribute is made available for WAN IP address. (This option is usually used for servers providing external services. Proceed with caution.)
Channel Usage Range: Set the types of data that can be matched to the channel, i.e., the usage range of the channel. The setting range includes app category, applicable object, effective time, destination IP group, subinterface, VLAN. Data should meet all these rules to be matched to the channel.
Applicable Application: Set the app category. If you select All, it is valid for all data types. If you select Custom, select specific app categories and click Select Application. In the Select Application dialog box that appears, select Application category and Website Type. In this example, to guarantee the bandwidth for the data of receiving and sending emails and accessing online banking websites, select Mail/All for the Application category and Bank Website for Website Type.
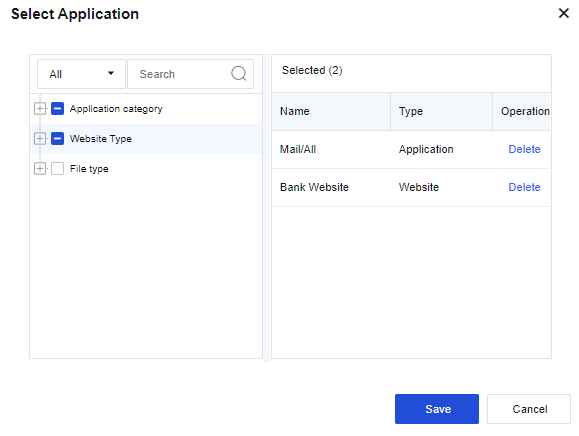
In addition, File Type is used to control the types of files downloaded via HTTP and FTP protocols. Confirm whether the range selected in Selected is correct. Click Save to complete the settings of applicable applications.
Applicable Objects: Set the network objects and user groups for which the channel is valid. The applicable object can be either IP address-based or user-based. In this example, to guarantee the bandwidth for all users in the Finance Department, select User. In the Groups section, select the required group path. In the Current Group section, select Group and User. In the Selected section, view the list of selected users and user groups. After you select Applicable Objects, click Save to complete the settings.
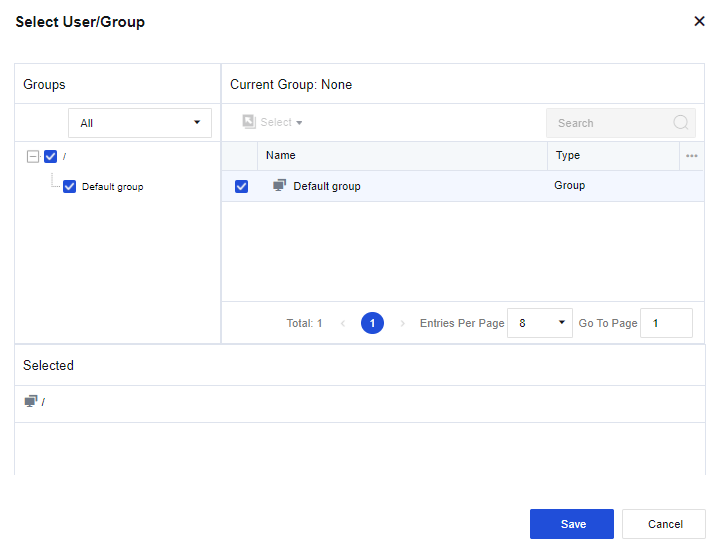
Schedule: Set the effective time of this channel.
Network Objects: Set the rules for the destination IP address.
Region: Set the destination IP address.
Subinterfaces: Set the subinterface to which the traffic channel is applicable.
VLAN: Set the VLAN to which the traffic channel is applicable.
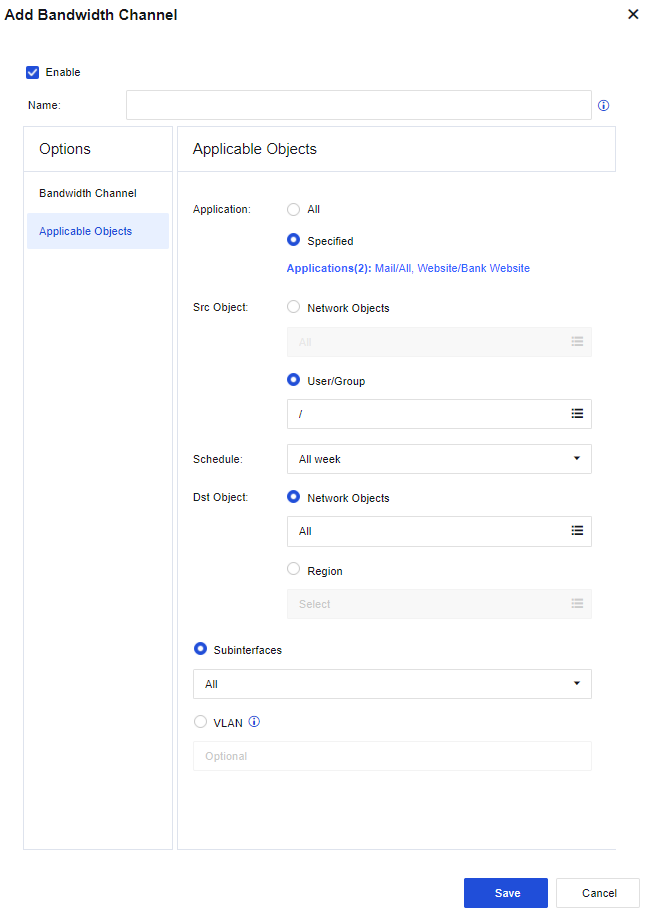
After you set these parameters, click Save to complete the setting for a guaranteed channel.
Step 6.After you click Save, the set channel will appear in the bandwidth allocation, and the guaranteed channel configuration will be completed.

1. The total percentage of the guaranteed bandwidth channels may exceed 100%. In that case, the minimum bandwidth of each guaranteed channel will be decreased proportionately. For example, you have set two channels, including the first with a guaranteed bandwidth of 30% and the second with a guaranteed bandwidth of 90%. So, 30/(90+30)% (i.e., 25%) is allocated to the first channel and 90/(90+30)% (i.e., 75%) to the second channel.
2. Priority: When there is actual idle bandwidth, channels with higher priorities will occupy the idle bandwidth first.
If you select Limited channel, you need to set the maximum channel bandwidth to control the traffic for the data matched to the limited channel and control the occupied bandwidth which shall not exceed the set maximum bandwidth.
Limited Channel Configuration
A company leases a 10 Mb/s China Telecom line and has 1,000 users on its LAN. It is found that many Marketing Department staff often use downloading tools such as Thunder and P2P to download, occupying most of the bandwidth and affecting the normal office business of other departments. We can set the bandwidth occupied by downloading to be limited to 2 Mb/s for the Marketing Department and 30 KB/s for each user via the traffic control system.
Step 1.Navigate to Bandwidth Management > Bandwidth Channel, and enable the bandwidth management system.
Step 2.Select Enable bandwidth management system to enable bandwidth management.
Step 3.Navigate to Bandwidth Management > Link to configure the virtual line list and virtual line rules.
Step 4.Configure the limited channel.
In this example, the bandwidth management is performed for the P2P and downloaded data of Marketing Department personnel. The total bandwidth occupied by these applications is limited to no more than 2 Mb/s.
On the Bandwidth Channel tab, click Add to add a Level 1 channel. In the Add Bandwidth Channel dialog box, if you select Enable, the channel is enabled. Otherwise, the channel is disabled and does not take effect temporarily.
Enter the name of the channel in the Name field. The channel level indicates the level of the channel and the slash (/) means that the channel is a Level 1 channel.
In the Options pane, select Bandwidth Channel, and set relevant attributes of the channel in the right window.
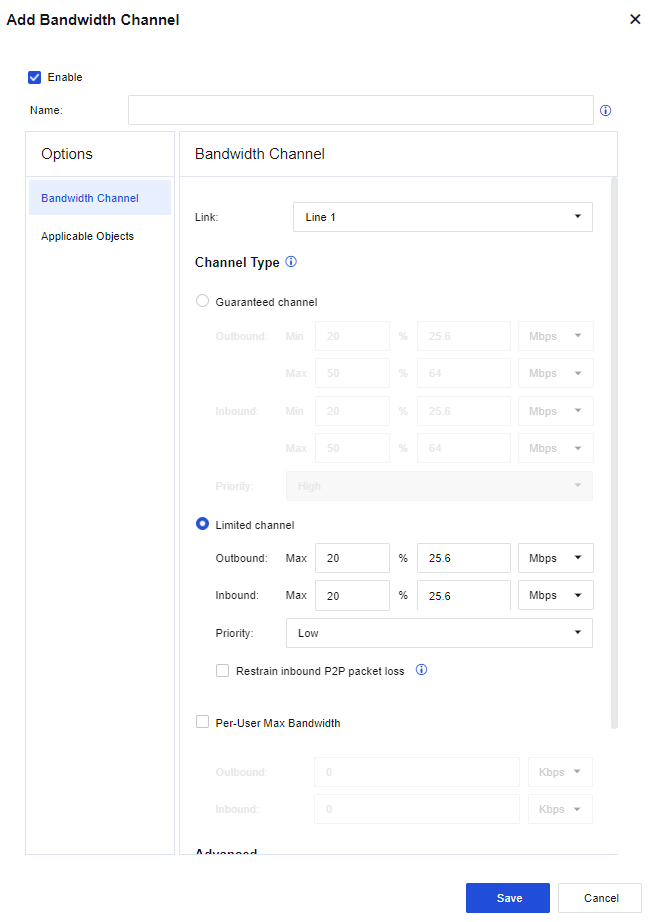
Bandwidth Channel: Set the target line, channel type, bandwidth of the limited or guaranteed channel, and maximum bandwidth per single user, etc.
Link: Select the line applicable for the channel. In this case, the channel is matched only when the data goes through this line.
Channel Type: Select the channel type and specify the bandwidth value. In this example, the bandwidth for the data of the Marketing Department staff accessing the online banking websites and sending and receiving emails should be guaranteed. In this case, select the Limited channel and set the Outbound and Inbound parameters to 20% and 50% of the total bandwidth. The total bandwidth is 10 Mb/s, so the maximum bandwidth is 2 Mb/s. Priority: Includes High, Medium and Low, and indicates the priority for the channel to occupy the idle bandwidth when other channels are idle.
Per-User Max Bandwidth: Limits the bandwidth occupied by a single IP address matched to this channel. In this example, you need to limit the bandwidth occupied by the P2P and download data of each Marketing Department user to 30 KB/s. In this case, set the Outbound and Inbound parameters to 30 KB/s.
Among-User Bandwidth Allocation Policy: Set how the bandwidth is allocated among the users matched to this channel. By default, Average allocation is selected. In this case, the bandwidth is evenly allocated among users. Note that the users here refer to those with traffic matched to this channel. Users selected for Channel Usage Range but do not have such application traffic do not participate in the average allocation.
Advanced: If you select this option, each WAN IP address is considered a user in the channel so that the bandwidth is evenly allocated among channel users. Single-user maximum bandwidth' attribute is made available for WAN IP address. (This option is usually used for servers providing external services. Proceed with caution.)
Applicable Object: Set the types of data that will be matched to the channel, i.e., the usage range of the channel. The setting range includes app category, applicable object, effective time, and destination IP group. Data should meet all these rules to be matched to the channel.
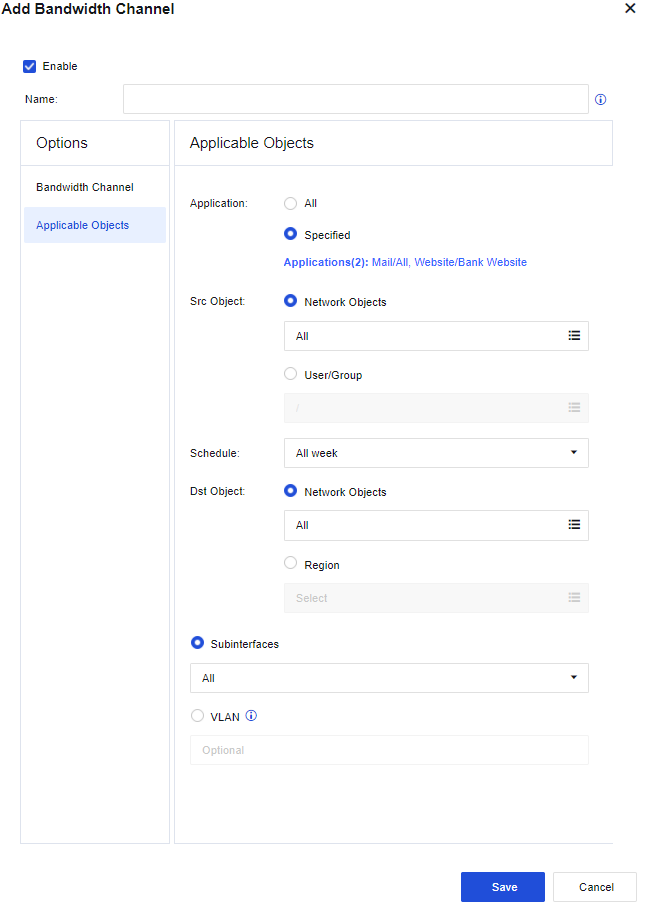
Application: Set the app category.
All: Indicates that it is valid for all data types.
Custom: Select a specific app category.
Click Select Application. In Select Application dialog box that appears, select the Application category.
In this example, the P2P-related data and the download data of downloading tools shall be subject to bandwidth management, and you can select Download Tools/All, P2P/All, and P2P Stream Media/All. In addition, you may also select Website Type and File Type. The former controls the data access to certain types of websites, whereas the latter controls the types of files downloaded via HTTP and FTP protocols. Confirm whether the range selected in Selected is correct. Click Save to complete the settings of applicable applications.
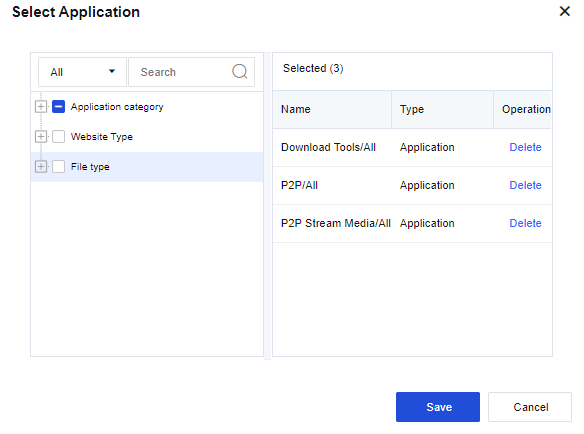
Src Objects: Set the network objects and user groups for which the channel is valid. The applicable object can be either IP address-based or user-based. In this example, to guarantee the bandwidth for all users in the Marketing Department, select User. In the Groups section, select the required group path. In the Current Group section, select Group and User. In the Selected section, view the list of selected users and user groups. After you select Applicable Objects, click Save to complete the settings.
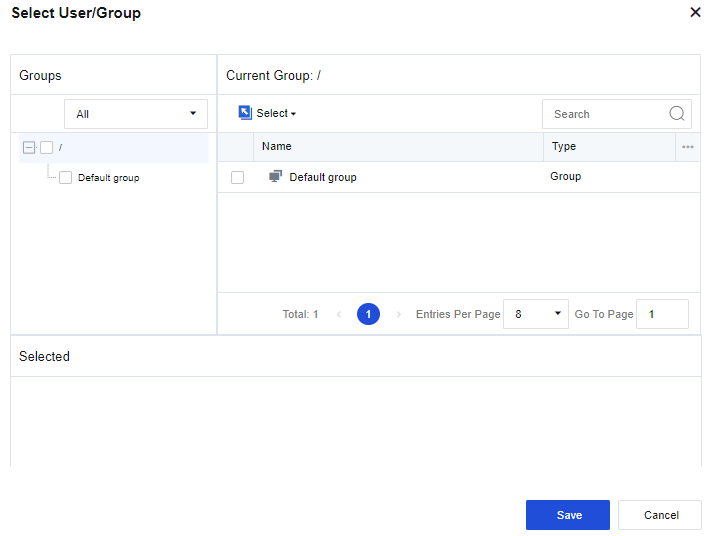
Schedule: Set the effective time of this channel.
Dst Object: Set the rules for the destination IP address.
Subinterfaces: Set the subinterface to which the traffic channel is applicable.
VLAN: Set the VLAN to which the traffic channel is applicable.
After the preceding parameters are set, the following page is displayed.
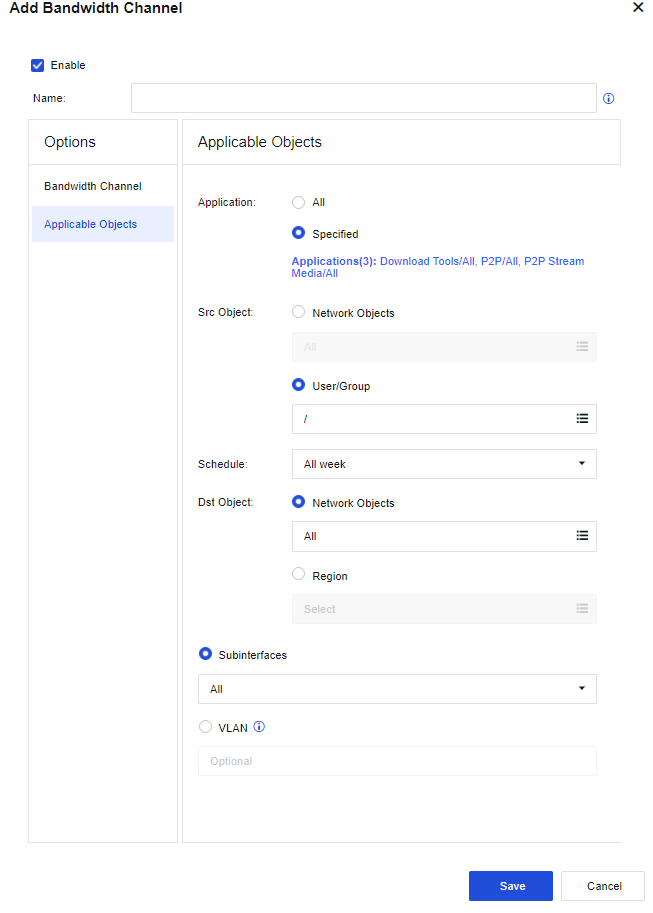
After setting, click Save to complete the setting for the limited channel.
Step 5. After you click Save, the set channel will appear on the Bandwidth Channel tab. The limited channel is configured.
The exclusion policy sets some types of data that do not match any traffic control channels. The purpose is to exclude part of the data from the traffic control policy. For example, when the device is deployed in network bridge mode and the DMZ of the front-end firewall is connected to some servers, there is no need to control the traffic of data accessing this part of servers on the LAN. This is because the data does not go through the internet and does not to be subject to the limit on the internet bandwidth. In that case, set an exclusion policy for the applications and IP addresses of these servers.
Exclusion Policy User Setting
For example, the device is deployed in network bridge mode, and the DMZ of the front-end firewall is connected to some servers. In this case, exclude the data accessing the servers.
Step 1.Go to Objects > Network Objects, create a new IP group, and add the IP address to be excluded.
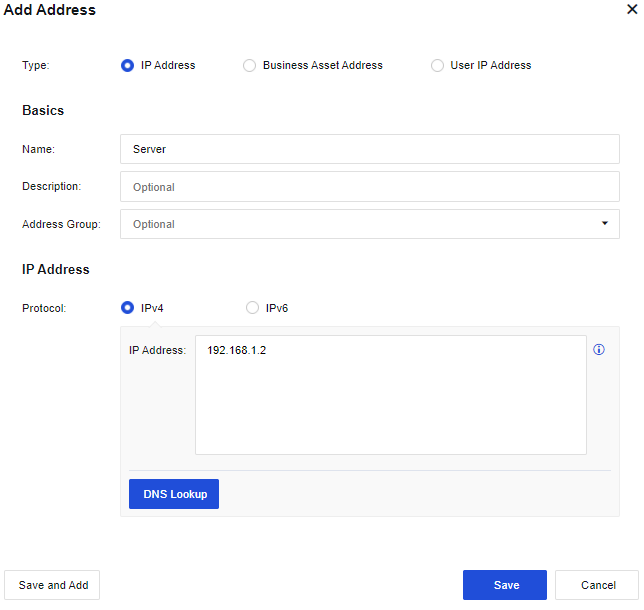
Step 2.Go to Bandwidth Management > Bandwidth Channel > Exclusion Rule, and click Add to add the exclusion policy.

Step 3.Set the exclusion policy. Enter the name of the policy, select All for the App Category, parameter and select Server set in Step 1 for the Destination parameter.
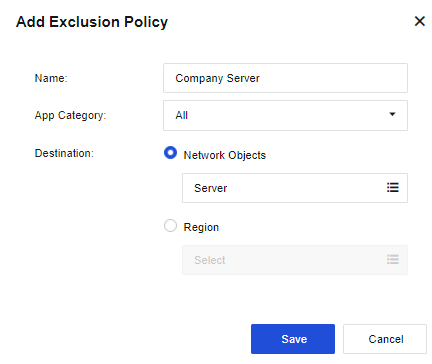
Step 4.Click Save to complete the setting.
The exclusion policy can also exclude those going to certain regions from bandwidth management.


 {{ $t('index.defaultHeader.chromeBrowserTip') }}