


{{ secondMenu.name }}






Security protection policy is a unified entrance for configuring security functions. It allows for the configuration of 6 security functions, including Passive Vulnerability Scan, Intrusion Prevention, Content Security, Web App Firewall, and Botnet Detection.

You can add, delete, enable, disable, move up, move down, move, refresh or filter security protection policies, or configure advanced settings.
This policy is to protect traffic direction accurately, so the correctness of traffic direction is related to whether the corresponding attack behavior can be detected.
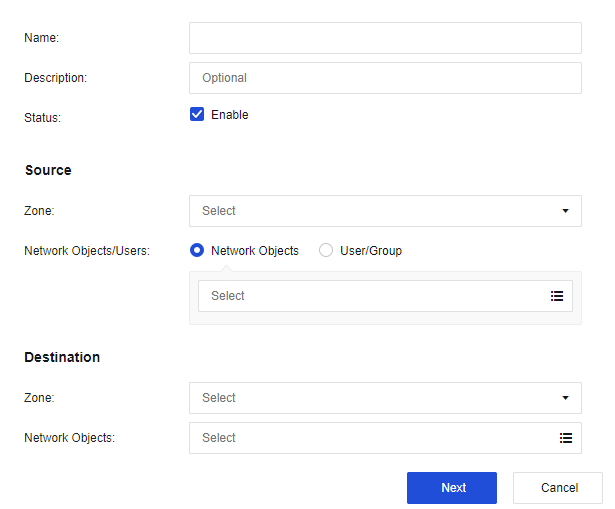
Name: Specify the name of the policy.
Description: Specify custom description.
Status: Specify whether to enable the policy.
Source
Zone: Select the zone where the attack data is initiated.
Network Objects/Users: Select the source IP address of the zone where the attack data is initiated.
Destination
Zone: Select the destination zone where the data access direction is located.
Network Objects: Select the destination IP address of the zone where the data access direction is located.
Policy for server scenario mainly protects users' services to prevent the service server from being attacked and improve network security. It mainly includes these functional modules: passive vulnerability scan, intrusion prevention, content security, web app firewall, website tamper protection, botnet detection, and correlated block.
Click Add and select Policy for Server Scenario, as shown in the following figure.
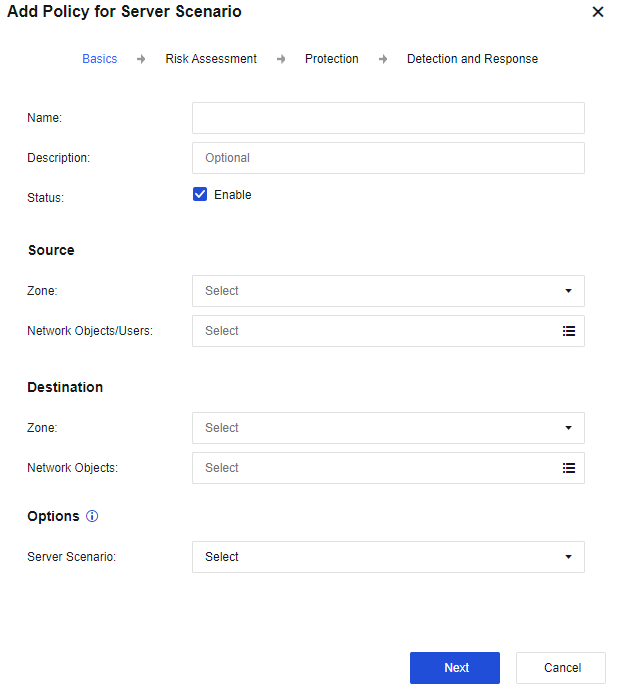
For more information about network configuration, see Section 7.3.1 Security Protection Policy. Take note of the source address and destination address direction.
Options
Server Scenario: Determines in advance whether there will be proxy scenarios, such as SNAT or CDN, during access. Two options are available: Source is not processed via SNAT or CDN and Source is processed via SNAT or CDN. The setting is mainly for the reference of the subsequent anti-scanning policy. If you select Source is not processed via SNAT or CDN, an alert message will appear when you select Default Template II(Scanner Blocker enabled for non-proxy access).

Content Distribution Network (CDN) is an intelligent virtual network based on the existing network. It relies on the edge servers deployed in various places and enables users to obtain the required contents nearby through the functional modules such as load balancing, content distribution, and scheduling of the central platform. It will reduce network congestion and improve user access response speed and hit rate. If the edge server cannot provide this service, it will act as a proxy and use the local IP address to send a resource request to the central server.
Click Next to go to the Risk Assessment step, Passive Vulnerability Scan, as shown in the following figure.
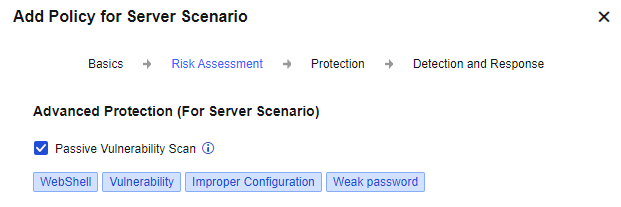
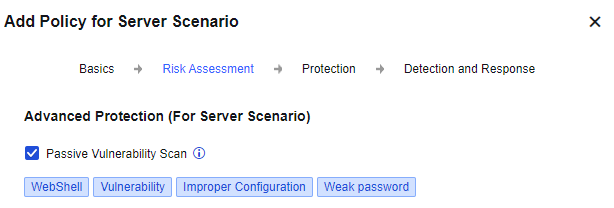
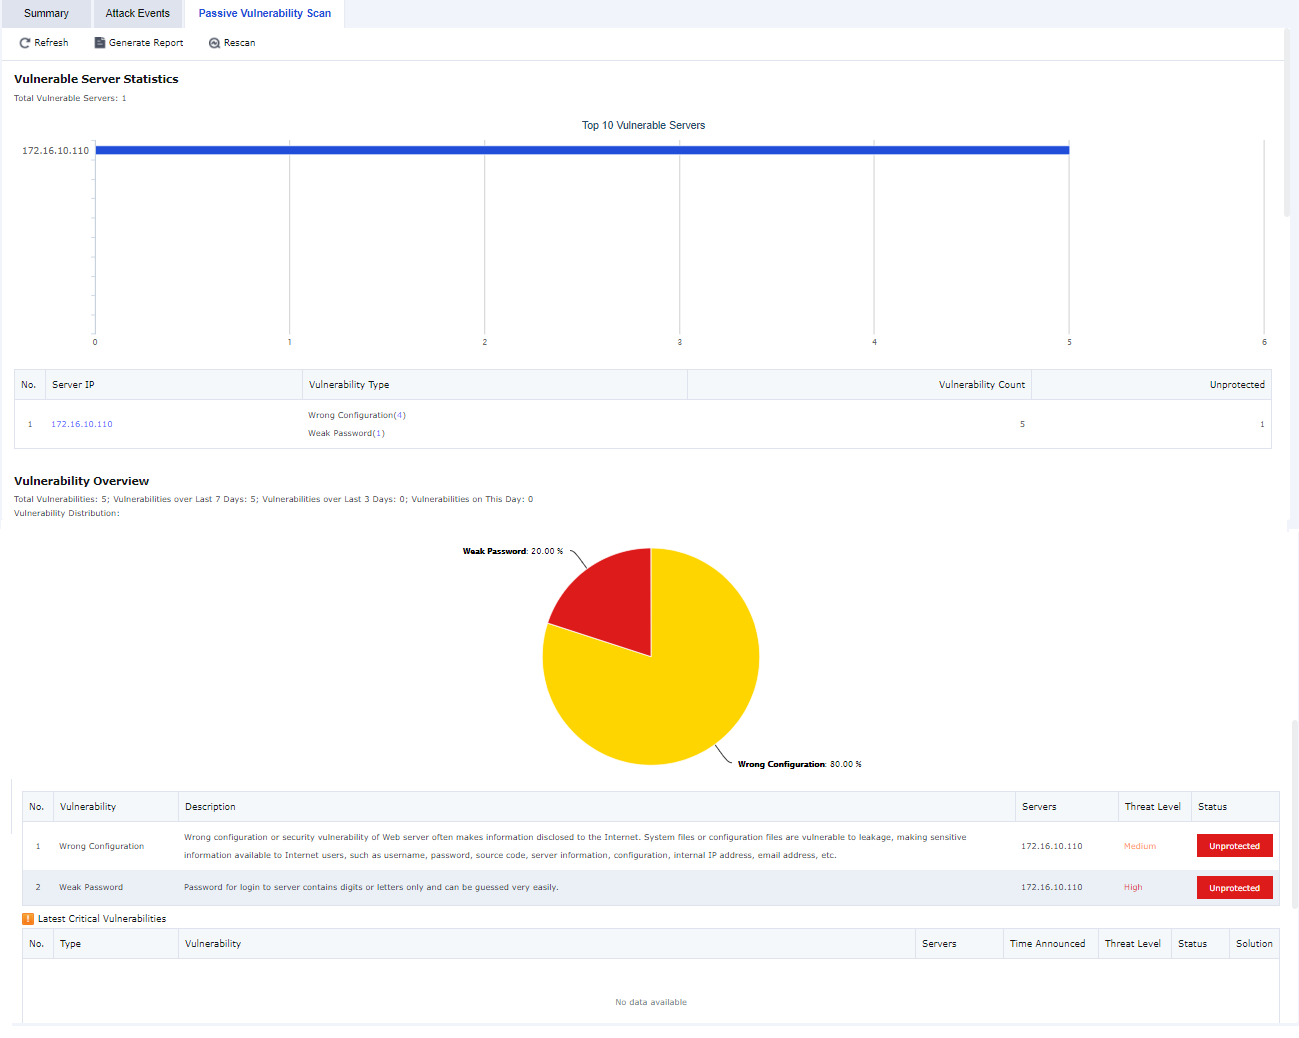
Passive Vulnerability Scan: Scan passive traffic observation to detect risks such as vulnerability, improper configuration, and weak passwords in the service system in real-time before an event occurs. Real-time analysis is conducted on the specified data in the network based on the part of built-in vulnerability rules. This function is to discover security vulnerabilities of the user's network and present users with a report of the potential risks and solutions to the vulnerabilities. You can navigate to Security Operations > Business Asset Security > Passive Vulnerability Scan to view the reports.
Click Next to go to the Protection step. See the figure below.
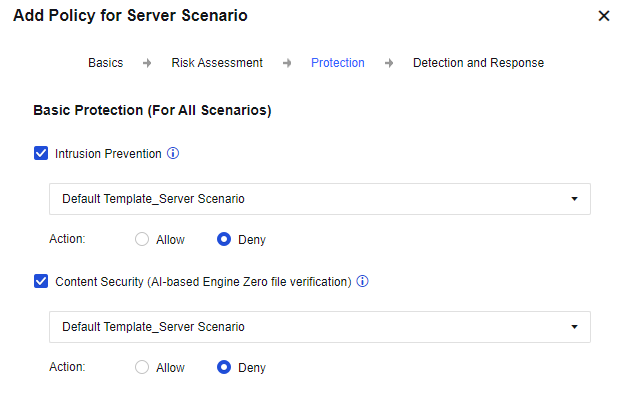
Basic Protection (For All Scenarios):
Intrusion Prevention: Select whether to enable Intrusion Prevention, for which the intrusion prevention template can be called. Identify attacks against system vulnerabilities, application vulnerabilities, and brute-force attacks of accounts.
Content Security (AI-based Engine Zero file verification): Select whether to enable Content Security, for which the content security policy template can be called. This option includes three functions: mail security, URL filtering, and file security, based on which threats in network communication content can be effectively identified defended.
Action: Set whether to allow or deny the data packets meeting the defined rules. If you select Allow, the data packet will be tested only and not be denied. If you select Deny, the data packet will be denied or allowed according to the action defined in the rule database.
Advanced Basic Protection (For All Scenarios):
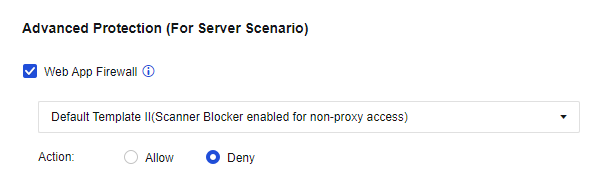
Web App Firewall: Select to enable Web App Firewall, and select the related default template. It is a website protection policy specially designed for web servers, and can prevent attacks targeting web apps such as system command injections, SQL injections, and XSS attacks.
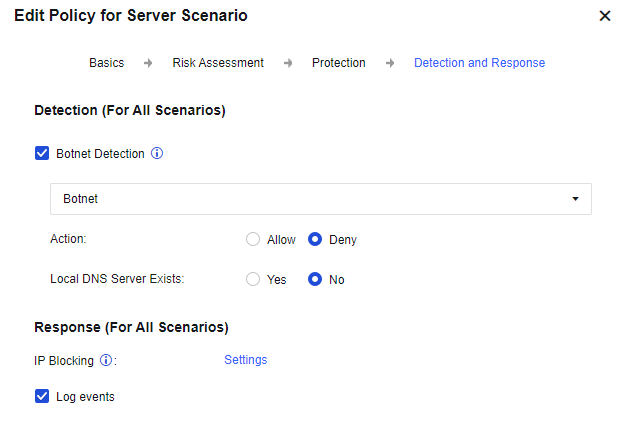
Click Next to go to the Detection and Response step. See the figure below.
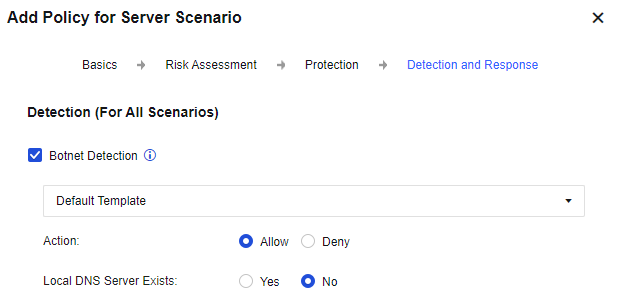
Detection (For All Scenarios):
Botnet Detection: Select to enable Botnet Detection, and select the default template.
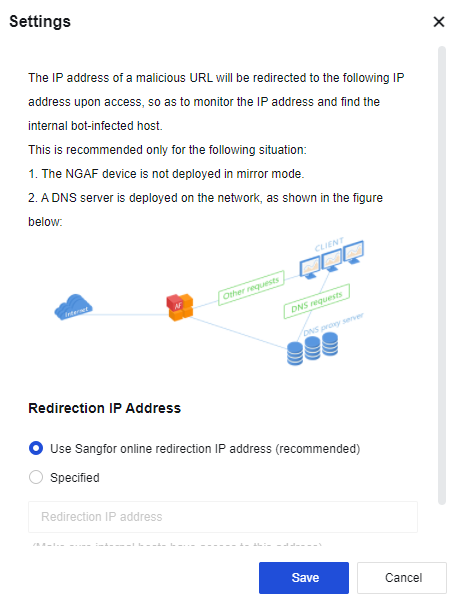
Local DNS Server Exists: If a local DNS server exists, the detected malicious domain name will be redirected. The IP address obtained by parsing the malicious domain name will be replaced by the following redirected IP address to monitor the access to the IP address, to locate the IP address of a real host infected by the botnet virus in the LAN.
Log events: Select Log events. Then, triggered attacks will be logged in the security log.
Response (For All Scenarios):
IP Blocking: Select Enable IP blocking to enable this parameter. Then, any one of the intrusion preventions rules, WAF rules, and content security module will block the source IP address of the attack after detecting an attack.
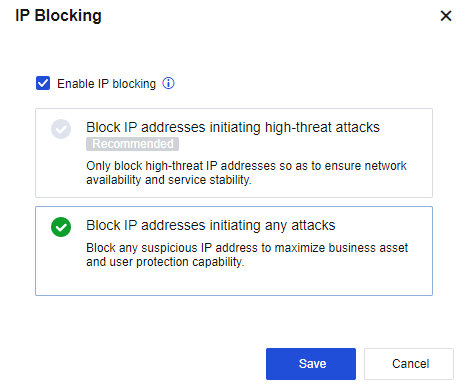
1. Block IP addresses initiating high-threat attacks: It is a high-level rule specified for intrusion prevention, WAF, and DOS.
2. Block IP addresses initiating any attacks: The correlated block will be triggered by the "blocking" event in intrusion prevention, WAF, and DOS.
3. Triggering IPS password blasting, WAF vulnerability anti-scanning, CC attack, backdoor anti-scanning, and DDOS attack will be automatically blocked, without enabling IP blocking.
An enterprise uses a web server to provide services to the internet and often suffers from malicious attacks from the internet, resulting in service exceptions. Therefore, for service continuity, you must deploy an NGAF device to prevent internet attack and ensure the security of services. At the same time, you must carry out a risk analysis on the server's vulnerabilities to detect the risk problems existing in the server.
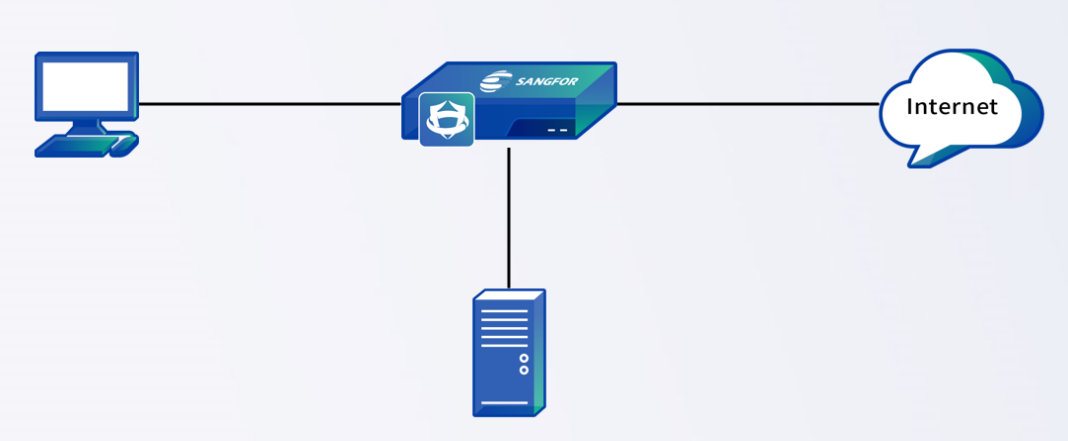
Step 1.Optional. Create intrusion prevention, content security, web application firewall, botnet detection, and network object templates to facilitate the call of policies for server scenarios and subsequent adjustment of policies.
Step 2.Click Add and select Policy for Server Scenario. In the Add Policy for Server Scenario dialog box that appears, enter the source IP address, zone, and other information, as shown in the following figure.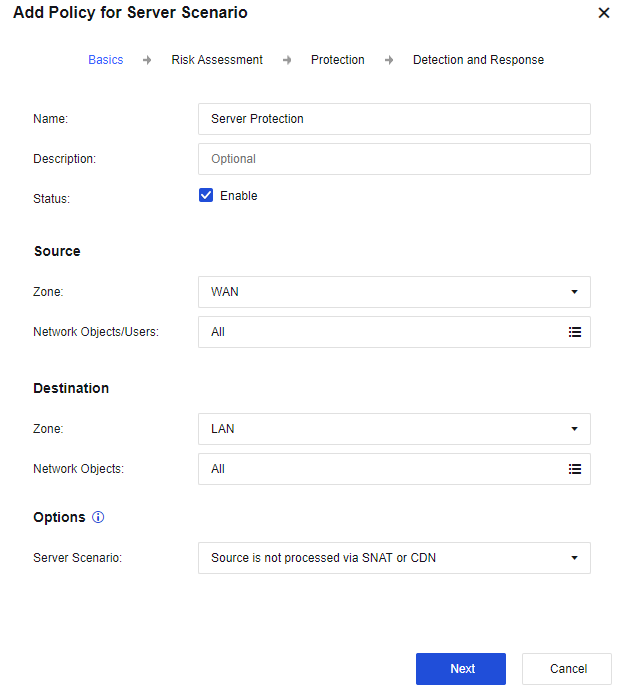
Step 3.Click Next to go to the Risk Assessment step, as shown in the following figure.
Step 4.Click Next, set the Instruction Prevention, Content Security (AI-based Engine Zero file verification), and Web App Firewall parameters, and block the attack behavior, as shown in the following figure.
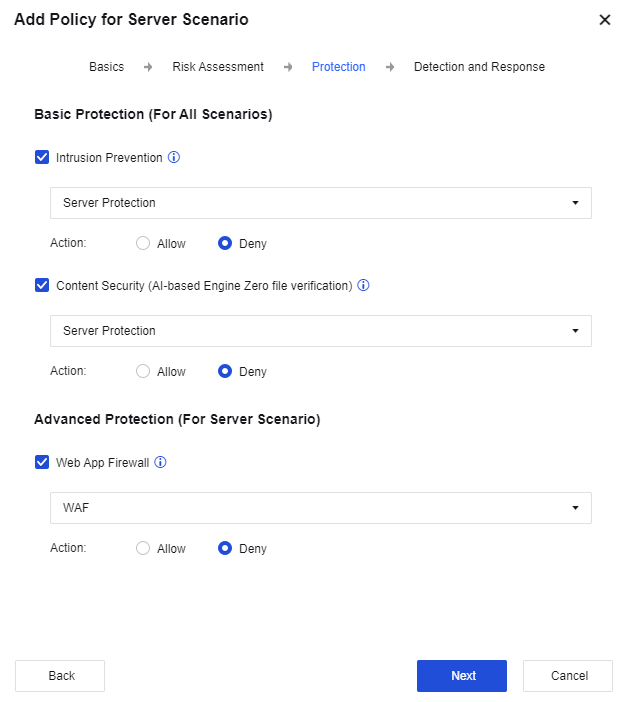
Step 5.Click Next to set the Botnet Detection and IP Blocking parameters, as shown in the following figure.
Step 6.After the configuration is complete, view the result on the Policies page.

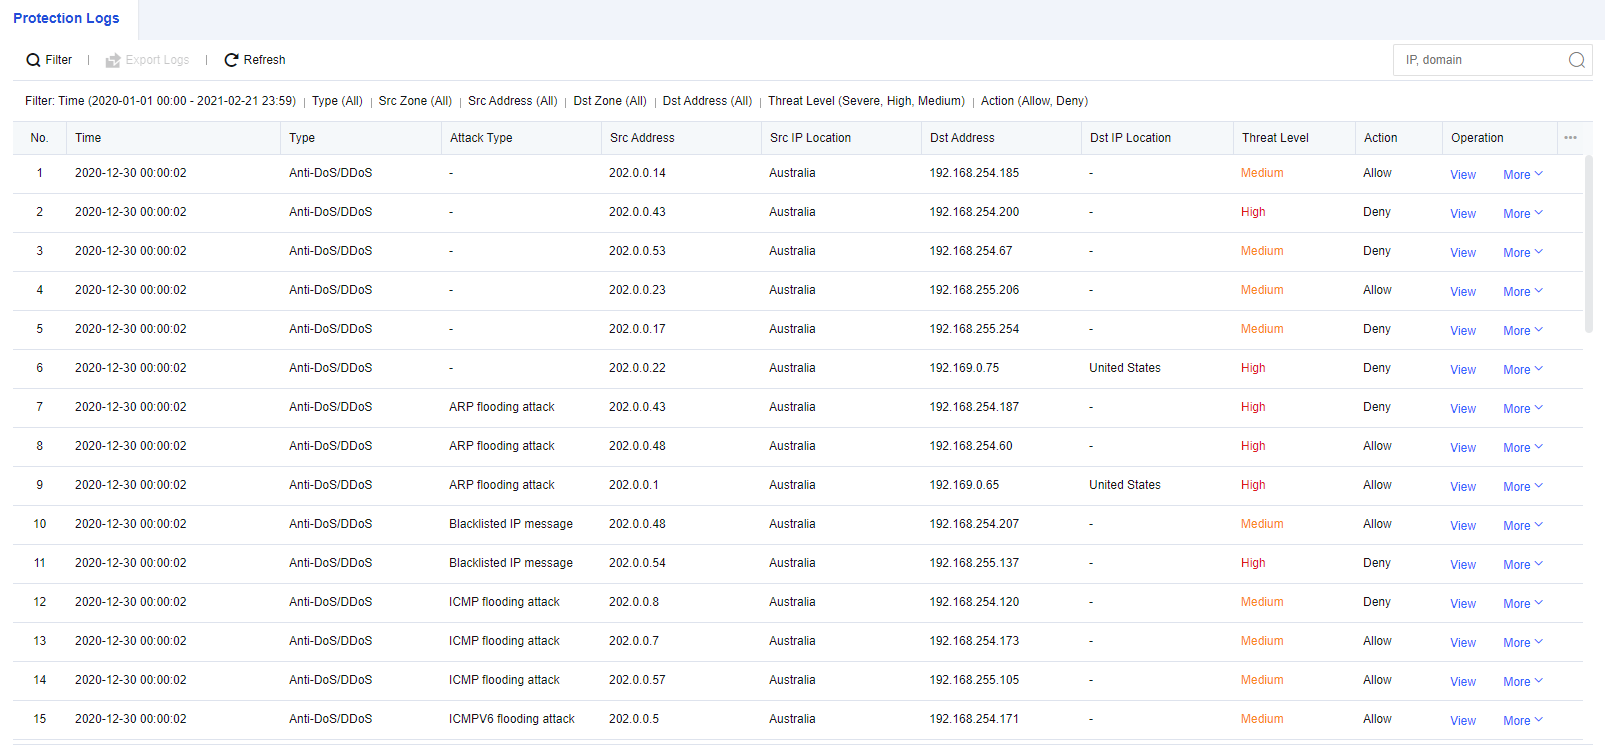
Step 7.Use the Xhack tool to attack the LAN server via the internet.
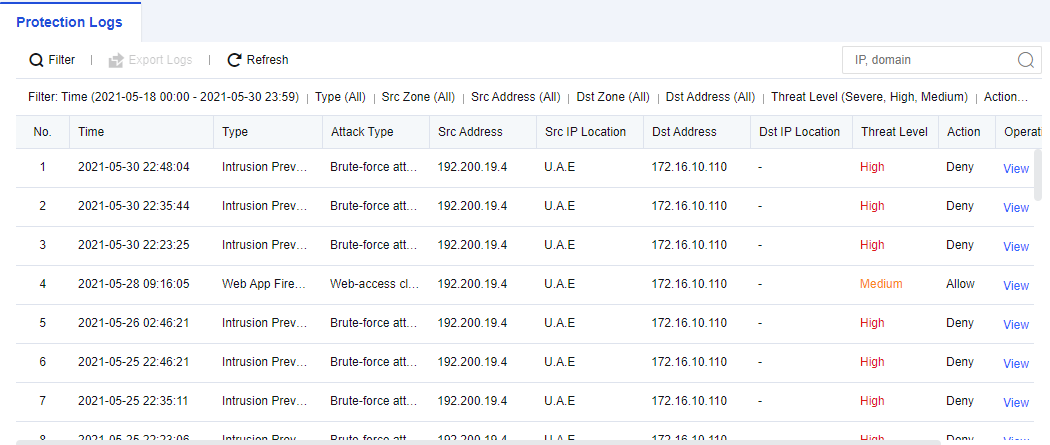
Step 8.View the security log to detect malicious attacks such as WAF, IPS, and botnet, as shown in the following figure.
Step 9.To view the passive vulnerability scan result, navigate to Security Operations > Business Asset Security > Passive Vulnerability Scan, as shown in the following figure.
Policy for internet access scenario mainly protects the end-users of customers, to prevent endpoints from being attacked and improve the security of the LAN. This policy mainly includes functions such as intrusion prevention, content security, and botnet detections.
In the office network environment of an enterprise, internal personnel may attack the internet to cause certain legal risks. Therefore, the user's internet access needs to be controlled.
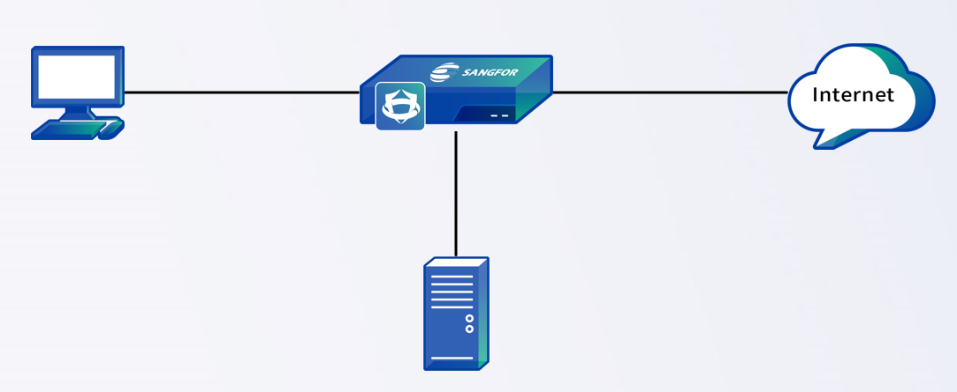
Step 1.Optional. Create intrusion prevention, content security, botnet detection, and network object templates to facilitate the calling of policies for server scenarios and subsequent adjustment of policies.
Step 2.Click Add and select Policy for Internet Access Scenario. In the Add Policy for Internet Access Scenario dialog box, enter the source IP address, zone, and other information, as shown in the following figure.
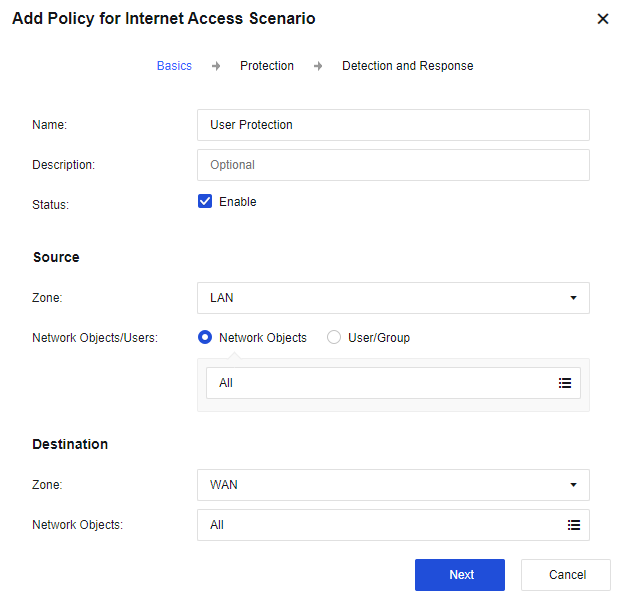
Step 3.Click Next to go to the Protection step, as shown in the following figure
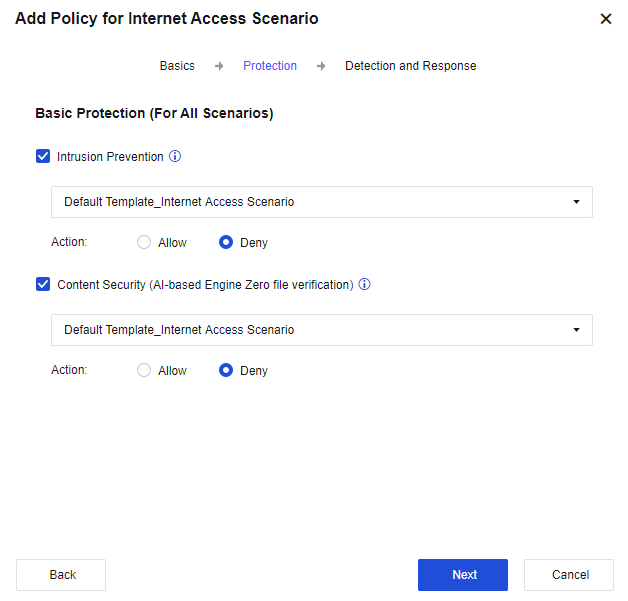
Step 4.Click Next to go to the Detection and Response step, as shown in the following figure.
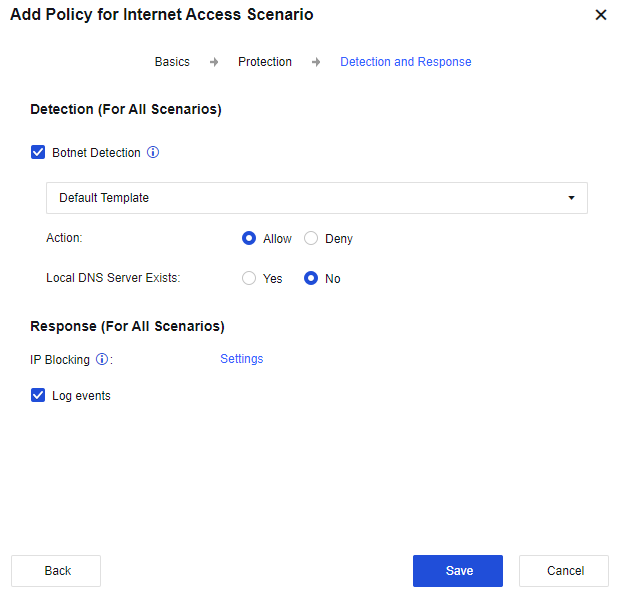
Step 5.Click Save. Then, the configuration is complete.
Step 6.The test results are shown in the following figure.
To add excluded items to rules affecting services or false positives. The rule added with excluded items will not go through detection or be alarmed. Rules added with excluded items include botnet detection, intrusion protection exclusion, passive vulnerability scan, web protection exclusion, content security, email exclusion, and file antivirus exclusion.
Click Advanced. Then, the Advanced panel appears, as shown in the following figure.
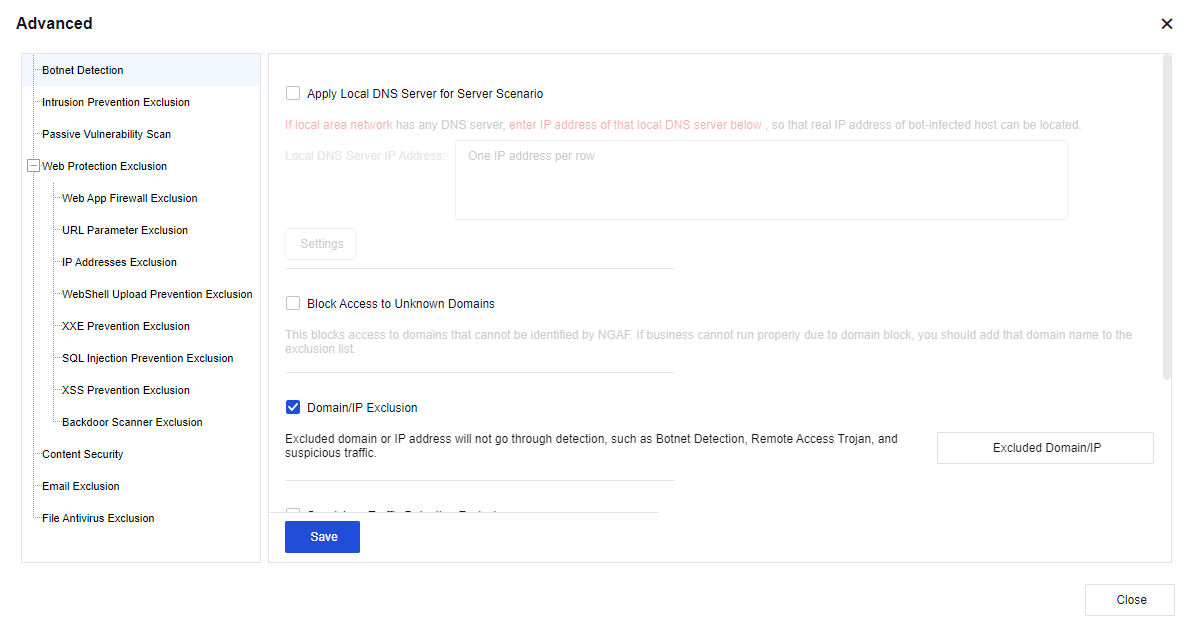
You can set the advanced functions of the botnet detection. See the figure below.
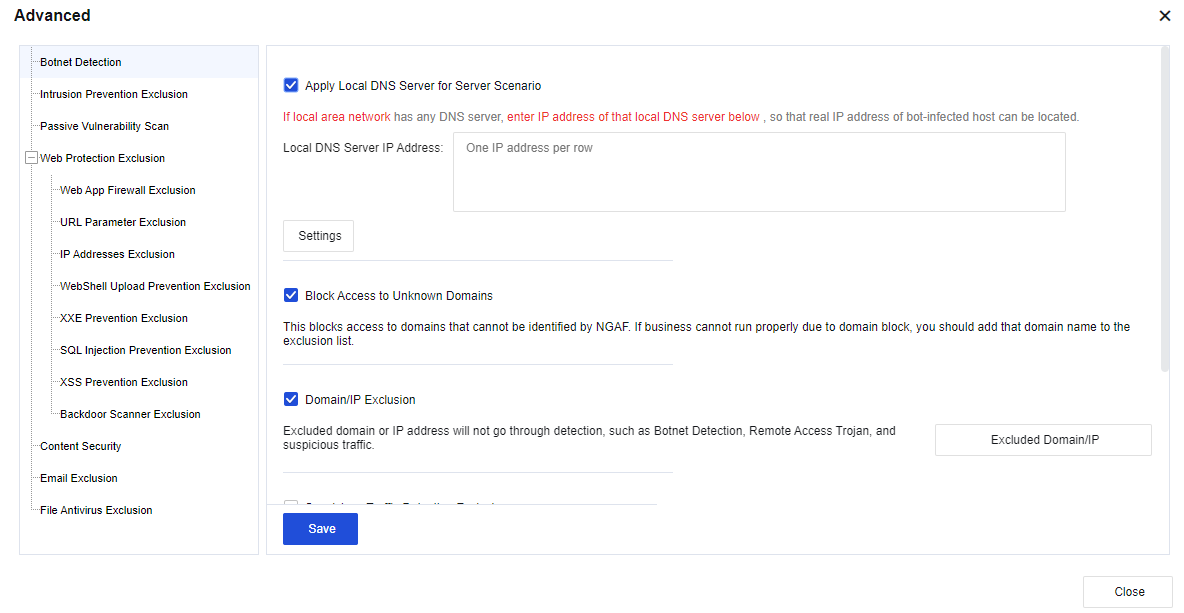
Apply Local DNS Server for Server Scenario: Select this option if a DNS server exists in the LAN. This function is used to locate the real IP address of the bot-infected host in the LAN.
Click Settings to re-direct the IP address of a malicious URL to the following honeypot IP address, to monitor the access to the IP address, and locate the real IP address of the bot-infected host in the LAN.
Block Access to Unknown Domains: If you select this option, access to URLs that cannot be identified by the domain name database of the NGAF device will be blocked. This option is often used in scenarios with high-security requirements. If the normal service cannot be accessed, we recommend that you add the domain name of the service to the whitelist.
Domain/IP Exclusion: Excluded domain names or IP addresses will not go through detection, such as Botnet Detection, Remote Access Trojan, abnormal connections, malicious URLs, and mobile security.
Abnormal Connection Detection Rule Exclusion: This option is valid only for abnormal connections. If you select this operation, the excluded rules during security detection of abnormal connections for specified destination IP addresses will not be detected.
Botnet activity detection: locates suspected botnet hosts by performing suspicious activity detection. However, all rules will only perform detection and record logs rather than blocking data traffic.
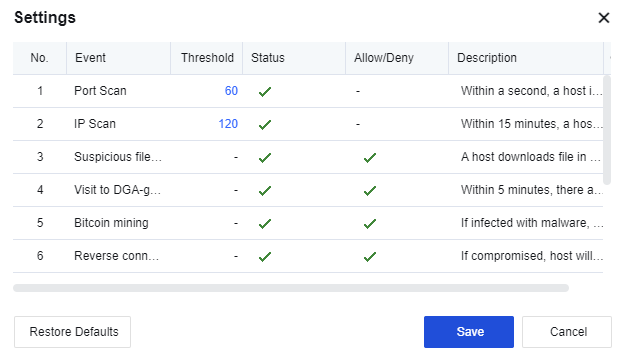
Click Save to save the advanced settings for botnet detection.
To set exclusion data that does not need to be detected for intrusion prevention. See the figure below.
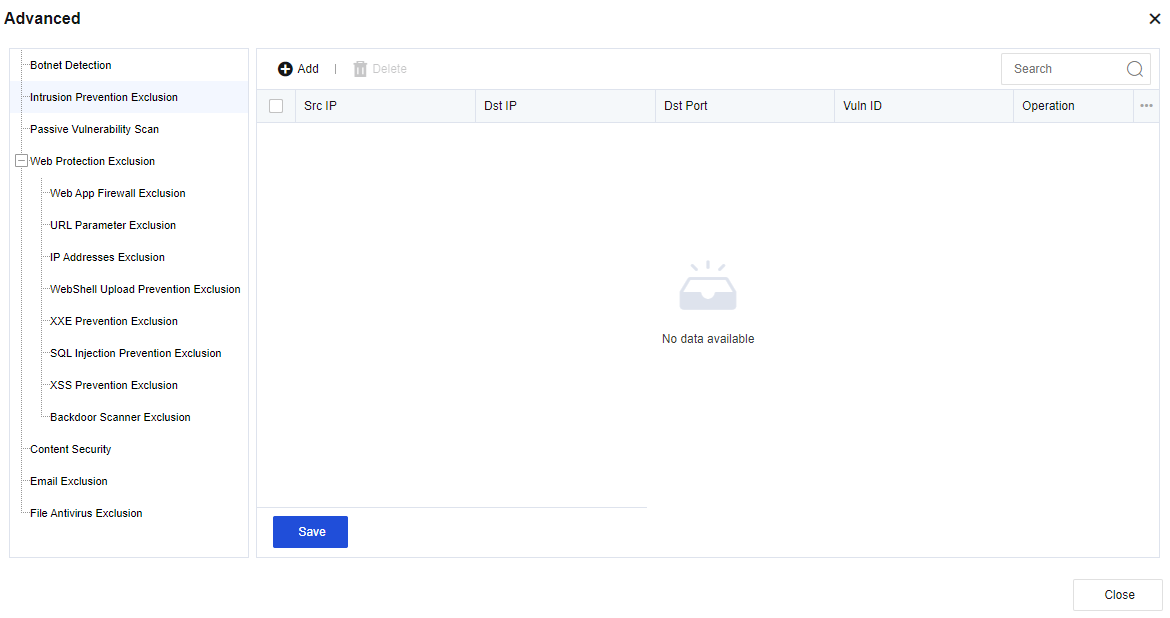
Click Add. Then, the Add Intrusion Prevention Exclusion dialog box appears. See the figure below.
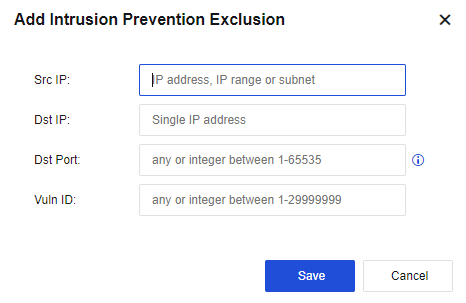
Src IP: Specify the source IP address. You can enter a single IP address, subnet, or IP address range.
Dst IP: Specify the destination IP address.
Dst Port: Specify the destination port.
Vuln ID: Specify the vulnerability ID.
Click Save. Then, the configuration is complete.
Click Save to save the settings of protection exclusion.
You can enable domain name, IP address, port, or URL exclusion, and set the OA service port.
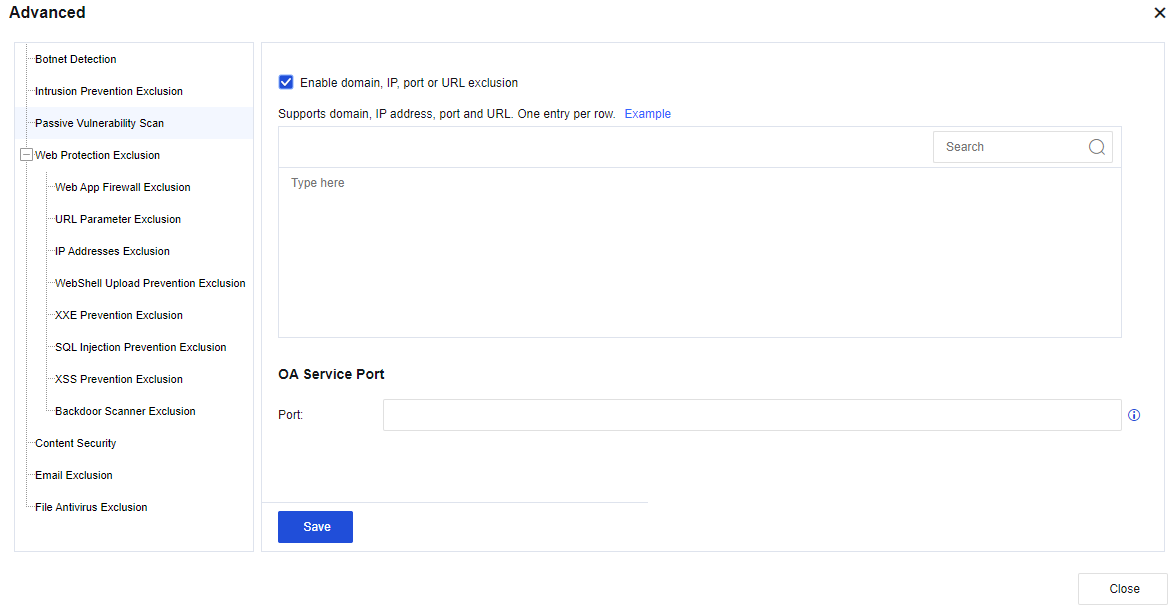
Click Save to save the advanced settings of the passive vulnerability scan.
Excluded items can be added to the rules that contain false positives in web detection, including web app firewall exclusion, URL parameter exclusion, IP address exclusion, Webshell upload protection exclusion, XXE prevention exclusion, SQL injection prevention exclusion, XSS prevention exclusion, and backdoor scanner exclusion, to reduce the occurrence of false positives, as shown in the following figure.
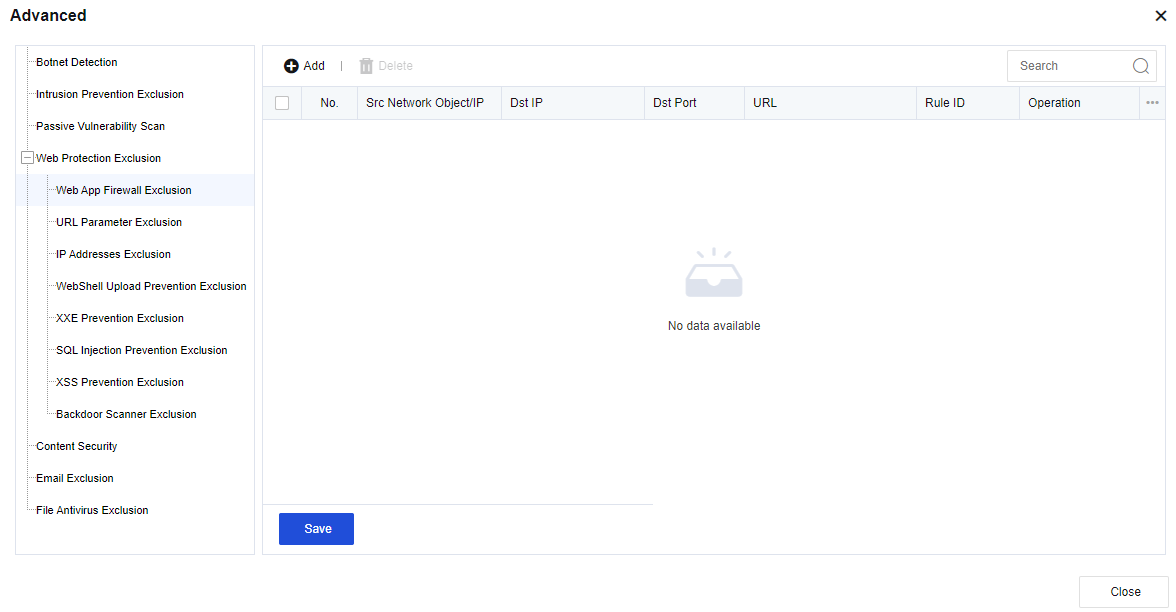
Web App Firewall Exclusion: Excludes the false positive rules detected by the web, thereby reducing the impact on services. Click Add. Then, the Add Web App Firewall Exclusion dialog box appears. See the figure below.
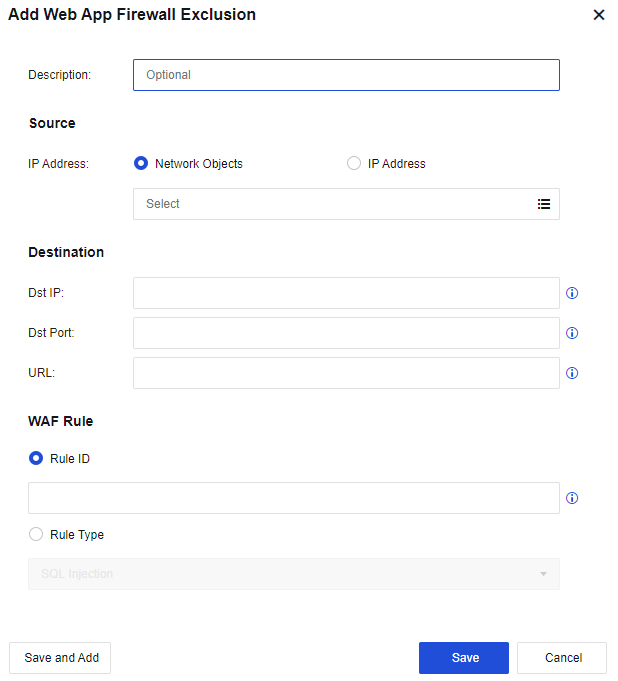
Source: Specify the source IP address. You can select Network Objects or IP Address.
Dst IP: Specify the destination IP address.
Dst Port: Specify the destination port.
URL: Specify the URLs to be excluded.
Description: Specify custom description.
Rule ID: Specify the ID of the rule.
Rule Type: Specify the rule type. You can add an exclusion for a specific type of rule.
Click Save. Then, the configuration is complete.
Click Save to save the settings of the web app firewall exclusion.
URL Parameter Exclusion: Add the URL parameters to be excluded. See the figure below.
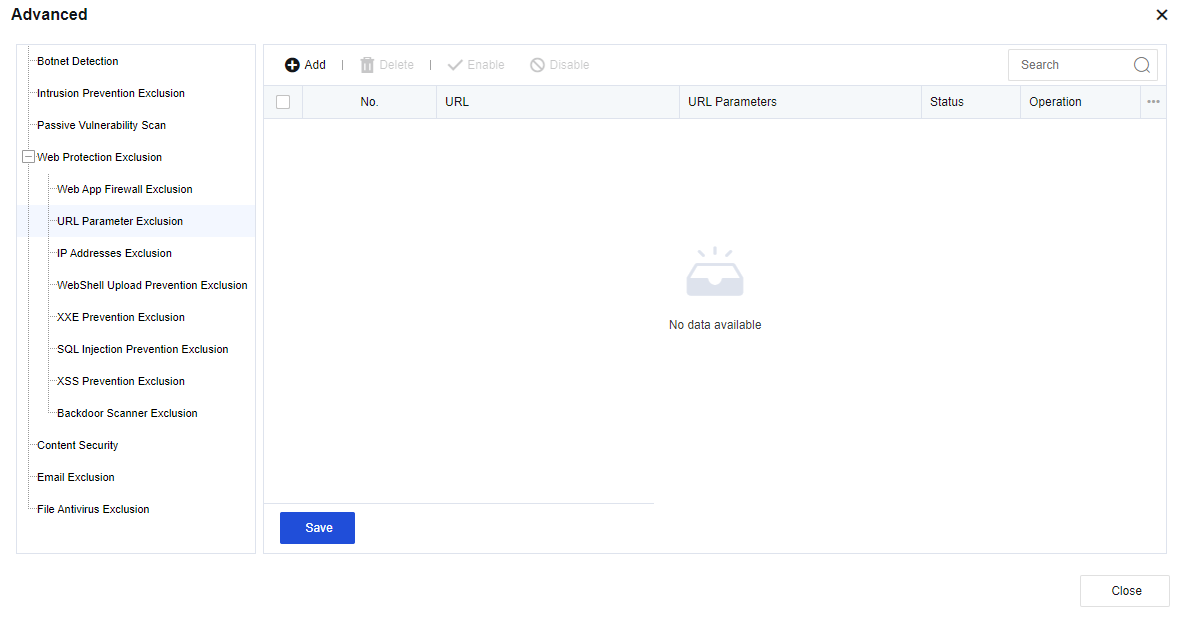
Click Add. Then, the Add URL Parameter dialog box appears. See the figure below.
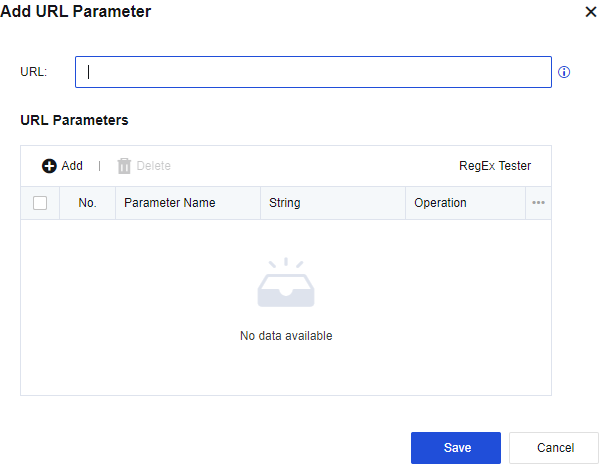
URL: Specify the URL.
URL Parameters: Specify the parameter information.
Click Save. Then, the configuration is complete.
Click Save to save the settings of the URL parameter exclusion.
IP Addresses Exclusion: Excludes IP addresses. See the figure below.
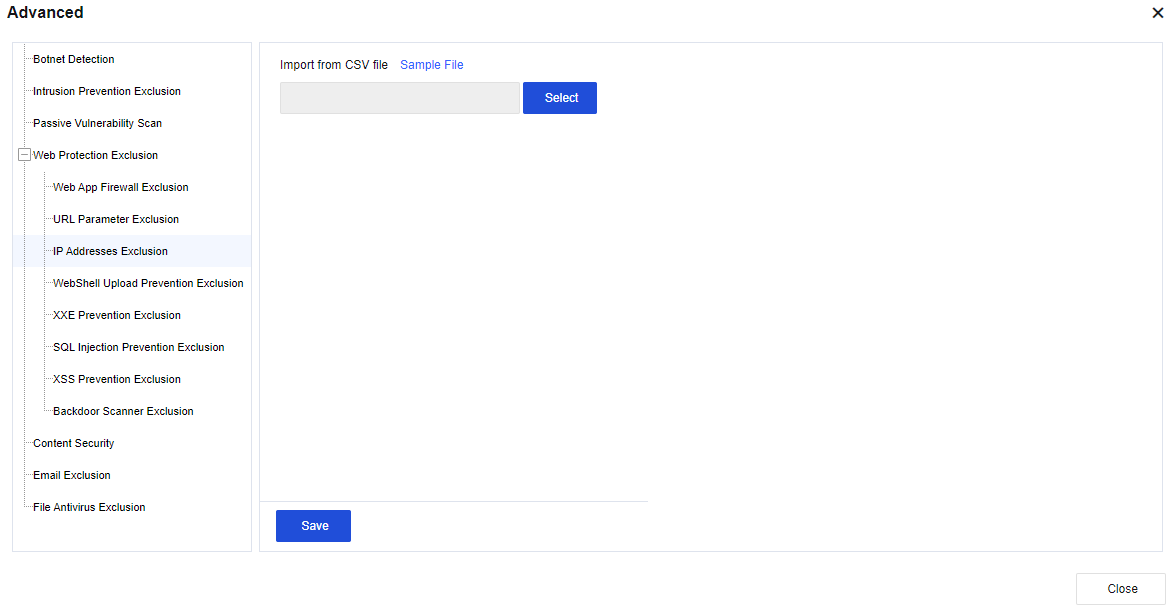
Click Sample File to download the file template. Enter the IP addresses to be excluded in the required format and import the file.
Click Save to save the setting of the IP address exclusion.
WebShell Upload Prevention Exclusion: If Webshell upload detected by the smart web engine has a false positive, add Webshell upload prevention into the whitelist to reduce the impact caused by the false positive. See the figure below.
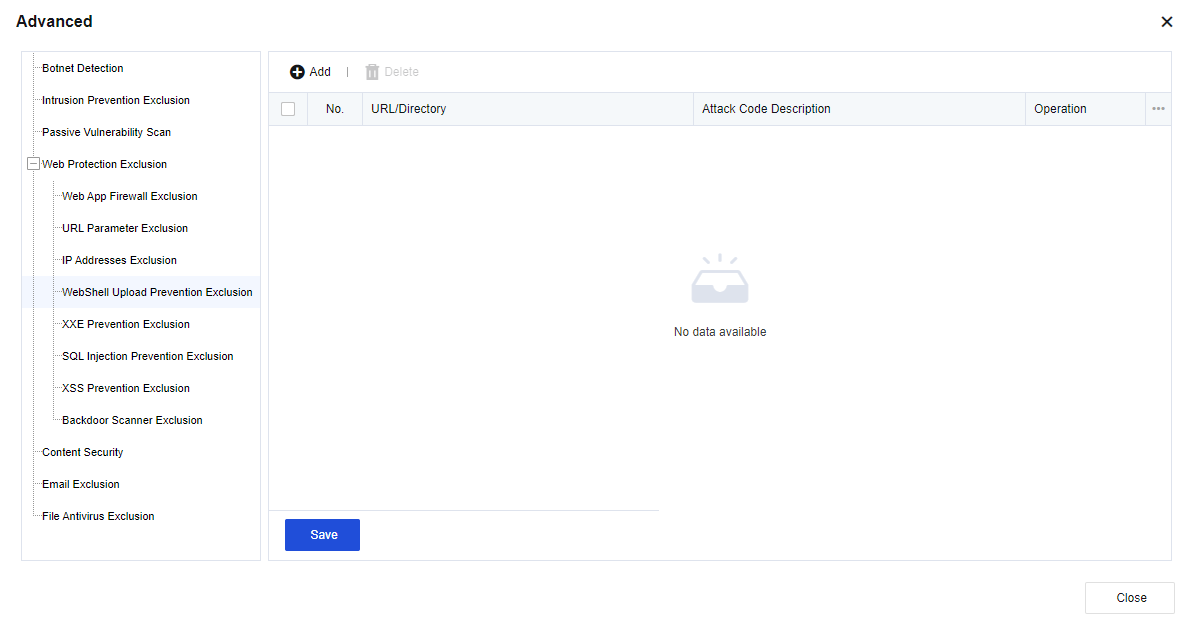
Click Add to go to the Protection Logs tab and add exclusion after the security log, which can be added to the whitelist.
XXE Prevention Exclusion: If the XXE prevention detected by the smart web engine has a false positive, Add the XXE prevention into the corresponding whitelist, as shown in the following figure.
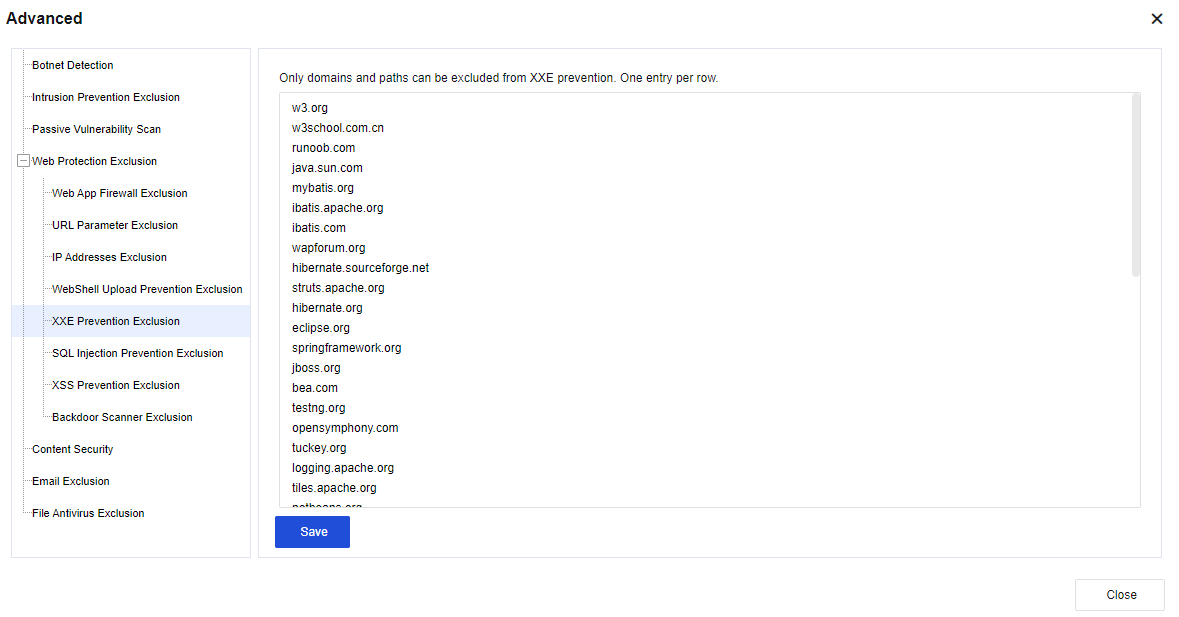
Enter the corresponding domain name and click Save. Then, the configuration takes effect.
SQL Injection Prevention Exclusion: When the SQL semantics detected by the smart web engine has a false positive, add the SQL injection prevention into the whitelist to reduce the impact caused by the false positive. See the figure below.
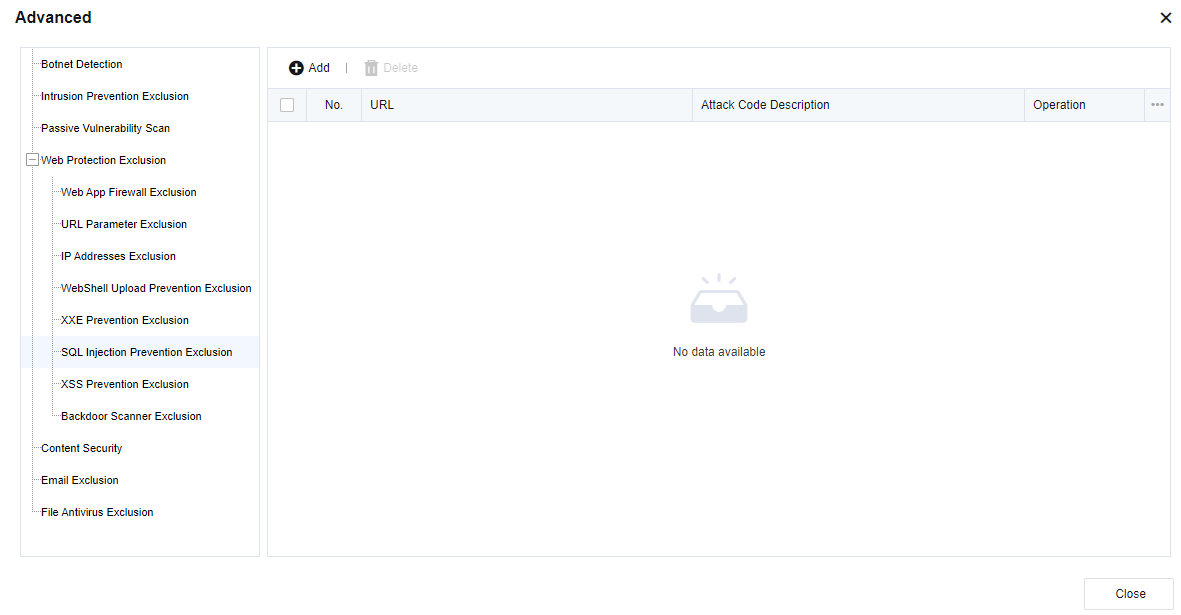
Click Add to go to the Protection Logs tab and add exclusion after the security log, which can be added to the whitelist.
XSS Prevention Exclusion: If the XSS semantics detected by the smart web engine has a false positive, the XSS injection prevention can be added to the whitelist to reduce the impact caused by the false positive. See the figure below.
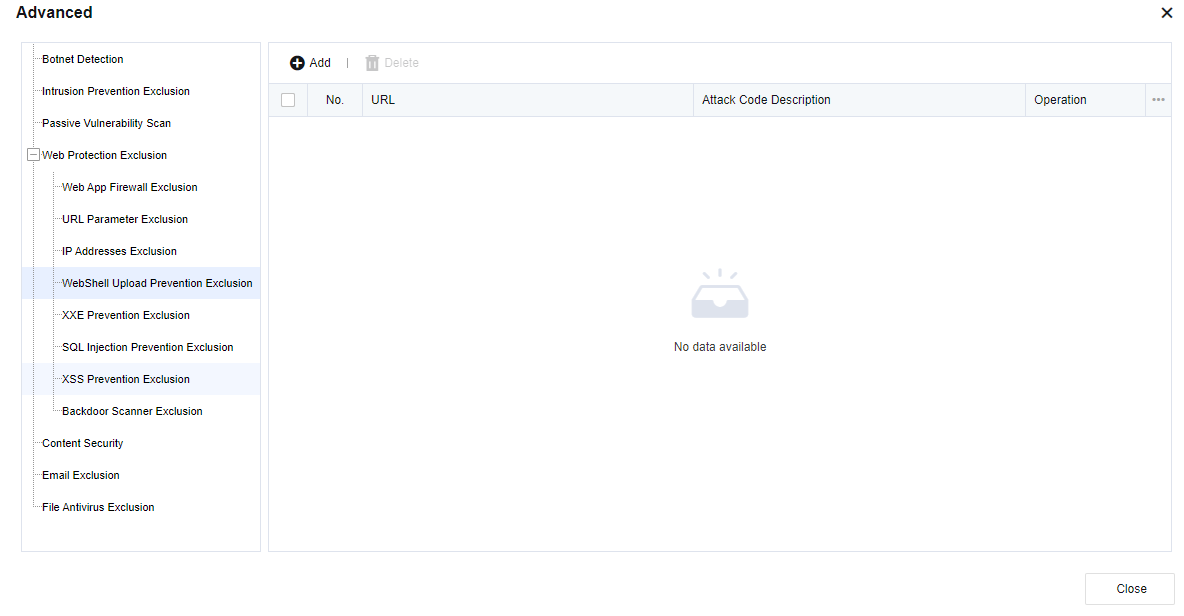
Click Add to go to the Protection Logs tab, and add exclusion after the security log, which can be added to the whitelist.
Backdoor Scanner Exclusion: If the backdoor scanning detected by the smart web engine has a false positive, the backdoor scanning can be added to the whitelist to reduce the impact caused by the false positive. See the figure below.
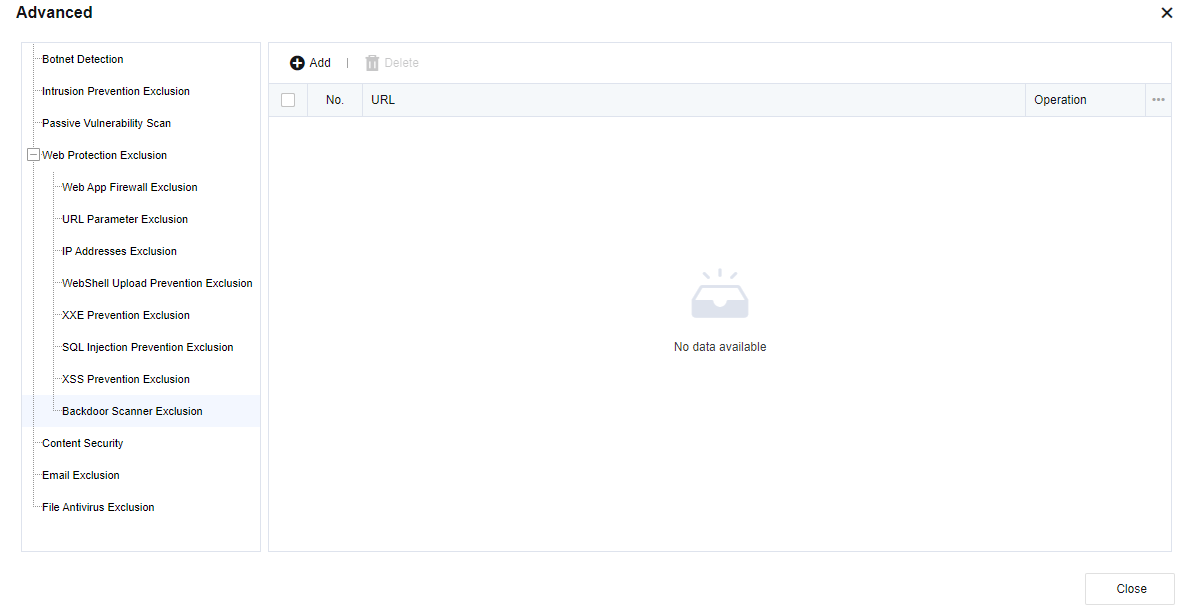
Click Add to go to the Protection Logs tab and add an exclusion after the security log, which can be added to the whitelist.
Content security mainly restricts the detection content of virus files, such as file size and compression degree, which can be adjusted accordingly. See the figure below.
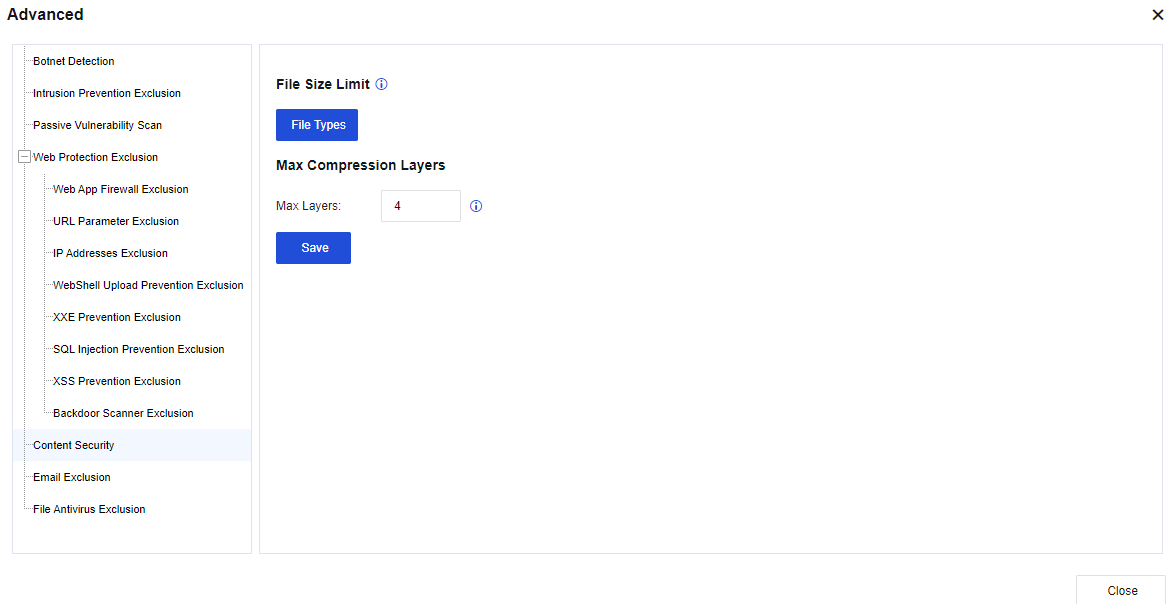
File Size Limit: Limits the size of the antivirus file. By default, the value is 10 MB. The maximum value is 20 MB. See the figure below.
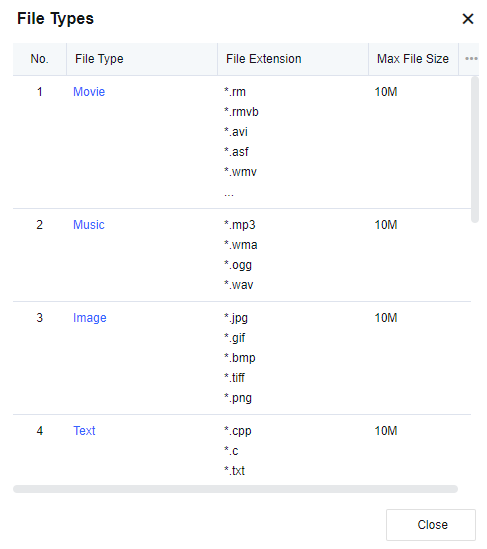
Click the name of the file type in the File Type column and change the file size, as shown in the following figure.
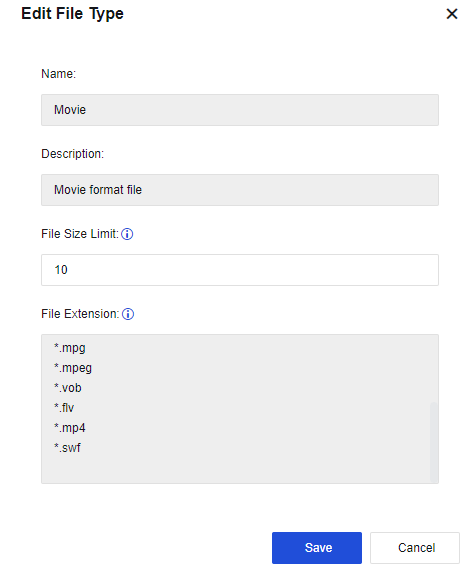
Max Compression Layers: Set the file’s layers to be decompressed to detect viruses in the decompressed file. The value of the Max Layers parameter is 4, and the maximum value is 16.
This can be set to exclude source IP addresses, destination IP addresses, recipient addresses, and sender addresses. For addresses added to the list below, all email security functions will be invalid. See the figure below.
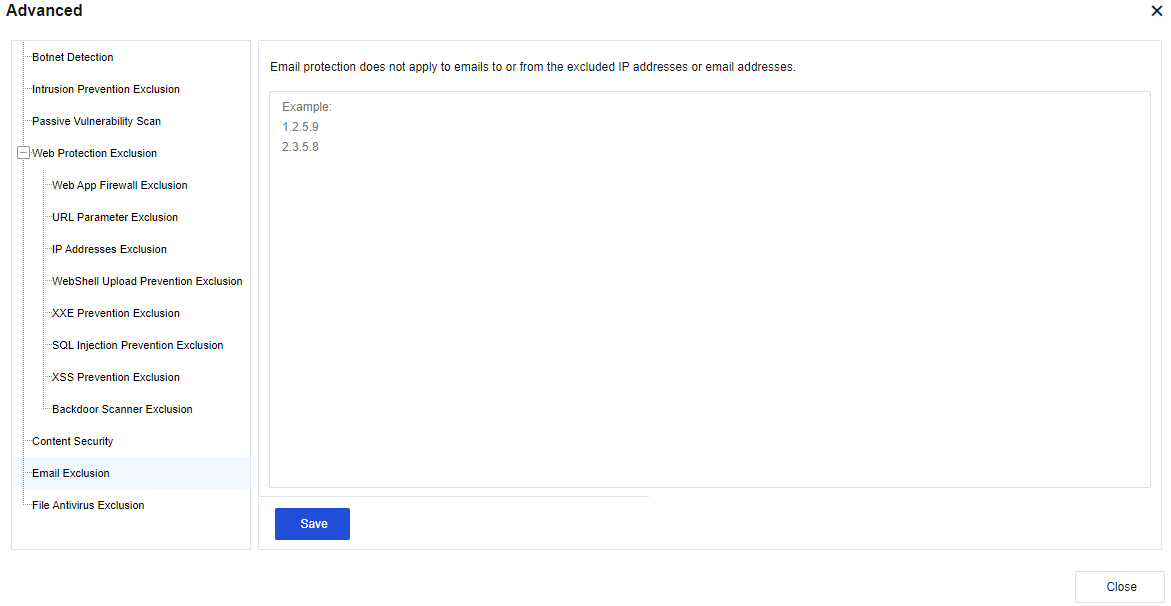
Click Save to save the settings of email exclusion.
The specified file or URL is not subject to virus scanning and killing, as shown in the following figure.
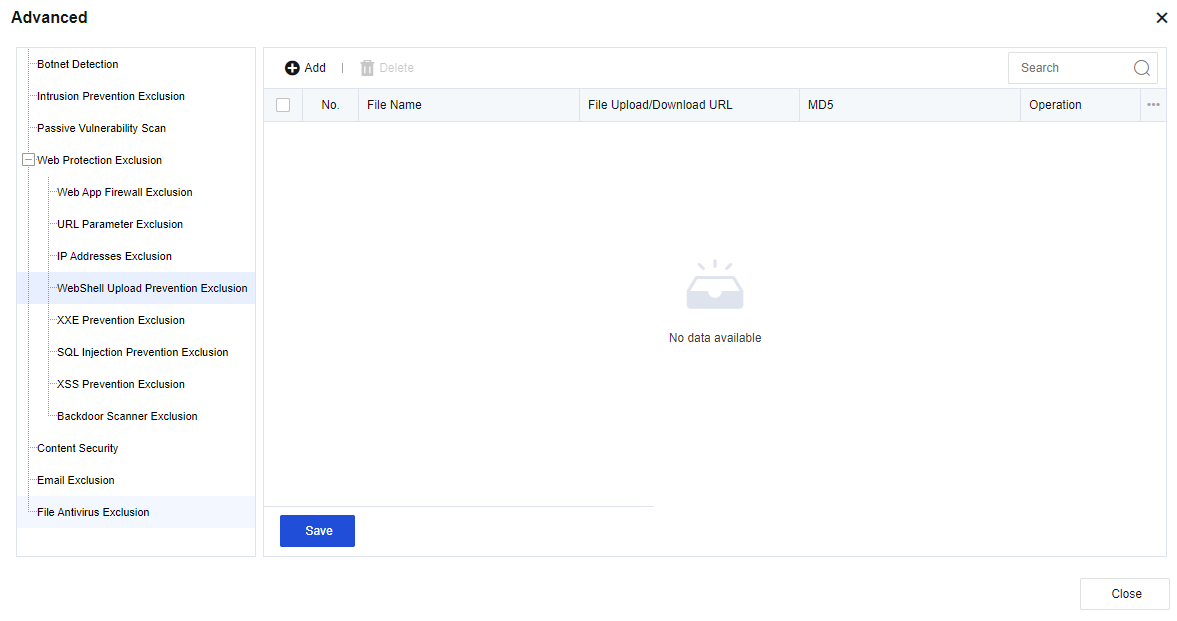
Click Add. Then, the Add File Antivirus Exclusion dialog box appears. See the figure below.
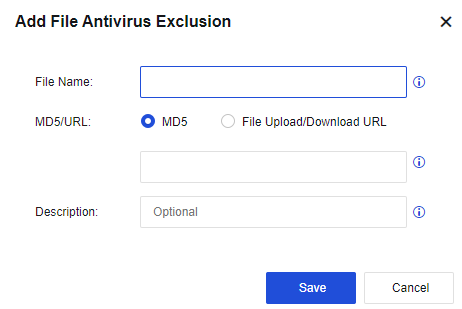
File Name: Specify the file name of the object to be excluded.
MD5/URL: Specify the MD5 value of the object or a URL to be excluded. You can select MD5 or File Upload/Download URL.
Description: Specify the description of the object.
Click Save. Then, the configuration is complete.
Click Save to save the settings of file antivirus exclusion.


 {{ $t('index.defaultHeader.chromeBrowserTip') }}