


{{ secondMenu.name }}






DNS mapping enables LAN users to access LAN servers through the domain names of the public network. This achieves the same effect as the bidirectional NAT policy. After DNS mapping is set, when a LAN user sends the DNS request, the NGAF device actively resolves the domain name into the LAN IP address of the server and returns it to the client. The client directly accesses the LAN IP address of the server without policy-based translation.
DNS mapping differs from bidirectional NAT in the following aspects:
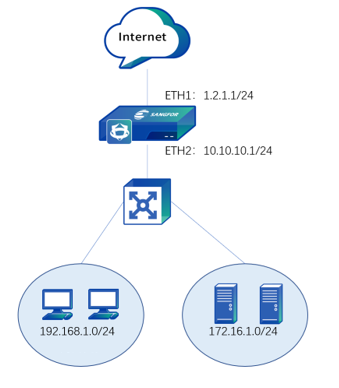
An enterprise has the following topology. A web server in the network segment of 172.16.1.100 exists in the LAN. The enterprise has applied for the domain name www.xxx.com that is bound to the IP address 1.2.1.1.
If you want the LAN user 192.168.1.0/24 to access the server in the network segment of 172.16.1.100 by entering www.xxx.com, you can use DNS mapping to allow LAN users to access the webserver by entering the domain name.
Step 1.Navigate to Network > NAT > DNS Mapping and click Add.

Step 2.In the dialog box that appears, set the Public Address, Domain Name, and Internal Address parameters. In this example, specify these parameters based on the following figure.
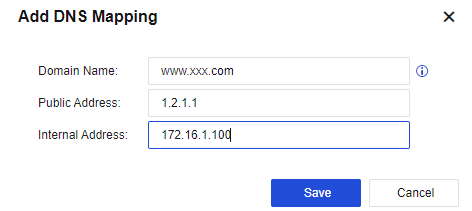
Step 3.Click Save. Then the configuration is complete. At this time, LAN users can directly access 172.16.1.100 by entering www.xxx.com.


 {{ $t('index.defaultHeader.chromeBrowserTip') }}