


{{ secondMenu.name }}






You can add the list of addresses to be blocked by the device to the blacklist, divided into the permanent blacklist and the temporary blacklist.
To block some LAN addresses that need to be banned from accessing the WAN or blocks some Internet addresses that access attack servers. Administrators can perform the following operations on the permanent blacklist.
| Operation |
Note |
| Edit |
Select the permanent blacklist that needs to be edited to modify the address and description. Then click Save. |
| Delete |
Select the permanent blacklist that needs to be deleted. Then click Delete. |
| Clear all blocked addresses |
All addresses on the permanent blacklist will be cleared. |
| Import/Export |
Import and export the permanent blacklist. |
| Refresh |
Refresh the data of the current list. |
| Search |
You can search for a specific address. |
Table 6:Permanent Blacklist
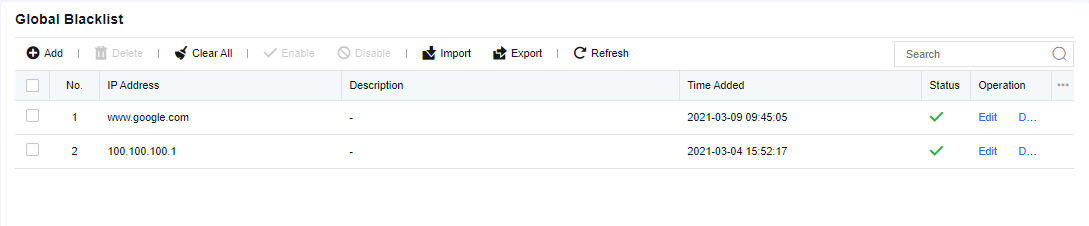
Click Add. On the displayed Add IP Address page, enter the IP addresses to be blocked and description. Then, click Save to submit it.
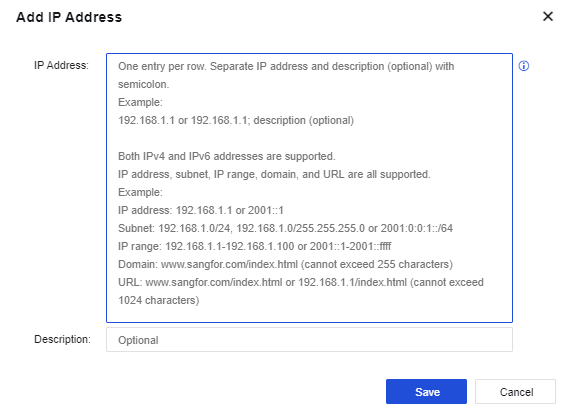
IP address: Supports IPv4, domain name, and URL, including single address, IP network segment, and IP range.

If the IPv6 address is required, check Enable IPV4/IPV6 dual protocol stack on the System > General Settings > Network page.
To check which source IP addresses have been blocked in policies related to intrusion prevention, web app protection, data leak protection, and botnet detection when IP blocking is enabled. It also can check which policies triggered the IP blocking and IP addresses manually added to the temporary blacklist. You can also set the lockout period. An IP address will be automatically unblocked after the lockout period expires. Administrators can perform the following operations on the temporary blacklist.
| Operation |
Note |
| Delete |
Select the permanent blacklist that needs to be deleted. Then click Delete. |
| Clear all blocked addresses |
All addresses on the permanent blacklist will be cleared. |
| Move to the permanent blacklist |
Add an address to the permanent blacklist. The communication to and from the said address will be permanently rejected. |
| Move to the whitelist |
Add an address to the whitelist. Addresses that have been moved into the whitelist will not be blocked by NGAF. |
| Refresh interval |
Set the refresh interval of the temporary blacklist, including four options, never, 5 seconds, 10 seconds, 20 seconds, and 30 seconds. Or, define the interval per your needs. |
| Search |
You can search for a specific address. |
Table 7:Temporary Blacklist

Click Add. On the displayed Add Address page, select the address type, source IP, destination IP, IP address, and lockout duration. Then, click Save.
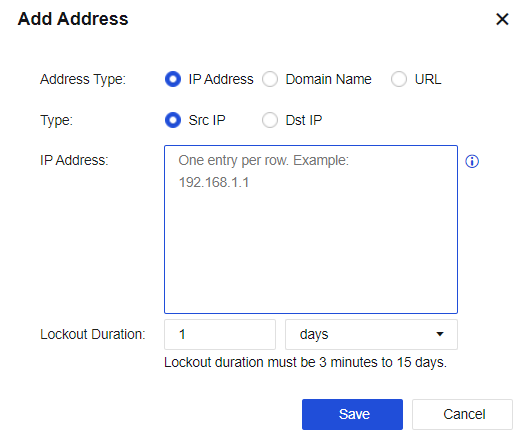
Address Type: Select the address type to be blocked, including IP address, domain name, and URL.
• IP Address: Enter the source IP or destination IP.
• Domain Name: Enter the domain name to be blocked.
• URL: Enter the URL to be blocked.
Lockout Duration: Set the lockout duration, which must be 3 minutes to 15 days, so that the blocked list will be unblocked once the duration expires.
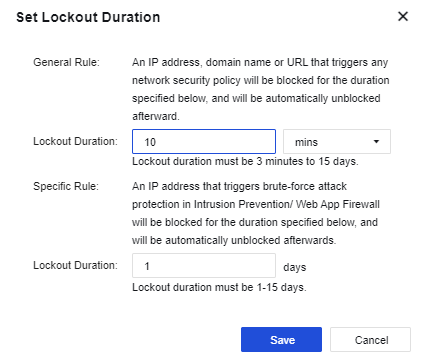
Click Set Lockout Duration. On the displayed Set Lockout Duration page, set the lockout duration for IP blocking.
This includes the lockout duration for the general rule and the specific rule, as shown in the following figure. The general rule refers to an IP address, domain name, or URL that triggers any network security policy. The specific rule refers to an IP address that triggers the LMF (low and medium frequency) brute-force attack, which indicates the low brute-force attack frequency of the attack source.


 {{ $t('index.defaultHeader.chromeBrowserTip') }}