Hyper Converged Infrastructure (HCI/aSV)

Sangfor HCI and aSV provide a unified infrastructure combining compute, storage, networking, and built-in security to simplify deployment, operations, and services.
{{ $t('productDocDetail.guideClickSwitch') }}
{{ $t('productDocDetail.know') }}
{{ $t('productDocDetail.dontRemind') }}
6.11.1R1
{{sendMatomoQuery("Hyper Converged Infrastructure (HCI/aSV)","Memory Replacement")}}

Memory Replacement

{{ $t('productDocDetail.updateTime') }}: 2026-01-05

Description

  1. When the memory of a node in the cluster is faulty, you can manually replace the faulty memory.
  2. When the memory resources in the cluster are insufficient, you can manually expand the memory capacity of the nodes in the cluster.
  3. For non-aServer computers, you need to contact the server vendor for operation and maintenance by the personnel of the corresponding vendor. Direct operation by Sangfor employees is prohibited.

Precautions

  1. The capacity can be expanded without stopping the customer's business. The capacity expansion needs to be shut down one by one. It is recommended to carry out the business during off-peak hours.
  2. Before expanding the capacity, ensure that no task is running(data rebuilding, data synchronization, and data balancing) on the cluster.
  3. After each expansion of a node, wait for the virtual storage task to complete before expanding the capacity of the next node.
  4. Please strictly follow the operation plan provided by the server vendor when unpacking the hardware.

Prerequisites

  1. Confirm the vendor and model of the memory to ensure hardware compatibility. When the memory is expanded or replaced, it must be stored as Sangfor memory, and the parameters are the same as those on the original machine. The company prohibits third-party accessories.
  2. Confirm that the cluster's current virtual storage task has no task running.

Steps

  1. Click Storage > Summary to check whether other tasks are being executed in the current virtual storage. If tasks are being executed, please wait for the tasks to be completed before performing maintenance operations.

  1. Enable Enter Maintenance Mode on the node that needs maintenance, migrate the virtual machines and NFV devices that need to be running to other nodes, and check the After entering maintenance mode, automatically shut down the node checkbox.

  1. After confirming that the node is turned off, remove the node from the shelf and expand the capacity. For details, please refer to the hardware operation guide below.
  2. After the hardware expansion is complete, put the node back on the shelf and join the original cluster. After the virtual storage task is executed, perform a Health Check (be sure to select the virtual storage data check).

Hardware Operation Guide

  1. After confirming that the device is powered off, unplug the power cable, remove the server, lay it flat on a stable platform, and open the top cover of the chassis.
  2. Read the memory installation sequence, and remember the memory installation slot to confirm whether the device has errors.
  3. Press down on the memory's left and right retaining clips to open left and right to eject the memory.

文本  低可信度描述已自动生成

  1. Touch the static-protective package containing the new memory module to any unpainted area on the outside surface of the server. Then, remove the memory module from the package (note: grasp the memory module's edge and handle the memory module with care).
  2. Verify that the memory model is correct.
  3. Place the new memory module on the memory socket. Ensure the new memory module's notch aligns with the memory socket's protrusion. Then press the new memory module straight down into the memory socket until the securing clips are closed, and the new memory module snaps into place.

图示, 白板  描述已自动生成

  1. Check that no other debris is left in the chassis, and restore the cover.
  2. Inspection after replacement:

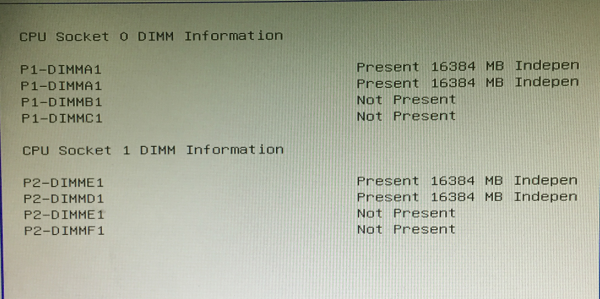
After the normal startup, you need to enter the BIOS or the system to confirm whether the device has all the memory.

The BIOS confirmation method is as follows:

Check whether Main's Total Menu value equals the total built-in capacity.

Such as 65536=64G, 131072=128G.

View Chipset Configuration > North Bridge > DIMM Configuration > DIMM Information in Advanced.

The figure below shows the usage of each memory slot.

手机屏幕截图  描述已自动生成

After entering the system, you can check the memory usage through the command to judge whether the recognition is complete.

There are many commands to use, but I will not list them one by one, as follows:

Cat  /proc/meminfo

free -m

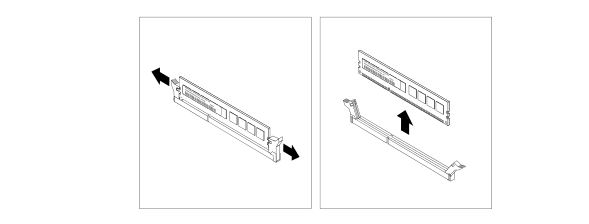
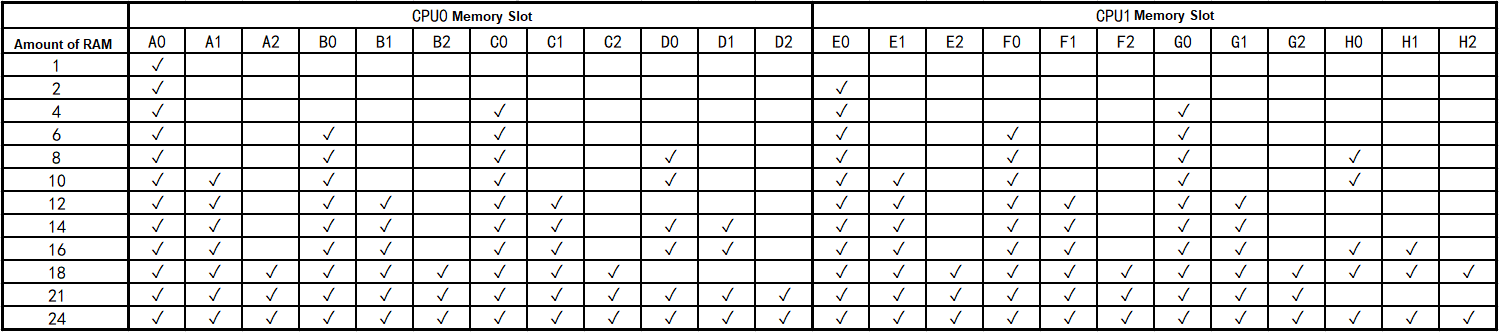
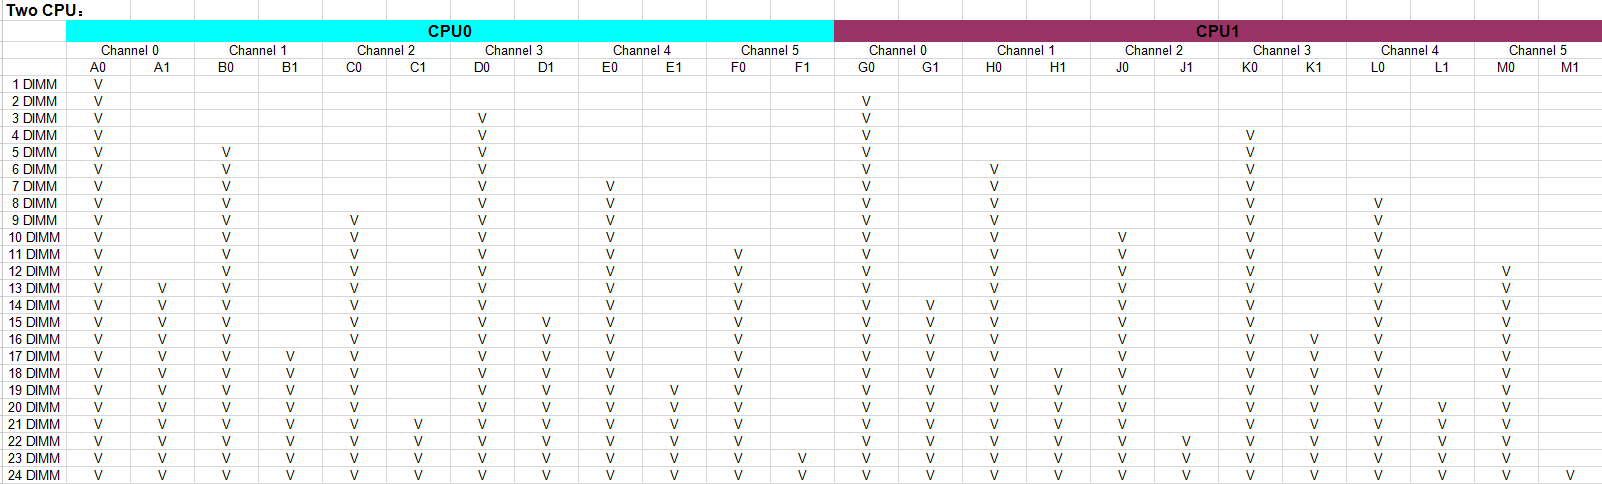
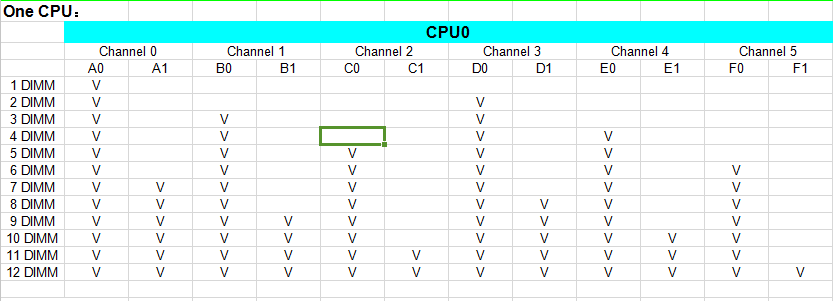
Attachment: memory slot insertion method

9S Series:

The ✓ in the table indicates that the memory slot is installed with memory, and the blank indicates that no memory is installed.

Remove the top cover of the server. You can see the mark next to the memory slot on the motherboard. Refer to the figure below. When only one memory is inserted, insert the memory into the A0 slot; when four pieces of memory are to be inserted, insert the memory into the A0, C0, E0, G0 slots; and so on.

图示  描述已自动生成

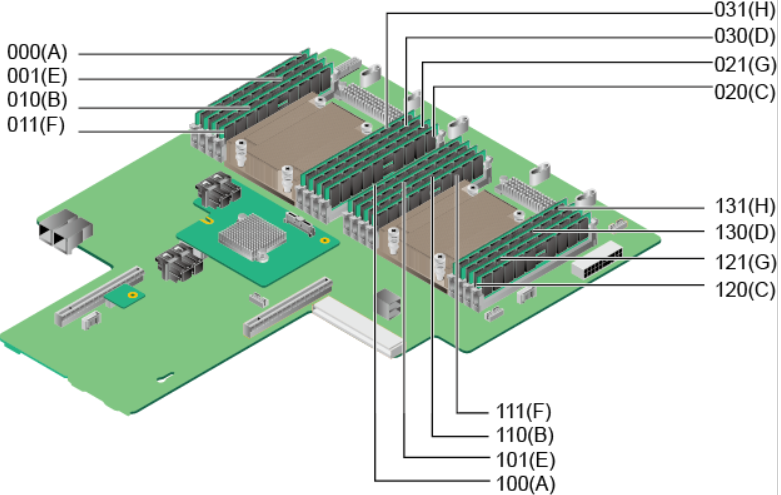
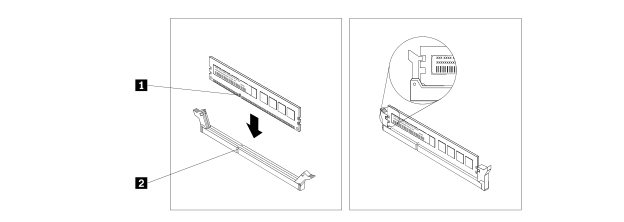
For devices starting with 9T, the memory insertion method is as follows.

图片包含 图形用户界面  描述已自动生成图形用户界面, 应用程序, 表格, Excel  描述已自动生成