Sangfor HCI and aSV provide a unified infrastructure combining compute, storage, networking, and built-in security to simplify deployment, operations, and services.
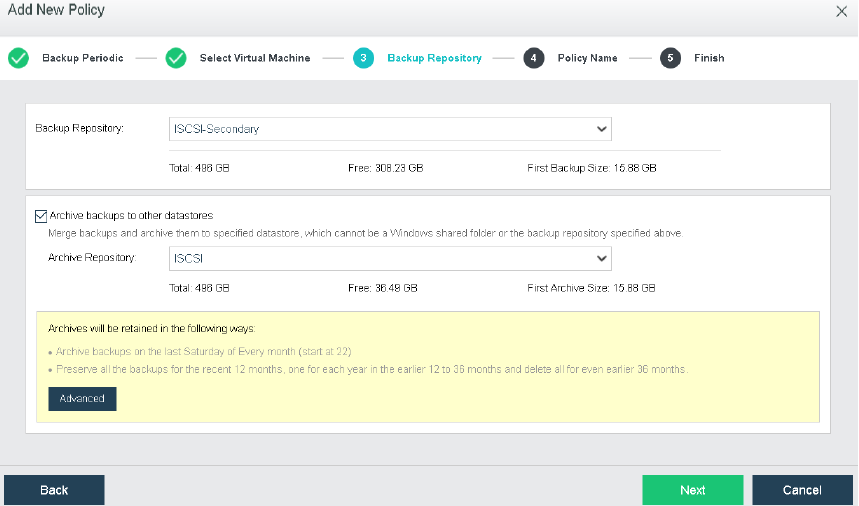
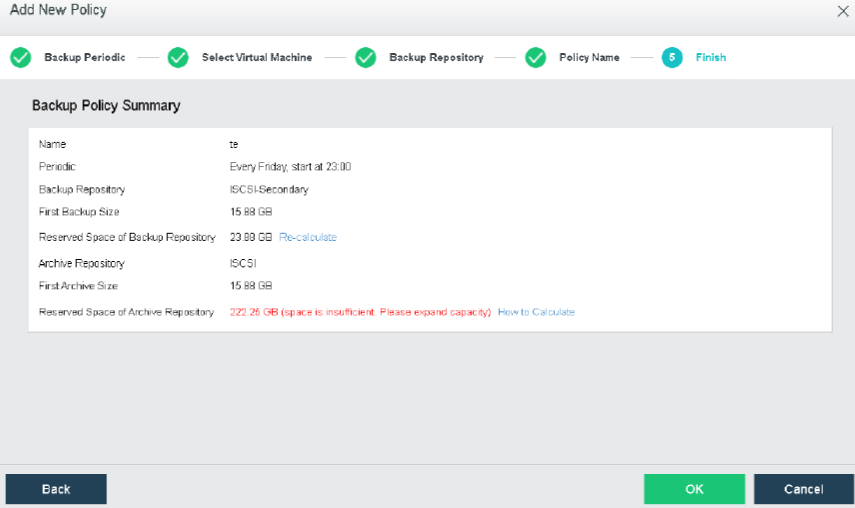
Guide administrators to configure automatic backup policies in the scenario of automatic virtual machine backup. The backup cleanup policy setting is more flexible, and the backup retention period can be set up to 100 years. Supports setting up regular full backups on a monthly basis. Supports automatic archiving of backup files to secondary storage and restores virtual machines from archived files.
Precautions
The virtual machine can be backed up when powered on or off.
The first backup is a full backup. Other backups within the backup retention period are incremental backups.
Only one full backup is retained in each backup retention period, and the system will automatically merge the first full backup and multiple incremental backups into a new full backup at the start of the next backup retention period.
The virtual machine can be quickly pulled up during backup and recovery when the backup repository is virtual storage, FC storage, or iSCSI storage.
Each virtual machine can only be added to one backup policy.
When compression is enabled for backup archives, the compressed archive time will increase by three times or more than the uncompressed case, and the data sorting time after recovery will increase by about three times or more than the uncompressed case. It is recommended to choose whether to compress according to the actual situation.
A backup is unavailable if all disks in the backup are unavailable, partly available if some disks are unavailable, and pass if all disks are available.
If the latest backup is found unavailable or partly available by the backup health check, a full backup will be created to repair the latest backup chain.
The backup health check will be skipped if the last check was performed less than 24 hours ago.
Disks in the unavailable backups cannot be restored or cloned, and their files cannot be browsed.
Only available disks in the partly available backups can be restored and cloned, and their files can be browsed.
The number of concurrent backup health check tasks per node is 2 by default and cannot be modified.
The number of concurrent backup health check tasks per datastore is 2 by default and can be modified to between 1 and 16 on the Backup Settings page.
The backup health check speed is 40 MB/s by default and can be modified to between 1 MB/s and 300 MB/s on the Backup Settings page.
Prerequisites
A third-party backup repository has been configured (it is recommended to configure a third-party backup repository).
When using the archive function, a separate archive repository is required, and the archive needs to be added to the backup repositories before configuring the archive. The Windows shared directory and the storage in the same location as the backup location cannot be selected for the archive storage.
Steps
Go to Reliability > Scheduled Backup/CDP and enter virtual machine backup configurations.
Select Scheduled for Type and click New Policy next to Backup Policy. On the backup policy settings page, set the backup frequency, date, and duration. Select Enable periodic full backup and enable Quiesce Guest File System as needed.
Note
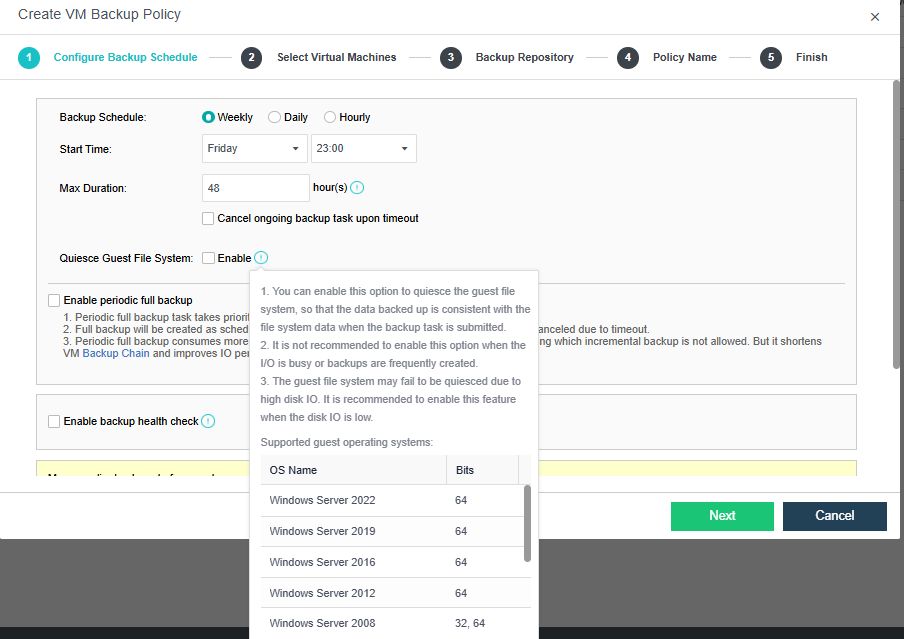
• Scheduled full backup tasks have a higher priority than ordinary backup tasks.
• VMs are backed up according to the scheduled full backup policy even if no incremental data is generated, and backup tasks will not be canceled due to timeout.
• Scheduled full backup is more storage resource-intensive and time-consuming, during which incremental backup is unavailable. However, it shortens the backup chain of a VM and improves the I/O performance for data fetching after VM recovery.
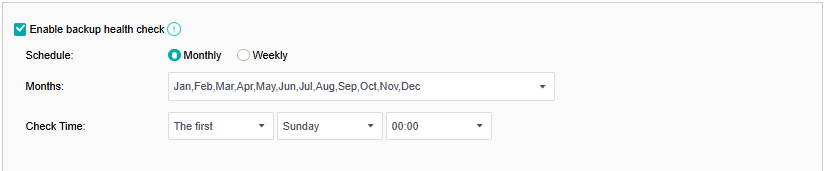
• Backup health checks check only the availability of the latest backup and consume computing resources and should be performed during off-peak hours. If the latest backup is found unavailable, a full backup will be created instead.
• Backup health checks apply to scenarios where backup metadata is corrupted or data block cannot be read due to storage failures.
Select VMs to be backed up and click Next.
Select the corresponding backup location. If the cluster is configured with an archive repository, you can select Archive backups to other datastores and click Next.
Fill in the backup policy name and description, and click Next.
Confirm the configuration of the backup policy. If there is an error, you can go back and click Previous to modify it step by step. After confirming there is no problem, click OK to make the scheduled backup policy take effect.