{{ secondMenu.name }}


As one of the basic units of Sangfor's SCP platform to carry services, the virtual machine can manage the entire life cycle of the virtual machine: creation, startup, shut down, import, export, deletion, allocation, revoke, etc.
Function Description:
The SCP platform supports ISO and built-in (HCI images) to create a new virtual machine and import existing virtual machines from the local node.
Prerequisite
When using an image to create a virtual machine, the required ISO image has been uploaded, or the HCI built-in image has been created.
Precautions:
Steps:
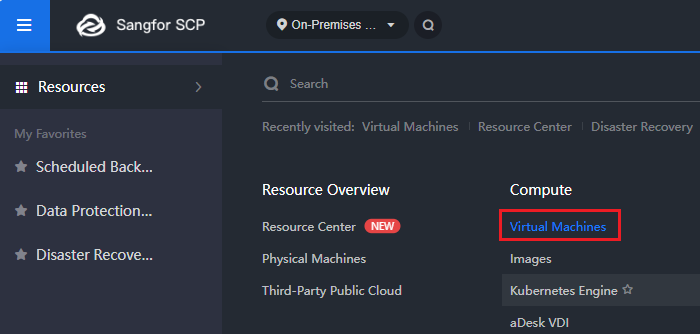
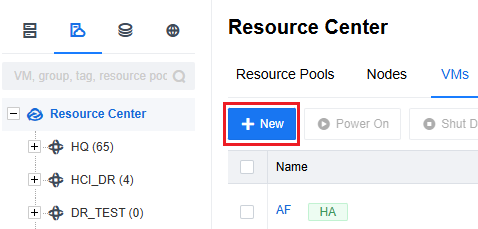
Step 1.Login to the SCP platform, select Compute > Virtual Machine, click the New button, and select Create New Virtual Machine.
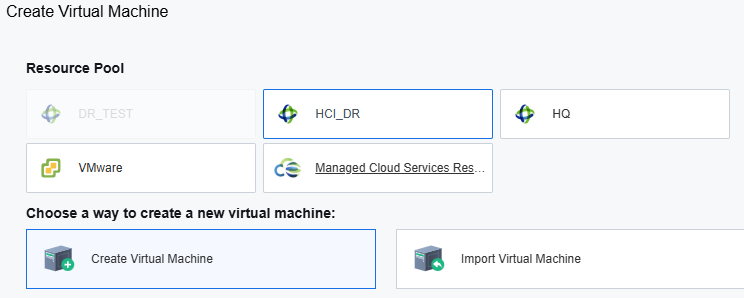
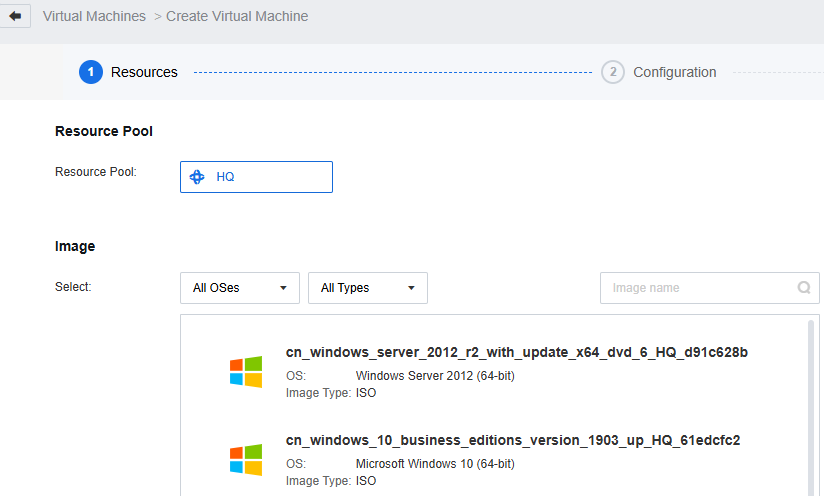
Step 2.Select the resource pool where the new virtual machine is located, select the required image, and click the Next button.
Note: The automatic image distribution feature is added for the administrator role. This means the current image can also be distributed to the current resource pool if the image is not associated with the resource pool. However, this may increase the time required for VM creation.
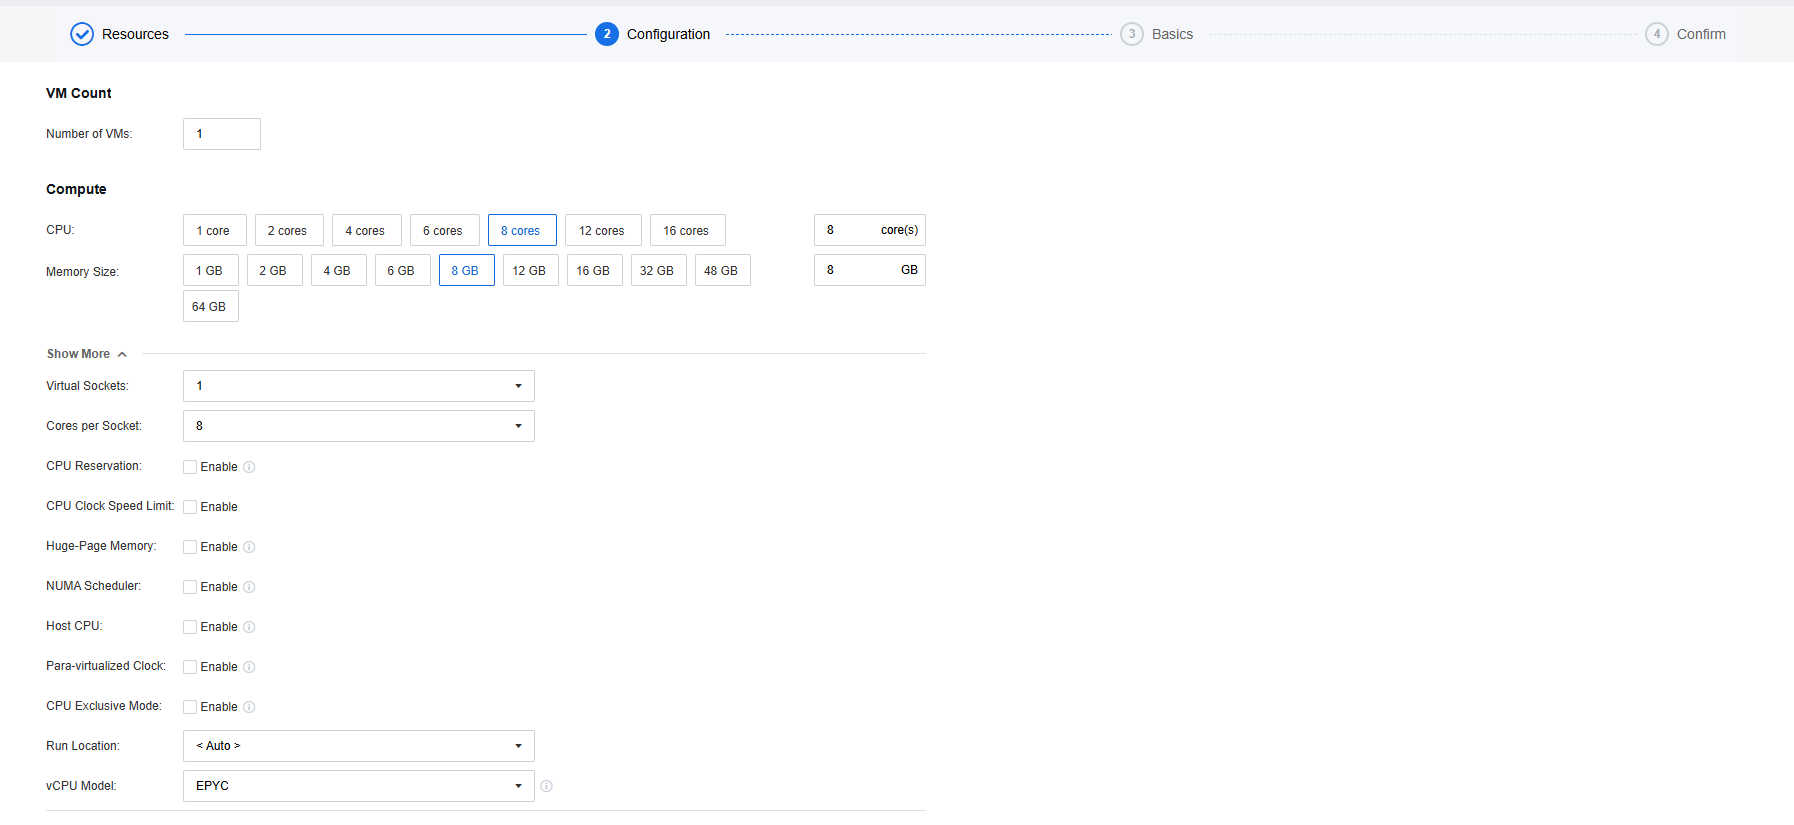
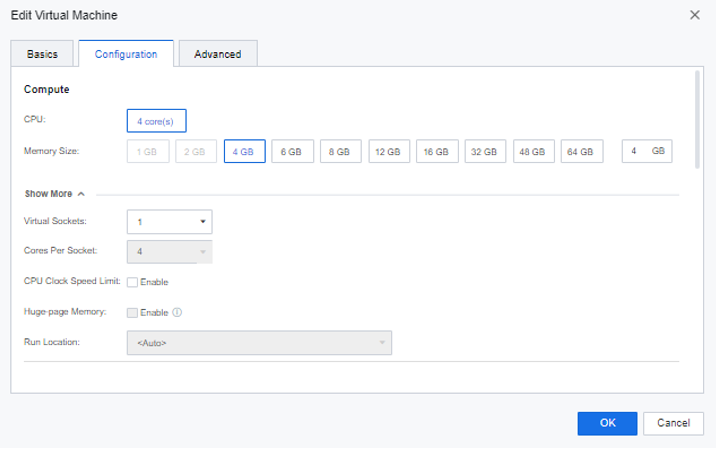
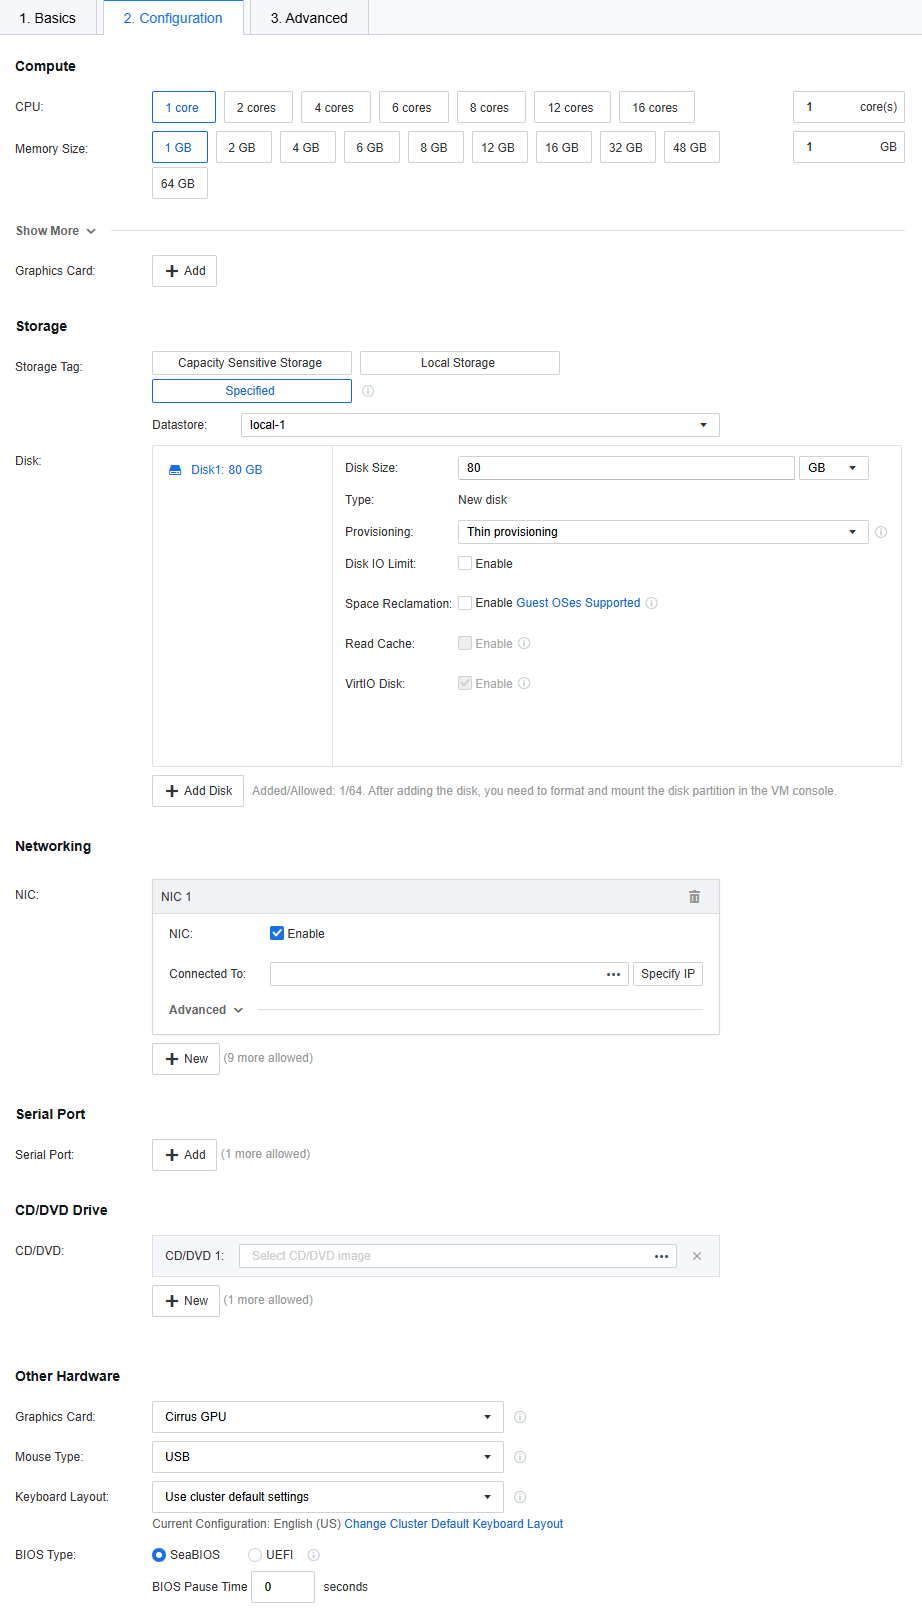
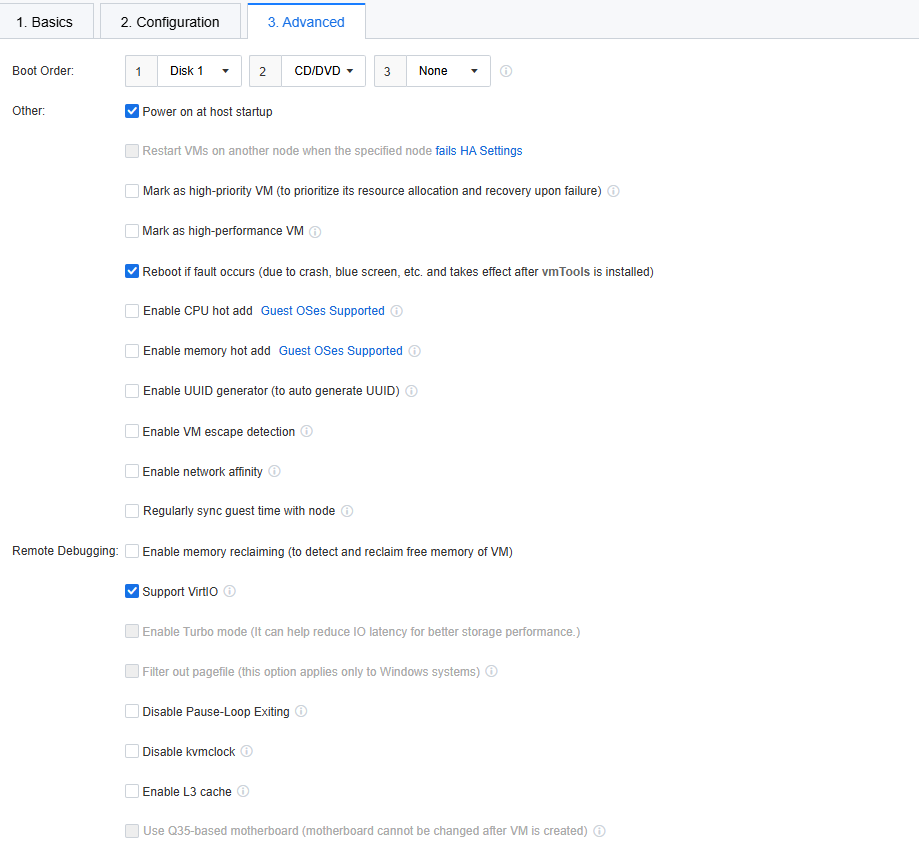
Step 3.Go to the Configuration page.
![]() :
:
1.SCP needs to manage HCI 6.7.0 and later versions.
2.If the CPU clock speed limit is too low, the VM may not start and run normally. Please operate with caution.
3.CPU clock speed limit value range: 100 MHz to 1,000 GHz
4.After the VM runs for a week, the system will take the average clock speed (0 will not be calculated) for a recent period (up to one month) as the recommended clock speed limit value. The value will display in the input box after selecting Enable.
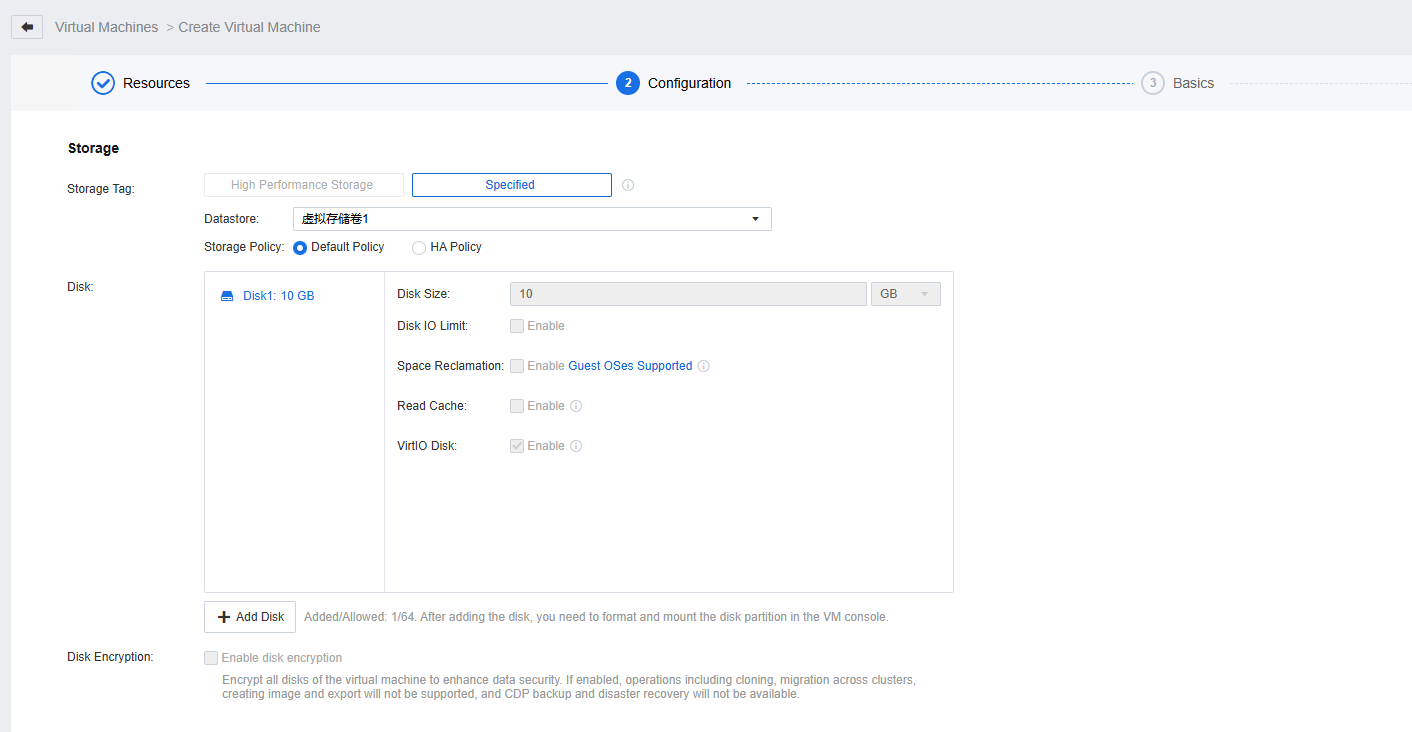
New disk (disk size can be specified in GB or TB)
Dynamic Provisioning: Dynamically allocates additional disk space as per demand to enhance disk performance and utilization. The maximum capacity is 16 TB.
Thin Provisioning: Allocates space based on actual data size to save space. The maximum capacity is 63 TB.
Pre-allocating: Pre-allocates a fixed amount of space. This enhances disk performance but wastes more storage space. The maximum capacity is 16 TB.
![]() :
:
1.The disks with the built-in images are configured as thin provisioning by default, and the disk provisioning type cannot be modified.
2.Two-node virtual storage does not support the dynamic provisioning of disks.
3.When tenants create a VM and add disks, the storage that supports dynamic provisioning is selected by default.
4.You can change the disk provisioning type in one way only, from thin provisioning to dynamic provisioning, and then to pre-allocating. Changes are allowed only from low-performance mode to high-performance mode.
5.The disk allocation methods are specified as thin provisioning for operations involving the VM's rapid pull-up (backup recovery, cloning, disaster recovery, etc.).
Existing disk:
Use the disk image file of the VM created earlier, such as a QCOW2 file.
Physical disk:
Mount the physical storage directly to the VM for use.
Shared virtual disk:
Select an existing shared virtual disk, generally used to deploy Oracle RAC and other apps requiring shared disks.
Disk IO Limit: You can configure the IO limit of each disk of the VM CPU.
![]() :
:
1.SCP needs to manage HCI 6.7.0 and later versions.
2.If the disk IO limit is too low, the VM may not start and run normally. Please operate with caution.
3.After the VM runs for a week, the system will take the average value for a recent period (up to one month) as the recommended disk IO limit value. The value will display in the input box after selecting Enable.
4.Supported IO limit range:
• Max read/write speed: 128 KB/s to 102,400 MB/s.
• Max reads/writes: 16 to 2,147,483,647
Space Reclamation: After being enabled, the corresponding storage space will be released immediately when a file on the disk is deleted. This feature will not apply to IDE disks.
![]() :
:
1.The feature can be enabled for the original disks and expanded disks on Windows-based VM.
2.The feature cannot be enabled for the existing disks on Linux-based VM. To enable the feature for the expanded disks on original VM, execute the command: mount -O discard /dev/vdb1 /test (Italicized placeholders can be specified.)
3.The feature cannot be enabled for the system disk on new Linux-based VM. To enable the feature for the data disks on new Linux-based VM, execute the following command during disk mounting: mount -O discard /dev/vdb1 /test (Italicized placeholders can be specified.)
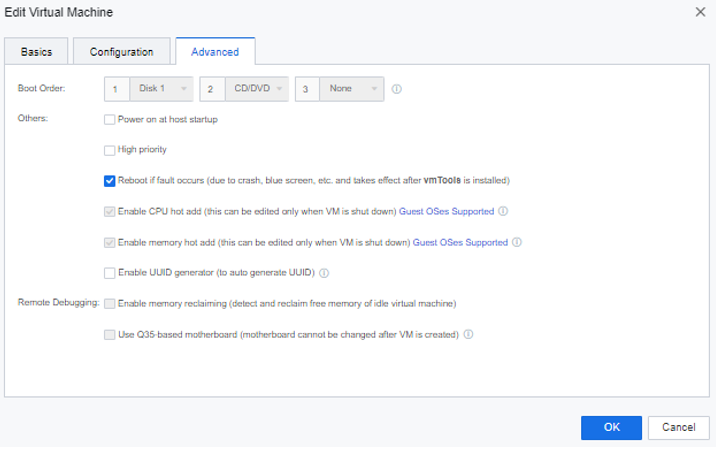
![]()
1.Only the shutdown VM supports modifying the keyboard layout.
2.SCP needs to manage HCI 6.7.0 and later versions.
Step 4: Enter the VM name, description, group, admin password, hostname, and expiration date according to actual needs.
Step 5: Finally, confirm the information, and click OK to create the VM.
![]() :
:
If the image type is specified as ISO image, the vmTools must be installed after creation for the hostname and password settings to take effect.
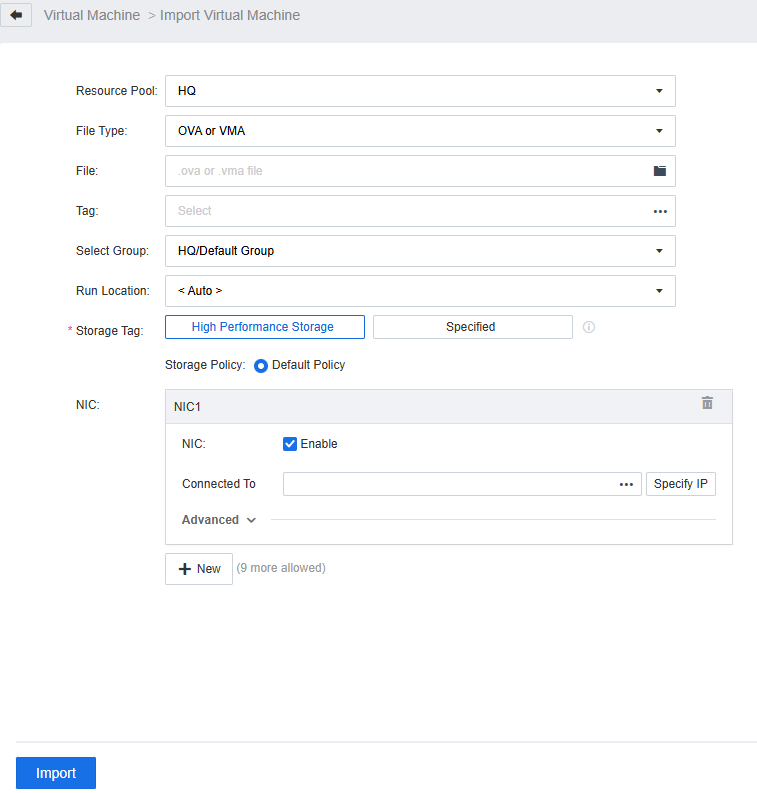
Step 1.Log in to the SCP platform, go to Resources > Compute > Virtual Machines > VMs, and click New.
Step 2.Select the resource pool where the new virtual machine is located and select Import Virtual Machine as the creation method.

Step 3.Select the OVA or VMA file to be uploaded, select the group, run location, and storage of the VM, specify NIC settings, and click Import to upload.
Function Description:
The related configuration of the virtual machine can be adjusted by editing the virtual machine.
Precautions:
Prerequisite
None.
Steps:
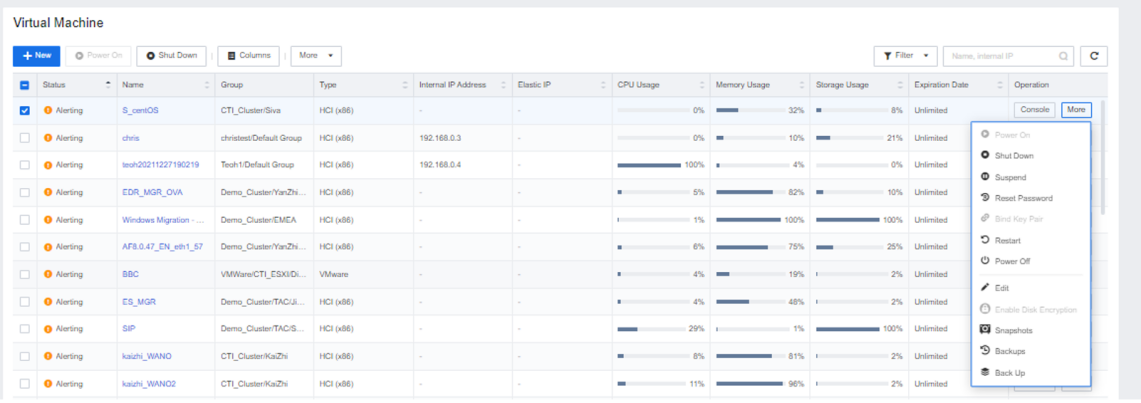
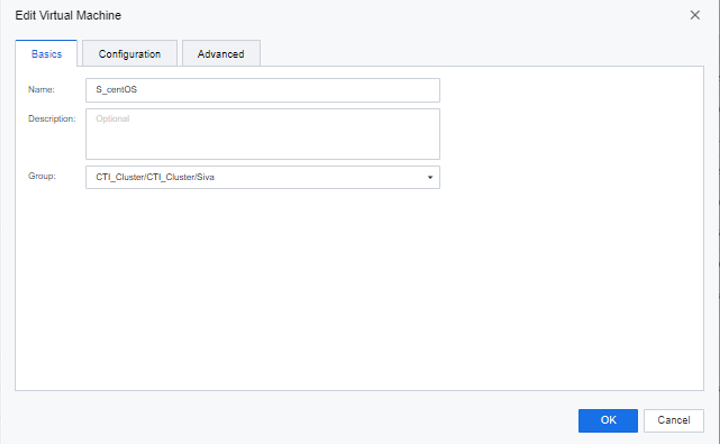
Step 1.Place the mouse cursor on the virtual machine that needs to be edited, and then click More > Edit.
Step 2.You can edit Basic, Configuration, and Advanced on the virtual machine edit page. Please refer to Chapter 4.2.1.1 Create Virtual Machine in this manual for more information.
Feature
By cloning, you can create one or multiple new VMs that are exactly the same as the source VM and operate independently.
Steps
Step 1.Log in to the SCP platform go to Compute > Virtual Machines > VMs. Find the VM you want to clone and click its name to go to the details page. Choose More > Clone to perform the cloning operation. You can select Instant Full Clone, Full Clone, or Linked Clone for Clone Type.
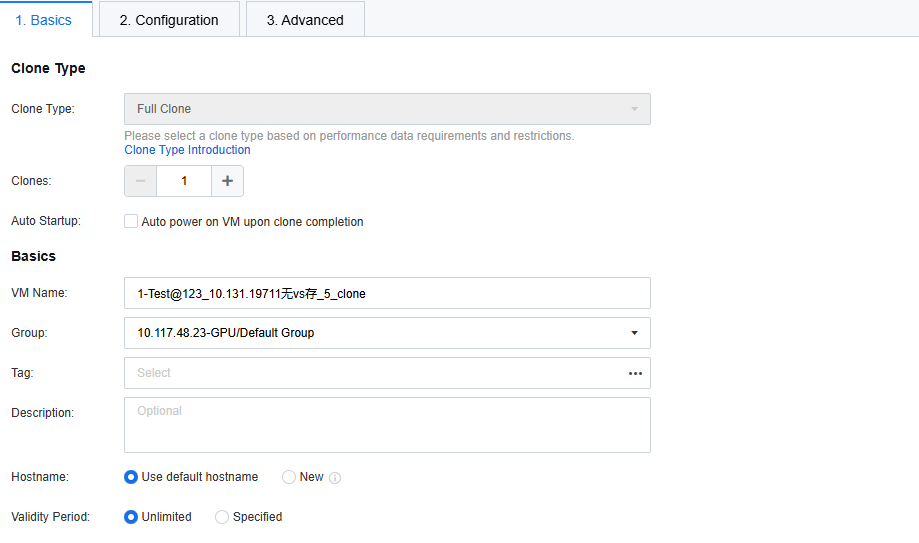
Step 2.Configure parameters on the Configuration tab.
Step 3.Configure parameters on the Advanced tab.
Function Description:
The SCP platform supports viewing virtual machine details, including operating status, hardware configuration, backup data, operation audit, alarm logs, and VM scheduling records, and supports viewing and exporting monitoring trend charts for a customized period, and viewing various VM detail fields, such as hostname, DUID, IAID, CBT Status, and Time Sync.
Precautions:
None.
Prerequisite
None.
Steps:
Step 1.Log in to the SCP platform, select Compute > Virtual Machine to enter the virtual machine list, find the target virtual machine, and click the virtual machine name to re-direct.
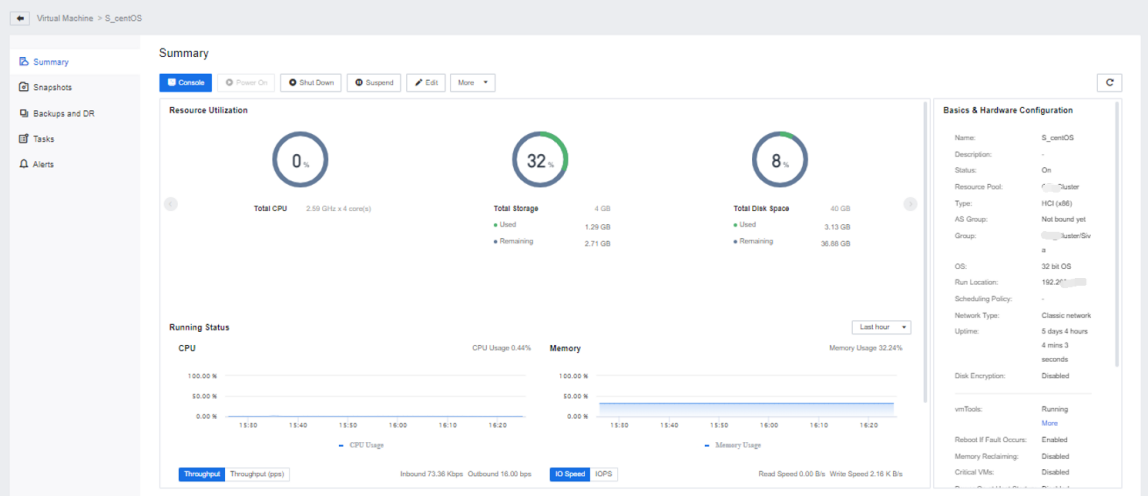
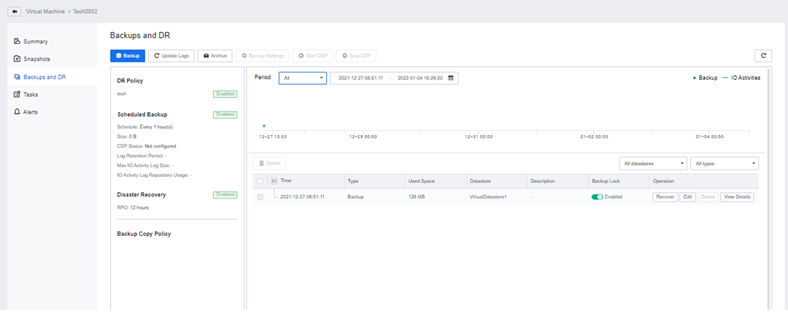
Step 2.Go to the Backup and DR page to view the backup data information.
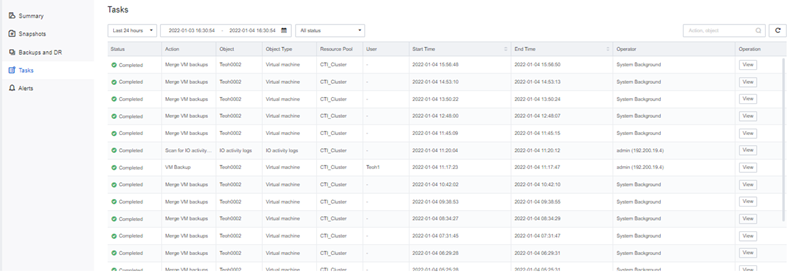
Step 3.Go to the Tasks page to view virtual machine operation records.
Step 4.Enter the Alerts page to view historical alarm records.
Function Description:
SCP displays all VMs in the VM list and supports displaying their tenants, Guest OS, resource usage, Run Location, hostname, Scheduling Policy, Tags, CPU Clock Speed, Datastore, Storage Policy, Logical Space Used, Used Memory, Uptime, and Scheduled Backup.
Precautions:
None.
Prerequisite:
None.
Steps:
Step 1.Log in to SCP, and then go to Compute > Virtual Machines to go to the VM list.

Function Description:
SCP platform supports setting a validity for the virtual machine, and the virtual machine that exceeds the validity will generate alarm messages.
Precautions:
Prerequisite
None.
Steps:
Step 1.Log in to the SCP platform, select Compute > Virtual Machine to enter the virtual machine list, find the target virtual machine, and click the virtual machine name to re-direct.
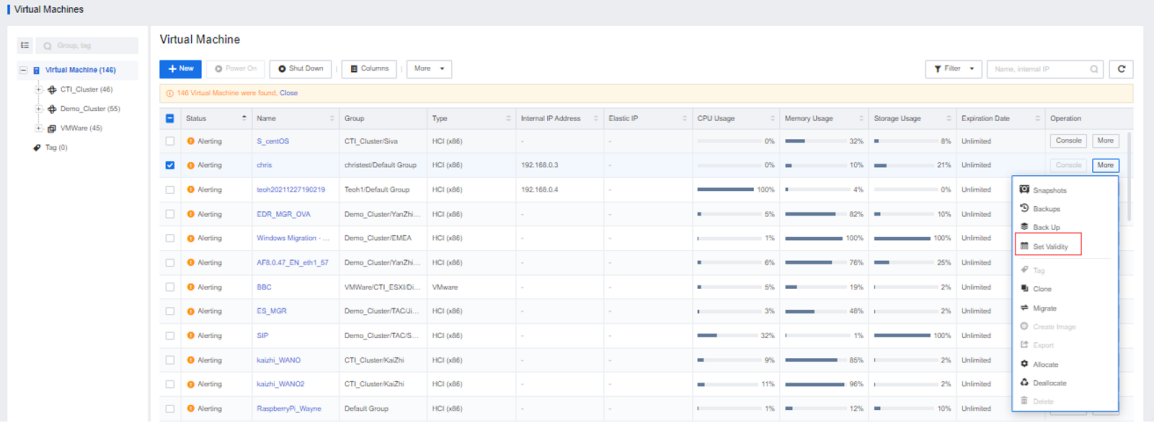
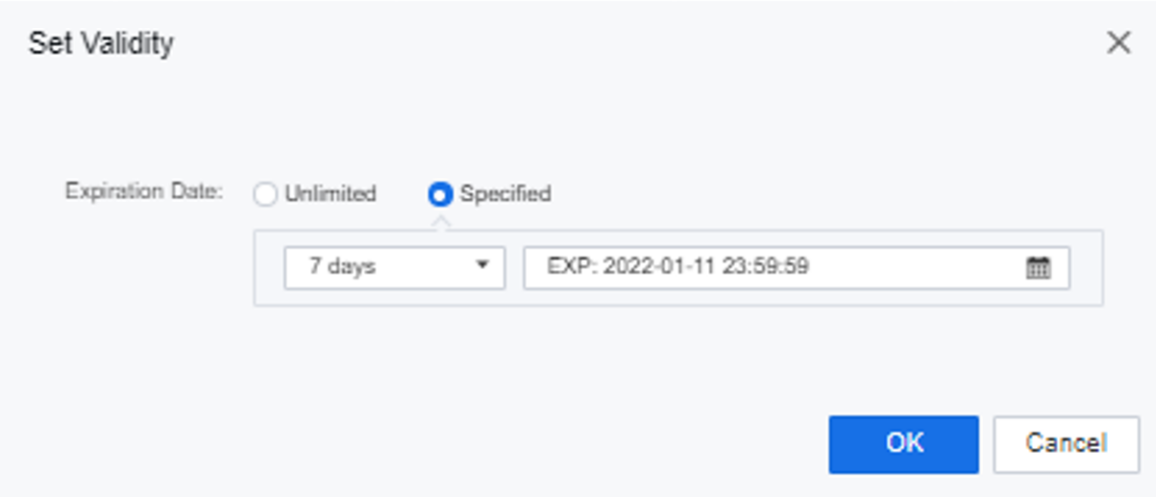
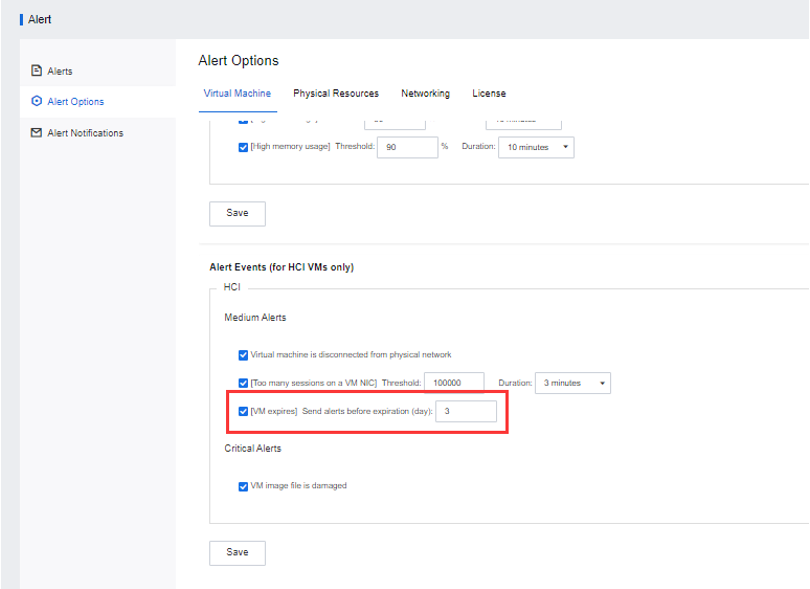
Step 2.The admin can set the number of days of early warning of the virtual machine. The default is 3 days. Suppose you need to customize the number of days of early warning. In that case, you can remind xx days before the virtual machine life cycle expires in Monitoring Center > Alerts > Alert Options.
Function Description:
This function supports exporting virtual machines in VMA or OVA format. When exporting the list, you can choose to include Run Location, hostname, Scheduling Policy, Tags, CPU Clock Speed, Datastore, Storage Policy, Logical Space Used, Used Memory, Uptime, Scheduled Policy, etc.
Precautions:
Only the shutdown virtual machine can perform the export operation.
Prerequisite
Virtual Machine already shut down.
Steps:
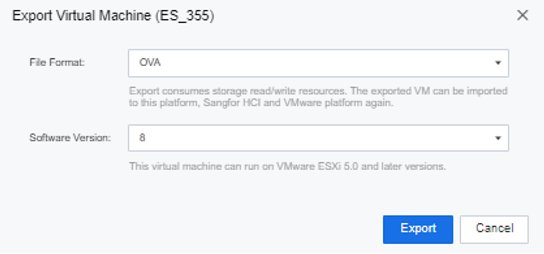
Step 1.Log in to the SCP platform, select Compute > Virtual Machine, select the virtual machine that needs to be exported, click the More button on the right, and click the Export option.
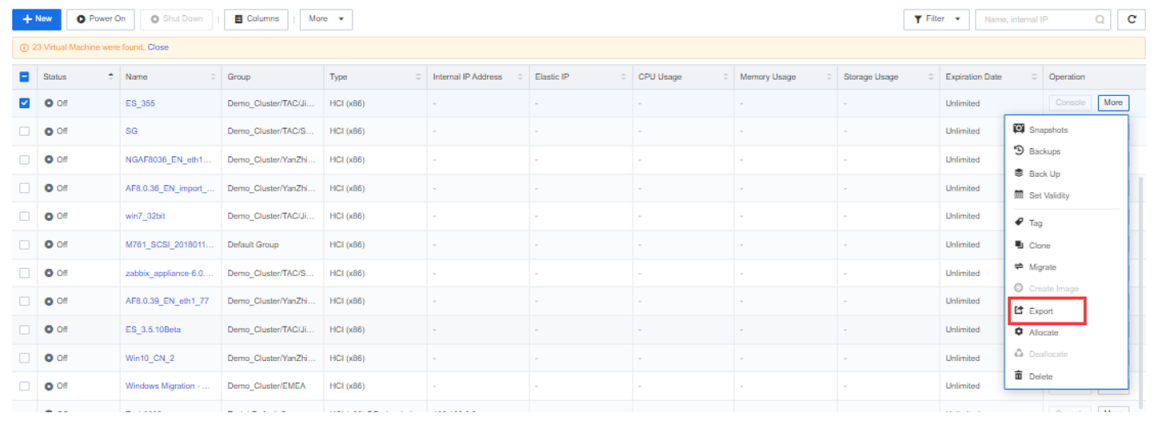
Step 2.Select the format that needs to be exported. OVA and VMA formats are available, and click the Export button.
![]()
There are two formats, VMA and OVA, with different export options. To export in VMA format, you can directly click to start exporting. But to export to OVA format, you must select the software version. The software version is the version number of VMware Station.
Step 3.Please wait for the virtual machine to produce and download the export file.
Function Description:
This feature supports the migration of the VM's run location and datastore and the migration of the VM across resource pools.
Precautions:
• Number of concurrent migration tasks per datastore: 1-50, Default: 1
• Number of concurrent migration tasks per node: 1-50, Default: 2
| Type |
Source Version |
Destination Version |
| x86 |
6.0.0 R5 |
6.8.0/6.9.0 |
| 6.2.0 |
||
| 6.3.0 |
||
| 6.3.0 R1 |
||
| 6.3.0 R2 |
||
| 6.3.0 R3 |
||
| 6.3.0 R1 (EN) |
6.9.0 (EN) |
|
| 6.3.0 R2 (EN) |
||
| ARM |
6.2.0 ARM |
6.9.0 ARM |
| 6.2.0 R1 ARM |
||
| 6.2.0 R2 ARM |
Some kernel features take effect only after a restart.
| Version |
Feature Restriction |
| 6.0.0 R5 |
The maximum memory is 960 GB. You cannot change the operating system of VMs. L3 cache is not supported. Disk space deallocation is not supported. Anti-escape is not supported for VMs. You cannot use a VirtIO NIC for a VM if vmTools is not installed on the VM. |
| 6.2.0, 6.3.0 R1, and 6.3.0 R2 |
You cannot change the operating system of VMs. L3 cache is not supported. Disk space deallocation is not supported. Anti-escape is not supported for VMs. You cannot use a VirtIO NIC for a VM if vmTools is not installed on the VM. |
| 6.2.0 ARM, 6.2.0 R1 ARM, and 6.2.0 R2 ARM |
VM guest OS cannot be modified by editing the VM. L3 cache is not supported. Disk space cannot be deallocated. Graphic cards cannot be added. High Performance Mode cannot be enabled. Disks cannot be pre-allocated. Serial ports cannot be added. E1000 NICs are not supported. |
• If you export a compatible VM and then import it, the imported VM will be a full-featured VM, not in compatibility mode
• If you back up a compatible VM and then recover it, the recovered VM will not be a compatible one but a full-featured VM.
• If you snapshot a compatible VM and then recover or clone it based on the snapshot, the new VM will not be a compatible one but a full-featured VM.
• If you clone a compatible VM, the new VM will not be a compatible one but a full-featured VM.
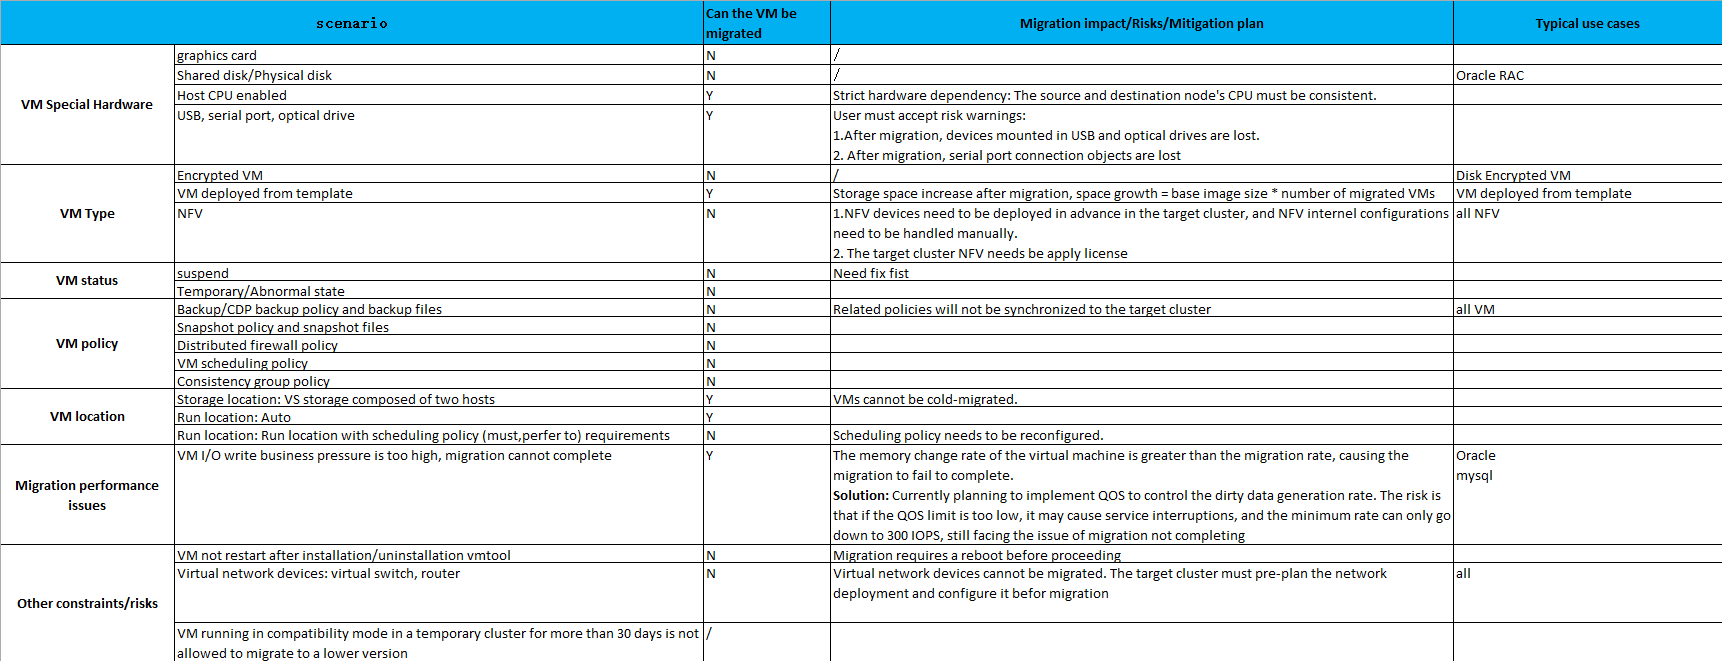
• You can perform migration among clusters on the classic network but not VPC.
• Migration optimization is not supported for a VM if you have configured its memory hot add settings when it is powered on or if you have not restarted it after installing or uninstalling vmTools.
• Cross-QEMU cluster migration is not supported if the underlying system of the host is UOS.
Prerequisites
The source VM can properly access the interface used for migration to the destination node, and the VM migration service has been enabled on the Port Management page of HCI.
Steps:
Step 1.Log in to the SCP platform, go to Resources > Compute > Virtual Machines > VMs, select the VM that you want to migrate, and choose More > Migrate.
Step 2.Specify the information of the migration destination: Resource Pool, Datastore, Run Location, and Connect NIC.
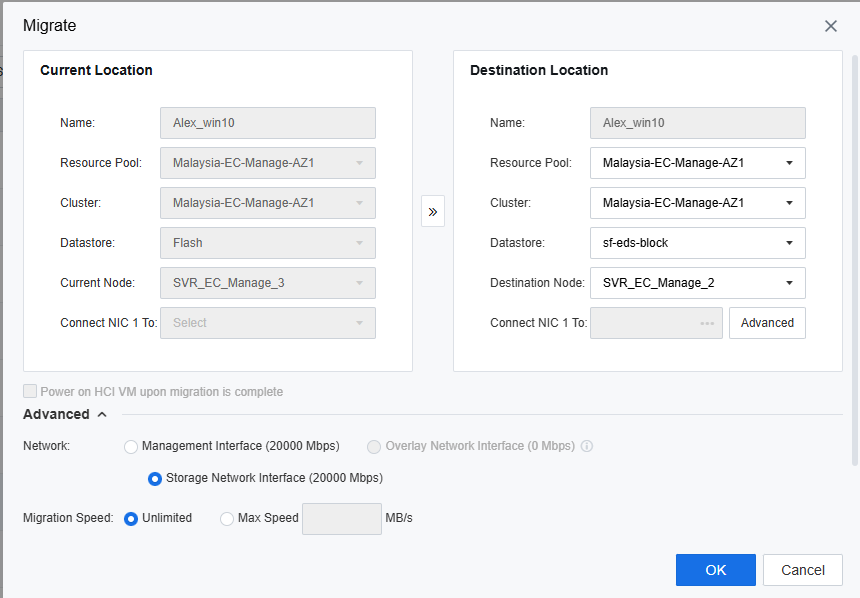
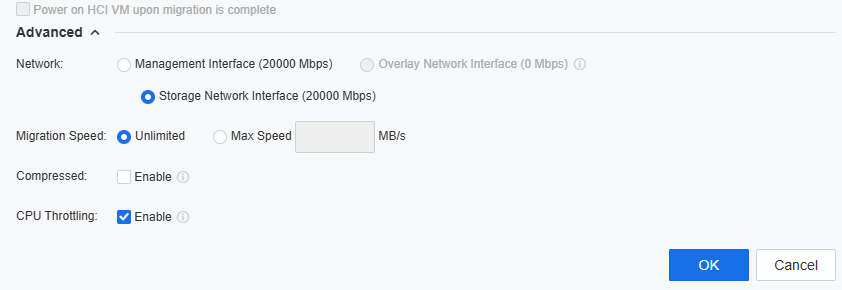
Step 3.Click Advanced, specify Network and Migration Speed for migration, and enable Compressed.
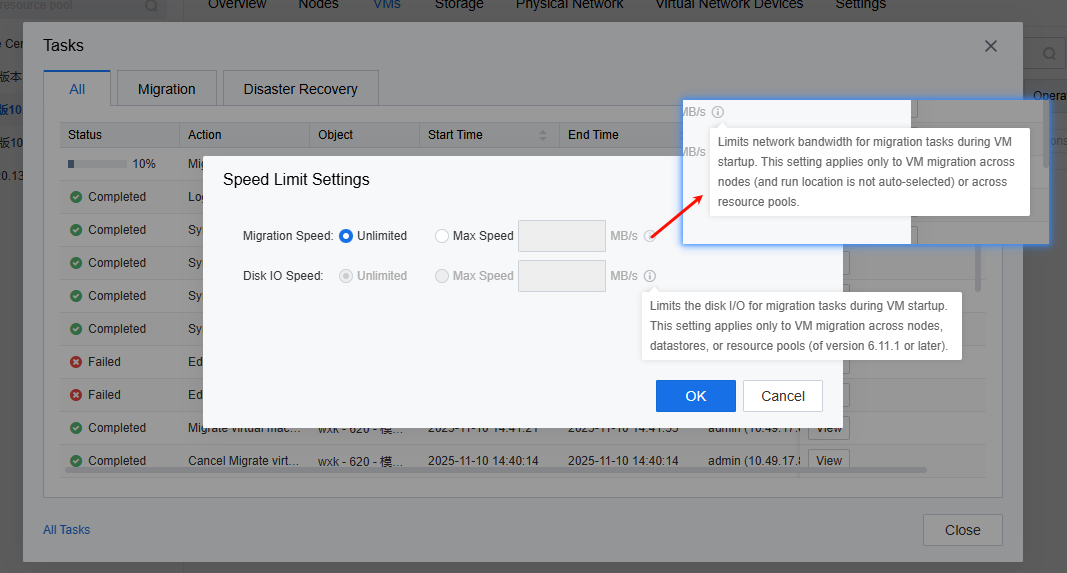
• Network: The interface bandwidth will be automatically identified here. When the bandwidth of the management interface, overlay network interface, and storage network interface is inconsistent, the interface with the highest bandwidth will be recommended. The priority of the interface is shown below when all interfaces have the same bandwidth: overlay network interface > storage network interface > management interface.
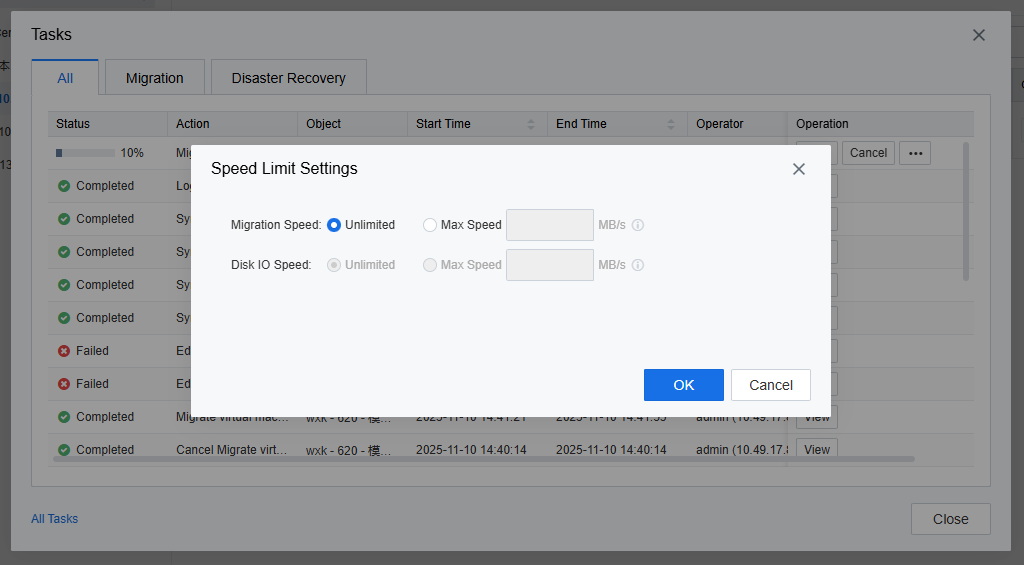
• Migration Speed: The default is Unlimited, and the maximum migration speed can be set before or during hot migration. The minimum migration speed limit is 50 MB/s, and the maximum value cannot exceed the bandwidth value of the physical interface of the current network.
• Compressed: After it is enabled, hot migration will be speeded up but also consume CPU resources (up to 4 threads).
![]() :
:
1.When migrating a VM, the destination location can be the resource pool where the VM is located or migrate to another resource pool.
2.For live migration, the VM remains powered on when migrating to an HCI cluster, but it will be shut down when migrating to a VMware vCenter. You can select Power on VMware VM upon migration is complete, and Auto power off HCI VM to complete migration. Otherwise, you need to shut down the VM manually to complete the migration.
3.For cold migration, the VM will be shut down after migration. You can select Power on HCI/VMware VM upon migration is complete.
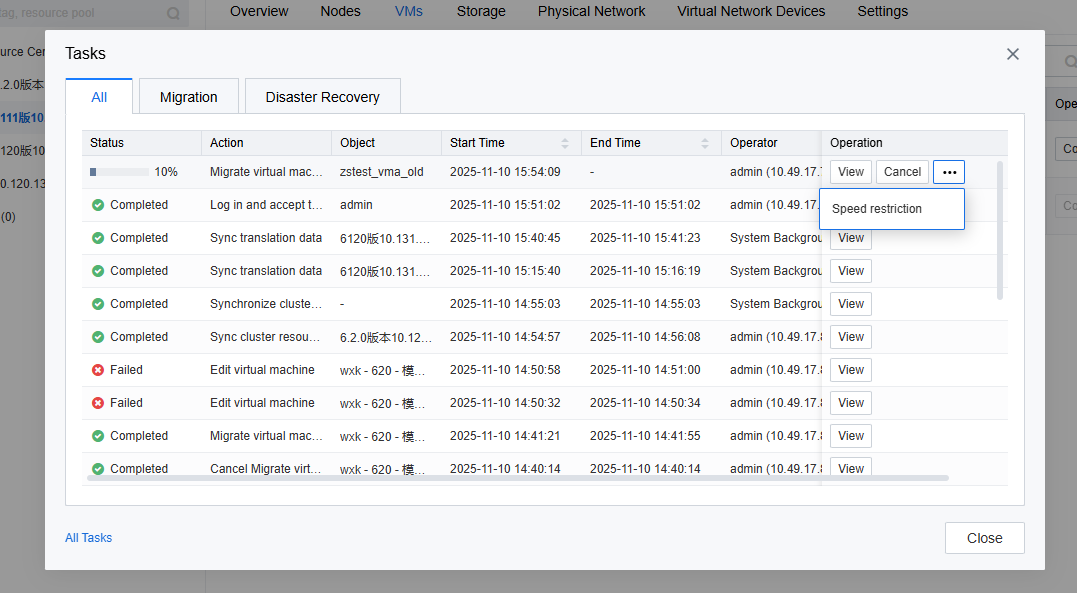
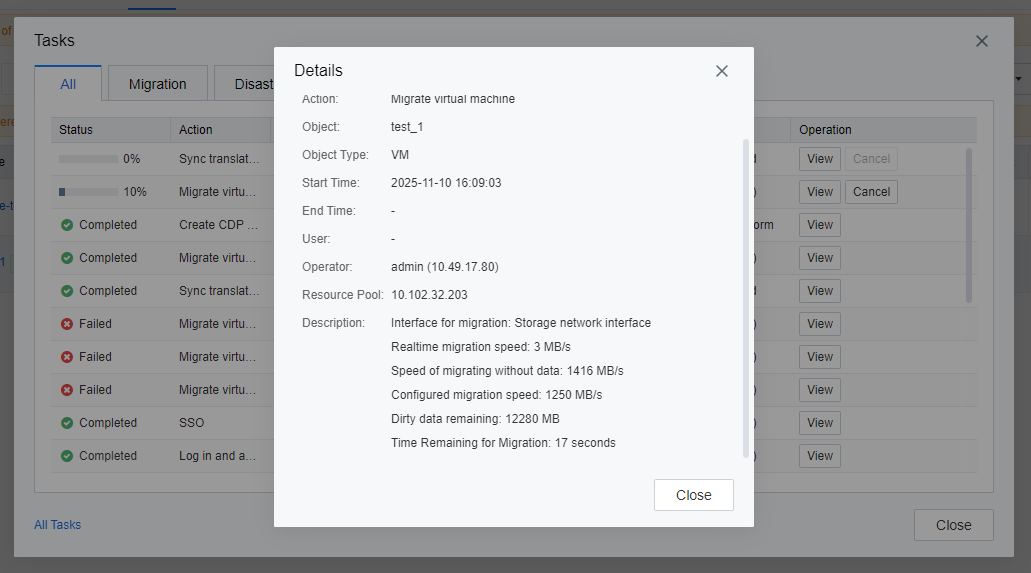
Step 4.During migration, view the migration progress in the Tasks pop-up window and suspend the VMs as required. Upon VM suspension, businesses will be suspended for a period of time to prevent the VMs from generating new memory data until migration is complete. We recommend that you suspend VMs during off-peak hours.
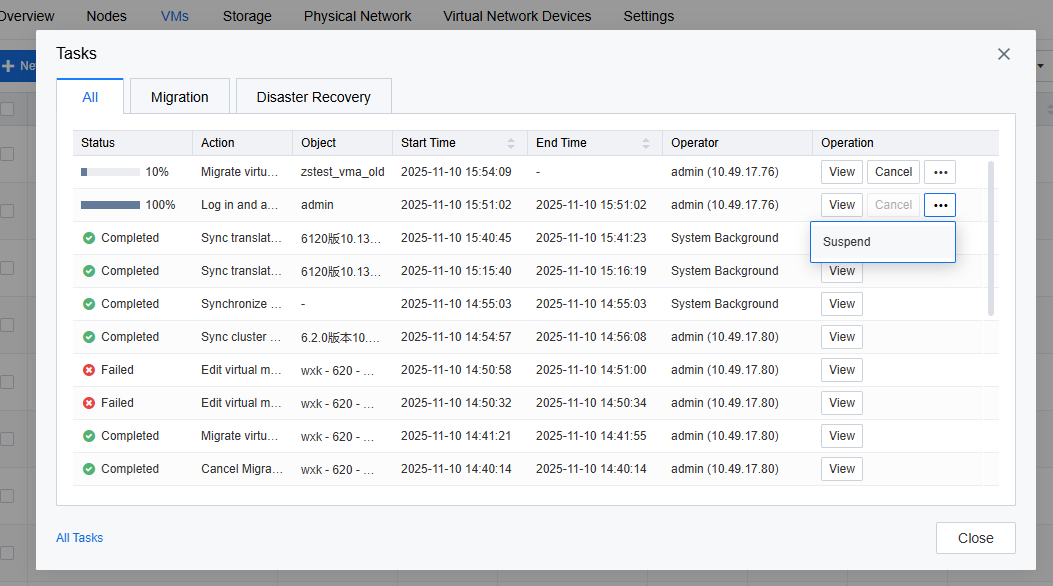
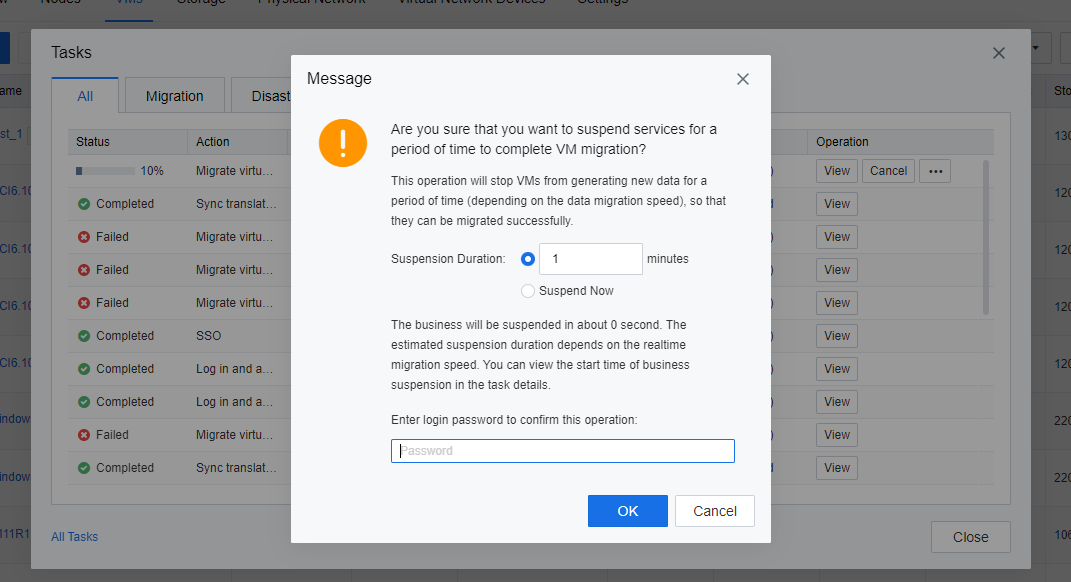
Speed limit is also supported.
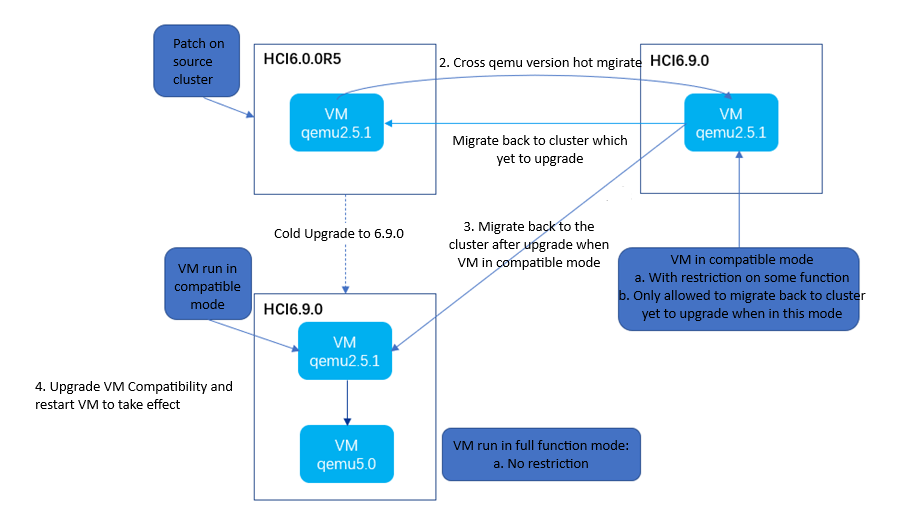
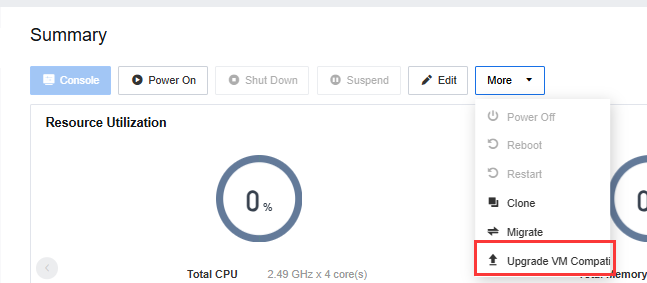
Step 5.In cross-cluster cross-version hot migration scenarios, the VMs will be in compatible mode after being migrated to the destination cluster, and some features will be restricted. Therefore, you need to go to the VM details page and choose More > Upgrade VM Compatibility to restart the VM for the features to become available.
Note:
• After the cross-cluster cross-version hot migration, we recommend that you upgrade the VM compatibility during off-peak hours.
• After the cross-version hot migration and before the VM compatibility upgrade, if you find that the VM businesses are abnormal, you can migrate them back to the source cluster. If you have upgraded the VM compatibility, this operation is not allowed.
Function Description:
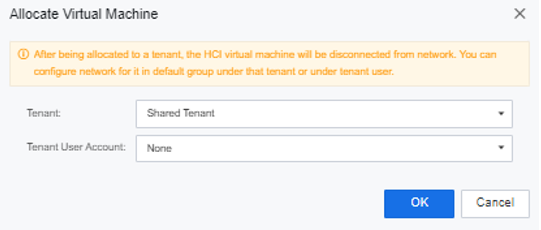
This function supports assigning virtual machines to tenants or tenant user accounts.
Precautions:
After deallocation, the HCI-type virtual machine will be disconnected from the network. You can go to the default grouped virtual machine list to configure the network for the virtual machine.
Prerequisite
The assigned tenant or tenant user account has a sufficient quota.
Steps:
Step 1.Log in to the SCP platform, select Compute > Virtual Machine, select the virtual machine that needs to be allocated, and click More > Allocate.
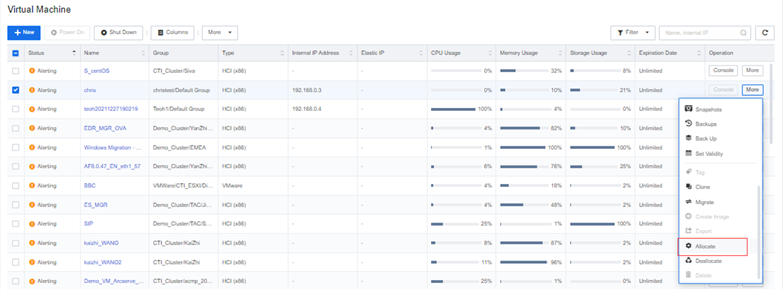
Step 2.Select the Tenant and Tenant User Account (it can be empty) and click the OK button.
Function Description:
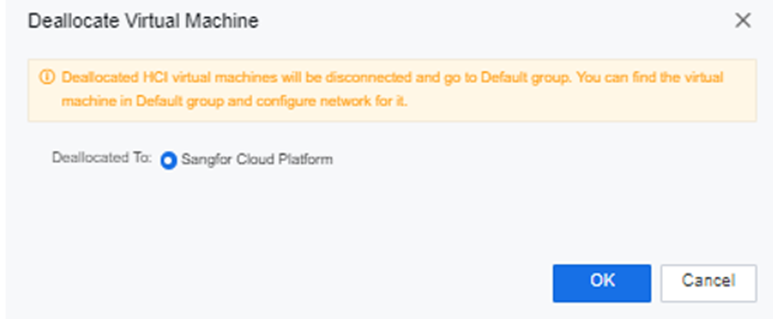
This function supports the virtual machines' deallocation to the SCP platform.
Precautions:
Prerequisite
The virtual machine that needs to be deallocated has been shut down.
Steps:
Step 1.Log in to the SCP platform, select Compute > Virtual Machine, select the virtual machine that needs to be deallocated, and click More > Deallocate. 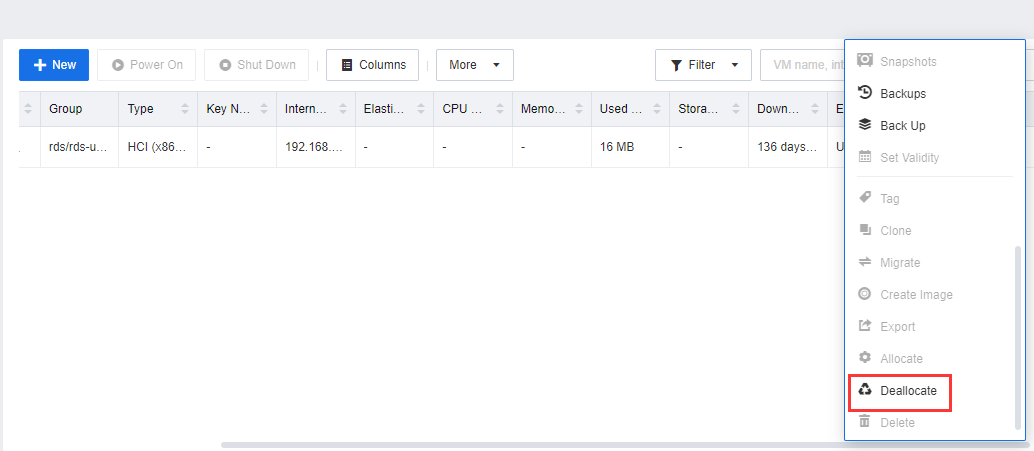
Step 2.You can see the deallocate progress on the taskbar.
Function Description:
The SCP platform supports creating a Standalone SQL Server and SQL Server AlwaysOn Cluster.
Precautions:
None.
Prerequisite
None.
Steps:
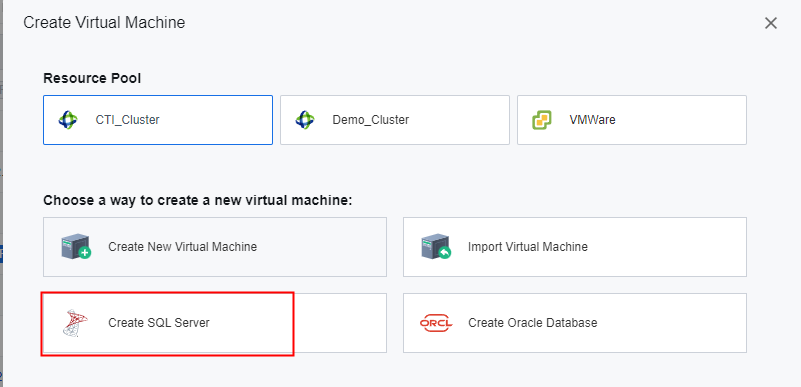
Step 4.Navigate to Resources, and select Virtual Machines under Compute.
Step 5.Click New, select Resource Pool for where the SQL server will be located, and click Create SQL Server to create a new SQL Server.
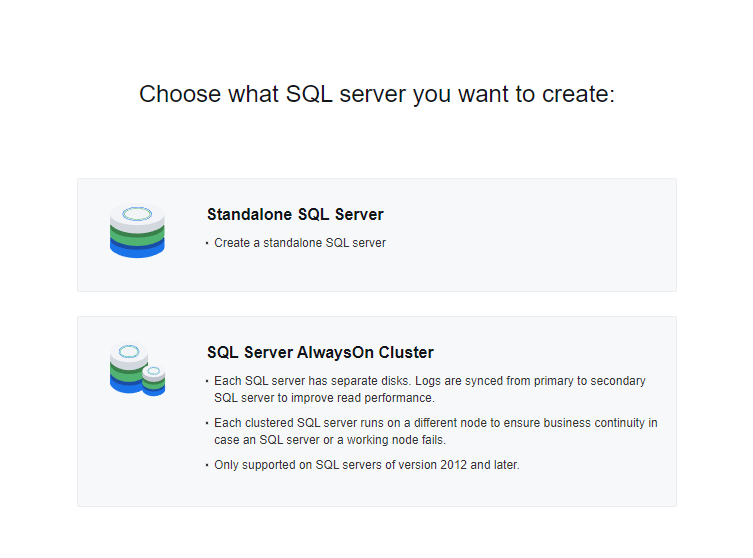
Step 6.Choose the type of SQL server you want to create.
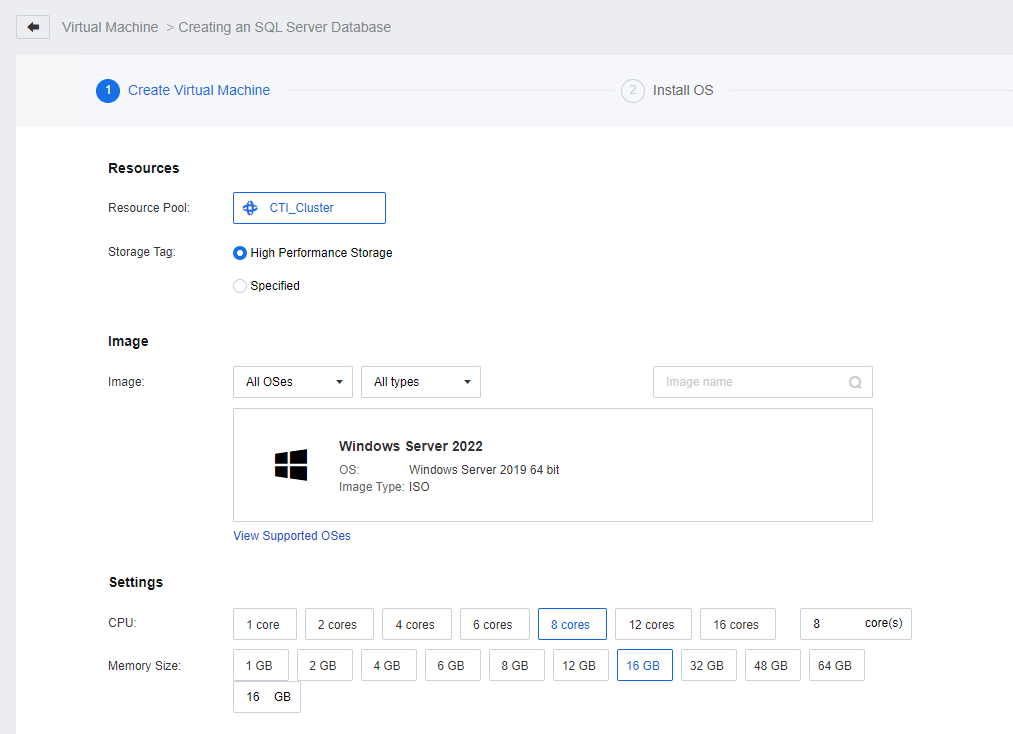
Step 7.Enter the SQL Server Database creation page, pick the appropriate Storage Tag, select Image and configure the Settings for CPU and Memory Size.
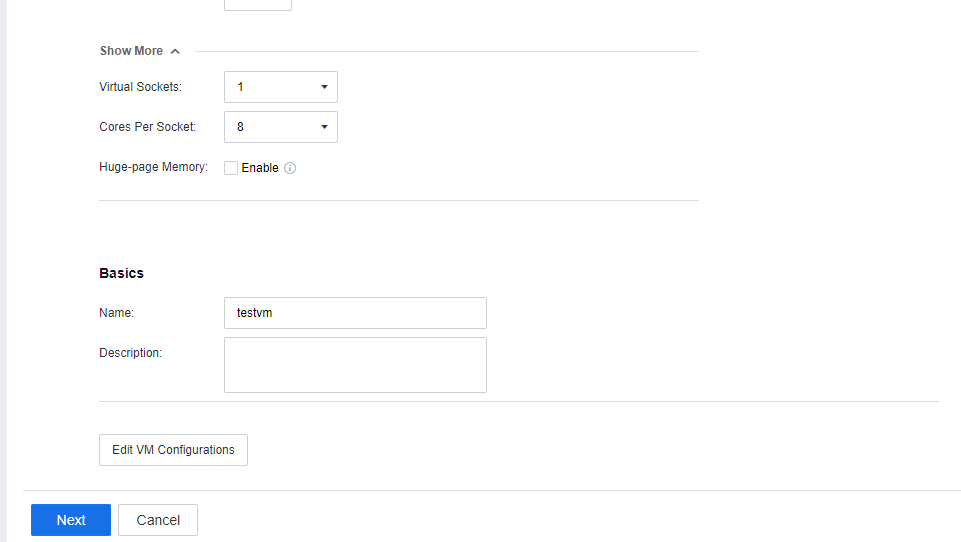
Step 8.Click Show More to configure the Virtual Socket, Cores Per Socket, and Huge-page Memory. Lastly, configure the Basics, then click Next to install OS.
Step 9.Install the SQL Server.

![]()
To proceed to the next step Allocate Disk, install vmTools, and restart this VM first.
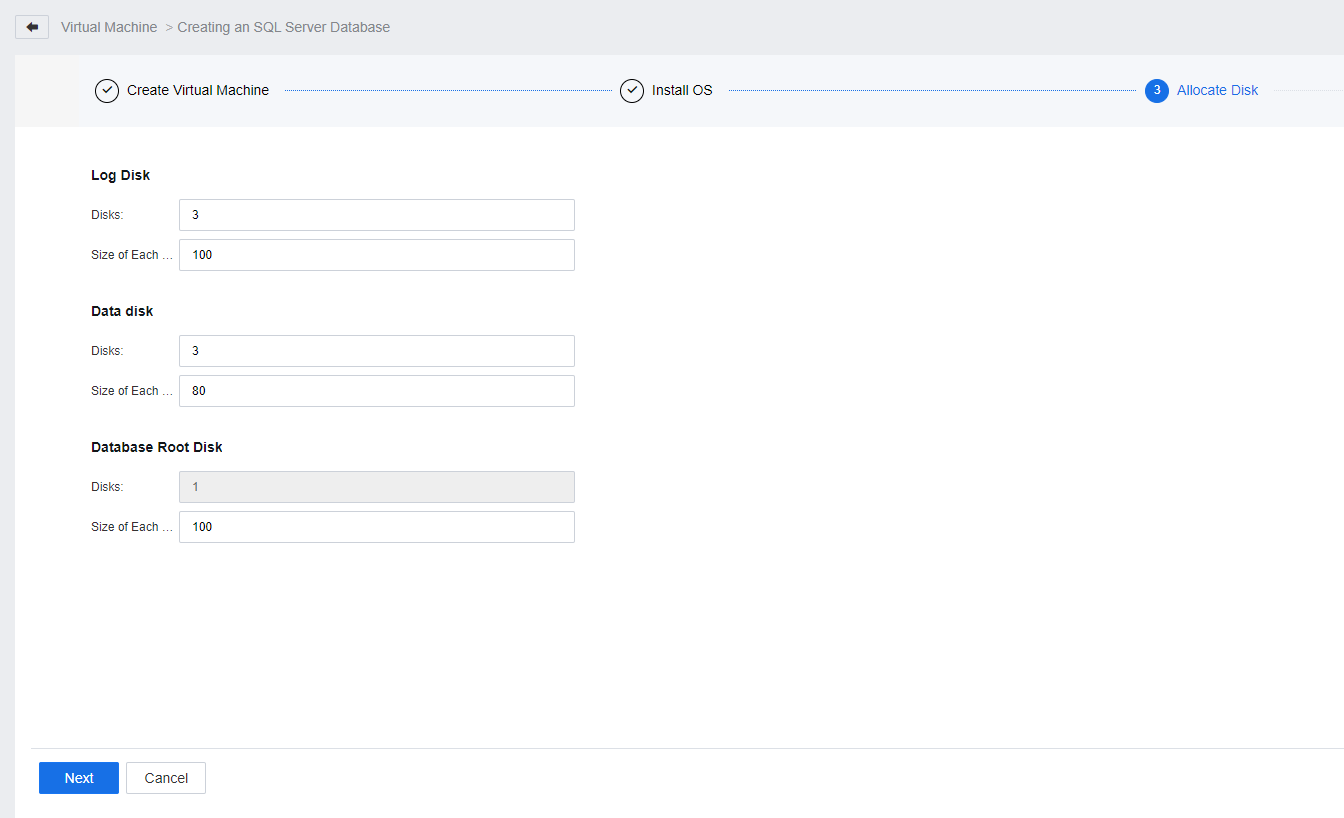
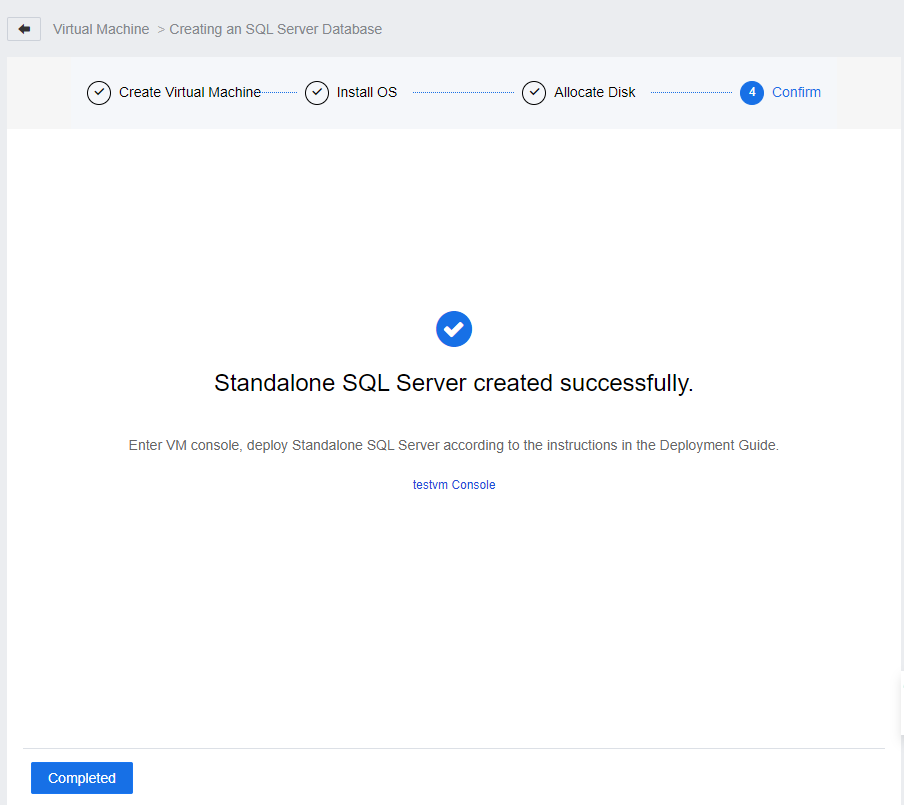
Step 10.Configure the Log Disk, Data Disk, Database Root Disks, and click Next to complete the SQL Server creation.

 {{ $t('index.defaultHeader.chromeBrowserTip') }}