{{ secondMenu.name }}


You can configure security policies for different groups in this module. Policy settings include basic configurations, anti-malware, real-time protection, anti-ransomware, trust list, general settings, vulnerability remediation, endpoint control, and customization.
Go to Policies > General Policies to configure security policies for different groups, as shown in the following figure.
![]()
You can configure security policies for endpoints running on different operating systems by selecting the Windows, Linux, or macOS tab. The example used in this section illustrates the configuration of security policies for Windows endpoints, serving as a reference for configuring policies for endpoints running on other operating systems.
On this tab, you can configure the administrator's asset attributes, contact information, notifications, passwords, and policies for collecting endpoint behavior data and logs. For details, see the following description.
Asset Attributes
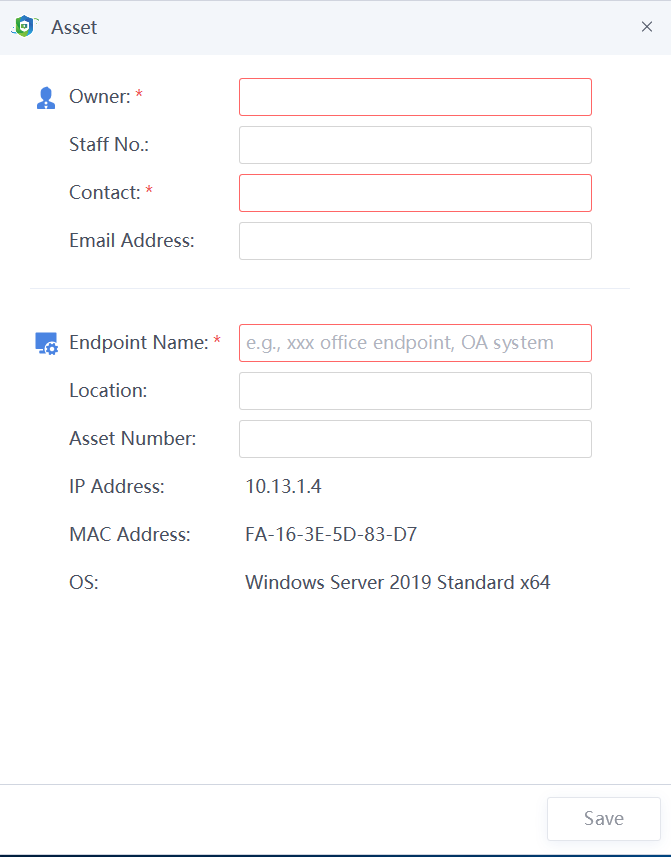
After Require users to provide asset attributes is selected, you can select asset attributes as needed, including the Department, Owner, Asset Name, Phone Number, Email Address, Location, Asset Number, and Staff No., as shown in the following figure.

After the configuration, endpoint users can view the details in system messages and provide the asset information as required, as shown in the following figure.
Administrator Contact Information
After Show contact information of administrator on Agent is selected, endpoint users can view the administrator's contact information, including the administrator name, mobile number, and email address, as shown in the following figure. 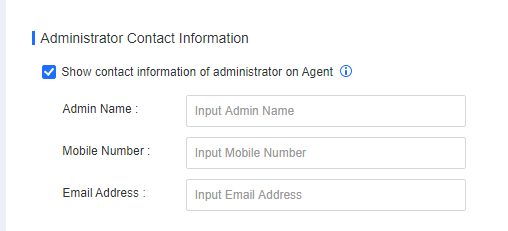
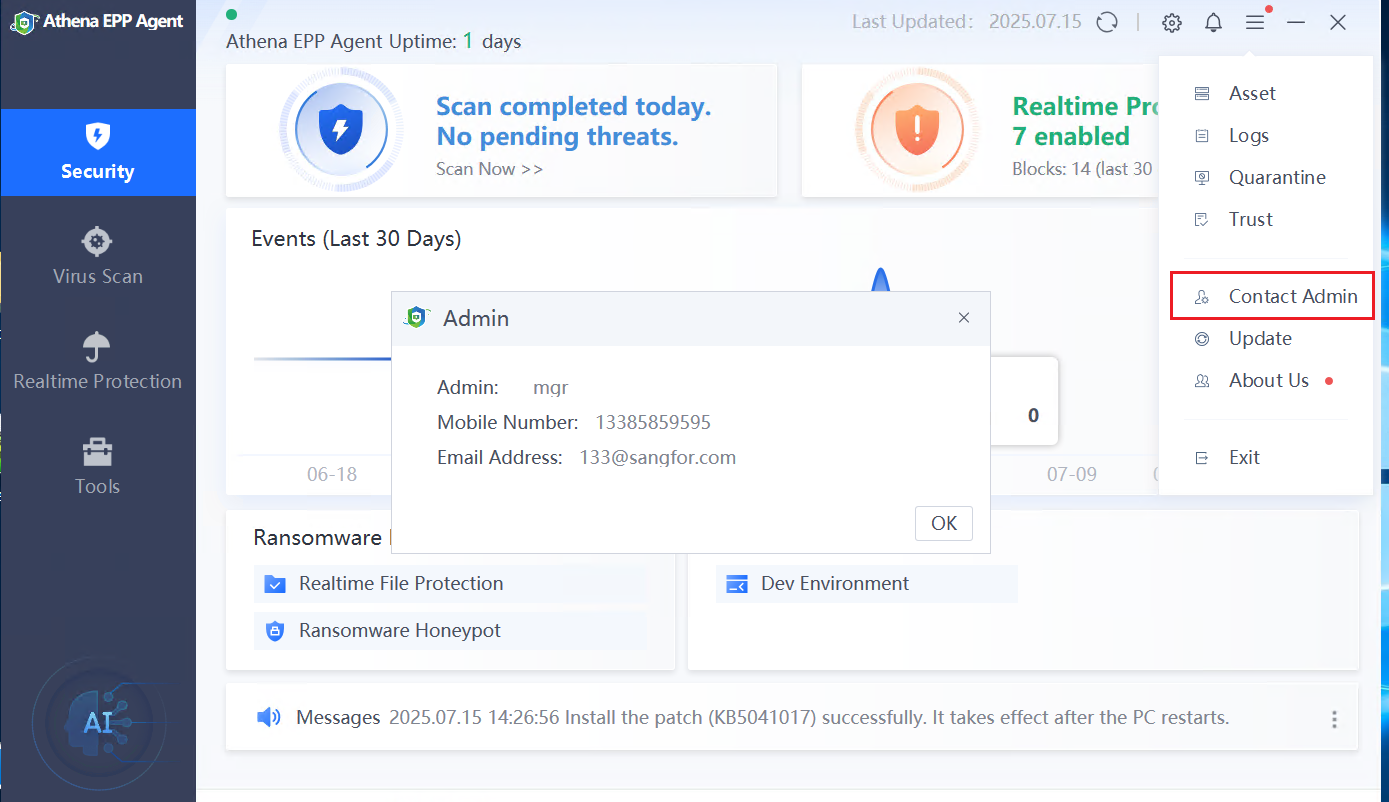
The following figure shows how to view the administrator information on an endpoint.
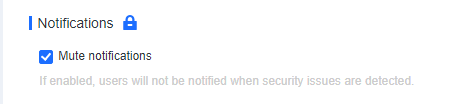
Notifications (Mute notifications)
After Mute notifications is selected, endpoint users will not be notified when security issues are detected, as shown in the following figure.
![]()
If the Lock icon is displayed, you cannot modify this option on the Athena EPP agent. If it is showing an Unlock icon, modification is allowed.
Agent Administration Passwords
You can set Exit Password, Uninstallation Password, and Trust Zone Password, as shown in the following figure. 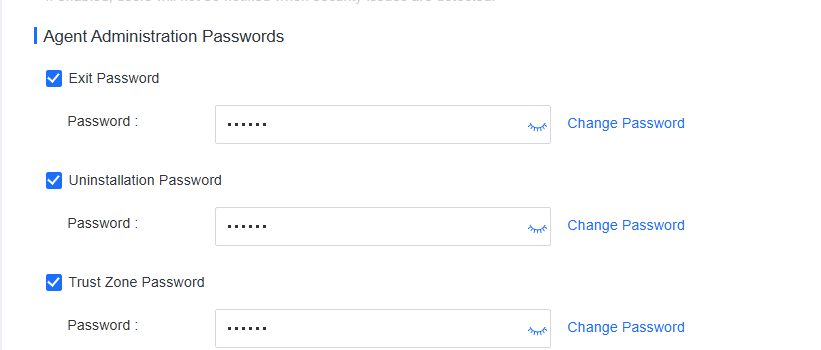
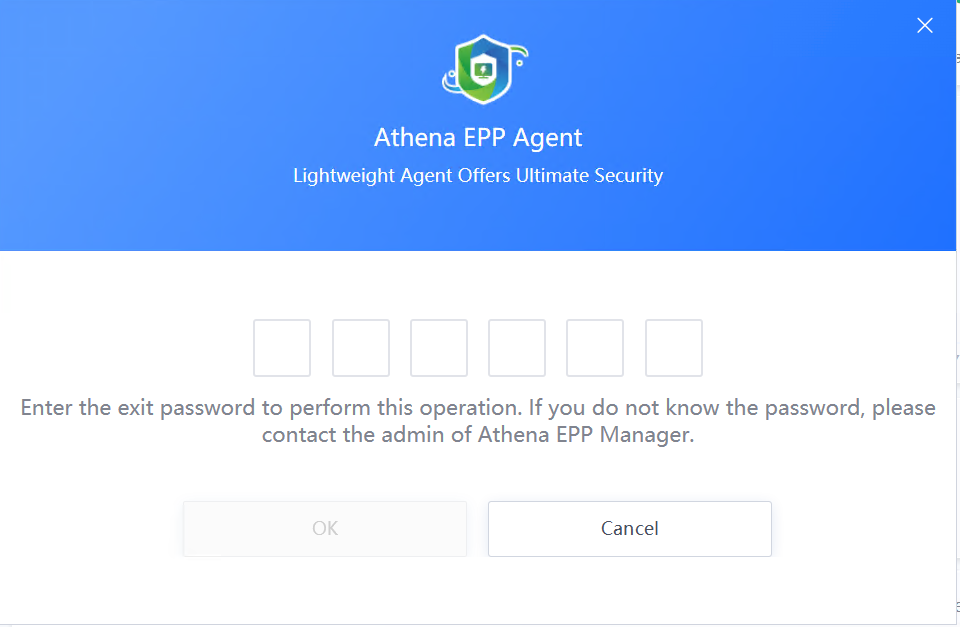
After Exit Password is selected, an endpoint user is required to enter the password to exit the Athena EPP agent, as shown in the following figure.
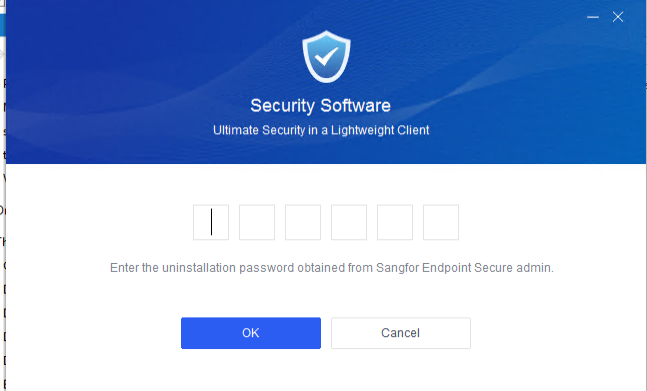
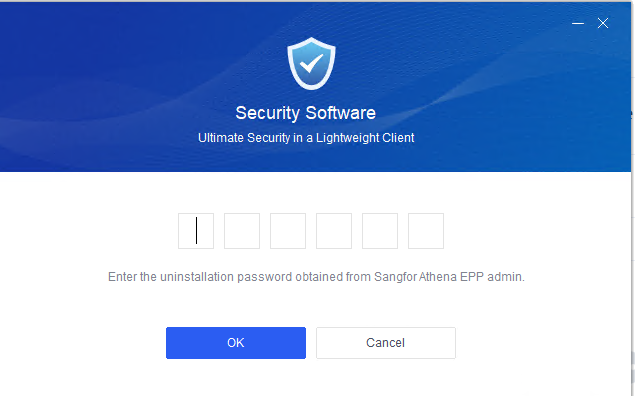
After Uninstallation Password is selected, an endpoint user is required to enter the password to uninstall the Athena EPP agent, as shown in the following figure.
After Trust Zone Password is selected, an endpoint user is required to enter the password to add a trusted file. It prevents unauthorized trust actions, ensuring that endpoints are protected on Athena EPP.
![]()
The Trust Zone Password check box is available for Windows endpoints only.
Advanced Threat Detection and Log Collection

Collect endpoint behavior data, including file, network, registry, DNS, and scheduled task activities: Select this check box if you need to use the advanced threat detection and threat hunting features, or report advanced threat alerts and events to Athena XDR or Athena MDR.
Report endpoint behavior data, including file, network, registry, DNS, and scheduled task activities: Select this check box if you need to report endpoint behavior data to Athena XDR or Athena MDR for analysis.
Collect logs in Event Viewer > Windows Logs > Security on Windows endpoints and report them to Athena MDR.
On this tab, you can configure scheduled scan settings, malware scan settings, and antivirus database engine settings.
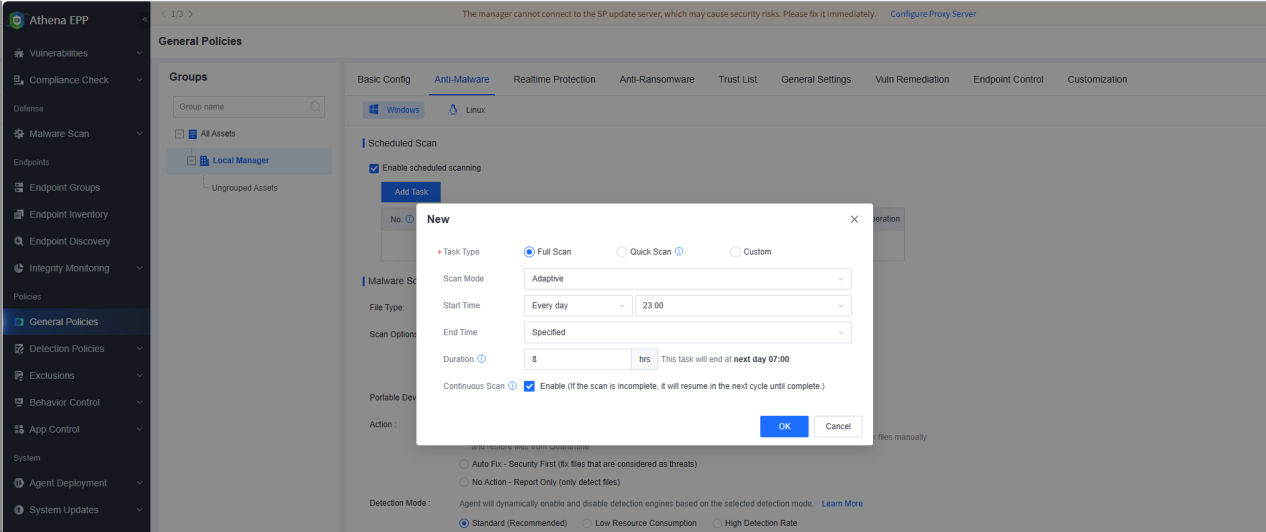
Scheduled Scan
You can configure scheduled scan settings so that virus scans can be performed on endpoints in the internal network as scheduled, as shown in the following figure.
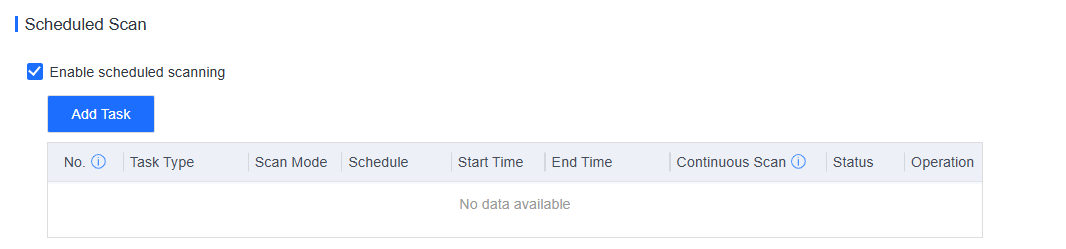
Two types of scheduled scans can be performed: Quick Scan and Full Scan, each offering three CPU usage options: High CPU, Adaptive, and Low CPU, as described below:
• High CPU: Scanning consumes the most CPU resources, but the scan speed is the fastest.
• Adaptive: Dynamically adjusts CPU resources based on the CPU usage. It optimizes the scan speed by leveraging ample CPU resources when the CPU usage is low and minimizing resource consumption when the CPU usage is high, thus ensuring smooth service operations.
• Low CPU: Scanning consumes no more than 10% of CPU resources, but the scan speed is the slowest.
In addition, when you add a scheduled scan task for a Windows endpoint, you can enable Continuous Scan as needed. For example, you have enabled Continuous Scan for a full scan task that is scheduled to run every day from 23:00 to 07:00 the next day. In this case, if the full scan task is not completed in the current cycle, the full scan task will resume in the next cycle until it is completed.
Malware Scan
You can configure malware scan settings such as the file types, scan options, actions required for malicious files, detection modes, and CPU usage, as shown in the following figure. 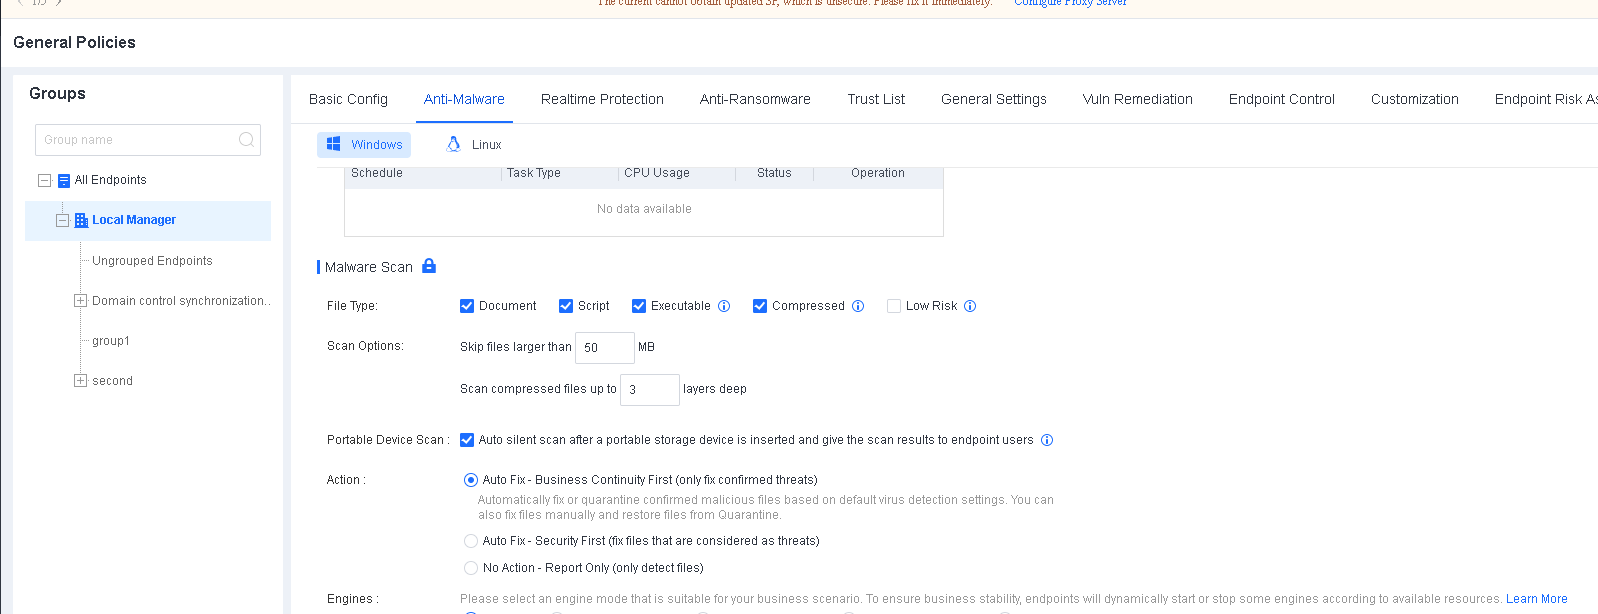
![]()
If the Lock icon is displayed, you cannot modify the settings on the Athena EPP agent. If the Unlock icon is displayed, modification is allowed.
File Type: Select Document, Script, Executable, Compressed, or Low Risk.
![]()
1. A total of 23 compressed file extensions are supported, including 7z, XZ, BZIP2, GZIP, TAR, ZIP, and WIM. For details, click the ![]() icon.
icon.
2. Low Risk is not recommended because low-risk files are identified as posing an extremely minimal threat after analysis. Filtering out low-risk files can improve the scan speed and reduce the memory usage of Sangfor Engine Zero. Low-risk file types include the following 42 types:
.vmdk, .iso, .lib, .a, .nsf, .pdb, .dmp, .db, .hdmp, .idb, .pch, .vdf, .pak, .evtx, .imd, .aac, .webm, .ntf, .cvd, .mof, .mdf, .mdb, .otf, .tlb, .jpg, .jfif, .jpeg, .jpe, .jp2, .png, .gif, .bmp, .mp3, .mp4, .m4a, .mkv, .wmv, .wma, .tif, .tiff, .flv, and .ogg
Scan Options: You can specify the maximum file size and supported compressed file layers for scanning.
Portable Device Scan: You can initiate a silent scan when a portable device such as a USB flash drive, portable hard disk, mobile phone, or digital camera is connected to an endpoint. The endpoint user will receive the scan results once the scan is complete.
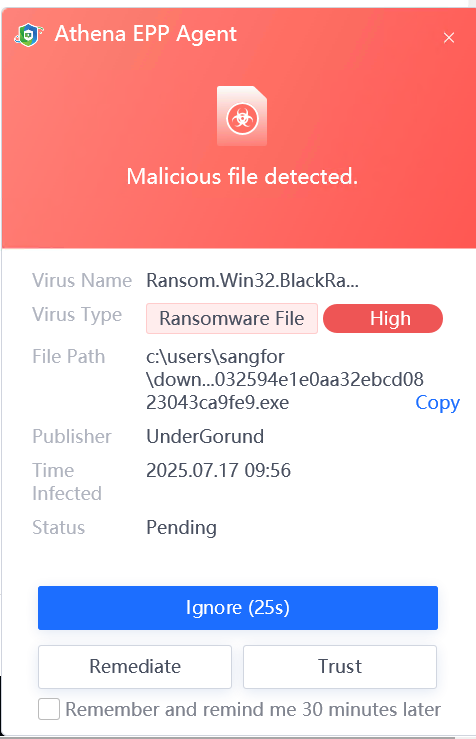
Action: You can specify the response to a detected malicious file. Select Auto Fix - Business Continuity First, Auto Fix - Security First, or No Action - Report Only as needed. The default action is Auto Fix - Business Continuity First.
• Auto Fix - Business Continuity First: Automatically fix or quarantine confirmed malicious files based on the default virus detection settings; do not automatically fix or quarantine suspicious files, but report them to the Athena EPP manager, allowing endpoint users to fix them.
• Auto Fix - Security First: Automatically fix or quarantine all malicious files and allow endpoint users to manually restore files from the Quarantine area. This option is suitable for scenarios with enhanced protection requirements.
• No Action - Report Only: Report malicious files to the Athena EPP manager, but do not automatically fix or quarantine them. This option suits scenarios where an on-duty security professional is responsible for fixing threats.
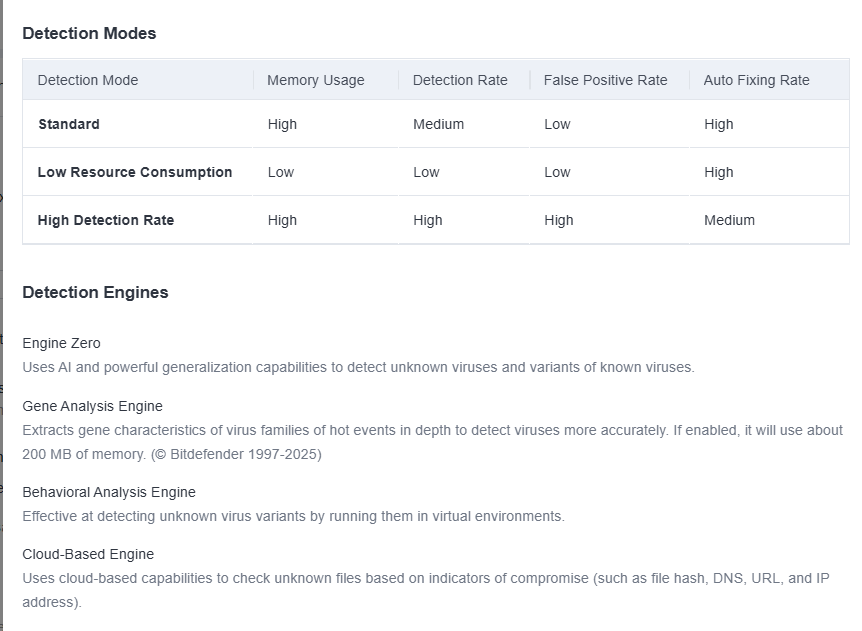
Detection Mode: Three detection modes are supported, including Standard (Recommended), Low Resource Consumption, and High Detection Rate. Select a mode that aligns with your business scenario, as shown in the following figure.
![]()
1. In contrast to other modes, more false positives are generated in High Detection Rate mode. Therefore, do not select this mode before a thorough assessment is carried out.
CPU Usage: If Restrict is selected, the CPU usage for Athena EPP is minimized. It may result in a longer virus scan duration. It applies to scenarios involving endpoints with legacy systems, virtual desktops, and overloaded systems. 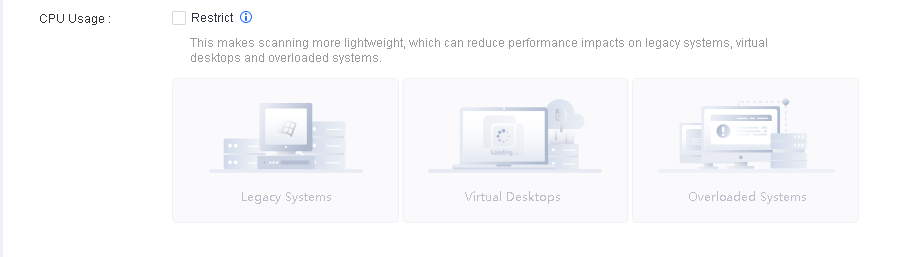
![]()
When Restrict is selected, the CPU usage of Athena EPP varies in different virus scan modes:
1. High CPU: Consumes no more than 50% of CPU resources.
2. Low CPU: Consumes no more than 5% of CPU resources.
Antivirus Database Engine
You can specify the antivirus database engine setting as Update via Manager or Update via update servers. If Update via update servers is selected, you can configure multiple update servers (including the Athena EPP manager), as shown in the following figure.
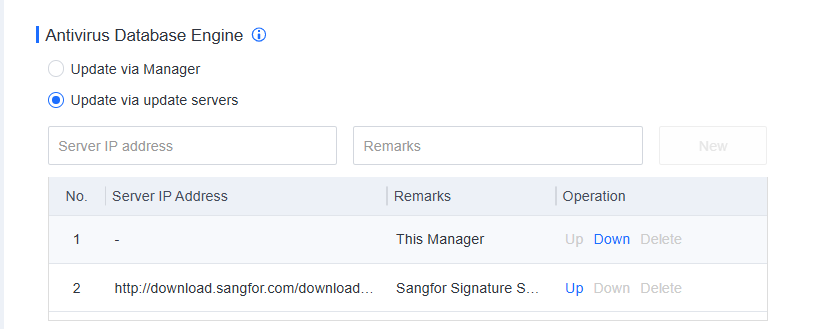
In the Operation column, you can click Up or Down to adjust the order of the update servers for the antivirus database.
On this tab, you can configure settings such as Auto-Fix of High Confidence Events, Realtime File Protection, Hacktool Protection, WebShell Detection, Brute-Force Attack Detection, Suspicious Login Detection, and Fileless Attack Protection.
![]()
You can click the ![]() icon on the right of a setting to lock it and prevent it from being modified on the Athena EPP agent.
icon on the right of a setting to lock it and prevent it from being modified on the Athena EPP agent.
Auto-Fix of High Confidence Events
This feature can automatically analyze and fix advanced threats, skip core processes and business processes of the operating system, and automatically terminate processes of events identified as threats.

Realtime File Protection
You can enable real-time file protection to monitor the read, write, and execution actions on files within an endpoint. It can prevent the impact of malicious files on the endpoint, as shown in the following figure. 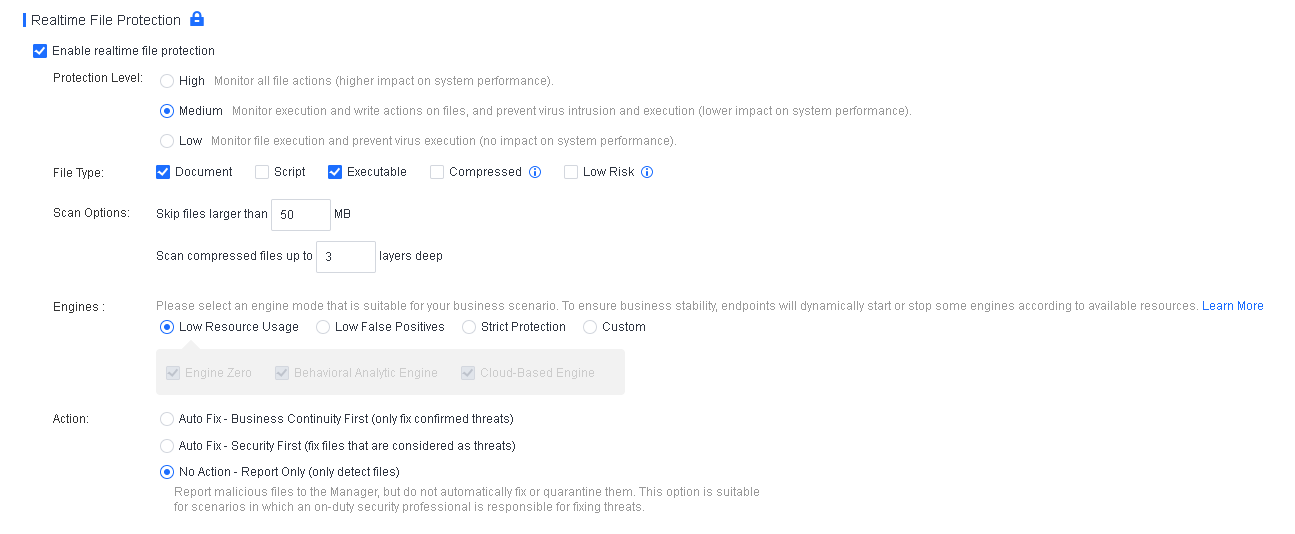
Relevant parameters are described as follows:
Protection Level: Three protection levels are provided to guard against malicious files, with the following differences:
• High: Monitor all file actions (higher impact on system performance).
• Medium: Monitor execution and write actions on files, and prevent virus intrusion and execution (lower impact on system performance).
• Low: Monitor file execution and prevent virus execution (no impact on system performance).
File Type: Available options include Document, Script, Executable, Compressed, and Low Risk.
![]()
1. A total of 23 compressed file extensions are supported, including 7z, XZ, BZIP2, GZIP, TAR, ZIP, and WIM. For details, click the ![]() icon.
icon.
2. Low Risk is not recommended because low-risk files are identified as posing an extremely minimal threat after analysis. Filtering out low-risk files can improve the scan speed and reduce the memory usage of Sangfor Engine Zero. Low-risk file types include the following 42 types:
.vmdk, .iso, .lib, .a, .nsf, .pdb, .dmp, .db, .hdmp, .idb, .pch, .vdf, .pak, .evtx, .imd, .aac, .webm, .ntf, .cvd, .mof, .mdf, .mdb, .otf, .tlb, .jpg, .jfif, .jpeg, .jpe, .jp2, .png, .gif, .bmp, .mp3, .mp4, .m4a, .mkv, .wmv, .wma, .tif, .tiff, .flv, and .ogg
Scan Options: You can specify the maximum file size and supported compressed file layers for scanning. In most cases, malicious file sizes are small.
Detection Mode: Two detection modes are supported, including Low Resource Consumption (Recommended) and Standard. Select a mode that aligns with your business scenario, as shown in the following figure. 
Action: You can specify the response to a detected malicious file. Select Auto Fix - Business Continuity First, Auto Fix - Security First, or No Action - Report Only as needed. The default action is Auto Fix - Business Continuity First.
• Auto Fix - Business Continuity First: Automatically fix or quarantine confirmed malicious files based on the default virus detection settings; do not automatically fix or quarantine suspicious files, but report them to the Athena EPP manager, allowing endpoint users to fix them.
• Auto Fix - Security First: Automatically fix or quarantine all malicious files and allow endpoint users to manually restore files from the Quarantine area. This option is suitable for scenarios with enhanced protection requirements.
• No Action - Report Only: Report malicious files to the Athena EPP manager, but do not automatically fix or quarantine them. This option suits scenarios where an on-duty security professional is responsible for fixing threats.
Hacktool Protection
This feature can effectively block the defense evasion tactics that hackers employ during ransomware attacks, protecting endpoint users from ransomware. 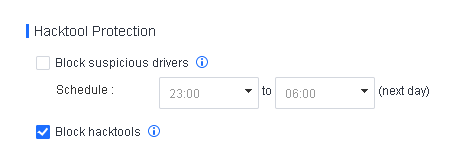
• Block suspicious drivers: Give alerts and block suspicious drivers' loading, running, and other behaviors during the specified scheduled period.
• Block hacktools: Give alerts and block the loading, running, and other behaviors of untrusted drivers and hacktools.
WebShell Detection
When this feature is enabled, you can specify a scan method and the action for detected web shells, as shown in the following figure.
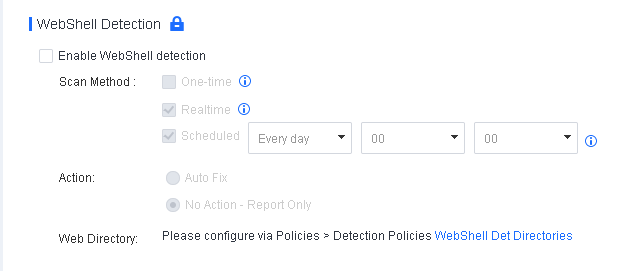
Relevant parameters are described as follows:
Scan Method: Available options include One-time, Realtime, and Scheduled.
• One-time: Scan the root directory and its subdirectories upon the first installation of the Athena EPP agent on an endpoint.
• Realtime: Scan new files on an endpoint in real time.
• Scheduled: Scan all files on an endpoint as scheduled.
Action: You can specify the action for detected web shells. Supported options include Auto Fix and No Action - Report Only.
Web Directory: You can configure the web shell detection directory, and it will be scanned by default. You can also specify a custom directory.
![]()
Web shell detection is available for Windows Server and Linux endpoints.
Brute-Force Attack Detection
This feature detects and blocks RDP, SMB, Microsoft SQL Server, and SSH brute-force attacks. You can enable RDP, SMB, and Microsoft SQL Server brute-force attack protection for Windows endpoints and SSH brute-force attack protection for Linux endpoints.
Settings for Windows endpoints are shown in the following figure.
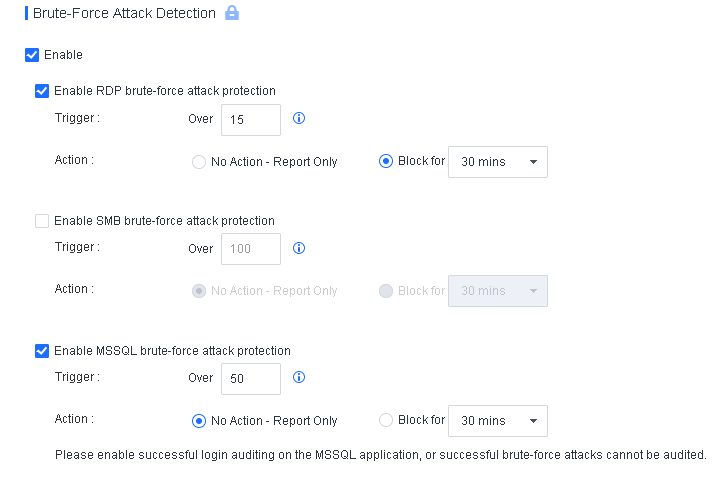
Relevant parameters are described as follows:
• Trigger: You can specify the threshold for identifying a quick brute-force attack. A brute-force attack is identified as a quick attack if the number of its consecutive attempts exceeds the specified value within a minute. For RDP and SMB quick brute-force attacks, you can specify an integer in the range of 1 to 100 and an integer in the range of 20 to 1,000, respectively. Slow and distributed brute-force attacks are identified based on an intelligent algorithm.
• Action: For identified attacks, select No Action - Report Only or Block for specific minutes.
![]()
Enable successful login auditing on the Microsoft SQL Server application or successful brute-force attacks cannot be audited.
Settings for Linux endpoints are shown in the following figure. 
Relevant parameters are described as follows:
• Trigger: You can specify the threshold for identifying a quick brute-force attack. A brute-force attack is identified as a quick attack if the number of consecutive attempts exceeds the specified value within a minute. You can specify an integer from 1 to 100 for SSH quick brute-force attacks. Slow and distributed brute-force attacks are identified based on an intelligent algorithm.
• Action: For identified attacks, select No Action - Report Only or Block for specific minutes.
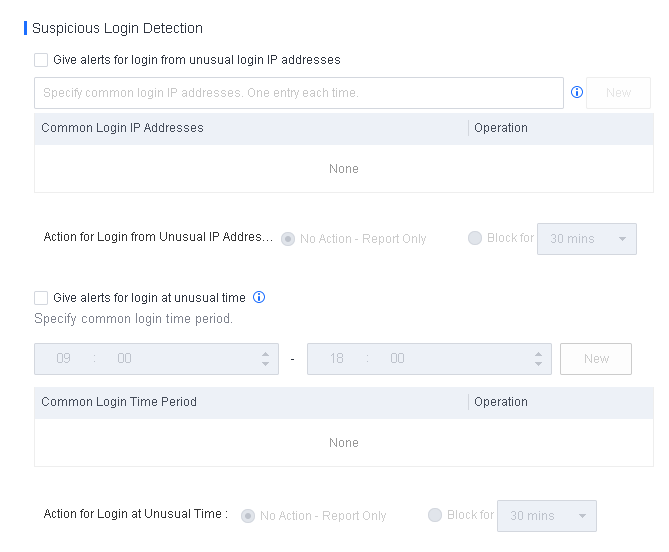
Suspicious Login Detection
Athena EPP can detect and automatically block logins at an unusual time or from uncommon IP addresses.
Athena EPP can detect suspicious logins on Windows endpoints (including PCs) via RDP and SMB and those on Linux endpoints via SSH.
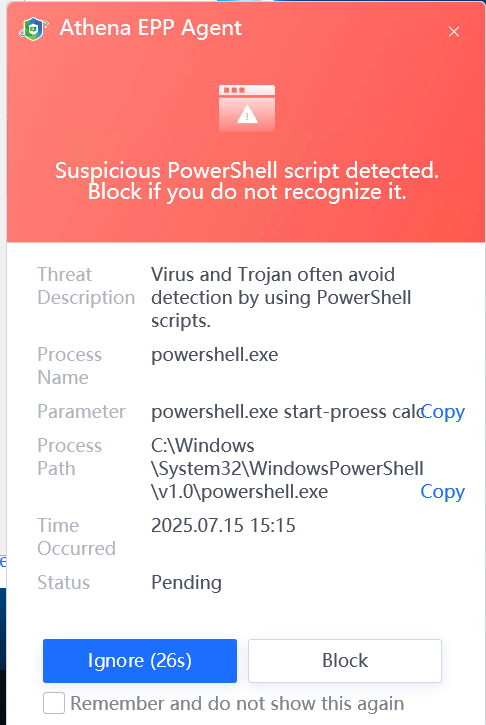
Fileless Attack Protection
A fileless attack is an advanced technique employed by attackers to exploit vulnerable applications to inject code into the memory and normal system processes, such as the registry, PowerShell scripts, and Microsoft Office documents, aiming to gain access permissions and execute attack commands on target devices. Fileless attack protection enables the detection and handling of suspicious PowerShell scripts. The settings for this feature are shown in the figure below: 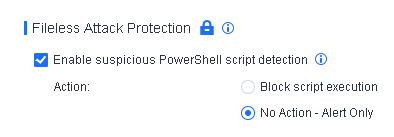
Relevant parameters are described as follows:
Enable suspicious PowerShell script detection: This option takes effect only when Realtime File Protection is enabled.
Action: Available options include Block script execution and No Action - Alert Only (recommended). When suspicious PowerShell scripts are detected:
• For PCs, Athena EPP generates alerts and suspends the scripts. Endpoint users can then allow or block the scripts.
• For servers, Athena EPP generates alerts but does not suspend the scripts. Endpoint users can determine whether to block or ignore the scripts.
The following alert is generated when a suspicious script is detected.
On this tab, you can configure policy settings for ransomware honeypot, RDP secondary authentication, and trusted processes.
Ransomware Protection
When Ransomware Protection is enabled, the Athena EPP agent promptly generates alerts and blocks any encryption behavior involving decoy files placed in crucial system directories on an endpoint. This proactive response is triggered upon detecting ransomware on the endpoint, effectively preventing the encryption of any business files. In addition, when a suspicious encryption process is detected, Athena EPP backs up certain file modifications or deletion operations performed by the process in real time and detects the encryption of certain files after the ransomware is already running. Finally, in scenarios where ransomware successfully bypasses the current virus detection policies, this feature enables you to restore the endpoint based on the snapshot using Windows VSS in time, thereby minimizing the impact of encryption on business operations and contributing to establishing a comprehensive security protection system.
Settings for this feature are shown in the following figure.
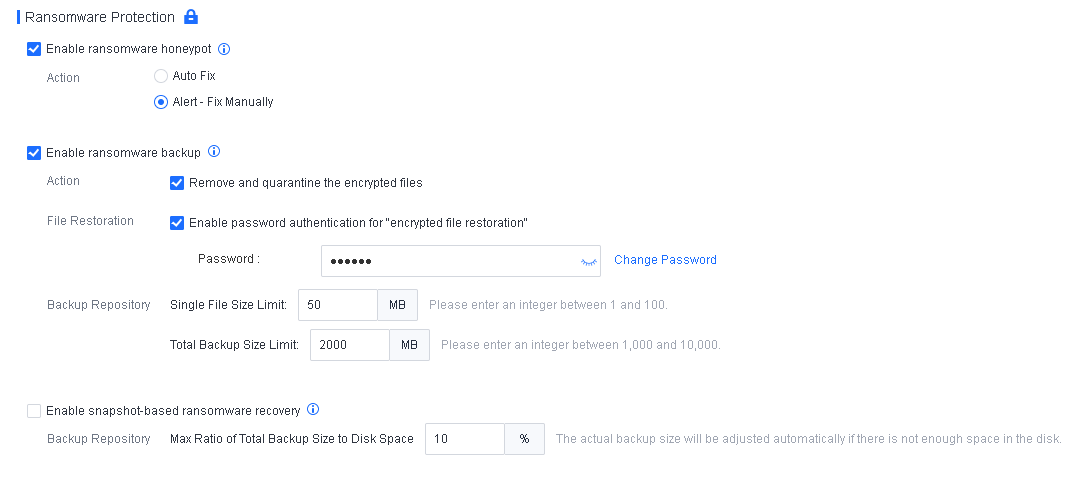
Relevant parameters are described as follows:
• Enable ransomware honeypot: This option takes effect only when Realtime File Protection is enabled.
• Action: Alert - Fix Manually is recommended. When ransomware is detected on an endpoint, an alert will be displayed in the lower right corner of the screen.
Enable ransomware backup: This option is available only when the ransomware honeypot is enabled.
You can select Remove and quarantine the encrypted files to specify it as the action to take when ransomware is detected. If you deselect the check box, no action will be taken for the encrypted files.
You can select Enable password authentication for "encrypted file restoration".
You can configure the following settings of the Backup Repository:
a)Single File Size Limit: Enter an integer from 1 to 100. The default size limit is 50 MB.
b)Total Backup Size Limit: Enter an integer in the range of 1000 to 10000. The default size limit is 2,000 MB.
Endpoint users can restore encrypted files on the Athena EPP agent. 
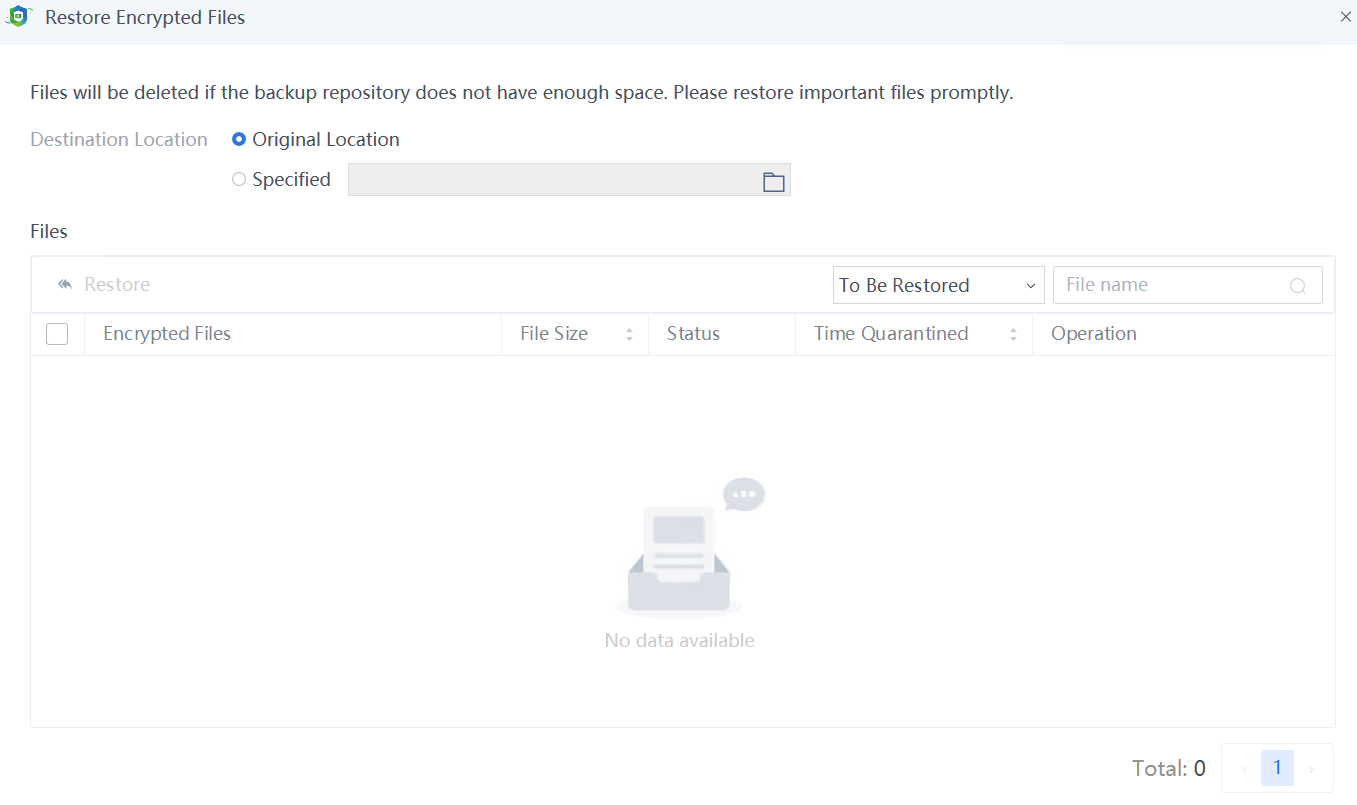
![]()
Ransomware honeypot and backup are available for endpoints running on Windows PCs and Windows Server, and snapshot-based ransomware recovery is available for endpoints running on versions later than Windows Server 2003.
RDP Secondary Authentication
An RDP or SSH brute-force login is one of the common attack vectors, and it is recommended that this feature be enabled.
![]()
This feature is available for Windows Server and Linux endpoints.
Secondary Authentication
To prevent hackers from accessing a server via RDP and quickly obtaining server permissions, you can enable secondary authentication for RDP access.
Settings for Windows endpoints are shown in the following figure. 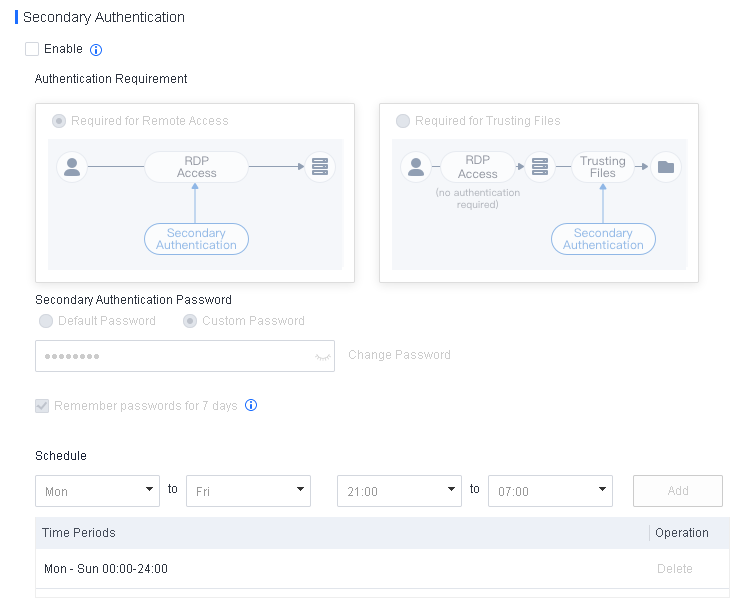
Settings for Linux endpoints are shown in the following figure. 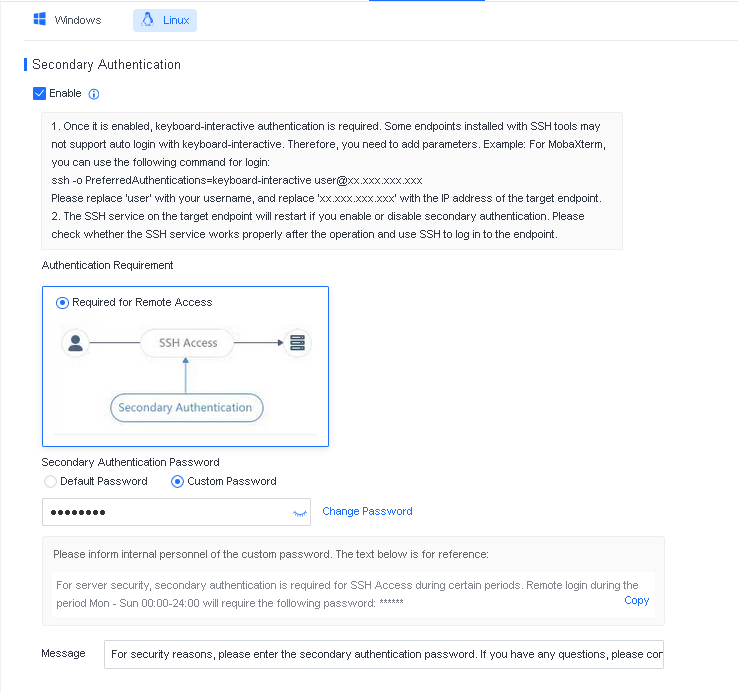
Suppose secondary authentication for RDP access is enabled, and a hacker successfully accesses a server via RDP access. In that case, Athena EPP will lock the screen to protect the server, as shown in the following figure. 
The hacker can obtain server permissions only after completing the secondary authentication process. It effectively ensures server security. It is recommended to enable secondary authentication.
Secondary Authentication for Trusting Files
To prevent hackers from infiltrating the Athena EPP trust list with malicious files and planting ransomware, you can enable secondary authentication for trusting files.
When a hacker successfully logs in to a server protected by Athena EPP and attempts to plant ransomware, the ransomware execution will fail as the file is not trusted. Nevertheless, if the hacker manages to include the ransomware in the trust list, the hacker can launch ransomware attacks successfully. If secondary authentication for trusting files is enabled, the hacker must complete the secondary authentication process to execute the file.
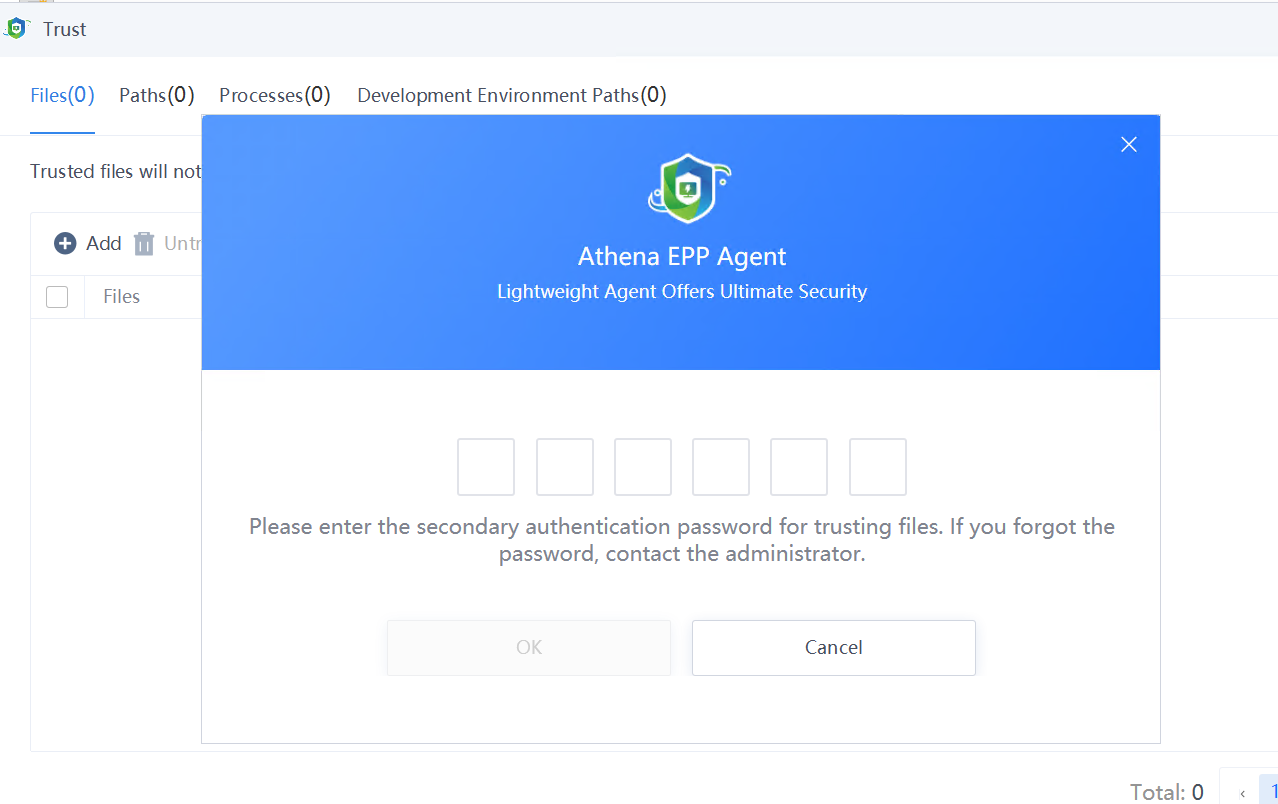
![]()
This feature is available for Windows and Linux endpoints.
Secondary Authentication Password
The default password is the last six digits of the administrator's mobile number. For instance, if the administrator's mobile number is 15258227998, the default password is 227998. To configure the administrator's contact information, go to Policies > Basic Config, as shown in the following figure. 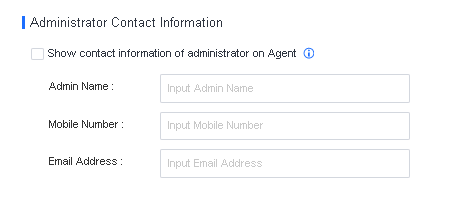
![]()
The default password is recommended, provided the administrator's mobile number is correctly configured. To obtain the mobile number, the server O&M administrator can check the company contact list or the Athena EPP information.
After Custom Password is selected and a custom password is configured, the server O&M administrator cannot access the server remotely if the administrator does not know the password. To avoid such remote access failures during critical business periods, it is recommended to inform the administrator of the custom password as soon as possible.
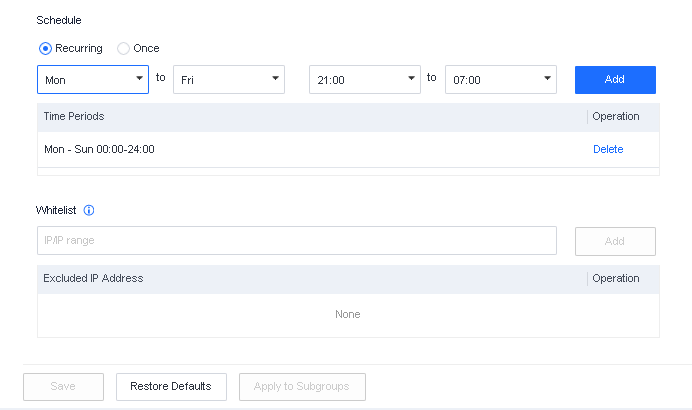
Schedule
You can specify the time during which RDP secondary authentication is applied. By default, secondary authentication is applied at all times.
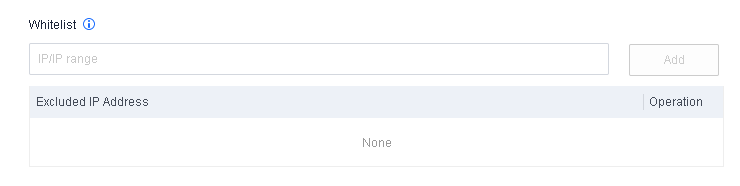
Whitelist
RDP secondary authentication is not required for remote access to the server from IP addresses in the whitelist during critical business periods. For trusted endpoints that attempt to access the server, you can add their IP addresses to the whitelist.
Trusted Processes
This feature protects the server system or specific directories on the server. When enabled, it allows only trusted processes to run, read, and write. You can also enable RDP access protection.
4.6.1.4.1Scenario 1: Protect the System
Protect stable systems by preventing untrusted processes (such as unknown ransomware and other viruses) from running, ensuring security.
Procedure:
Step 1.Perform a virus scan.
Perform a virus scan on the endpoint to ensure the operating environment is secure.
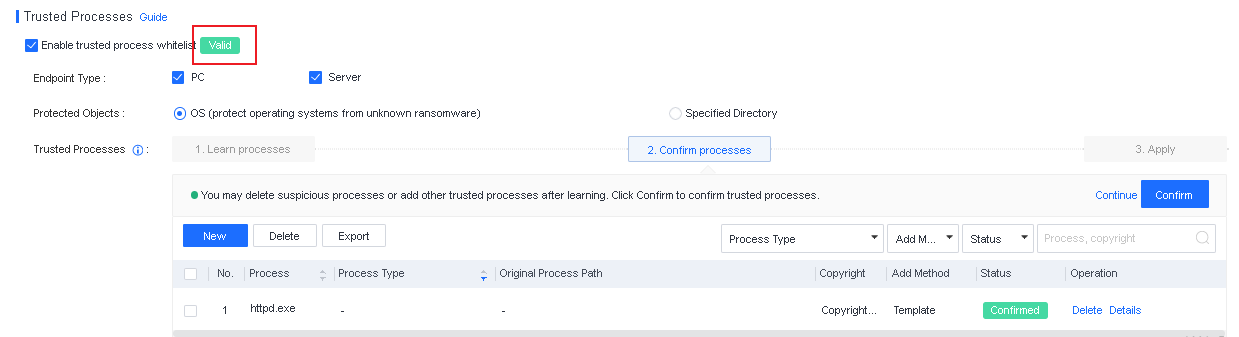
Step 2.Enable process learning.
Select Enable trusted process whitelist and then select OS as Protected Objects. Specify a time ranging from 1 day to 30 days for process learning and click Save, as shown in the following figure.
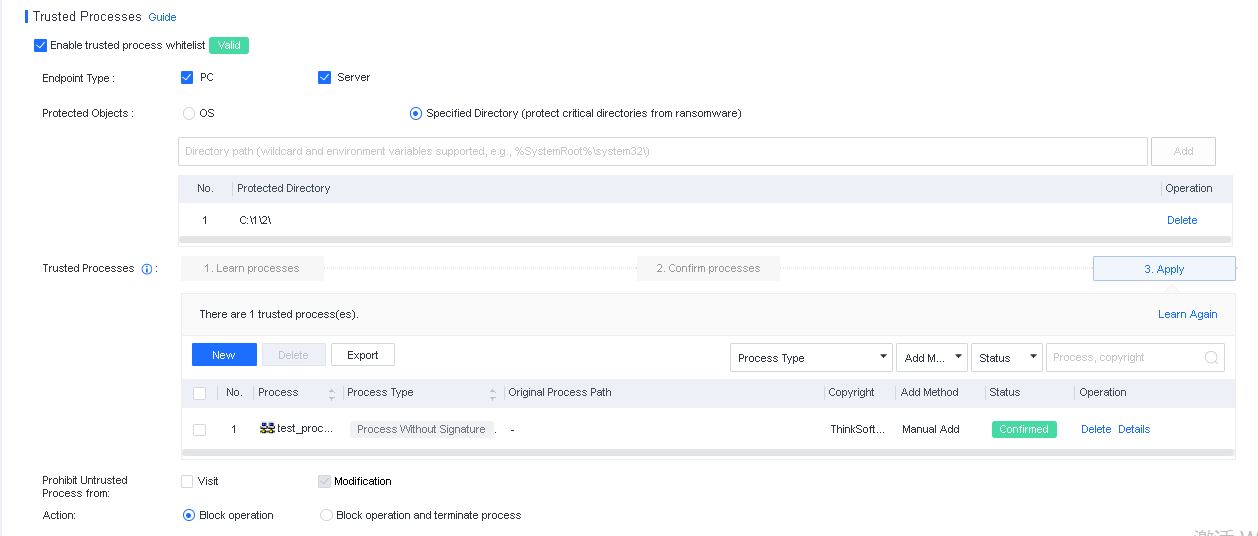
After the learning is complete, you can check the learned processes on this page and review the status of each process, including whether a process is flagged as suspicious or lacks a digital signature. This information can be a reference for confirming trusted processes in the next step.
Step 3.Confirm trusted processes.
After the learning, you need to confirm trusted processes. By analyzing the results of process learning, you can remove untrusted processes and add trusted processes that were not learned, as shown below. 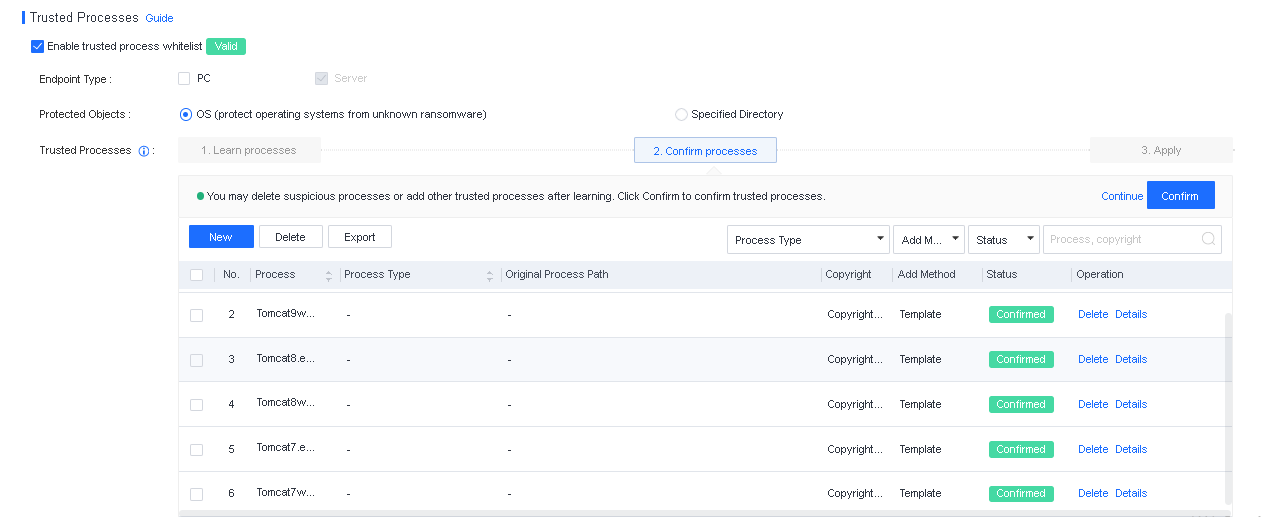
• Process Type: Athena EPP identifies a process as a suspicious or system process.
• Original Process Path: The path where the process file was initially reported.
• Add Method: The method for adding the process, including Learning, Manual Add, and Template.
• Status: The current status of the process. Unconfirmed means the process has not been confirmed as trusted.
• Operation: You can delete, view process details, or analyze the process.
Note:
1. If you find a trusted process not in the learning results, click New to add it. The page for adding a process is shown in the following figure.
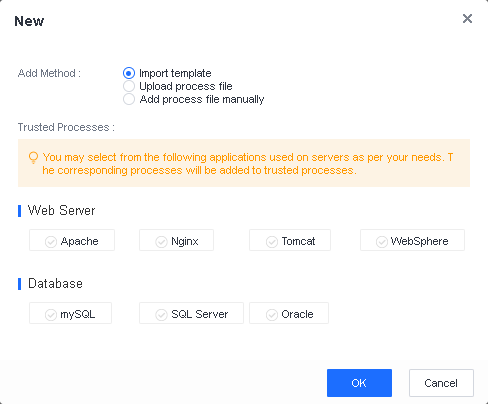
Add Method: Three methods are available for adding a process: Import template, Upload process file, and Add process file manually.
• Import template: Applicable to scenarios where the endpoint that needs to be strengthened are the web servers or database servers provided in the template.
• Upload process file: Upload a trusted process file to the endpoint.
• Add process file manually: Collect the process name, original file name, and copyright of the trusted process, and then manually enter the information.
After confirming the information, click OK to complete the setting.
Step 4.Apply trusted processes.
Click Save. You can find that endpoint protection is in effect, showing Valid.
4.6.1.4.2Scenario 2: Protect the Specified Directories
Protect critical endpoint directories and files from unauthorized access and modification.
Procedure:
Step 1.Perform an endpoint virus scan.
Perform a virus scan on the endpoint to ensure the operating environment is secure.
Step 2.Add directories.
Select Enable trusted process whitelist and then select Specified Directory as Protected Objects. Manually add critical directories of the endpoint. Directories with a wildcard (*) or an environment variable are supported. 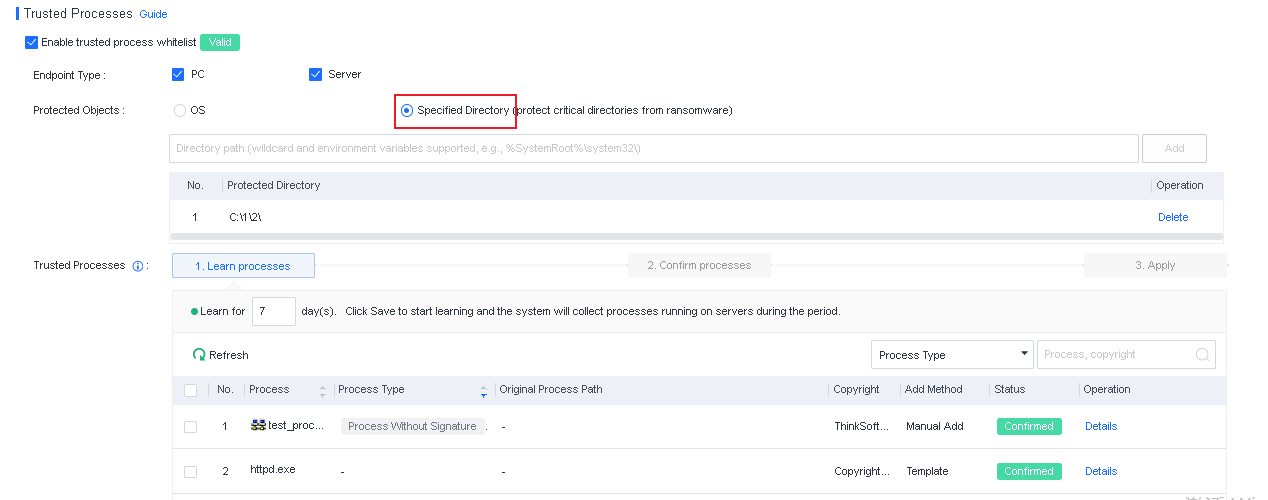
Step 3.Enable process learning and confirm trusted processes.
For details about the configurations, see Chapter 4.6.1.4 "Scenario 1: Protect the server system" for references.
You can specify the action to take when an untrusted process is detected.

• Prohibit Untrusted Process from: Untrusted processes cannot delete or modify protected directories. You can specify whether their access to protected directories is allowed.
• Action: You can specify whether to block process operations or block process operations and terminate an untrusted process when the untrusted process performs operations on protected directories.
This policy covers the Brute-Force Protection IP Whitelist and PowerShell Parameter Whitelist.
Brute-Force Protection IP Whitelist
Source IP addresses for brute-force attacks can be added to the whitelist on Windows or Linux endpoints. When false positive brute-force attacks are detected, you can add the source IP addresses to the whitelist. Then, IP addresses in the whitelist are allowed without triggering an alert.
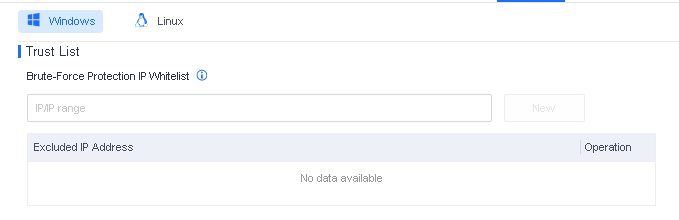
You can specify IP addresses, IP address ranges, or subnets for the Brute-Force Protection IP Whitelist. When false positive brute-force attacks are detected, you can add the source IP addresses to this whitelist. Then, IP addresses in the whitelist are allowed without triggering an alert.
PowerShell Parameter Whitelist
When O&M scripts written with PowerShell commands are detected, it is important to add the corresponding PowerShell parameters to the whitelist, as shown in the following figure. 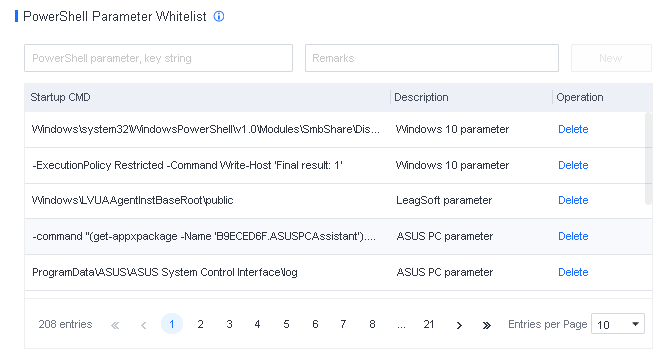
It ensures that false positives do not affect business operations.
Whitelist PowerShell parameters: When detected, PowerShell parameters listed in the whitelist are allowed to run. Partial string match is supported. For instance, the parameter powershell -ExecutionPolicy Restricted -Command Write-Host 'Final result:1' can be matched by full name or keywords, such as Command Write-Host 'Final result:1'.
![]()
It is recommended to enter parameters longer than 10 characters to avoid protection being bypassed by attackers.
On this tab, you can configure the following general settings: Intelligent Identification of Development Environment, Quarantine Management, Agent Bypass, and Agent Performance Protection. 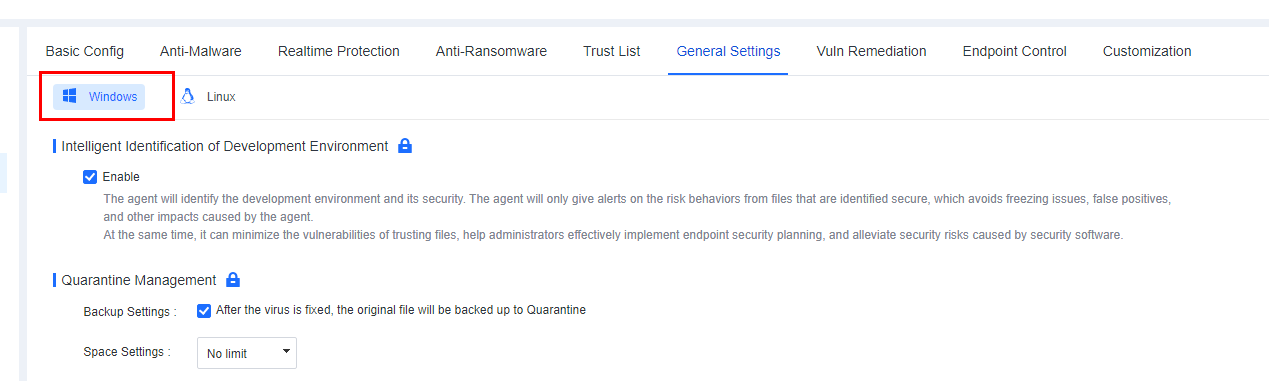
The development environment is important, producing numerous unsigned compiled files that antivirus software might flag as false positives. It disrupts developers' work and may even make them hesitant to install antivirus software, posing security risks. This feature intelligently identifies the development environment, reduces false positives, and keeps the development environment secure.

After Enable is selected for Intelligent Identification of Development Environment, it intelligently scans for the presence of compiling software on endpoints. A pop-up window appears when the compiler is detected, prompting endpoint users to confirm whether they are using a development environment, as shown in the following figure.
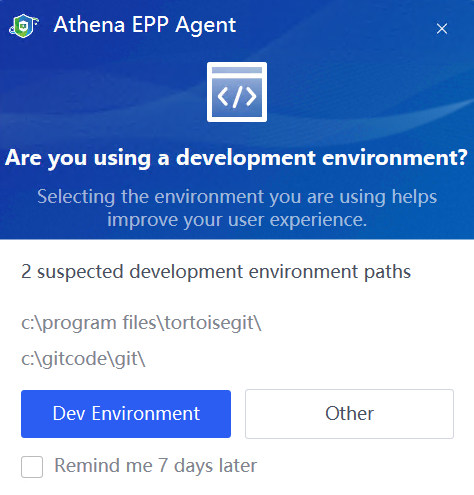
Endpoint users can select Dev Environment or Other.
When Other is selected, this feature fixes threats according to the antivirus policy.
When Dev Environment is selected, intelligently identified paths are automatically added in Trust > Development Environment Paths on the Athena EPP agent. For compiled files generated during the execution of the compiling software, Athena EPP only reports them without fixing them or giving alerts, as shown in the following figure.
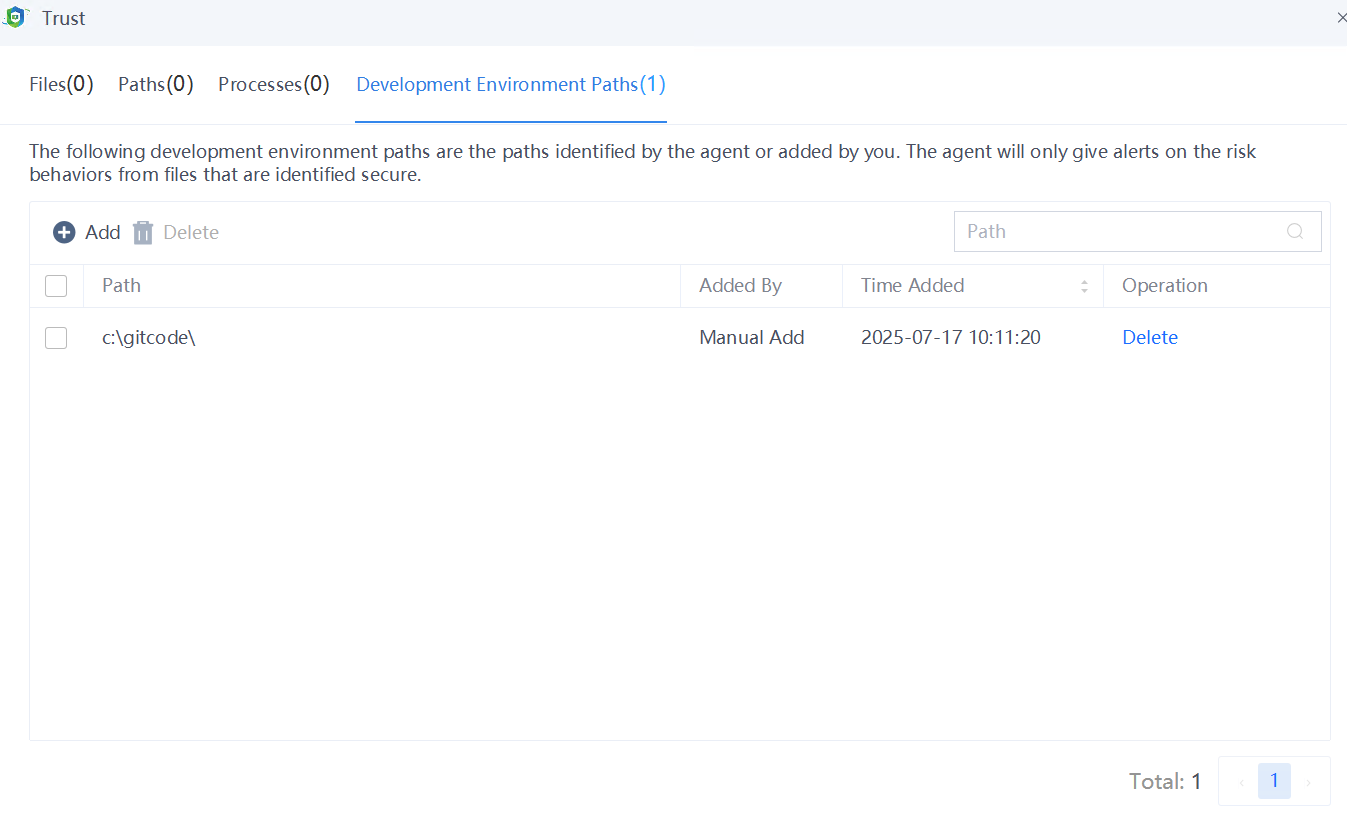
Endpoint users can manually add or delete a development environment path, as shown in the following figure. 
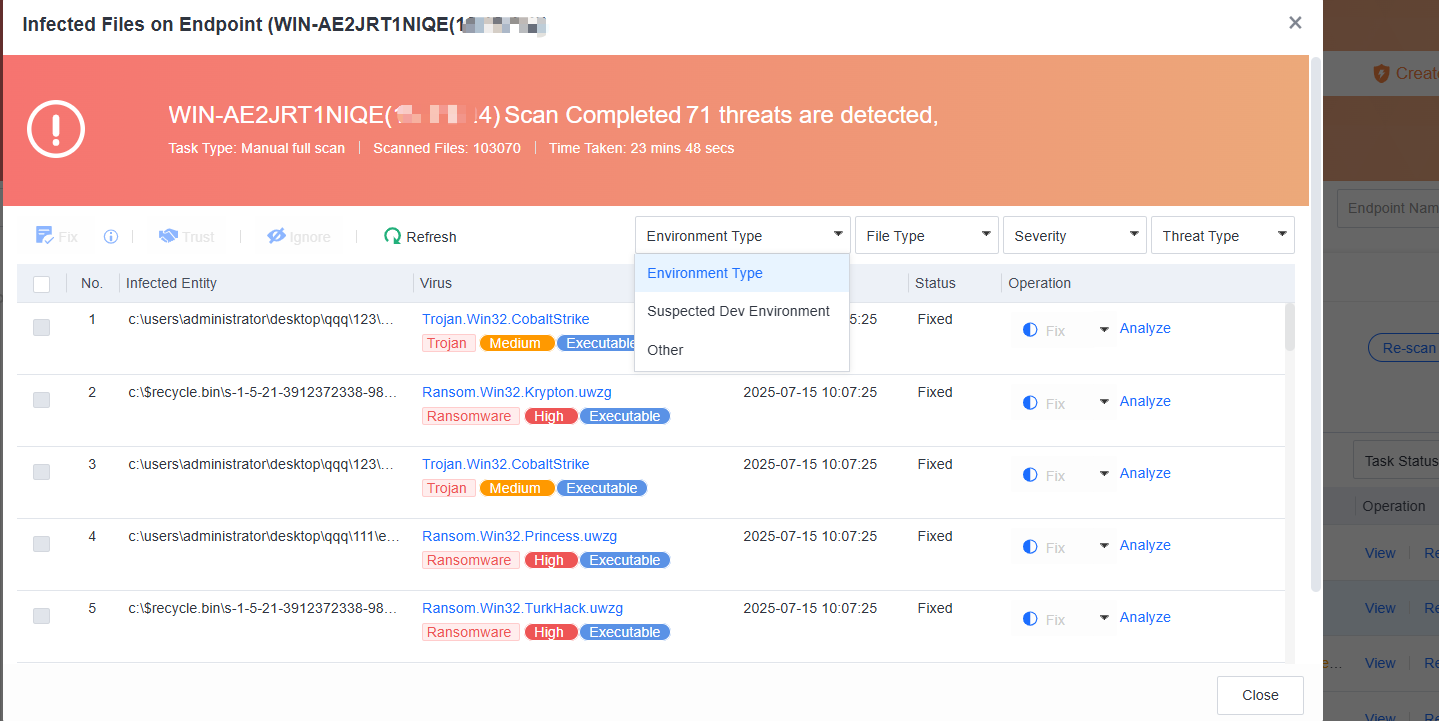
For an intelligently identified path, a Suspected Dev Environment tag is shown on the Defense > Malware Scan > Virus List page and the Defense > Malware Scan >Tasks page. When you handle viruses on the Athena EPP manager as an administrator, you can select Suspected Dev Environment for Environment Type to avoid false positives.


Backup Settings: If this feature is enabled, the original file will be backed up to Quarantine after the virus is fixed.
Space Settings: Configure the size of the Quarantine area on an endpoint or set it as No limit.
![]()
Quarantine management is not available for macOS endpoints.
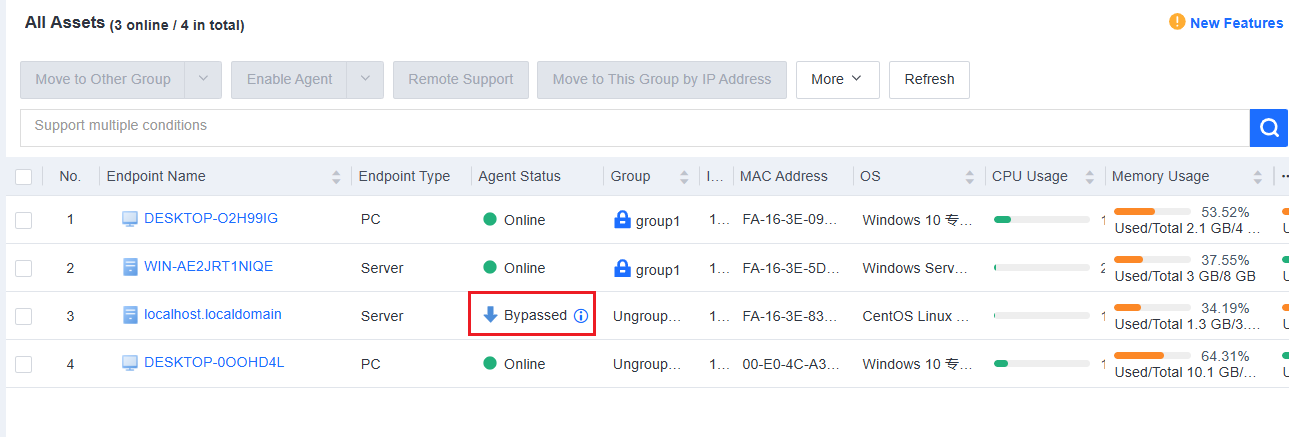
Agent bypass is available for endpoints running on Windows Server and Linux.
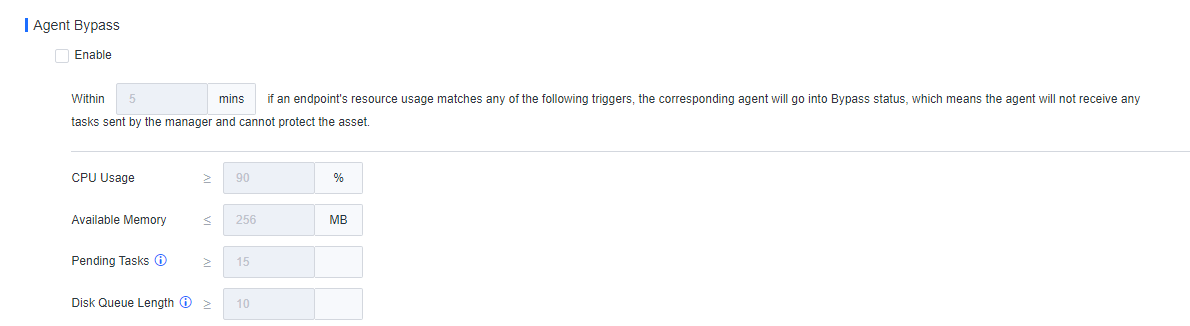
Agent bypass refers to the policy applicable to scenarios where the Athena EPP agent actively monitors resources on an endpoint. Suppose the average usage of any resources (CPU, memory, or load) on the endpoint reaches or exceeds the threshold within a specified period. In that case, the Athena EPP agent automatically enters the Bypass state to release occupied resources, preventing disruptions to business operations from resource contention. On the contrary, suppose the average usage of any resource (CPU, memory, or load) on the endpoint remains below the set threshold. In that case, the endpoint is automatically restored to its normal state.
In the Bypass state, the Athena EPP agent releases occupied resources, the agent will not receive any tasks sent by the manager, and the agent cannot protect the asset.
![]()
Agent bypass is available for Windows Server and Linux endpoints.
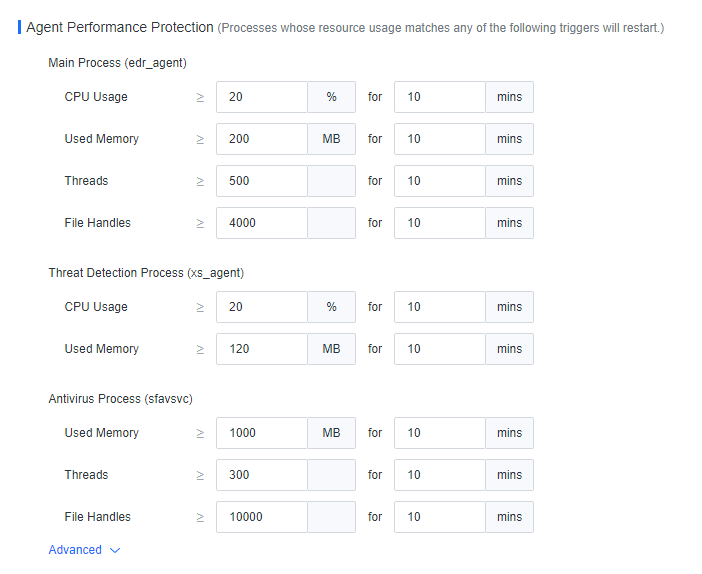
Processes whose resource usage matches any threshold will restart. It aims to constrain the resource usage of the Athena EPP agent processes to prevent them from occupying too many business resources. Thresholds for the resource usage of the processes can only be adjusted to higher values than the default values. In scenarios with adequate server resources, you can increase the thresholds for the resource usage of the Athena EPP agent, enabling faster and more comprehensive detection. This feature is available for Windows Server and Linux endpoints.
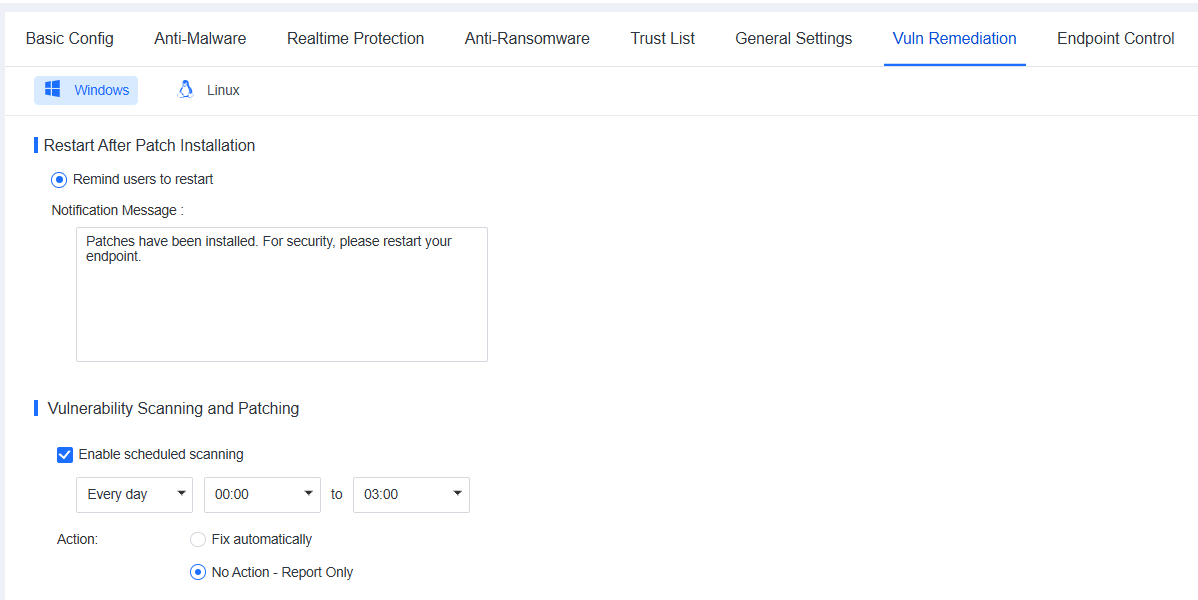
On this tab, you can customize vulnerability scan settings for Windows and Linux systems separately. Specifically, you can configure scheduled vulnerability scan tasks for endpoints, and select whether to remind users to restart endpoints after patch installation to ensure that the installed patches take effect.
![]()
1. Patching is available for Windows PCs and Windows Server endpoints.
2. For details about systems that support this feature, see Compatibility Support.
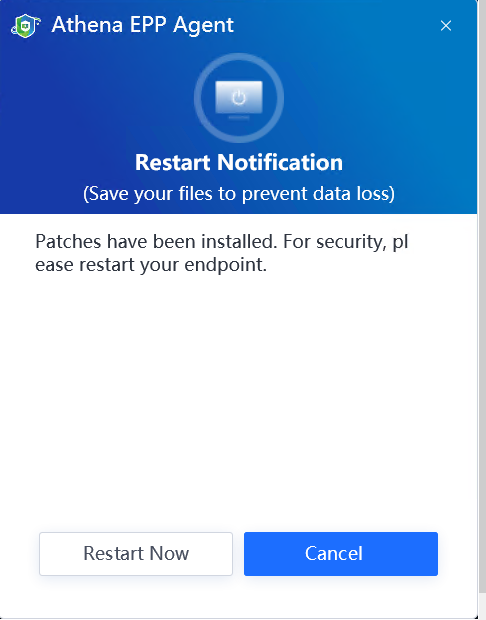
Certain patches take effect only after the endpoint restarts. You can specify the restart policy by selecting Remind users to restart, and customize the notification message to send after patch installation. 
Go to Risk Assessment > Windows Update or Risk Assessment > Vulnerabilities to scan for and fix vulnerabilities. When it is required to restart the endpoint following patch installation, a prompt appears, as shown in the following figure. 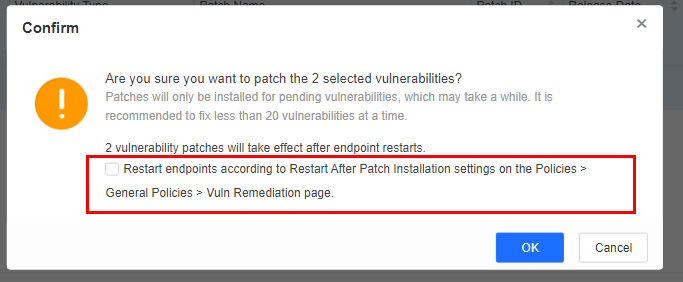
If you select this option and Remind users to restart is selected as the restart policy, a pop-up reminder appears on the endpoint, as shown in the following figure.
Select Enable scheduled scanning to enable scan tasks to run as scheduled. 
Relevant parameters are described as follows:
• Scheduled scanning: Specify the time for the vulnerability scan to run.
• Action: Specify the method for fixing vulnerabilities, including Fix automatically and No Action - Report Only (recommended).
• Download Security Patches: Specify the server where vulnerability patches for endpoints can be downloaded. Default options include Sangfor CDN Server, Microsoft Patch Server, and the Athena EPP manager.
Install vulnerability patches when an endpoint is offline
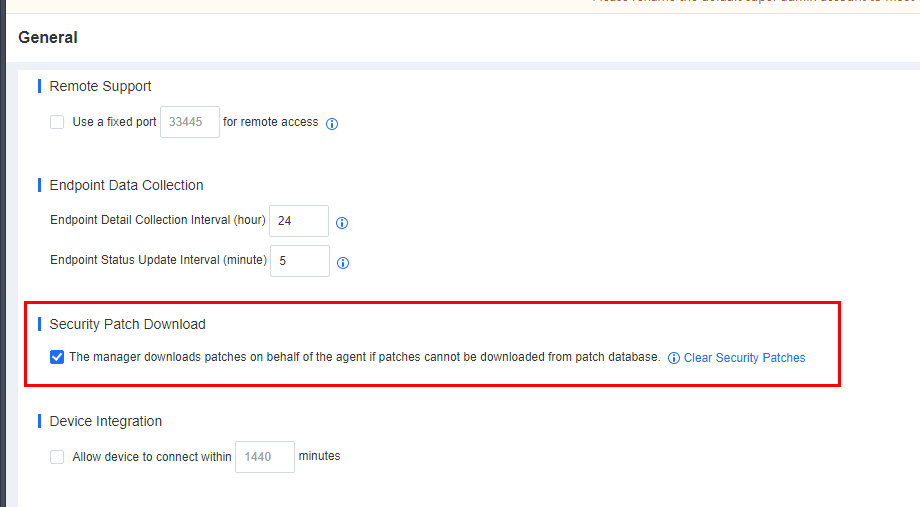
In cases where an endpoint does not have an Internet connection, while the Athena EPP manager is connected to the Internet, the endpoint cannot download vulnerability patches from an online server. To install vulnerability patches, go to System > System > General. Select The manager downloads patches on behalf of the agent if patches cannot be downloaded from patch database to enable the Athena EPP manager to download patches on behalf of the Athena EPP agent, as shown in the following figure.
![]()
If an endpoint and Athena EPP manager are not connected to the Internet, you can download vulnerability patches using offline tools. For details, see Chapter 3.6.9.9 "Tools" in this document.
This feature enables you to identify and install vulnerability patches for Windows endpoints and applications and identify vulnerability patches for Linux endpoints. It does not support the automatic installation of vulnerability patches for Linux endpoints.
On this tab, you can configure the following settings: USB device control, unauthorized outbound access detection, remote support control, and cleanup. Among them, USB device control is available for both Windows and macOS endpoints, whereas other settings are available only for Windows endpoints.
Unauthorized access to USB storage devices can expose endpoints to various threats, such as viruses, Trojans, data leaks, and tampering. By leveraging the USB device control feature, you can deny or allow the usage of mobile devices such as USB flash drives, removable hard disks, and mobile phones. Furthermore, you can set up notifications to alert endpoint users, mitigating the risks associated with insufficient control over mobile devices.
For Windows endpoints, go to Policies > General Policies > Endpoint Control, and select Enable USB device control for Windows PCs and Enable USB device control for Windows Servers under USB Device Control as needed.
For macOS endpoints, go to Policies > General Policies > Endpoint Control, and select Enable under USB Device Control.
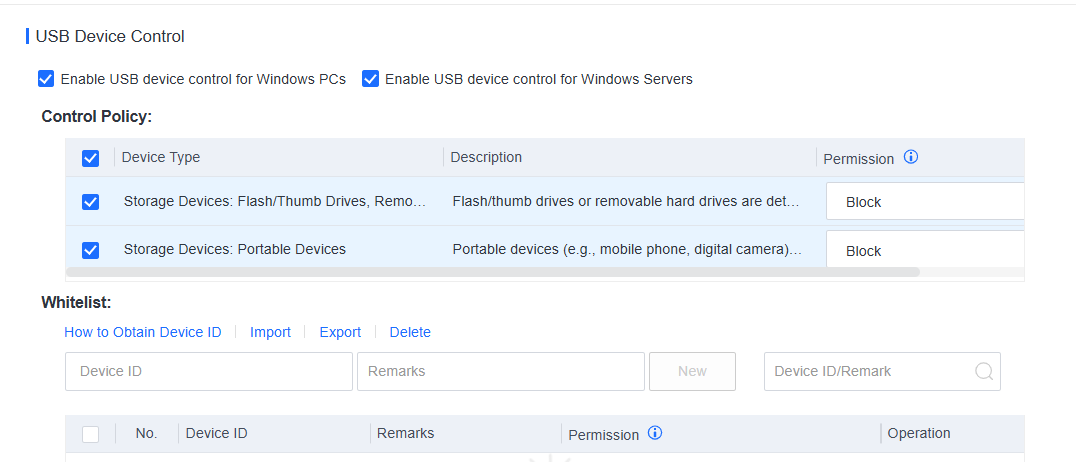
You can set the control policy for the storage features of USB flash drives, removable hard disks, and portable devices (such as mobile phones and digital cameras).
Control policies include the following:
Block: The device and the files it contains are not visible to users.
Read & Execute: Data can be read from but cannot be written to the device. The files it contains can be executed.
Read: Data can be read from but cannot be written to the device. The files it contains cannot be executed.
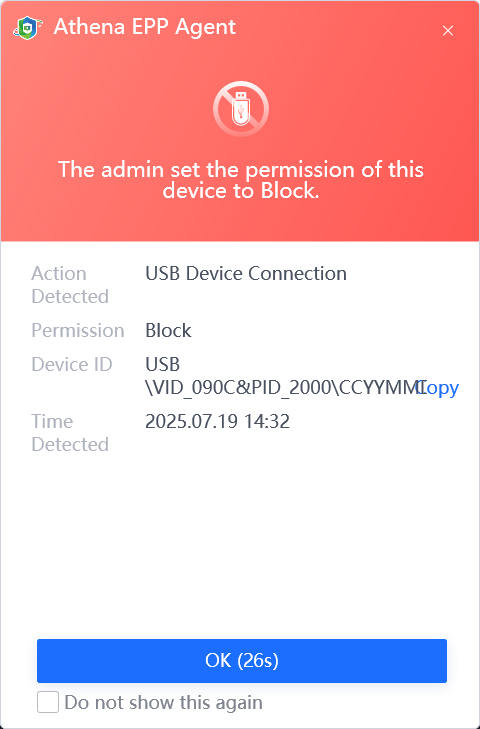
Full Access (With Notification): Data can be read from and written to the device. A pop-up notification will be displayed on the endpoint and related logs will be reported to the manager.
Whitelist
When certain USB devices are allowed, add them to the whitelist and complete the required information settings, as shown in the following figure.
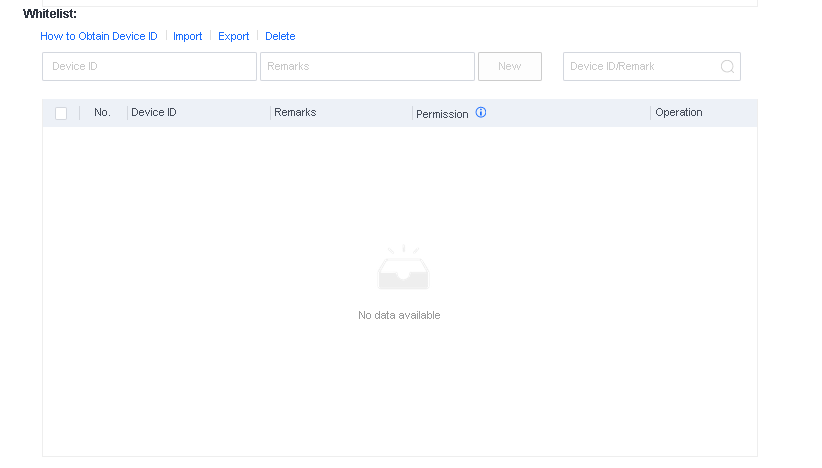
You can import many devices in batches if you need to add them.
Notify
After selecting the Notify user when a device with permissions other than Full Access is detected, endpoint users will receive notifications when attempting to use devices blocked on servers or endpoints, as shown in the following figure.
![]()
The USB device control feature is available for Windows and macOS endpoints. You can block USB devices or set the permissions of the devices to Read-Only for macOS endpoints.
Unauthorized outbound access occurs when an endpoint in the internal network connects to an unauthorized target server. Athena EPP can detect unauthorized outbound access by utilizing the ping command and respond with actions like disconnecting the endpoint from the network, shutting down the endpoint, and notifying users if such access is identified, enabling real-time control of endpoints.
Settings for this feature are shown in the following figure.
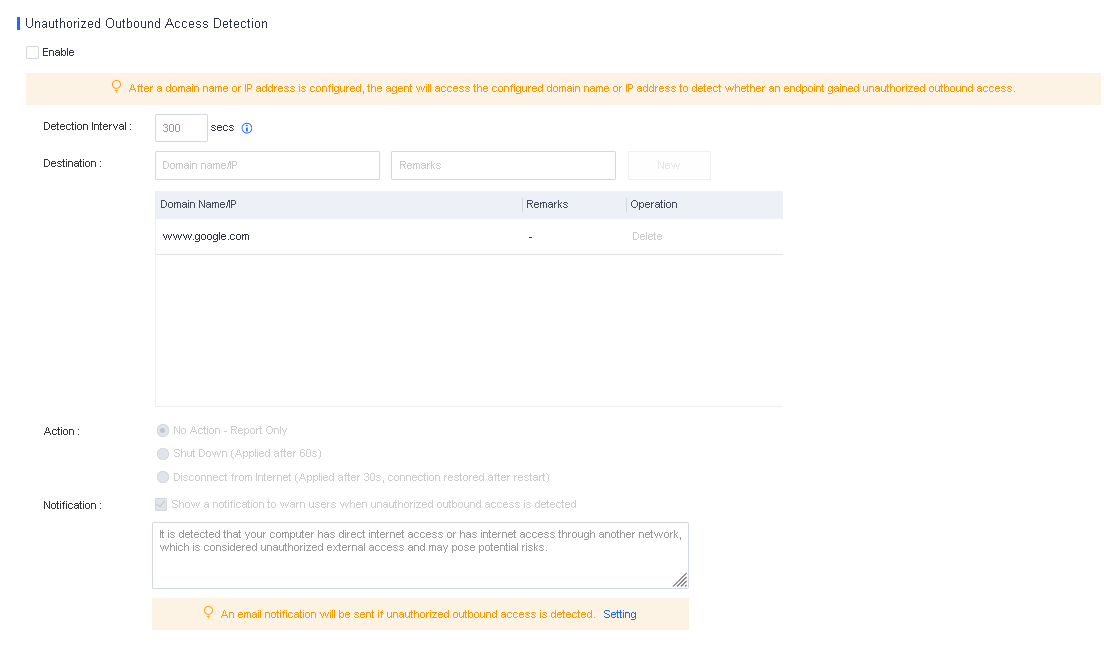
Detection Interval: The interval for detecting unauthorized outbound access on an endpoint. You can set the detection interval to a value from 60 to 3,600 seconds.
Destination: The destination address for unauthorized outbound access is www.google.com by default. You can add IP addresses or domain names.
Action: The method for handling detected unauthorized outbound access.
• No Action – Report Only: Only display a notification.
• Disconnect from Internet (Applied after 30s, connection restored after restart): For Windows Vista and above, the result of this action is similar to endpoint isolation because the endpoint can only communicate with the Athena EPP manager. As an administrator, you can restart the Athena EPP agent on the Endpoint page to restore the Internet connection. For Windows Server 2003 and Windows XP, this action disables the NIC, and the endpoint user must manually enable the NIC or restart the endpoint.
• Shut Down: The endpoint will shut down after a 60-second countdown.
Notification: When unauthorized outbound access is detected on an endpoint, a notification appears in the lower right corner of the screen to warn the endpoint user. You can specify the content of the notification in the Notification field.
Email notification: When unauthorized outbound access is detected on an endpoint, you can receive an email notification as an administrator.
When an exception occurs on a managed endpoint, you can remotely control the endpoint as an administrator to help solve the exception quickly and safely.
Prerequisites
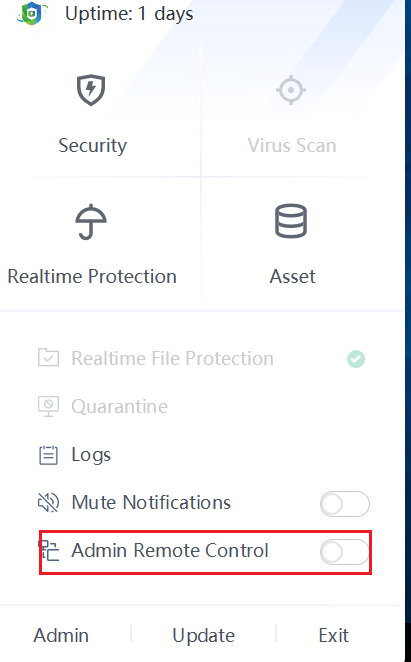
You can remotely control an endpoint if the endpoint user has enabled Admin Remote Control on the Athena EPP agent. To set this feature, right-click the tray icon of the Athena EPP agent on the endpoint, as shown in the following figure. This feature is enabled by default.
Scenario 1: Remote control of an endpoint without user consent
You can remotely control an endpoint without user consent. This configuration applies to an unattended scenario:
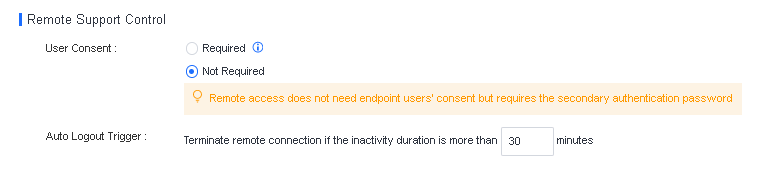
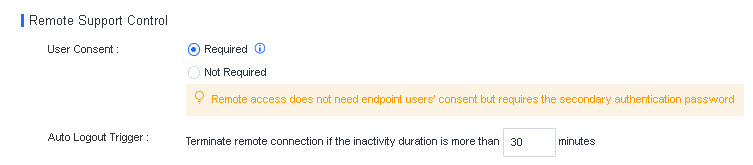
Go to Policies > General Policies > Endpoint Control and select Not Required for User Consent in the Remote Support Control section, as shown in the following figure.
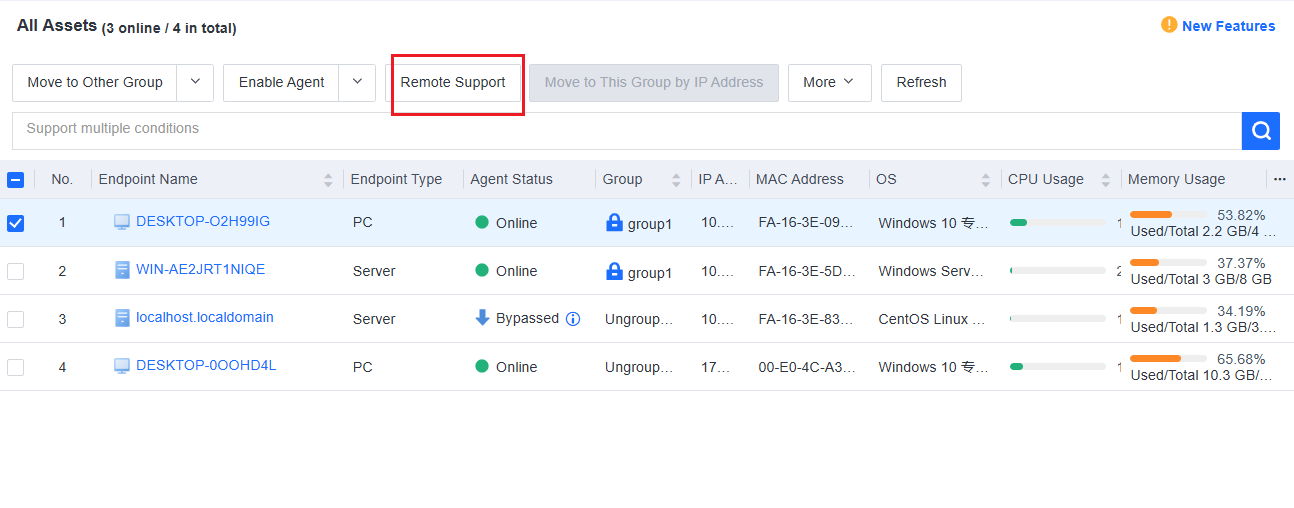
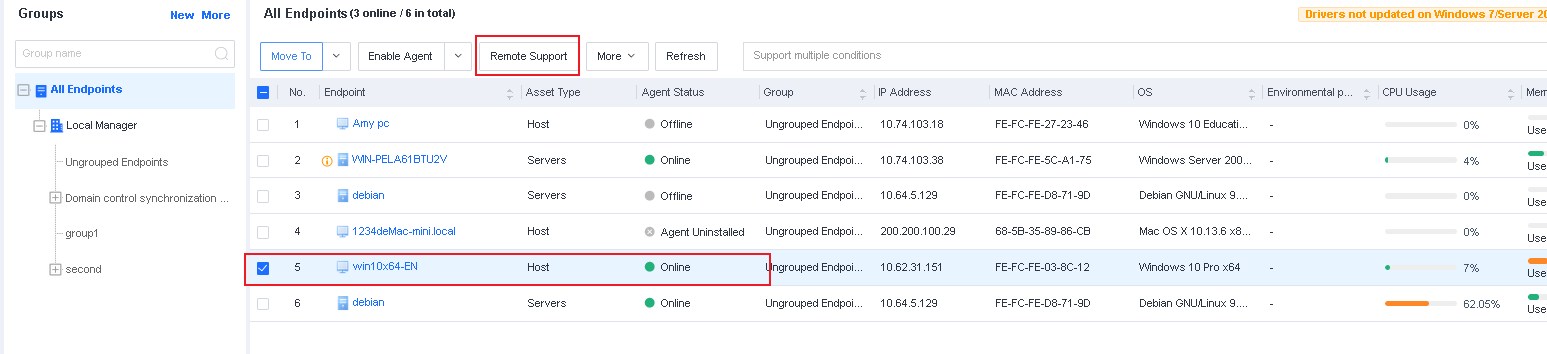
Go to Endpoints > Endpoint Groups, select the endpoint you want to control, and click Remote Support, as shown in the following figure.
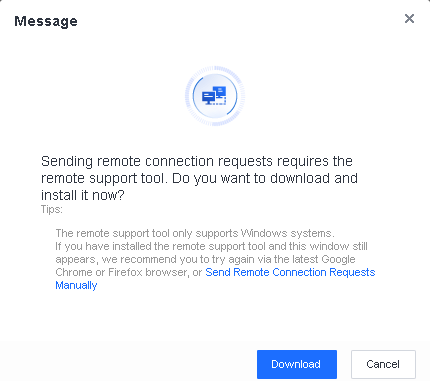
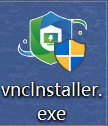
When you initiate the remote control for the first time, a message indicates that you need to download UltraVNC Viewer(the remote control tool). Click Download to download and install the tool, as shown in the following figure.

After you install UltraVNC Viewer, initiate remote control again. A message box appears, as shown in the following figure.
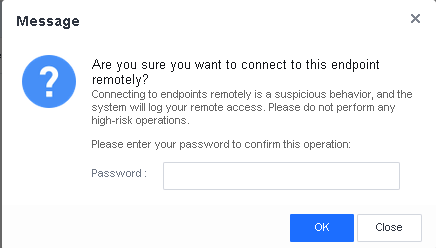
To confirm that you are an administrator, you need to enter the password of your administrator account and click OK to establish a remote connection to the endpoint, as shown in the following figure. 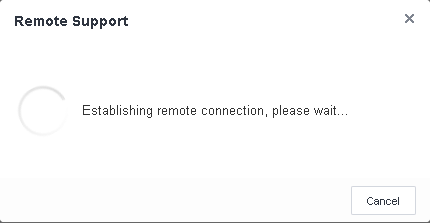
Scenario 2: Remote control of an endpoint with user consent
You can also specify that user consent is required to control an endpoint remotely. This configuration applies to a constantly attended endpoint sensitive to remote operations:
Go to Policies > General Policies > Endpoint Control and select Required for User Consent in the Remote Support Control section, as shown in the following figure.
Go to Endpoints > Endpoint Groups, select the endpoint you want to control, and click Remote Support, as shown in the following figure.
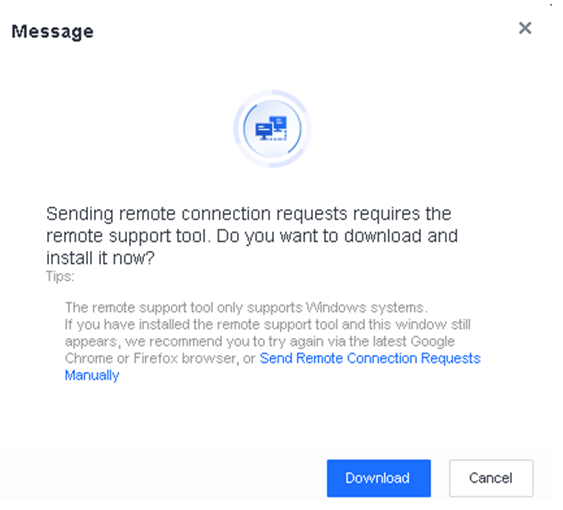
When you initiate the remote control for the first time, a message indicates that you need to download UltraVNC Viewer(the remote control tool). Click Download to download and install the tool, as shown in the following figure.
After you install UltraVNC Viewer, initiate remote control again. A message appears, as shown in the following figure. 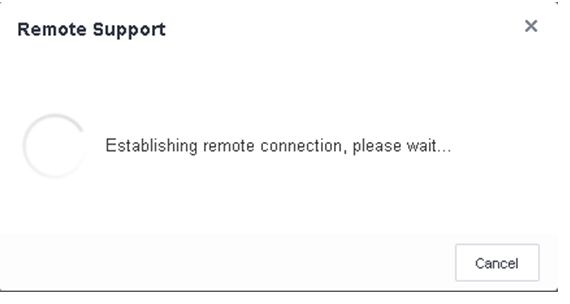
An Athena EPP agent notification will be shown on the endpoint.
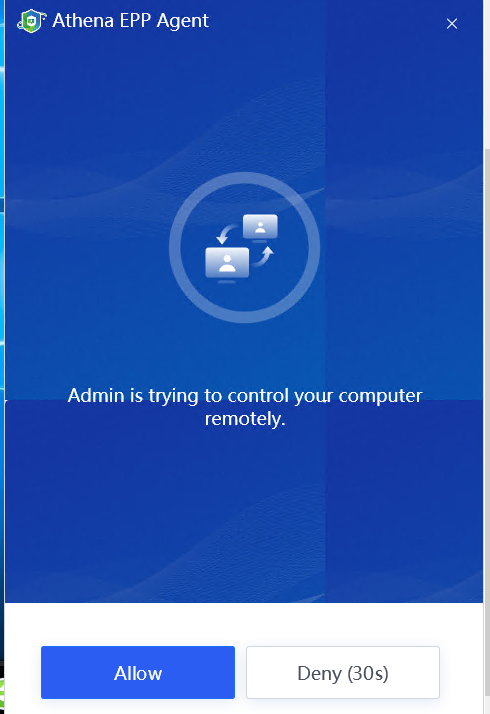
Once the endpoint user clicks Allow, you can remotely control the endpoint.
To confirm that you are an administrator, you need to enter the password of your administrator account and click OK to establish a remote connection to the endpoint, as shown in the following figure.
![]()
1. Only the Super administrator and security administrator have remote control permissions. The communication is fully encrypted.
2. By default, a random port is used for the remote control of an endpoint. You can go to System > System > General and specify the port for remote control in the Remote Support section.
3. Remote control is supported by endpoints running on Windows XP, Windows 7, Windows 8, Windows 8.1, Windows 10, or Windows 11.
You can enable this feature to free up the storage space to improve the endpoint system performance.
On this tab, you can customize the brand name and logo as needed.
Customize the Athena EPP manager
To change the name and logo for the Athena EPP manager, go to System > System > Customization, as shown in the following figure.
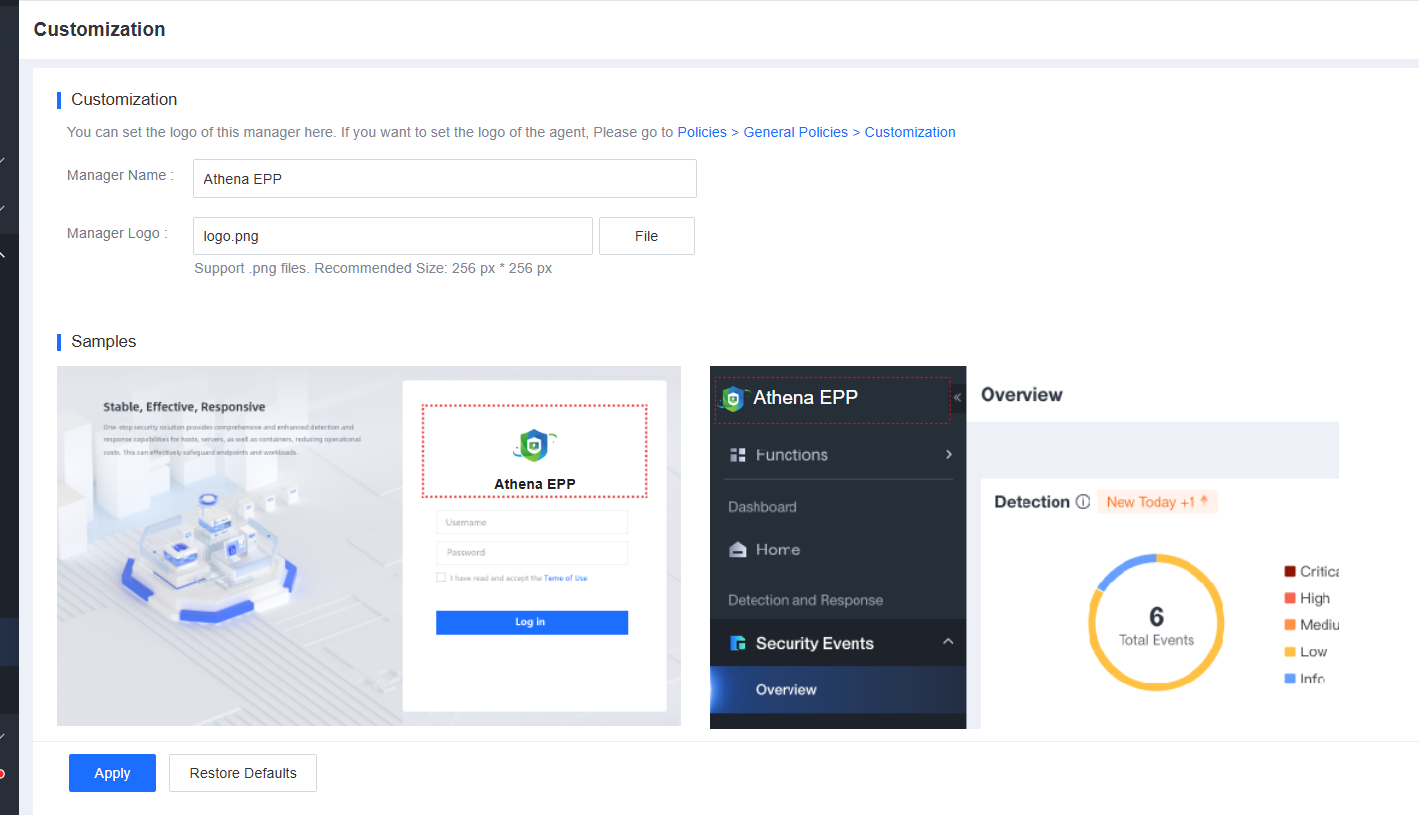
On the Customization page, change the Manager Name and upload a Manager logo image.
Customize the Athena EPP agent
To change the name and logo for the Athena EPP agent, go to Policies > General Policies > Customization, as shown in the following figure.
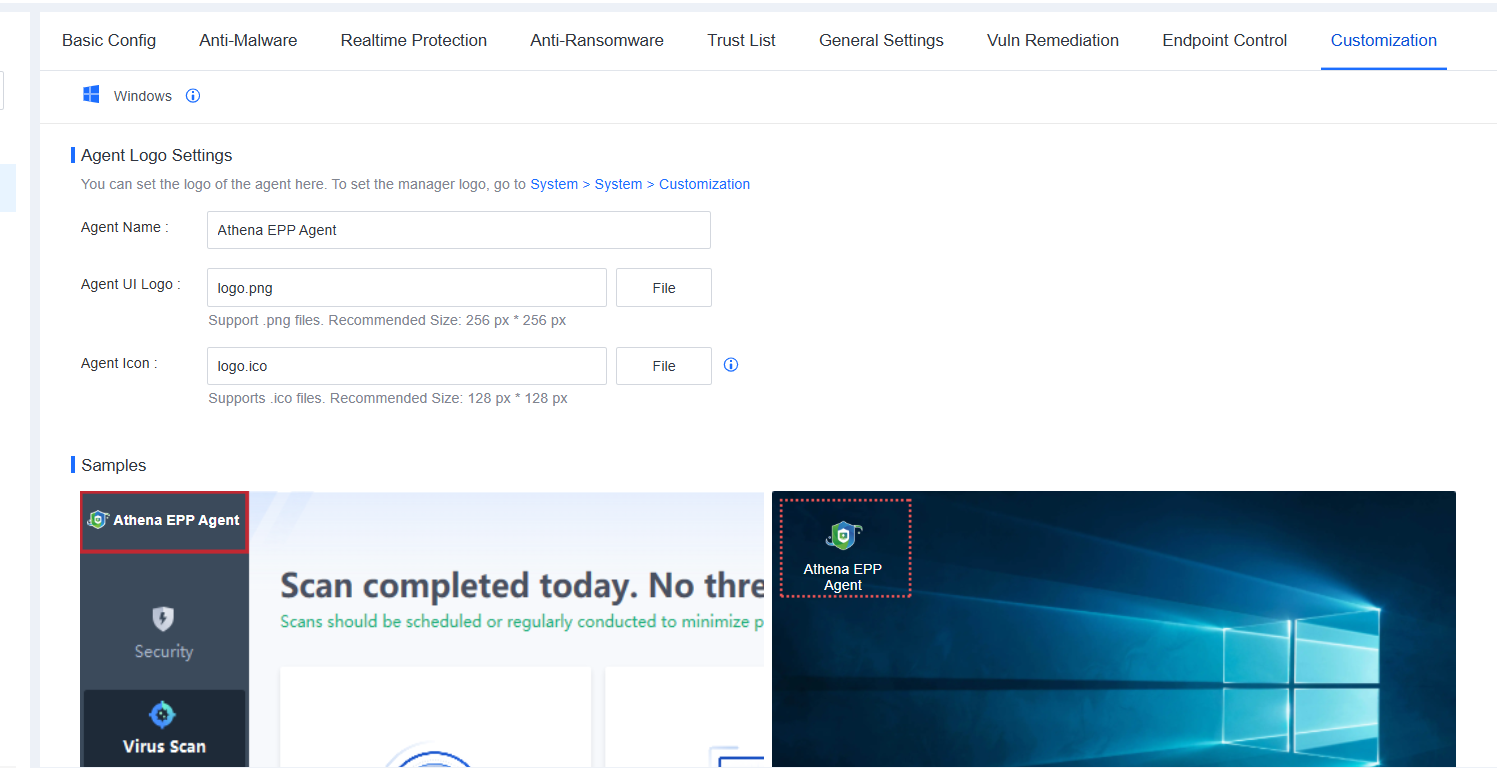
On the Customization tab, configure Agent Name, UI Logo, and Agent icon. The following figure shows an example configuration result.


 {{ $t('index.defaultHeader.chromeBrowserTip') }}