{{ secondMenu.name }}


You can deploy the Athena EPP agent on Windows on a small or large scale.
Manual installation is the most commonly used method in small-scale deployment scenarios. Administrators download the Athena EPP agent installer from the Athena EPP manager and copy the installer to endpoints for installation using portable devices such as USB devices. The procedure is as follows:
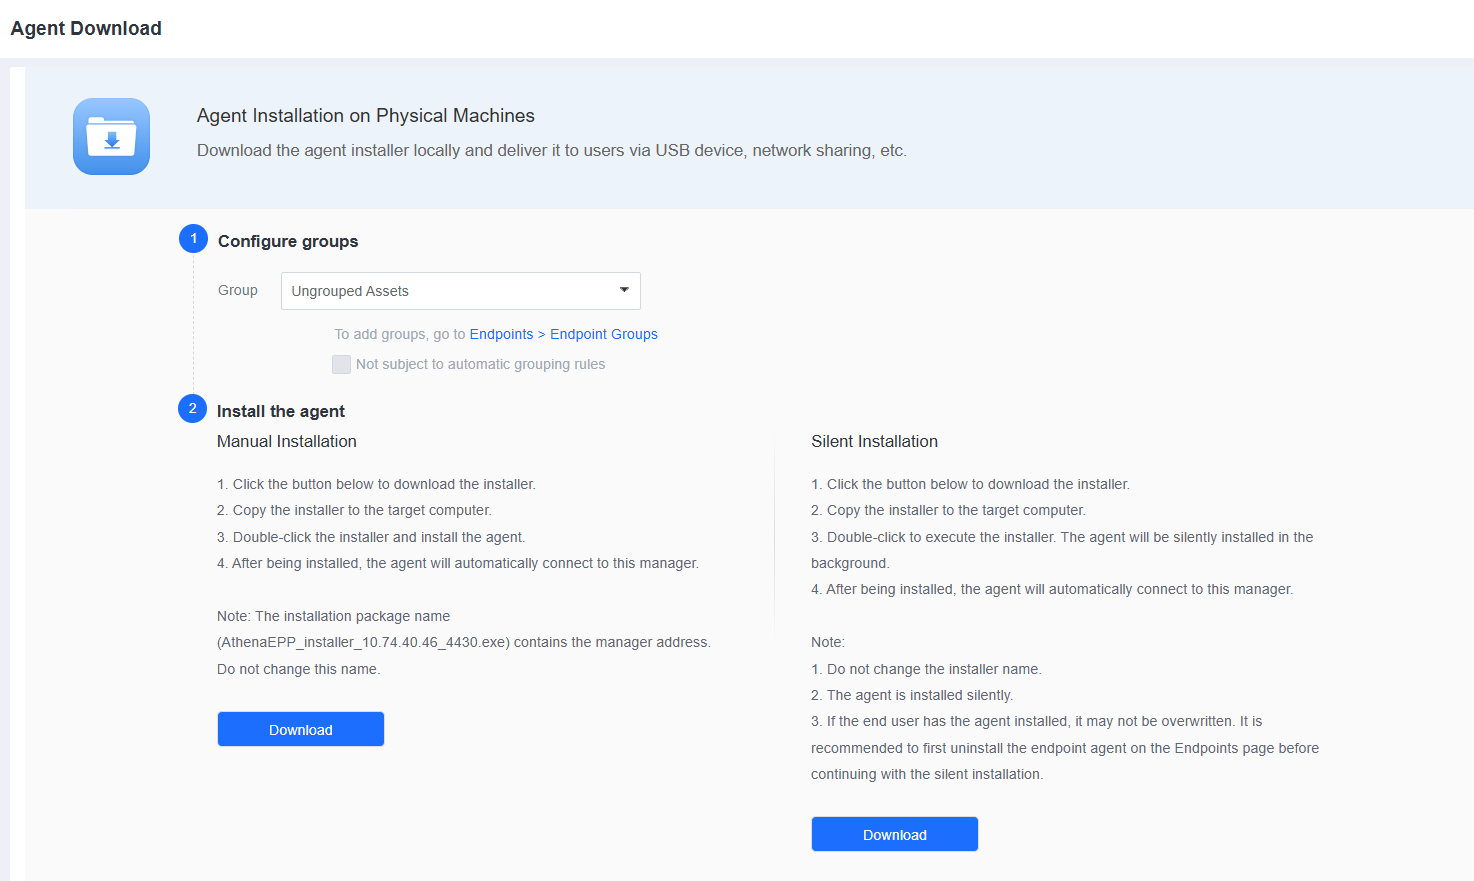
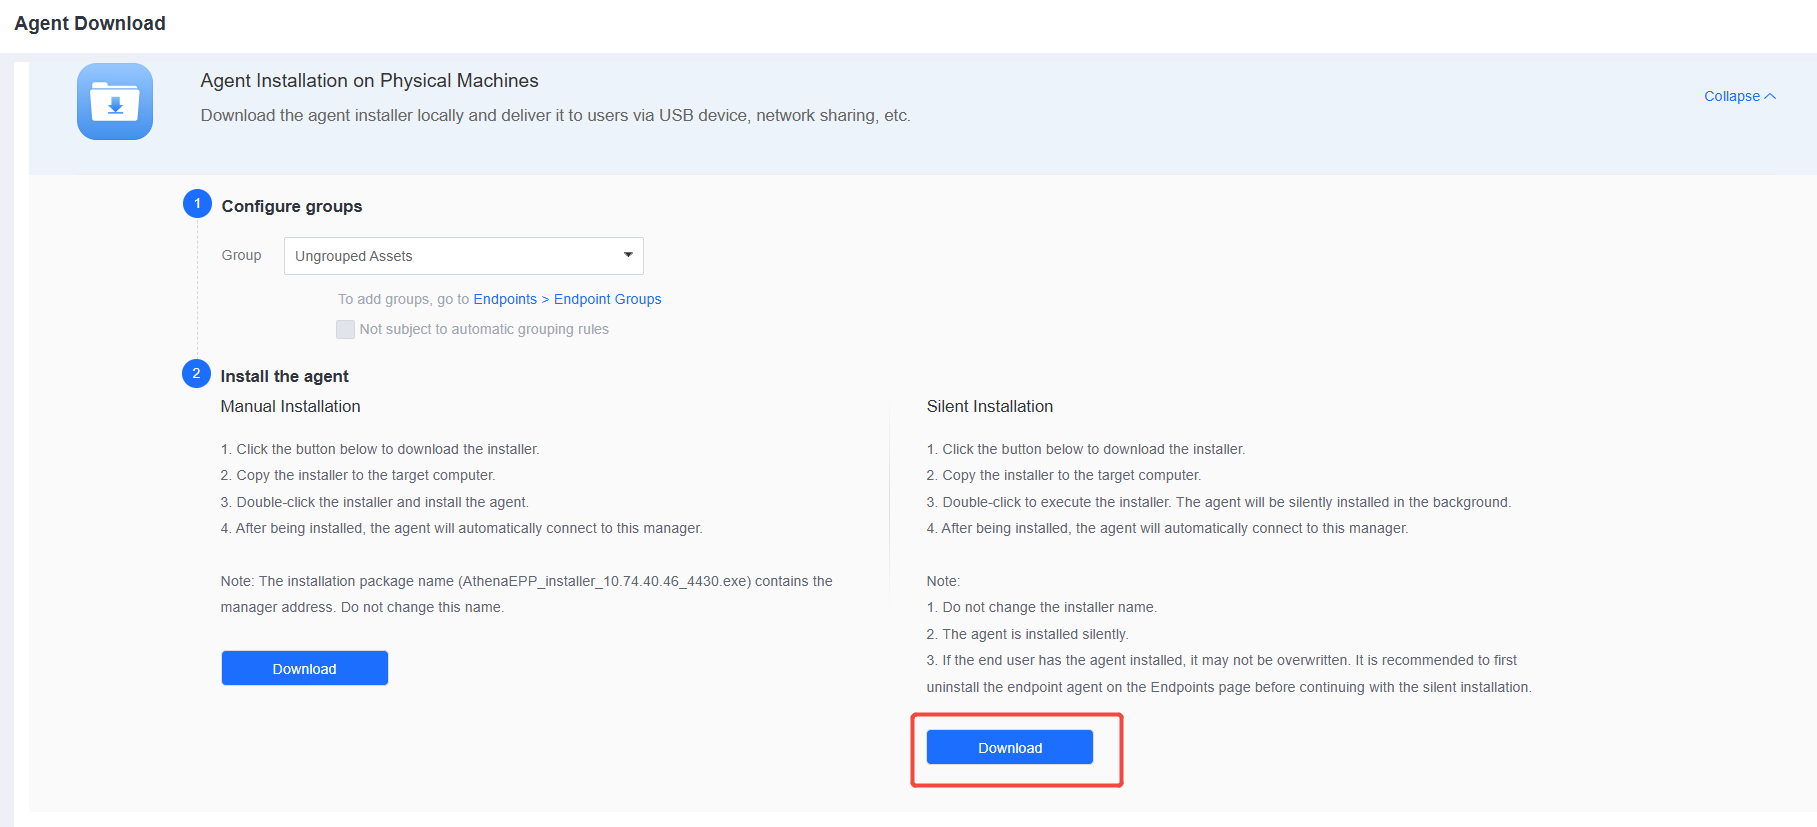
Step 1.Download the Athena EPP agent installer from the Athena EPP manager. Go to System > Agent Deployment > Agent Download > Windows, find Agent Installation on Physical Machines, click Expand on the right, and then click Download under Manual Installation, as shown in the following figure.
![]()
The installer name (such as AthenaEPP_installer_[Manager IP]_4430.exe) contains the IP address of the EPP manager. Do not change the installer name.
Step 2.Copy the installer to the target endpoint and double-click it to install. Reserve 5 GB of space for the installation. The default installation path is on the C drive. To install the Athena EPP agent on another drive, make sure you have super administrator permissions. Otherwise, use the default installation path.
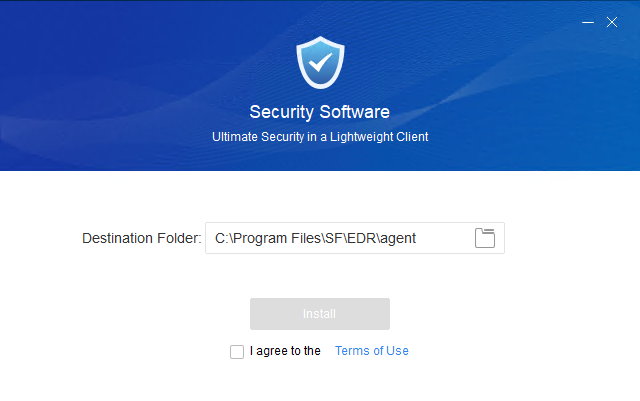
Read the terms of use, check I agree to the Terms of Use, and click Install. Then, the installer connects to the Athena EPP manager to download the necessary installation components, as shown in the following figure. 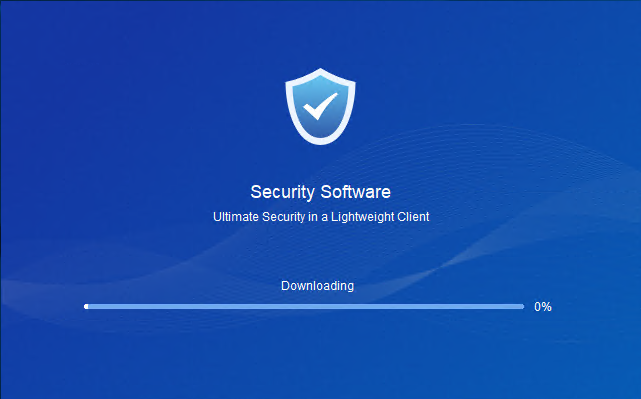
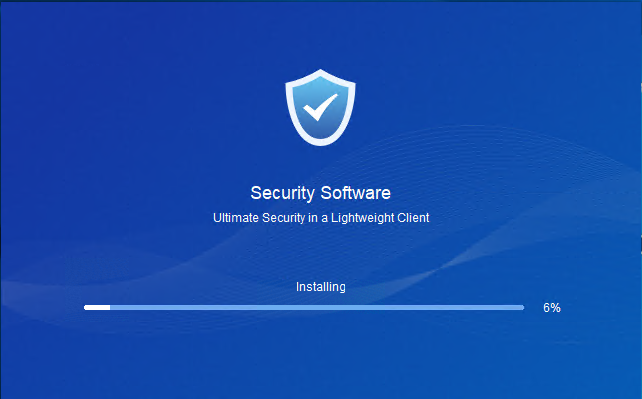
Wait for the installation of the components downloaded from the Athena EPP manager to complete. 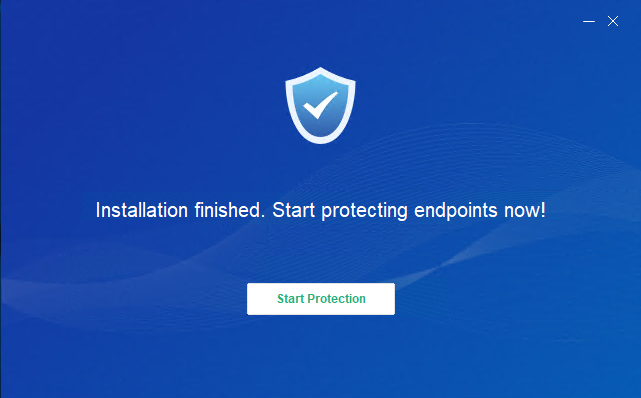
After the installation, click Start Protection to register the asset, as shown in the following figure.
The Athena EPP agent is successfully installed once the Athena EPP homepage appears after registration.

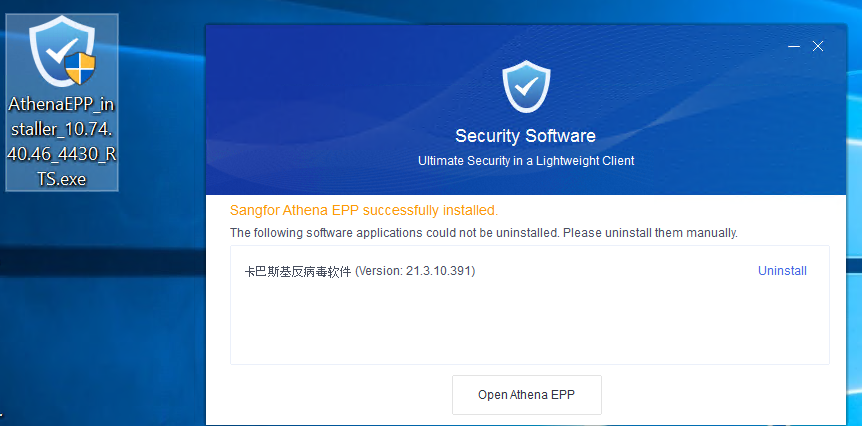
Modify the file name of the agent installation file and add the suffix _RTS at the end. It will uninstall the third-party EDR when the agent is installed. Otherwise, it will not uninstall the third-party EDR.
Silent installation is an installation without the need for manual intervention. Administrators download the Athena EPP agent installer from the Athena EPP manager and copy the installer to endpoints for installation using portable devices such as USB devices. The procedure is as follows:
Step 1.Download the Athena EPP agent installer from the Athena EPP manager. Go to System > Agent Deployment > Agent Download > Windows, find Agent Installation on Physical Machines, click Expand on the right, and then click Download under Silent Installation, as shown in the following figure.
Step 2.Right-click the installer to execute it as an administrator or double-click the installer for a silent, automatic installation. After the installation, the Athena EPP agent automatically connects to the Athena EPP manager, and you can find the online endpoint by going to Endpoints > Endpoint Groups of the Athena EPP manager.
![]()
![]()
The installer name (such as AthenaEPP_installer_[Manager IP]_4430_silence.exe) contains the IP address of the Athena EPP manager and the word "silence". Do not change the installer name.
![]()
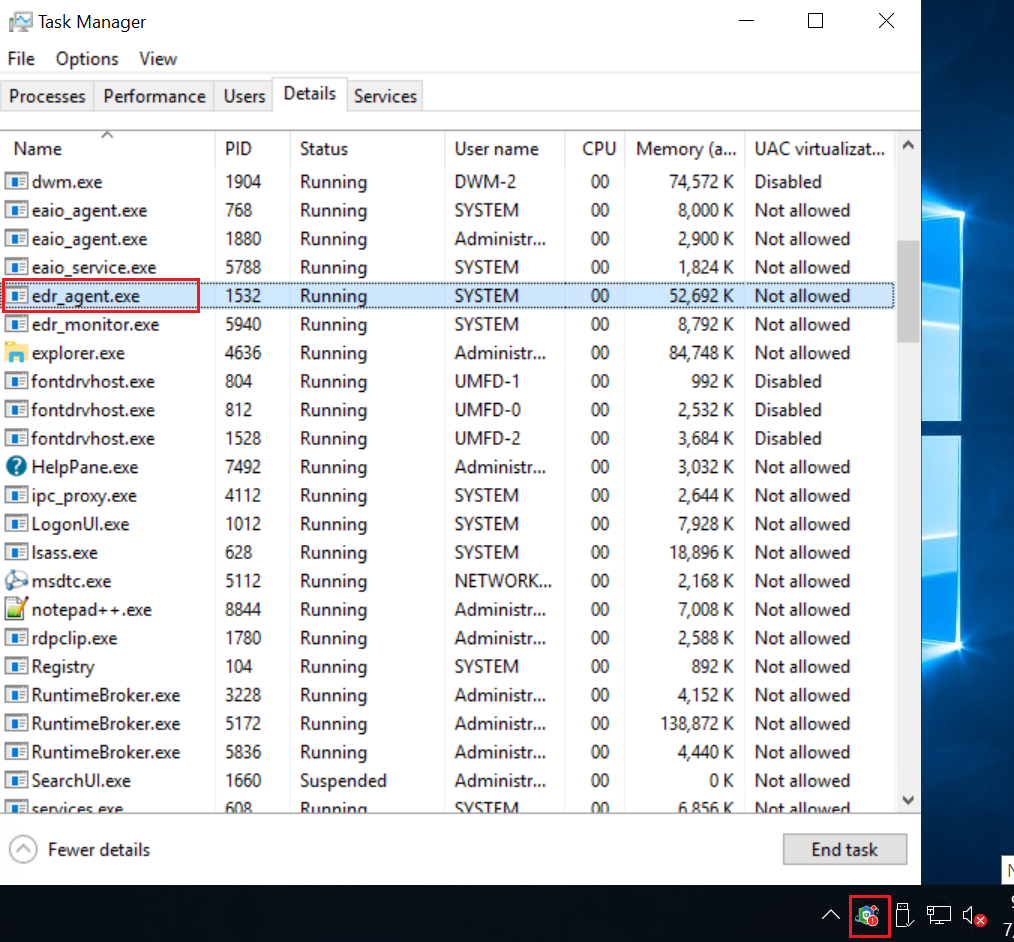
To check the silent installation process, open Task Manager to find the running fget.exe process. If the process is obtaining files, silent installation is in progress. Alternatively, open the default installation directory "SF/EDR/agent/bin" and refresh the page to check whether new files are created.

After the Athena EPP agent is successfully installed, the Athena EPP icon appears in the lower-right corner of the screen, and the asset registration window pops up (whether filling in the information is required depends on the policy on the Athena EPP manager). You can also find the running edr_agent.exe and sfavui.exe processes in Task Manager.
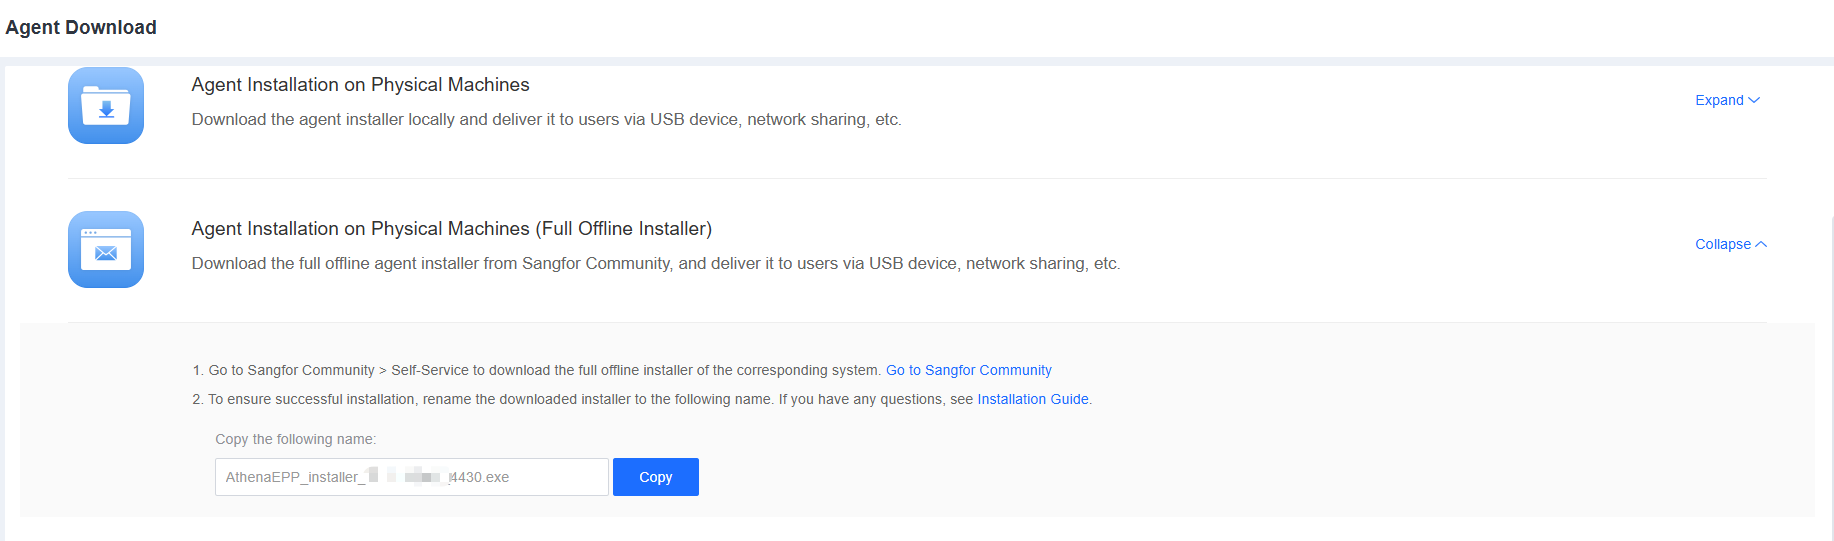
In scenarios where a group company consisting of a headquarters and multiple branches has the Athena EPP manager installed at the headquarters, you must download components from the Athena EPP manager at the headquarters through the VPN or dedicated network during the installation of the Athena EPP agent, leading to high dedicated network bandwidth usage and a slow installation process. The full offline installer-based installation enables direct installation without downloading components from the Athena EPP manager, avoiding excessive dedicated network bandwidth usage.
Go to System > Agent Deployment > Agent Download > Windows, find Agent Installation on Physical Machines (Full Offline Installer), and click Expand on the right, as shown in the following figure.
The procedure is as follows:
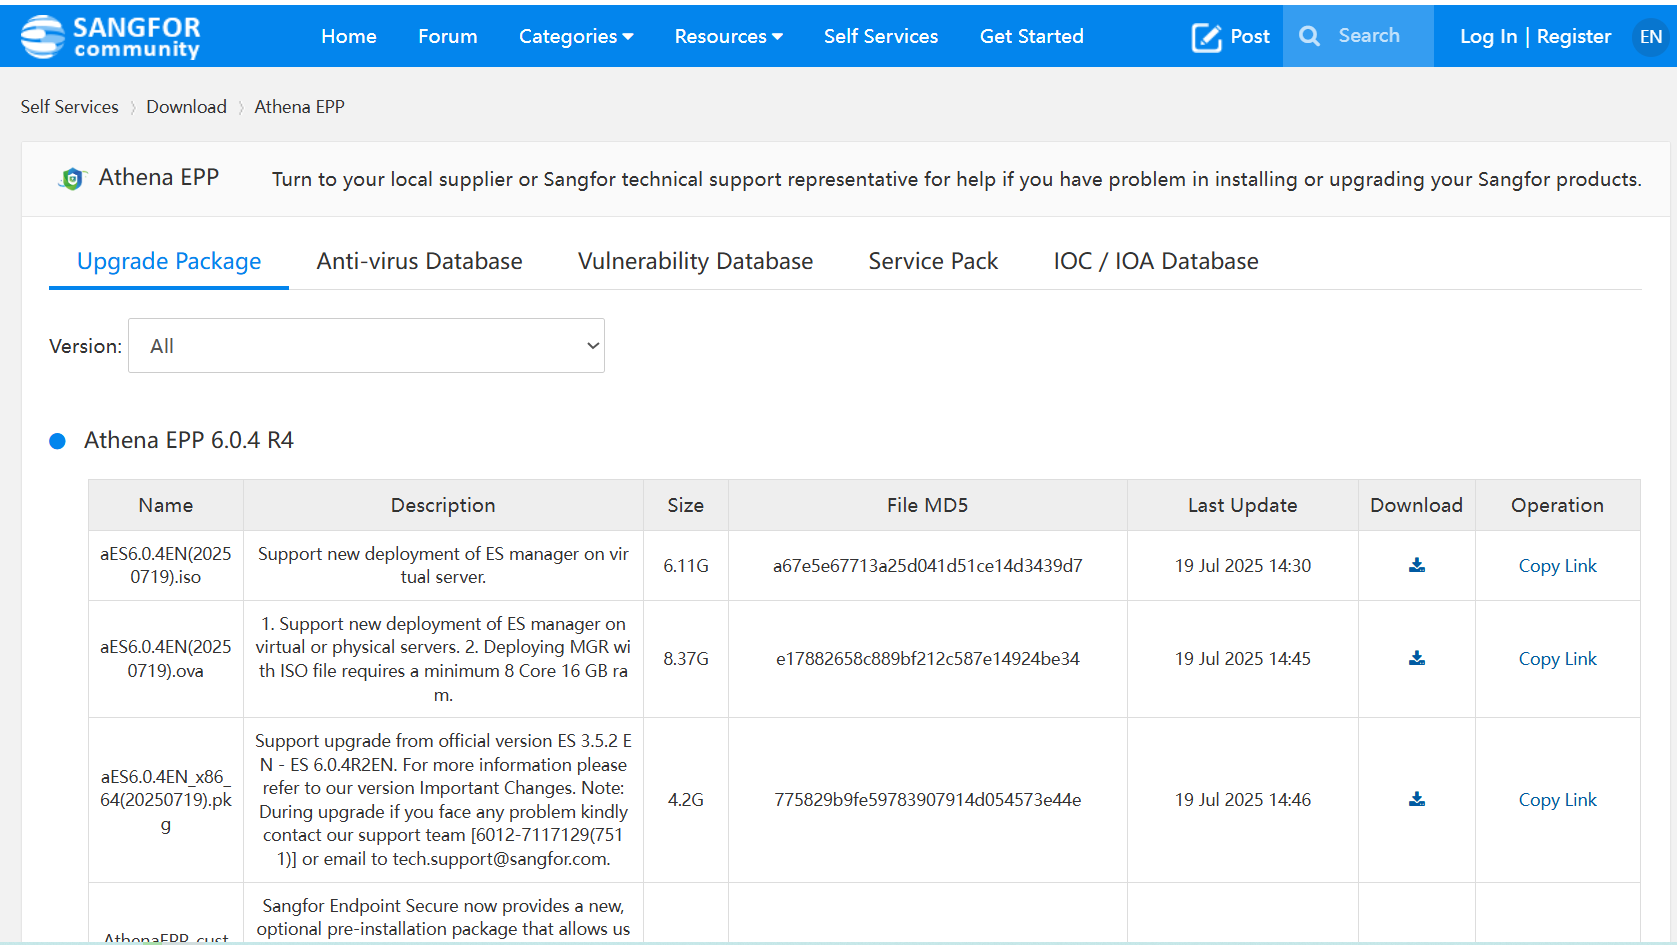
Step 1: Download the full offline installer.
Click Go to Sangfor Community and download the full offline installer corresponding to your system (32-bit or 64-bit), as shown in the following figure.
Step 2: Change the name of the installer.
Change the name of the installer before executing it. The following introduces how to change the installer names for the local Athena EPP agent and SaaS Athena EPP agent separately:
1. Change the installer name for the local Athena EPP agent.
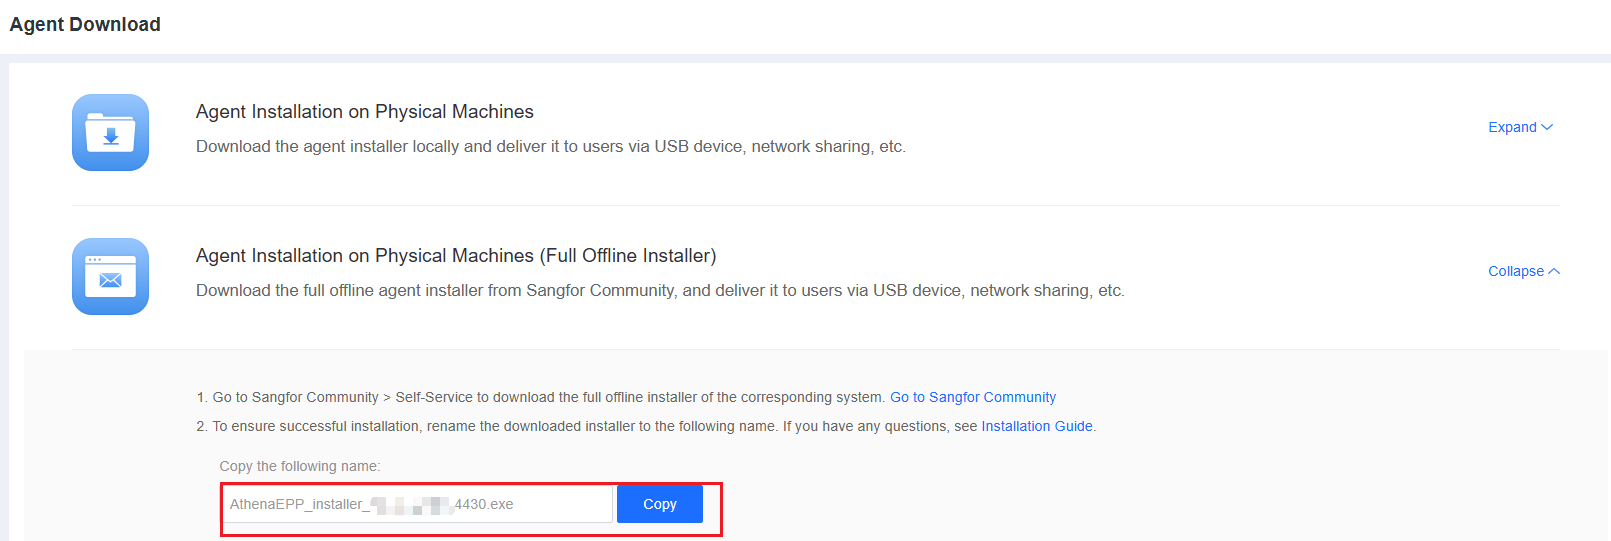
The default installer name is "AthenaEPP_installerFullX64_IP_PORT.exe" or "AthenaEPP_installerFullX86_IP_PORT.exe", where IP and PORT must be replaced for the local Athena EPP agent.
![]()
IP: Replace it with the IP address of the Athena EPP manager.
PORT: Replace it with the port that the Athena EPP agent communicates with the Athena EPP manager. The default port number is 4430, and you can change it on the Athena EPP manager, as shown in the following figure. Keep the port in the installer name like that on the Athena EPP manager.

You can also copy the name from System > Agent Deployment > Agent Download > Agent Installation on Physical Machines (Full Offline Installer) and replace the name of the downloaded installer with the copied name.
Example 1: Change the name of the full offline installer for the local Athena EPP agent for Windows.
Suppose the IP address of the Athena EPP manager is 10.0.0.1, and the port that the Athena EPP agent communicates with the Athena EPP manager is 4430. The installer names are changed as follows:
The 64-bit installer: AthenaEPP_installerFullX64_10.0.0.1_4430.exe
The 32-bit installer: AthenaEPP_installerFullX86_10.0.0.1_4430.exe
The copied name: AthenaEPP_installer_10.0.0.1_4430.exe
2. Change the installer name for the SaaS Athena EPP agent.
The default installer name is "AthenaEPP_installerFullX64_IP_PORT.exe" or "AthenaEPP_installerFullX86_IP_PORT.exe", where IP and PORT must be replaced and "_CorpID" must be appended for the SaaS Athena EPP agent.
![]()
IP: Replace it with "edragent.sangfor.com".
PORT: Replace it with "443".
CorpID: Append the CorpID to the installer's name. You can obtain the CorpID from Sangfor Platform-X, as shown below. 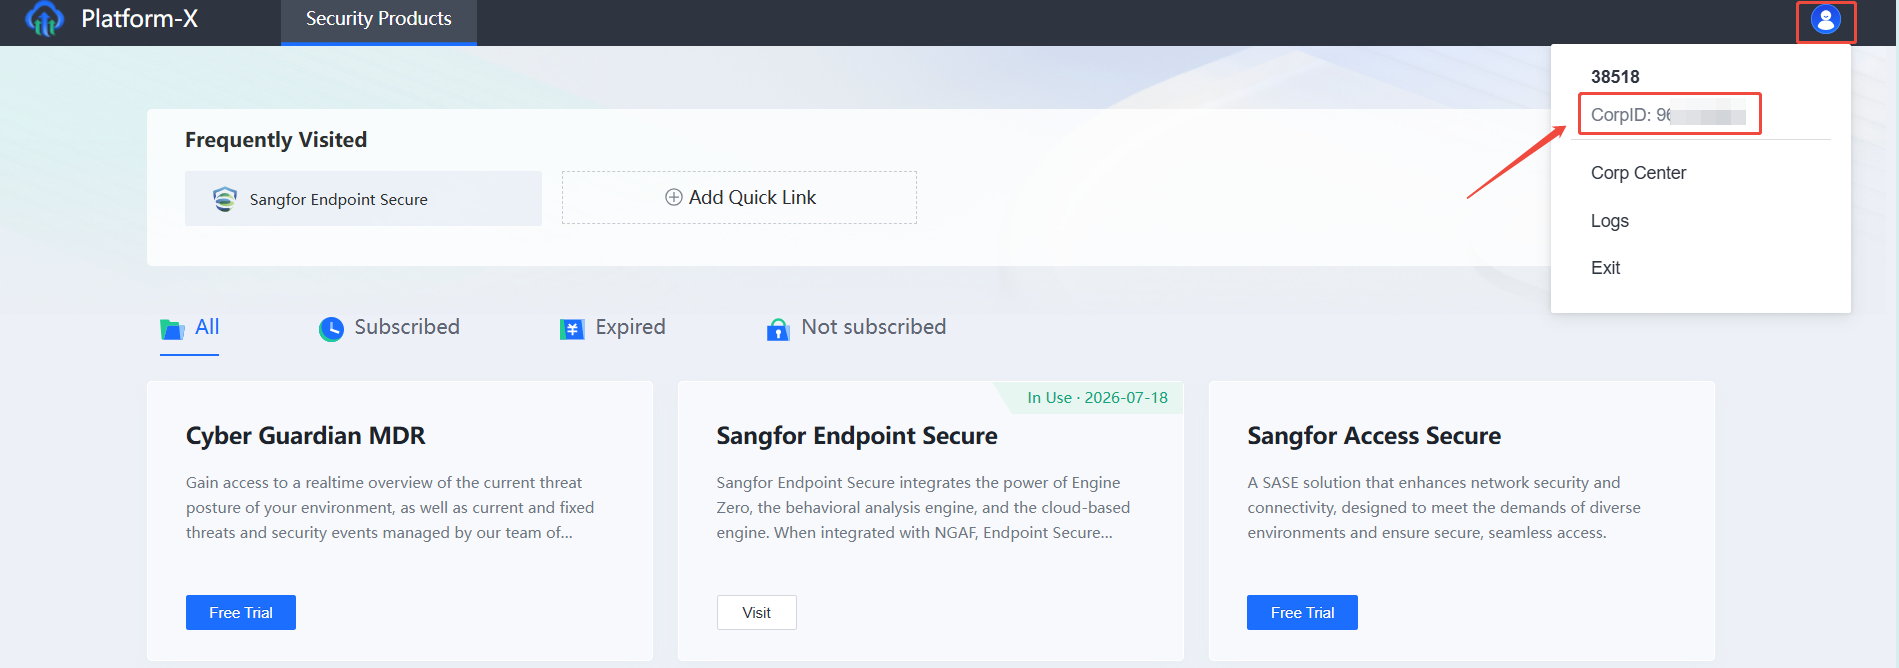
You can also copy the name from System > Agent Deployment > Agent Download > Agent Installation on Physical Machines (Full Offline Installer), and replace the name of the downloaded installer with the copied name.
Example 2: Change the name of the full offline installer for the SaaS Athena EPP agent for Windows.
Suppose the CorpID is 36138639. The installer names for SaaS Athena EPP are changed as follows:
The 64-bit installer:
AthenaEPPFullX64_edragent.sangfor.com_443_36138639.exe
The 32-bit installer:
AthenaEPPFullX86_edragent.sangfor.com_443_36138639.exe
The copied name: AthenaEPP_edragent.sangfor.com_443_36138639.exe
Step 3: Execute the full offline installer.
Double-click the installer or right-click the installer to execute it as an administrator.
The Athena EPP agent is successfully installed once you see the corresponding online endpoint on the Athena EPP manager.
Administrators can distribute a link to the installer download webpage to user endpoints via channels such as email and office automation (OA), to remind the users to download and install the Athena EPP agent.
Go to System > Agent Deployment > Agent Download > Windows, find Redirection to Agent Installer Download Page, and click Expand on the right, as shown in the following figure.

Enter a title and the content in the Customize title and contents step and click Next to generate a link, as shown in the following figure.
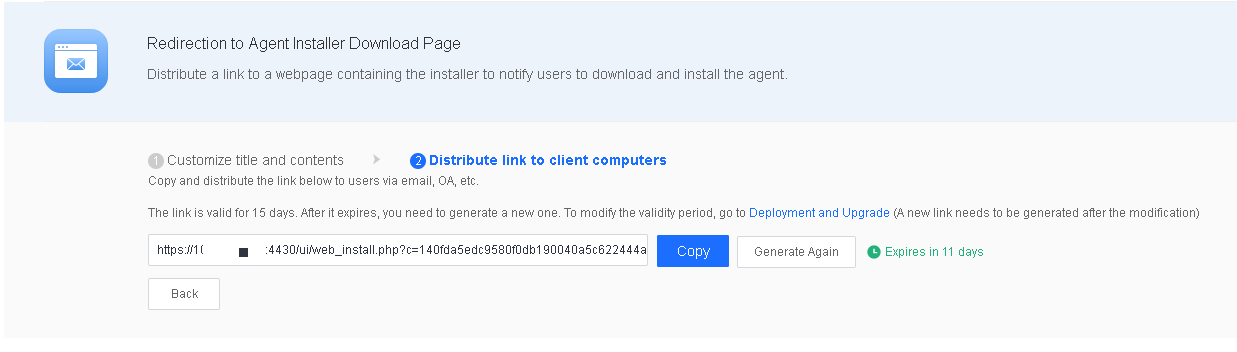
Distribute the link to endpoints as an administrator via email, OA, or other channels for users to download and install the Athena EPP agent, as shown in the following figure.
In scenarios where you have deployed a Microsoft AD domain controller in the internal network to which endpoints are connected for unified management, you can automatically install the silent Athena EPP agent package upon the startup of endpoints by distributing a group policy via the domain controller.
The procedure for Athena EPP agent installation via an AD domain is as follows:
Download the installer :
Download the installer and deployment guide, as shown in the following figure. 
The name of the downloaded installer contains the IP address and the port to connect to the Athena EPP manager, as shown in the following figure. Do not change the installer's name. Otherwise, the installation will fail. 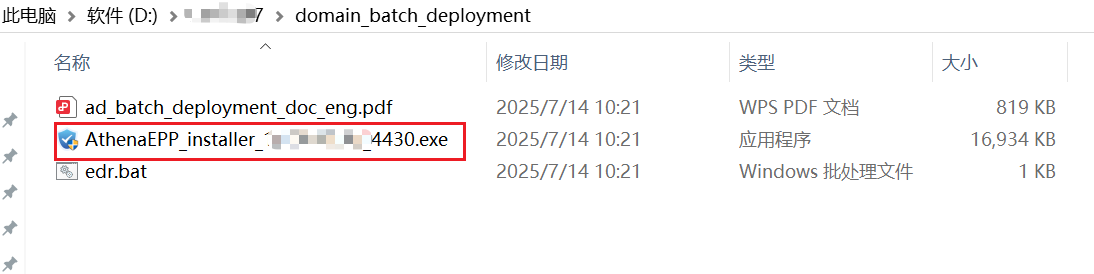
Create a group policy object :
Log in to the domain server, go to the Group Policy Management page, and create a group policy object, as shown in the following figure. 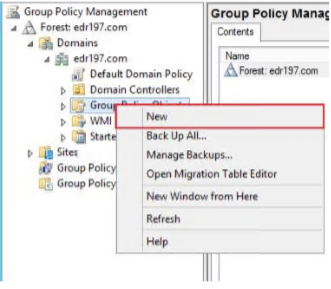
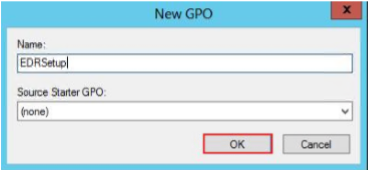
Enter a name for the group policy object and click OK.
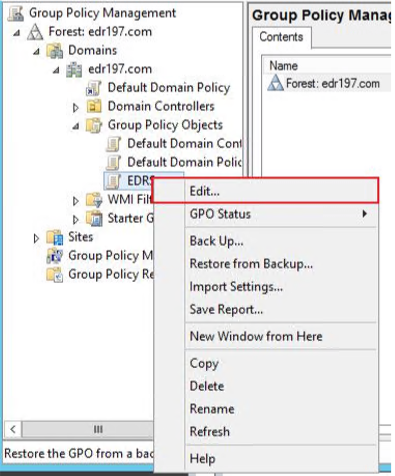
Edit the group policy object
Right-click the newly created group policy object and select Edit.
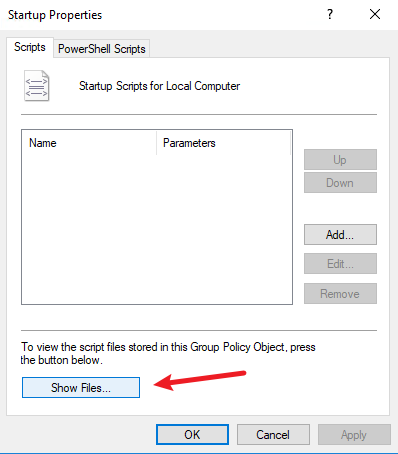
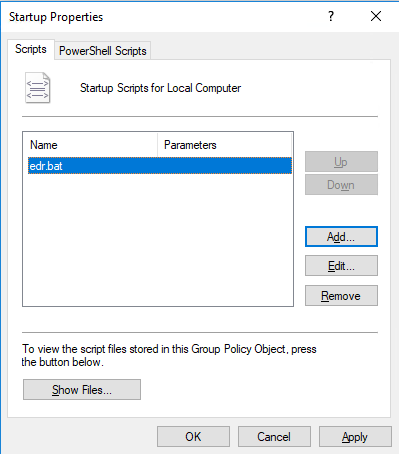
Go to Computer Configuration > Windows Settings > Scripts (Startup/Shutdown) and click Startup. 
Click Show Files to open the startup script directory where the installer and the batch policy distribution script are to be placed, as shown in the following figure.
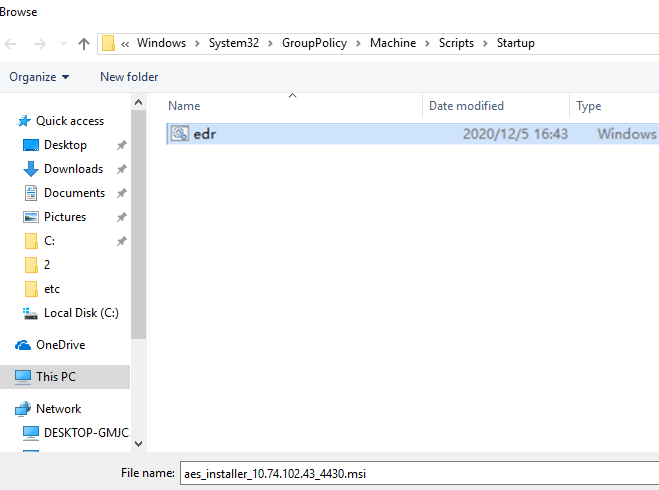
Place the installer and the batch policy distribution script in the startup script directory, as shown in the following figure.

Copy the path to the startup script directory from the address bar for later use in aES.bat modification.
Open edr.bat with Notepad++ and make the following changes.
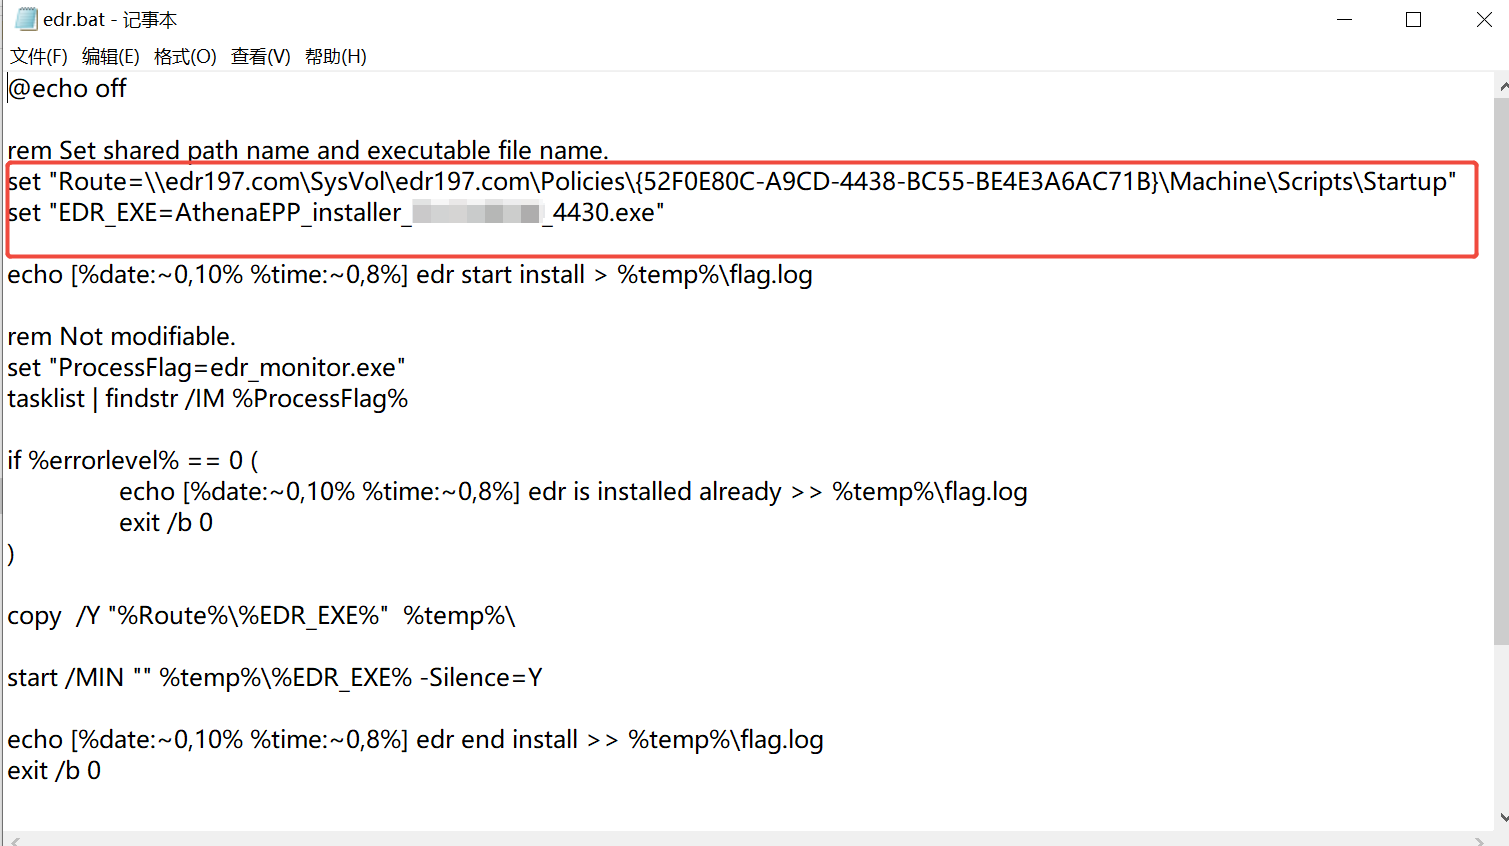
• Change the values of the Route and EDREXE parameters.
• Set Route to the startup script directory where the installer and the batch policy distribution script are stored.
• Set EDR_EXE to the installer name.
• Save the changes and close the script.
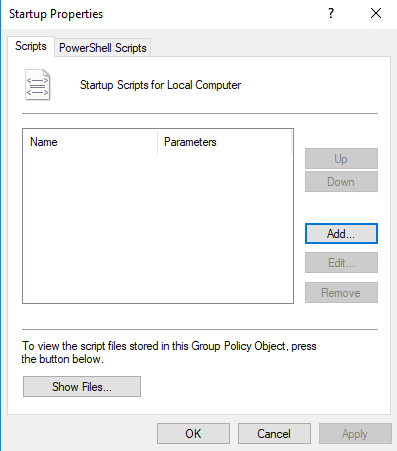
Click Add..., as shown in the following figure.
Click Browse... to select and add aES.bat.
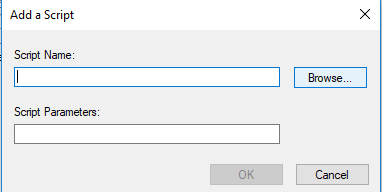
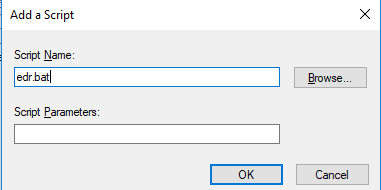
Click OK.
Link the group policy object :
Before applying the group policy to all computers in the domain, link the group policy object to a test organizational unit (OU) for a small-scale test.
![]()
The group policy takes effect only if there are computers in the OU. The group policy does not take effect if there are only domain users because it is for Computer Configuration rather than User Configuration.
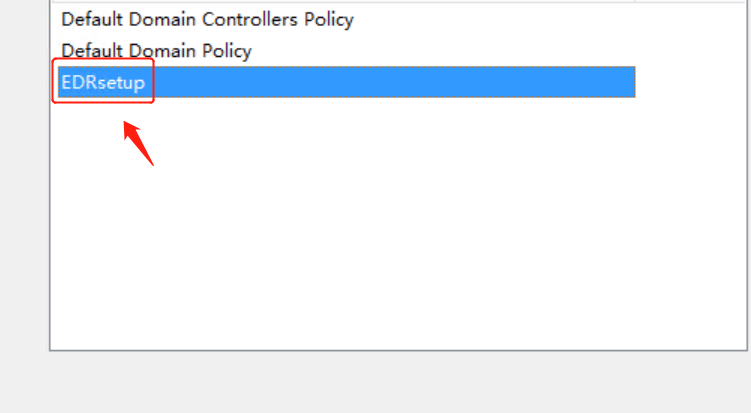
For example, you can link the group policy object to the test OU in the domain, as shown in the following figure. 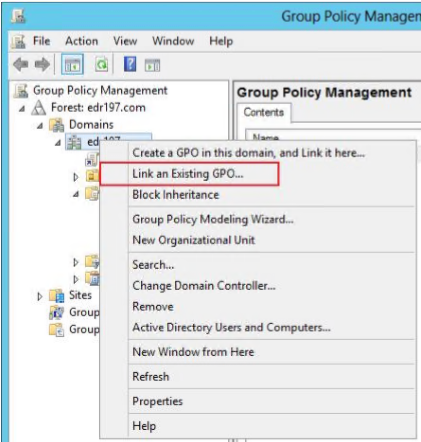
Select the newly created group policy object (such as EDRSetup), and click OK to complete the script-based deployment upon endpoint startup.
Verify the installation :
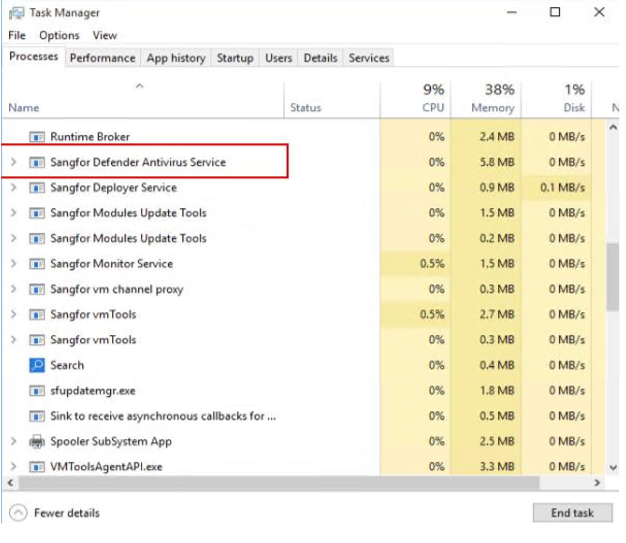
Restart the test endpoint to verify the installation of the Athena EPP agent. The Athena EPP agent is under installation if you find Sangfor Defender Antivirus Service in Task Manager on the endpoint PC.
Wait for a few minutes for the installation to finish. Then, you can find the icon of the Athena EPP agent on the screen, as shown in the following figure.

If computers in the test OU can successfully install the Athena EPP agent, link the group policy object to all computers in the domain. To do this, right-click the domain aES197.com and select Link an Existing GPO..., as shown in the following figure.
![]()
1. The group policy takes effect only if computers are in the linked OU. The group policy does not take effect if there are only domain users because it is for Computer Configuration rather than User Configuration. In this case, a computer automatically obtains the Athena EPP agent installation group policy after it starts up and joins the domain. For a group policy for User Configuration, a computer automatically obtains the group policy for Athena EPP agent installation after logging in to the computer using a domain user with the administrator role.
2. During the installation of the Athena EPP agent, necessary components are downloaded from the Athena EPP manager. To avoid excessive bandwidth usage due to bulk installation and ensure stability, limit the number of endpoints per bulk on which the Athena EPP agent is to be installed.
If the bandwidth is 100 Mbit/s (12.5 Mbit/s) and the maximum download bandwidth for each endpoint is 2 Mbit/s, limit the number of endpoints per bulk to 5, with a reserved bandwidth of 0.5 Mbit/s.
If the bandwidth is 1,000 Mbit/s (125 Mbit/s) and the maximum download bandwidth for each endpoint is 2 Mbit/s, limit the number of endpoints per bulk to 60, with a reserved bandwidth of 5 Mbit/s.
3. A computer with the Athena EPP agent installed will not undergo another installation when restarted.
In scenarios where you have desktop management software that supports software distribution, you can distribute the Athena EPP agent via desktop management software for bulk installation.
Scenario 1: Desktop management software for bulk installation supports the silence parameter.
In this scenario, you can download the standard Athena EPP agent installer and set the silence parameter (-Silence=Y) for bulk installation. Go to System > Agent Deployment > Agent Download > Windows, find Agent Installation via Desktop Management Software under Bulk Deployment, click Expand on the right, and then click Download, as shown in the following figure.
Scenario 2: Desktop management software for bulk installation does not support the silence parameter.
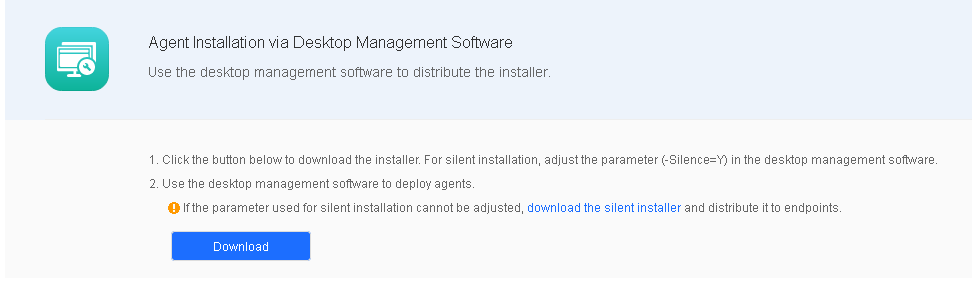
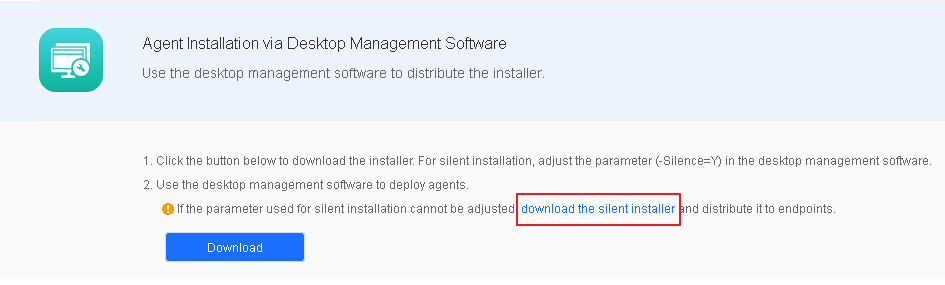
In this scenario, you must download the silent Athena EPP agent installer for Windows for bulk installation. Go to System > Agent Deployment > Agent Download > Windows, find Agent Installation via Desktop Management Software under Bulk Deployment, click Expand on the right, and then click download the silent installer, as shown in the following figure.
An integrated Athena SWG device will reject Internet access from the endpoints without Athena EPP agent installed and redirect users to the agent installer download page. The procedure is as follows:
In scenarios where Athena SWG is in use, you can deploy the Athena EPP agent based on integrated Athena SWG. Go to System > Agent Deployment > Agent Download > Windows, find Agent Installation via Integrated Internet Access Control Devices under Bulk Deployment, click Expand on the right, and then click Download Deployment Guide, as shown in the following figure.

In virtualization environments, administrators can convert a virtual machine with Athena EPP agent installed into a template and create virtual machines in bulk. Go to System > Agent Deployment > Agent Download > Windows, find Agent Installation on Virtual Machines under Bulk Deployment, and click Expand on the right, as shown in the following figure. 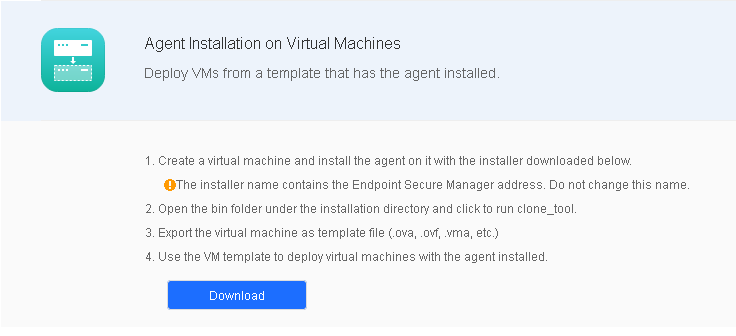
Step 1.Download the installer for standard installation following the instructions in Chapter 2.4.2.1. The endpoint will go online once the installation is complete.
Step 2.Before exporting a virtual machine, right-click clone_tool.exe under the "xxx/bin/" Athena EPP agent installation directory and execute it as an administrator to ensure that the Athena EPP agent IDs of the created virtual machines are unique.
Find the tool, and it is in "C:/Program Files/SF/EDR/agent/bin" by default.
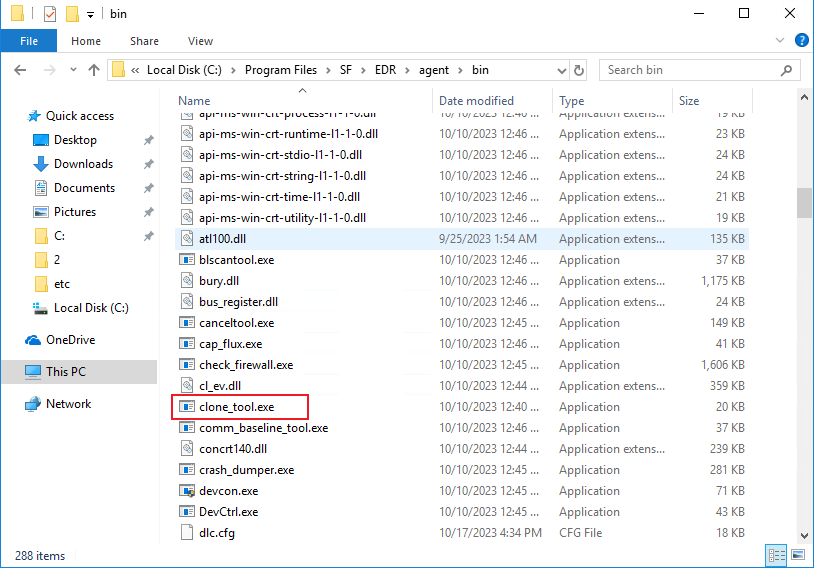
Right-click clone_tool.exe to execute it as an administrator and wait for the prompt "create copying flag success" to appear. 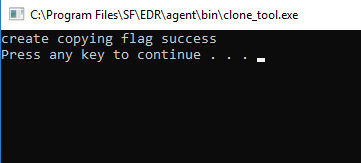
Step 3.Export the virtual machine. The following steps use Sangfor HCI as an example.
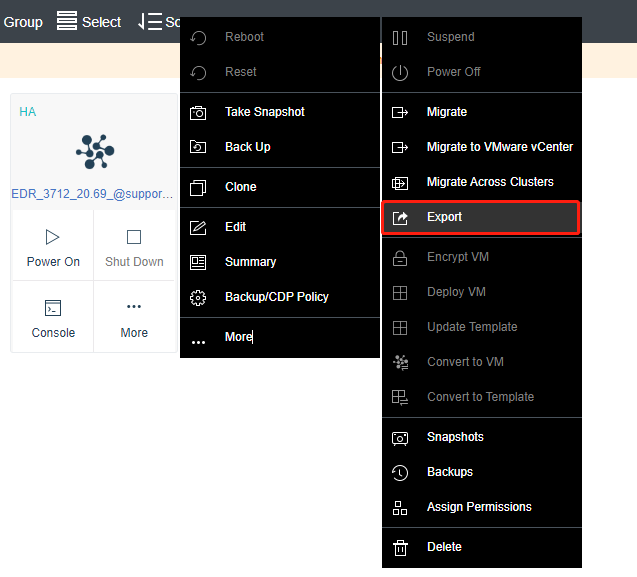
Step 4.Select File Format. OVA is recommended.
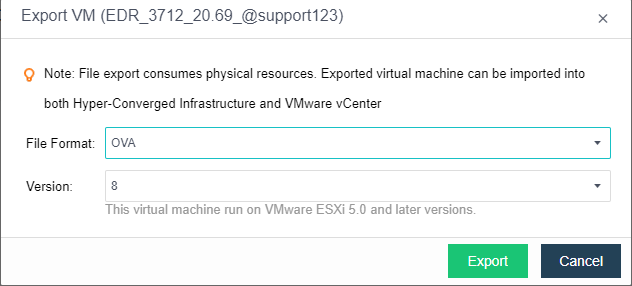
Once the OVA file is exported, you can use it to create virtual machines with Athena EPP agent installed in bulk. 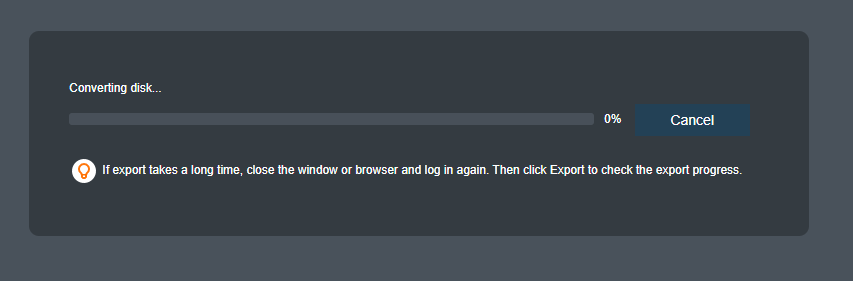

 {{ $t('index.defaultHeader.chromeBrowserTip') }}