{{ secondMenu.name }}


Traffic sub-channels are used to create more detailed bandwidth allocation policies for assurance channels and limitation channels.
Scenario:
A company leases a 10 Mbps line and has 1000 intranet users. All users' bandwidth to send and receive emails must not be less than 3 Mbps or greater than 5 Mbps, even in peak traffic hours. Because there are many marketing personnel and sending and receiving emails is vital to them, the bandwidth for them to send and receive emails must not be less than 1 Mbps or greater than 2 Mbps even in peak traffic hours in addition to the preceding assurance. The bandwidth for each user in the marketing department to send or receive emails must not exceed 20 Kbps.
Configuration steps:
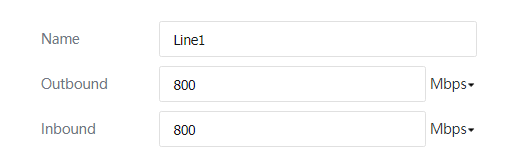
Step 1.Choose Bandwidth Management > Edit Line Bandwidth and configure Internet line bandwidth. Click Line 1. In this example, the company leases an 800 Mbps line; therefore, the values of Outbound and Inbound are set to 800 Mbps.
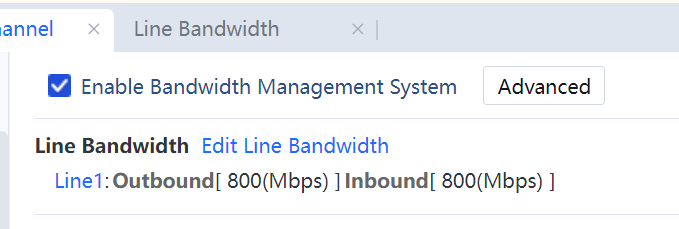
Step 2.Choose Bandwidth Management > Edit Line Bandwidth.
Step 3.Configure a level-1 assurance channel.
In this example, bandwidth assurance is implemented for all users to send and receive emails. In addition, bandwidth assurance is implemented further for marketing personnel to send and receive emails. This requirement can be achieved using a traffic sub-channel. You must create an assurance channel for all users and then further ensure bandwidth for the marketing department.
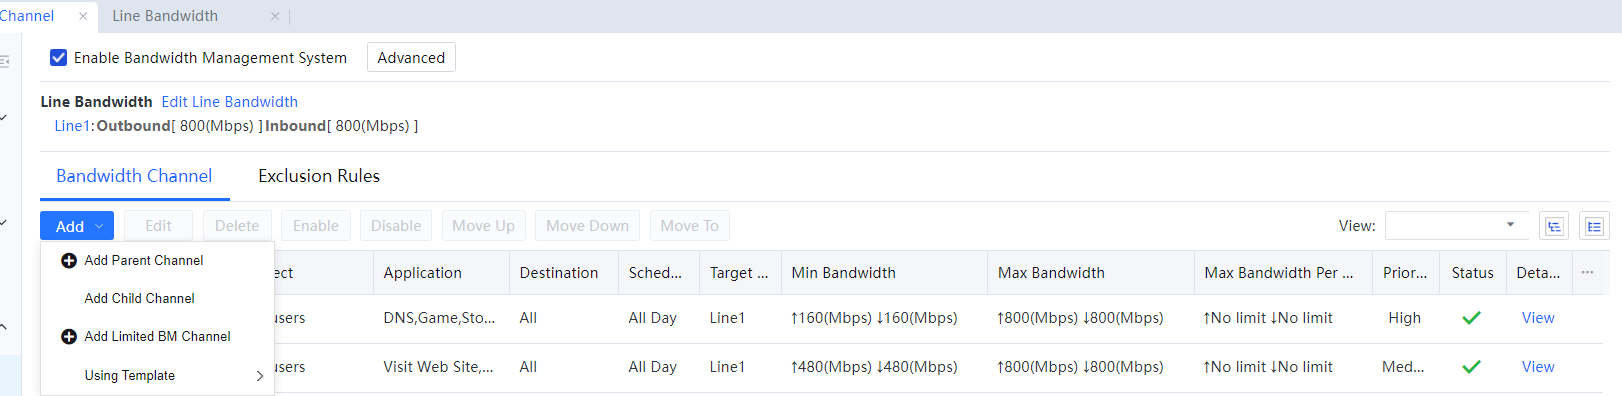
On the Bandwidth Channel tab page, click Add and choose Add Parent Channel. The New Add Parent Channel page is displayed.
If Enable Channel is selected, the channel is enabled. Otherwise, it is disabled.
Enter the name of the channel in the Channel Name text box. The Home Channel field displays the level of the channel and / indicates a level-1 channel.
In the Channel Editing menu, choose Bandwidth Channel Settings. The related attributes for setting the channel are on the right.
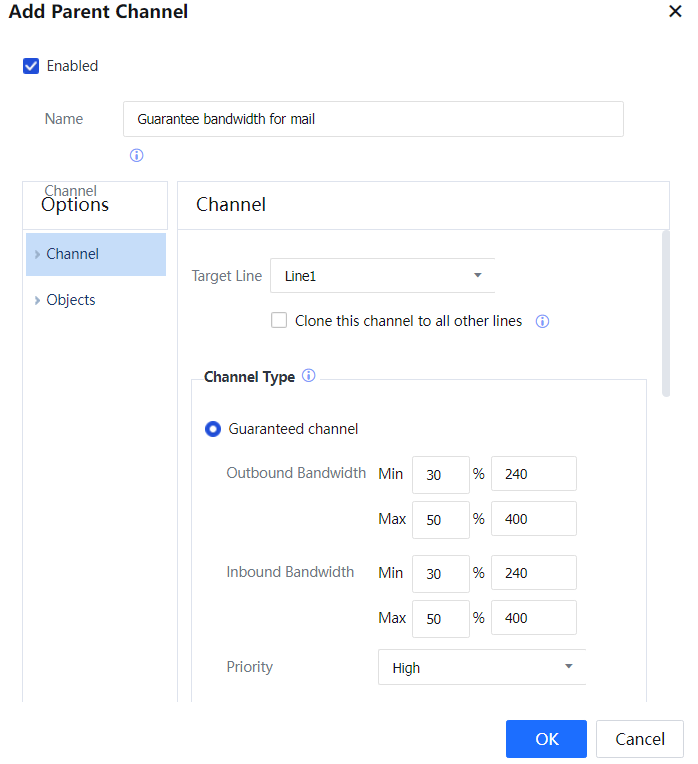
Bandwidth Channel Settings: Set the effective line, channel type, limited or assured bandwidth, and per-user bandwidth.
Target Line: To select the line applicable to the channel. The channel is used only when data is transferred through the selected line. In this example, there is only one line. Therefore, select Line 1.
Bandwidth Channel Type: To select a channel type and set bandwidth thresholds. In this example, all intranet users must be allocated 240 to 400 Mbps bandwidth to send and receive emails. Therefore, select Guaranteed Channel and set Minimum and Maximum bandwidth of Outbound Bandwidth and Inbound Bandwidth to 30% and 50% of the total bandwidth. The total bandwidth is 800 Mbps; therefore, the assured bandwidth is 240 Mbps, while the maximum bandwidth is 400 Mbps. Priority includes three options, High, Medium, and Low, which indicate the priority of allocating bandwidth of other channels to this channel when the other channels are idle.
Objects: It specifies the data types to which the channel is available. The channel is available only when the criteria, including applicable application, applicable object, effective time, and destination IP address group are met.
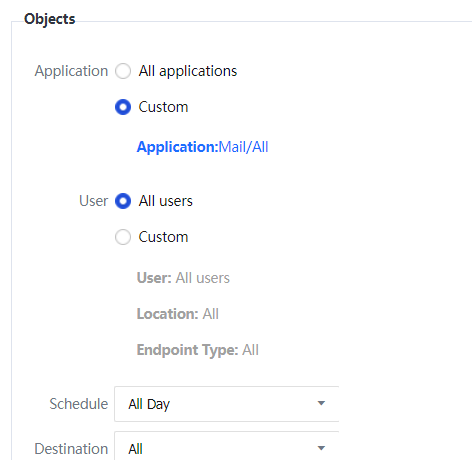
Set Applicable Application to Custom and select Mail/All.[A110]
Set Applicable Object to All Users, Scheduled to All day, and Destination to All. After the parameters are set, the settings are displayed. See the following figure.
Click OK to save the settings.
Step 4.Close the notification dialog box. The Bandwidth Allocation tab page displays the configured channel.
Then, set the sub-channel of the created assurance channel to limit the HTTP application bandwidth for the marketing department. Select HTTP Application Assurance, click Add, and choose Add Child Channel.

Step 5.Set the sub-channel.
On the Add Child Channel window that appears, set the sub-channel.
If Enable Channel is selected, the channel is enabled. Otherwise, it is disabled.
Enter the name of the channel in the Channel Name text box. The Home Channel field displays the level of the channel, and HTTP Application Assurance indicates a sub-channel.
In the Channel Editing menu, choose Bandwidth Channel Settings. The related attributes for setting the channel are on the right.

Bandwidth Channel Settings: To set the target line, channel type, limited or assured bandwidth, and per-user bandwidth.
Target Line is the same as that of the parent channel. It is not set in this example.
Bandwidth Channel Type: To select the assurance channel. In this example, marketing personnel must be allocated 1 to 2 Mbps/s bandwidth for sending and receiving emails, each having a maximum of 20 KB/s. Therefore, select Guaranteed Channel and set the Minimum and Maximum of Outbound Bandwidth and Inbound Bandwidth to 33% and 33% of the total bandwidth. The total bandwidth depends on the parent channel's assured bandwidth and maximum bandwidth. Priority includes three options, High, Medium, and Low, which indicate the priority of allocating bandwidth of other channels to this channel when the other channels are idle.
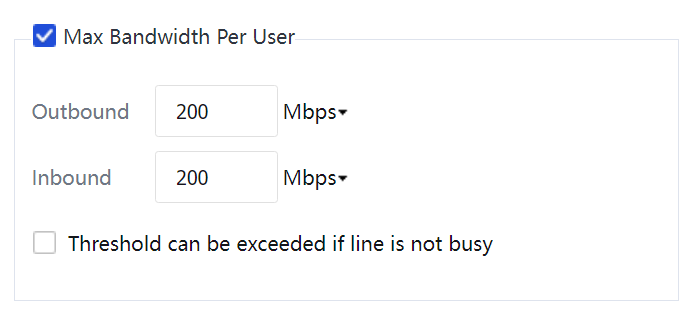
Max bandwidth Per User limits the unbound and outbound speed per user IP address.
Channel Availability: It specifies the data types to which the channel is available. The channel is available only when the criteria, including applicable application, applicable object, effective time, and destination IP address group are met.[LCH111][112]
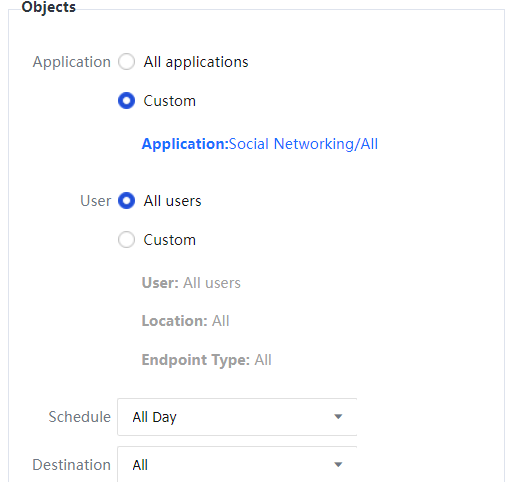
Set Applicable Application to Specified and select Mail/All. (Only the applications among the applicable applications of the parent channel can be selected.)
Set Applicable Object to Specified and select the marketing department. (Only the objects among the applicable objects of the parent channel can be selected.)
Set Scheduled to All Day and Destination to All. After the parameters are set, the settings are displayed. See the following figure.
Click OK to save the settings.
Step 6.The Bandwidth Channel tab page displays the configured parent channel and child channel.
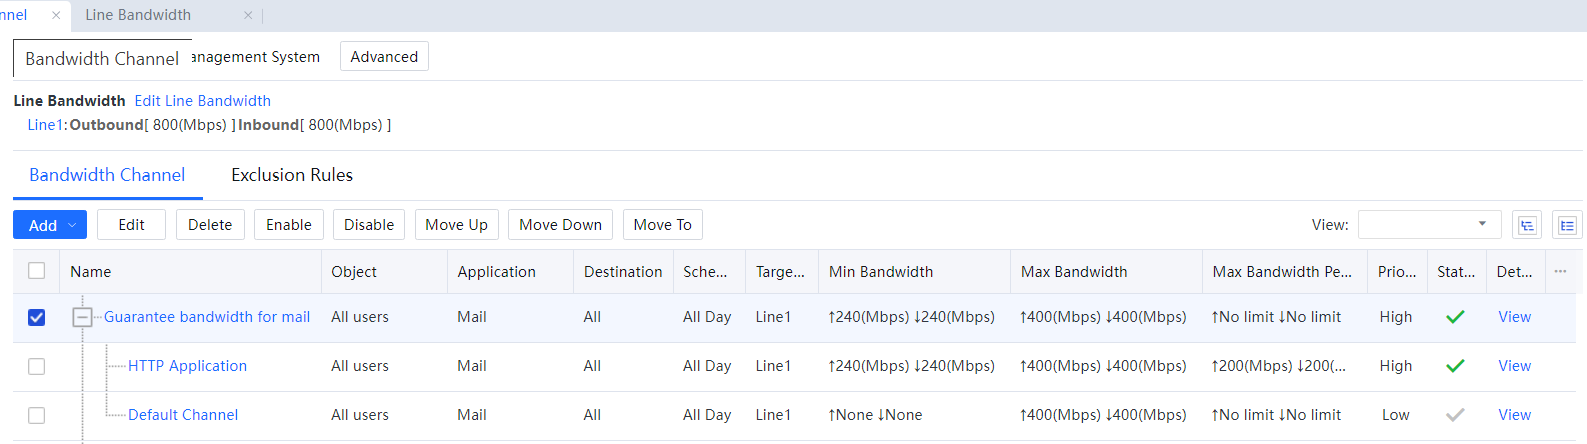
![]()
1. The percentages defined by the sub-channel depend on the bandwidth calculated for the parent channel. The actual traffic for the sub-channel does not exceed the traffic limit of the parent channel.
2. The Bandwidth Management system supports three levels of sub-channels by default. A sub-channel at each level contains one default channel for the traffic that does not meet the channel criteria. Therefore, the default channel cannot be deleted.
3. The applications and objects defined for a sub-channel must be among the applications and objects defined for its parent channel. Otherwise, the configuration fails.

 {{ $t('index.defaultHeader.chromeBrowserTip') }}