


{{ secondMenu.name }}






On the VPN Wizard page, click IPSec VPN. The system automatically proceeds to the next page, as shown in the following figure.


Configuration Check Results: Show the check results for the current deployment mode, available outbound interfaces, available intranet interfaces, VPN service port, number of licenses, and network connection status. If the status changes, you can click Check Again on the right to refresh the check results.
Collect Information: Show the information required for configuring the VPN for the device. For example, the peer device address and type, authentication method, and internal subnets of traffic to be encrypted.
Download Collection File: You can click this button to download the collection file template. The file content is shown in the following figure.

Confirm the information and click Next.
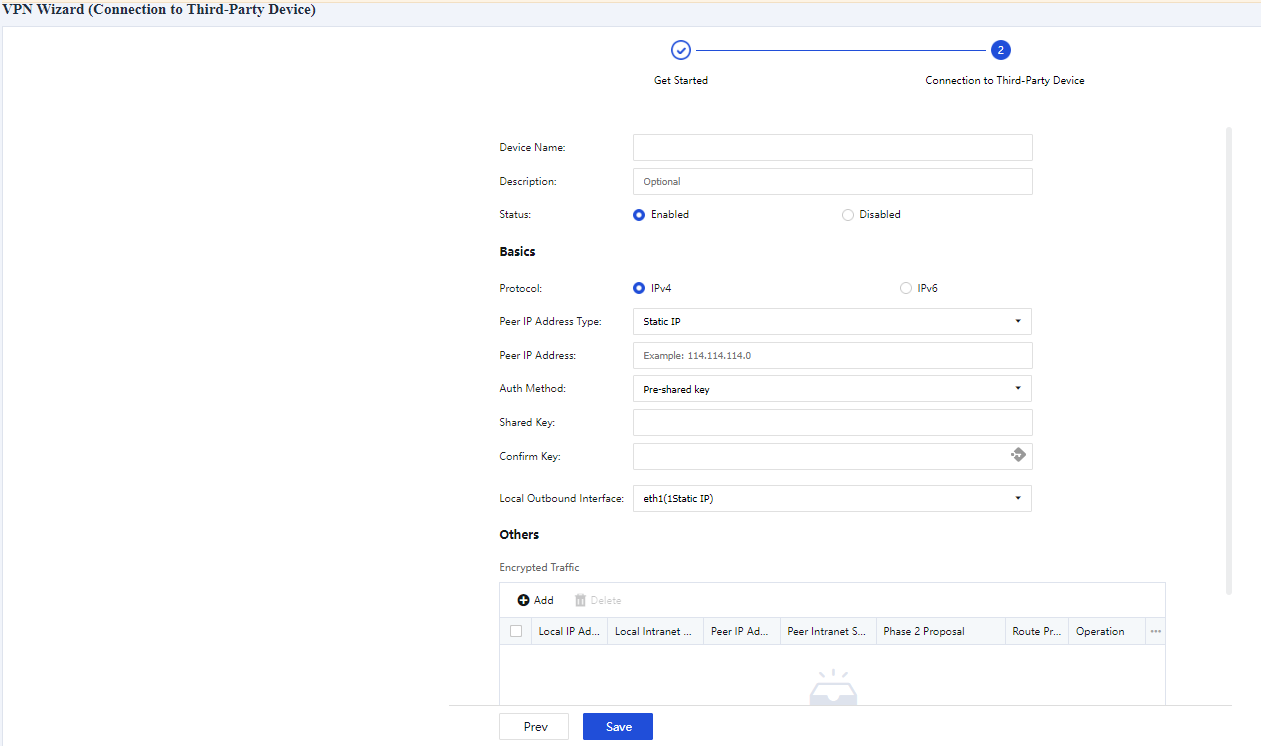
Device Name: Enter a name for the local IPSec device. This parameter is not verified in IPSec negotiation, and it applies only to the local network. You can set it as required.
Description (Optional): Enter a description of the device.
Status: Specify whether to enable or disable VPN for the current device.
Basics:
Peer IP Address Type: Select Static IP, Dynamic IP, or Dynamic Domain as required. If you select Static IP, enter the IP address of the peer device. If you select Dynamic Domain, enter the WAN domain name of the peer device.
Auth Method: Select Pre-shared key, Certificate based, or SM2 Certificate V1.1 as required.
Shared Key and Confirm Key: Enter the correct pre-shared key. Ensure both devices use the same pre-shared key.
Local Outbound Interface: Select an outbound interface based on the link status.

In the Others section, click Add. In the Add Encrypted Traffic dialog box, set the following parameters:
Protocol: Select IPv4 or IPv6 protocol.
Local IP Address: Enter a source IP address or IP range to match the protected data flows of IPSec VPN.
Local Intranet Service: Select a source intranet service type to match the protected data flows of IPSec VPN. You can select All Services, All TCP Services, All UDP Services, or All ICMP Services as required.
Peer IP Address: Enter a destination IP address or IP range to match the protected data flows of IPSec VPN.
Peer Intranet Service: Select a destination intranet service type to match the protected data flows of IPSec VPN. You can select All Services, All TCP Services, All UDP Services, or All ICMP Services as required.
Phase 2 Proposal: Set the parameters required for Phase 2 negotiation, including Protocol, Encryption Algorithm, Auth Algorithm, and Perfect Forward Secrecy (PFS). Options for Protocol include AH and ESP. Options for Encryption Algorithm include DES, 3DES, AES, AES192, AES256, SANGFOR_DES, and SM4. Options for Auth Algorithm include MD5, SHA1, SHA2-256, SHA2-384, SHA2-512, and SM3. You can select the Diffie-Hellman (DH) group algorithm for Perfect Forward Secrecy.
Route Priority: Set a value for local and peer IP addresses to identify the route priority.
Click OK to proceed.
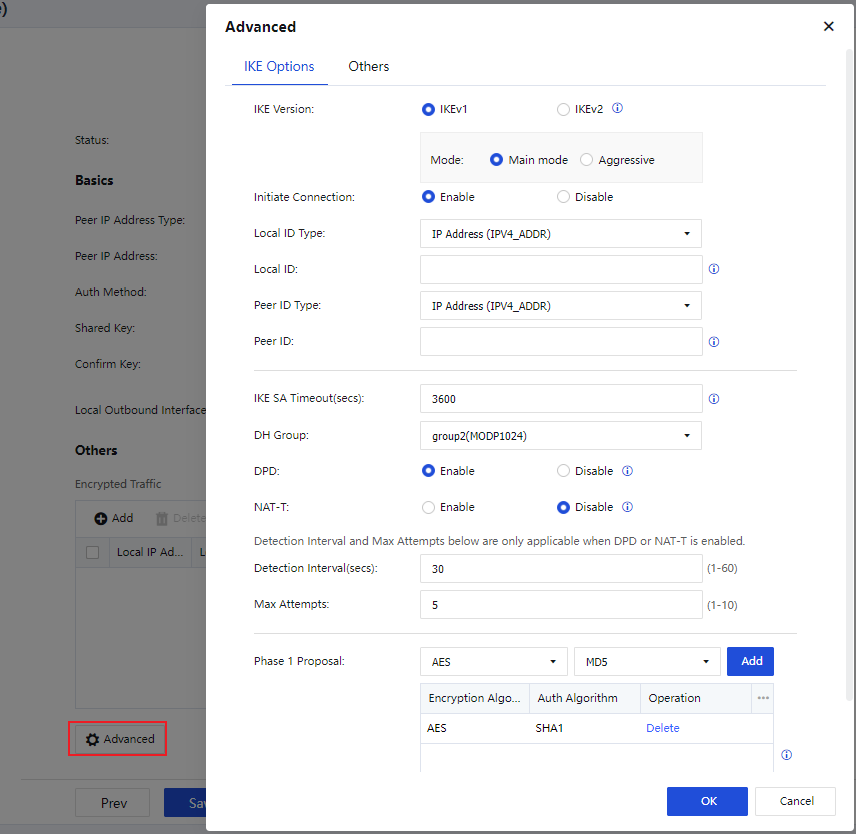
IKE Options:
IKE Version: Select IKEv1 or IKEv2. The setting must be the same as that of the peer device.
Mode: The connection mode. Options include Main mode and Aggressive. The main mode is applicable when both devices use static IP addresses, or one uses a static IP address and the other uses a dynamic domain name. It does not support NAT traversal. The aggressive mode is applicable when one of the devices establishes connections through dial-up, and it supports NAT traversal. Select either mode based on your business requirements.
Initiate Connection: Specify whether the device can actively initiate a VPN connection.
Local ID Type: Select an ID type for the local device to ensure that the peer device can identify the local device. Options include IP Address (ADDR), Domain String (FQDN), and User String (USER_FQDN).
Local ID: Set an ID for the local device based on the selected local ID type.
Peer ID Type: Select an ID type for the peer device to ensure that the local device can identify the peer device. Options include IP Address (ADDR), Domain String (FQDN), and User String (USER_FQDN).
Peer ID: Set an ID for the peer device based on the selected peer ID type.
IKE SA Timeout(secs): Set the Phase 1 lifetime for IPSec negotiation in seconds.
DH Group: Select a DH group type, including DH groups 1, 2, 5, 14, 15, 16, 17, and 18. The setting must be the same as that of the peer device.
DPD: Specify whether to enable the Dead Peer Detection (DPD) feature to detect the life status of the peer device in IPSec.
NAT-T: This feature is available only in aggressive mode. It avoids failure of IPSec negotiation when NAT is enabled on one of the devices. After you enable NAT traversal, the UDP header will be added to encapsulate Encapsulating Security Payload (ESP) packets. When an ESP packet traverses a NAT device, the NAT device converts the IP address and port number in the outer IP header and the added UDP header of the packet. When the converted packet reaches the peer device of the IPSec tunnel, it is processed in the general way of the IPSec.
Detection Interval(secs): Set an interval for DPD and NAT-T detection.
Max Attempts: Set the maximum number of DPD and NAT-T detection attempts. If the number of attempts exceeds this value, the local device determines that the peer device fails and disconnects from the peer device.
Phase 1 Proposal: Set the parameters required for Phase 1 negotiation, including Encryption Algorithm and Auth Algorithm. Options for Encryption Algorithm include DES, 3DES, AES, AES192, AES256, SANGFOR_DES, and SM4. Options for Auth Algorithm include MD5, SHA1, SHA2-256, SHA2-384, SHA2-512, and SM3.

Others:
Max Attempts: Set the maximum number of attempts for an IPSec VPN connection.
IPSec SA Timeout(secs): Set a timeout interval for IPSec security associations (SAs).
Expiration Time: Specify whether to enable expiration time for IPSec VPN tunnels.
Click OK to proceed.


 {{ $t('index.defaultHeader.chromeBrowserTip') }}