


{{ secondMenu.name }}






Authentication Options is used to set configuration information related to user authentication on devices, including SSO Options, Auth Page Redirection, Authentication Conflict, Obtain MAC By SNMP, and Others.
6.6.3.2.1.1SSO Options
For customers with third-party authentication servers to authenticate LAN users, SSO allows LAN users to pass both third-party server authentication and device authentication as well as obtain permission to access the Internet. The username and password used by the device are the same as those used by the third-party authentication server. SSO types supported by the device currently are AD AD SSO, Proxy SSO, POP3 SSO, and Web SSO. Those are basic SSOs. To use SSO, you need to configure users, authentication servers, and user authentication methods in Administrators, External Auth Server, and Authentication Policy, respectively.
6.6.3.2.1.2AD SSO
AD SSO is acceptable in enterprises with Microsoft AD domain server presence for user management and where LAN users log in to the computer as domain accounts. After logging in to the domain, LAN users are considered to have passed device authentication. In other words, end users can log in to the domain to access the Internet without device authentication. AD SSO can be realized by distributing domain scripts or listening to packets of the login domain. AD SSO applies only to the Microsoft Active Directory (AD) domain.
Configuration of Domain Script Distribution Mode:
Configure login (logon.exe) and logout (logff.exe) scripts for the domain server. Then, you can log in to or log out of the device by running the two scripts based on the issued domain policy.

The data stream is as follows:
Configuration Steps:
Step 1.Navigate to Policies > Authentication > User Authentication > External Auth Server to set the authentication AD domain service.
Step 2.Enable SSO on the device, select the SSO mode, and set a Shared Key. Go to Policies > Authentication > User Authentication > Authentication Options > SSO Options > AD SSO to enter the editing page.
Select Enable AD SSO to enable the AD SSO.
If Receive login credentials from a login script running on your AD domain controller is selected, SSO will be implemented by issuing the domain script. Enter the shared key in Shared Key, as shown below.
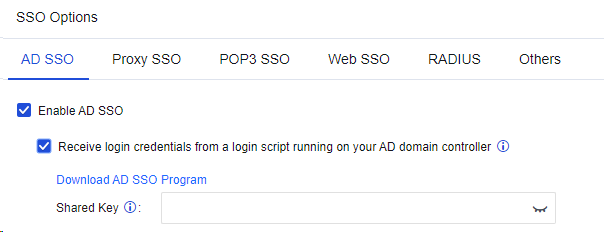
The Shared Key is used for encrypted communication between the AD domain server and the device and must be the same in login scripts. Click Download AD SSO Program to download the login and logout scripts to complete settings in Step 3 and Step 4.

IAM11.0R2 and later versions are supported to synchronize authentication information to the Network Secure over port 1775.
Step 3.Configure the login script on the AD domain server.

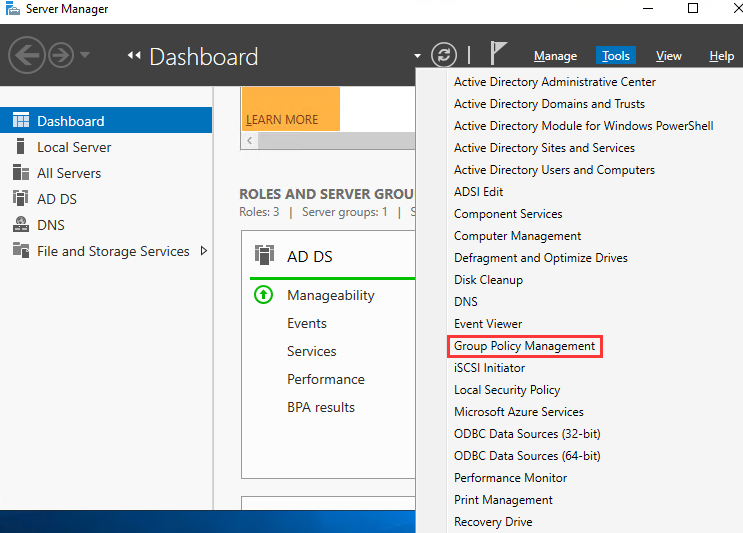


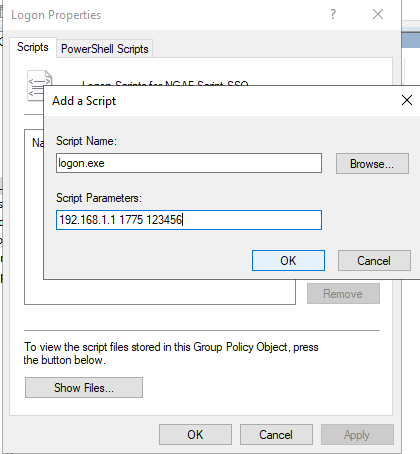


Step 4.Go to Policies > Authentication > User Authentication > Authentication Policy, and click Add. Set the authentication policy according to the IP or MAC address of the SSO user.
Step 5.Log in to the domain on a PC. You can access the Internet after a successful login.
Configuration of AD SSO:
Login information can be automatically obtained through the built-in program of the Network Secure device. The Network Secure device has a built-in SSO client program named AD SSO. When this method is enabled, the program regularly obtains successful login information of the PC logging in to the domain and reports the information to the Network Secure device for SSO.
The Single sign-on configuration required to select AD SSO and select Enable AD SSO.

Click Add to add a domain server.
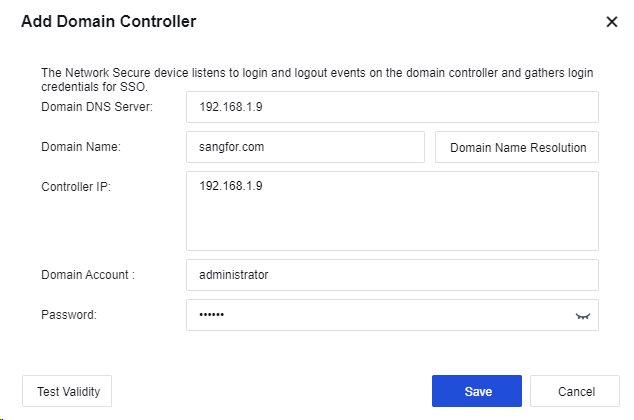
Domain DNS Server: Enter the Domain DNS Server and Domain Name. The Domain DNS Server shall be able to resolve the Domain Name. If you click the Domain Name Resolution button, it can automatically resolve the IP addresses of all domain controllers.
Domain Name: Enter the domain name of the domain server.
Controller IP: Enter the IP address of the domain server.
Domain Account: Enter the account (an administrator account or an account listed in the administrator group) with domain admin privileges.
Password: Enter the password of the Domain Account.
Click Test Validity to obtain the result of the domain controller test.
Click Save to save the configuration.
Redirection Interval After Auth Failure (mins): Set the time interval for redirection and re-authentication after IWA SSO fails.
Domain of Windows 2000 Earlier Versions: If the domain server runs on Windows earlier than 2000, you need to set the domain name here.
1. If the domain account expires or is disabled, the logged-in PC can still be successfully authenticated through Kerberos and display UI optimization.
2. IWA authentication does not apply to mobile phone network access via proxy. If IWA authentication is enabled, the authentication window will not pop up as long as the proxy is working.
3. Kerberos authentication will not kick out password-authenticated users.
4. If a domain account contains special characters such as `~! #$%^&;*+\|{};:“”‘’,/<>? attempts to log in, no authentication will be performed for this user (only for Network Secure).
Configuration of Listening Mode:
In the listening mode, SSO is realized by listening to the data of the domain server that the PC logs in and obtaining user login information from the data. In this case, no components need to be installed on the domain server. However, the PC login data to the domain must be mirrored to the device through the device or listening port. The device listens to the login information of the UDP 88 port. The user successfully logged in to the domain can access the Internet directly without passing the device authentication again. This mode applies to domain servers on the LAN or WAN. The following describes SSO settings in two scenarios.
Scenario 1: Domain Servers in the LAN Environment

The data stream is as follows:
Configuration Steps:
Step 1.Click Policies > Authentication > User Authentication > External Auth Server to set the authentication AD domain service.
Step 2.Enable SSO on the device, select the listening mode, and set the IP address of the domain server. Click Policies > Authentication > User Authentication > Authentication Options > SSO Options > AD SSO for configuration. Tick the option Enable AD SSO to enable the domain single sign-on function.
Step 3.Select Gather login credentials by monitoring the data when a device logs in to the domain to enable the listening mode for SSO. Enter the IP address and listening port of the domain server in the list of Monitored Domain Controllers. If there are multiple domain servers, specify one IP address and one port per row, as shown below.

Step 4.If the login data does not pass through the device, you must go to the Others tab to enable the mirror interface and connect it to the switch's mirror interface that forwards it. A mirroring interface must be an idle network interface.

Step 5.Go to Policies > Authentication > User Authentication > Authentication Policy and click Add to set the authentication policy according to the IP or MAC address of the SSO user.
Step 6.Log in to the domain on a PC. Then you can access the Internet.
Scenario 2: Domain Servers on the WAN Interface Side

The data stream is as follows:
Configuration Steps:
Step 1.Click Policies > Authentication > User Authentication > External Auth Server to set the authentication AD domain service.
Step 2.Enable SSO on the device, select the listening mode, and set the IP address of the domain server. Click Policies > Authentication > User Authentication > Authentication Options > SSO Options > AD SSO for configuration.
Select Enable AD SSO.
Select Gather login credentials by monitoring the data when a device logs in to the domain to enable the listening mode for SSO. Enter the IP address and listening port of the domain server in the list of Monitored Domain Controllers. If there are multiple domain servers, specify one IP address and one port per row, as shown below.
Step 3.Go to Policies > Authentication > User Authentication > Authentication Policy and click Add to set the authentication policy according to the IP or MAC address of the SSO user.
Step 4.Log in to the domain on a PC. You can access the Internet after a successful login.
In the mirror mode, only the login information of a user is monitored. If a user logs out, no data can be monitored. Therefore, there may be the case that the user who has logged out of a PC is still displayed in the online user list of the device.
6.6.3.2.1.3Proxy SSO
It is applicable to network access via proxy. In this mode, each user is assigned an account of the proxy server. In proxy SSO authentication mode, when the user passes the proxy server's authentication, it is also considered to have passed the device's authentication. Proxy SSO is realized in the listening mode, i.e., by listening to the login data.
WAN: The proxy server is on the WAN side, as shown below:

The data stream is as follows:
Configuration Steps:
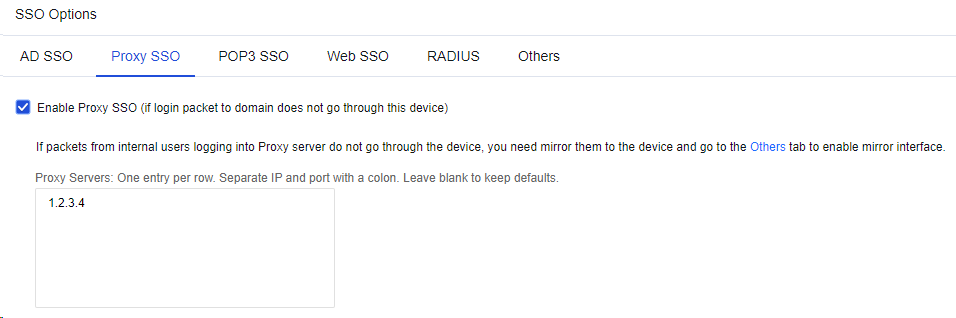
Step 1.Enable SSO on the device, select the listening mode, and set the IP address of the domain server. Click Policies > Authentication > User Authentication > Authentication Options > SSO Options > Proxy SSO for configuration.
Select Enable Proxy SSO (if login packet to domain does not go through this device).
Enter the IP address and the listening port of the proxy server in Proxy Servers. If there are multiple proxy servers, specify one IP address and one port per row, as shown below. As to the listening port, set it to the proxy authentication port in this example.
Step 2.If the login data does not pass through the device, you must go to the Others tab to enable the mirror interface and connect it to the switch's mirror interface that forwards it. A mirroring interface must be an idle network interface.
Step 3.Go to Policies > Authentication > User Authentication > Authentication Policy and click Add to set the authentication policy according to the IP or MAC address of the proxy SSO user.
Step 4.Log in to the proxy server on a PC. You can access the Internet after a successful login.
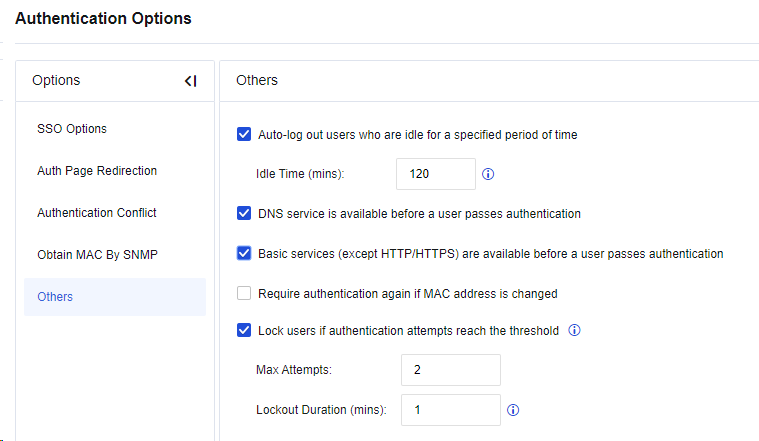
To enable automatic authentication for a proxy server on the WAN, enable access to the proxy server in the root group. Navigate to Policies > Authentication > User Authentication > Authentication Options > Others and select Basic services (except HTTP/HTTPS) are available before a user passes authentication. See the figure below.
6.6.3.2.1.4POP3 SSO
In an enterprise network with a mail server presence, user information is stored on the POP3 server. Suppose the user has logged in to the POP3 server and received or sent an email using Outlook or Foxmail before network access. In that case, the device obtains the login information in the listening mode and automatically identifies and authenticates the user as valid. At this time, the user accesses the Internet directly without the need to enter the username and password. This function applies to POP3 servers on both LAN and WAN. The following describes POP3 SSO settings in two scenarios.
Scenario 1: POP3 Servers on the LAN

The data stream is as follows:
Configuration Steps:
Step 1.Click Policies > Authentication > User Authentication > External Auth Server to set the authentication POP3 server.
Step 2.Enable SSO on the device, select the listening mode, and set the IP address of the POP3 server. Click Policies > Authentication > User Authentication > Authentication Options > SSO Options > POP3 SSO for configuration.
Step 3.Select Enable POP3 SSO. Enter the IP address and listening port of the POP3 server in Mail Servers. If there are multiple POP3 servers, enter one IP address and one port per row. In this example, the port here shall be set to the POP3 authenticated port (TCP110 by default).

Step 4.If the login data does not pass through the device, you need to go to the Others tab to enable the mirror interface and connect it to the switch's mirror interface that forwards login data. A mirroring interface must be an idle network interface.
Step 5.Go to Policies > Authentication > User Authentication > Authentication Policy and click Add to set the authentication policy according to the IP or MAC address of the POP3 SSO user.
Step 6.Send and receive emails once through the email client on the PC. Then, you can access the Internet after successfully logging in to the POP3 server.
Scenario 2: POP3 Server on the WAN

The data stream is as follows:
Configuration Steps:
Step 1.Click Policies > Authentication > User Authentication > External Auth Server to set the authentication POP3 server.
Step 2.Enable SSO on the device, select the listening mode, and set the IP address of the POP3 server. Click Policies > Authentication > User Authentication > Authentication Options > SSO Options > POP3 SSO for configuration.
Select Enable POP3 SSO.
Enter the IP address and listening port of the POP3 server in Mail Servers. If there are multiple POP3 servers, enter one IP address and one port per row. In this example, the port shall be set to the POP3 authenticated port (TCP110 by default), as shown below.
Step 3.Go to Policies > Authentication > User Authentication > Authentication Policy and click Add to set the authentication policy according to the IP or MAC address of the POP3 SSO user.
Step 4.Send and receive emails once through the email client on the PC. Then, you can access the Internet after successfully logging in to the POP3 server.
To enable automatic authentication for the POP3 server on the WAN, enable access to the POP3 server in the root group. Navigate to Policies > Authentication > User Authentication > Authentication Options > Others and select Basic services (except HTTP/HTTPS) are available before a user passes authentication. See the figure below.
6.6.3.2.1.5Web SSO
Web SSO applies to users whose account information is stored on their web servers. To implement Web SSO, the user needs to pass the authentication of the web server and the device before network access. It applies to Web servers on the LAN or WAN.
Scenario 1: Web Server on the LAN
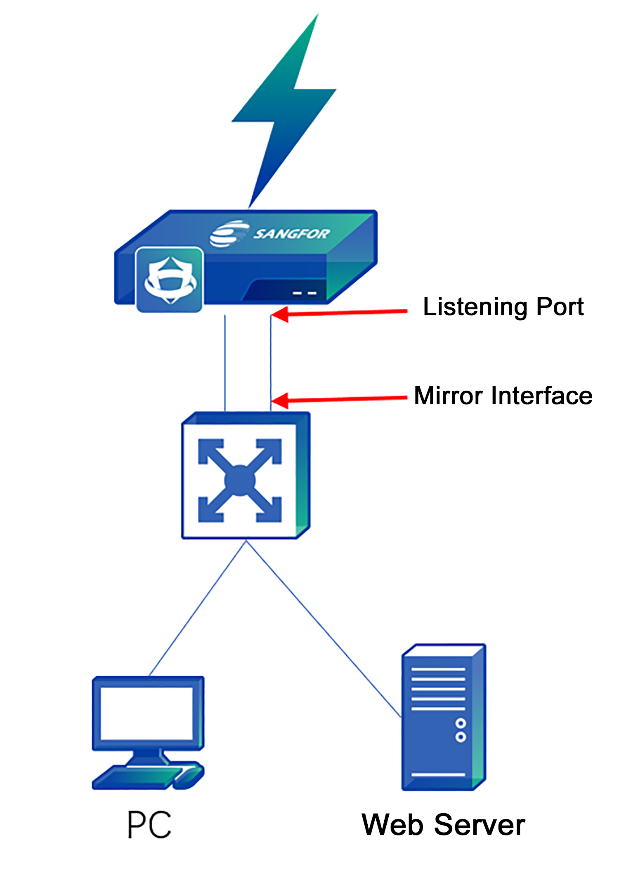
The data stream is as follows:
Configuration Steps:
Step 1.Enable Web SSO on the device, and select the SSO mode. Navigate to Policies > Authentication > User Authentication > Authentication Options. Then, select SSO Options > Web SSO to go to the Web SSO configuration page. Select Enable Web SSO.

Step 2.Enter the address of the Web authentication server in Web Authentication Server.
Step 3.Select Redirect browser to the above server before authentication. Before authentication, the user will be redirected to this page for Web SSO upon webpage access.
Step 4.Fill in the User Form Name with the name of the table where the "username" field is located for Web authentication.
Step 5.Select Authentication success keyword or Authentication failure keyword to specify the keyword for identifying whether a Web login is successful. For example, if Authentication success keyword is selected, Web SSO is successful when the success keywords are included in the result returned by POST. If Authentication failure keyword is selected, Web SSO fails when the failure keywords are included in the result returned by POST.
Step 6.Click the Others tab, select Enable mirror interface, and specify the listening port.
Step 7.Log in to the website set on the PC, such as the BBS in this example. You can access the Internet after a successful login.
Scenario 2: Web Server on the WAN

The data stream is as follows:
Configuration Steps:
Step 1.Enable Web SSO on the device, and select the SSO mode. Navigate to Policies > Authentication > User Authentication > Authentication Options. Then, select SSO Options > Web SSO to go to the Web SSO configuration page. Select Enable Web SSO.
Step 2.Enter the address of the Web authentication server in Web Authentication Server.
Step 3.Select Redirect browser to the above server before authentication. Before authentication, the user will be redirected to this page for Web SSO upon webpage access.
Step 4.Fill in the User Form Name with the name of the table where the "username" field is located for Web authentication.
Step 5.Select Authentication success keyword or Authentication failure keyword to specify the keyword for identifying whether a Web login is successful. For example, if Authentication success keyword is selected, Web SSO is successful when the success keywords are included in the result returned by POST; if Authentication failure keyword is selected, Web SSO fails when the failure keywords are included in the result returned by POST.
Step 6.Log in to the website set on the PC, such as the BBS in this example. You can access the Internet after a successful login.
6.6.3.2.1.6RADIUS SSO
When there is any RADIUS server in the user environment, and the data packets used for authentication and billing via the RADIUS server pass through the Network Secure device, you can enable RADIUS SSO. After successful authentication, the RADIUS username can be used to log in to the Network Secure device.
Select Enable RADIUS SSO, and enter the address of the RADIUS server in RADIUS server IP addresses.
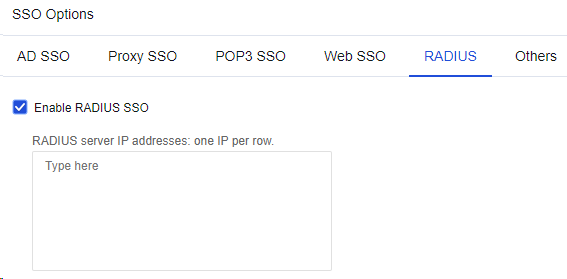
Suppose RADIUS authentication and billing packets do not pass through the Network Secure device. In that case, you need to set a mirror interface on the Network Secure device to mirror the data to the Network Secure device.
6.6.3.2.1.7Others
Others: If server login data does not pass through the gateway, you need to select an idle interface to monitor the login data as a mirror interface. Such an interface is required in AD SSO, POP3 SSO, Proxy SSO, and Web SSO.
Auth Page Redirection
Auth Page Redirection: Specify the page to which the web browser will be redirected after a user passes authentication.

Recently visited page: If this option is selected, the user is redirected to the page visited before authentication.
Logout page: If this option is selected, the user is redirected to the logout page.
Specified page: If this option is selected, the user is redirected to a specified page.
Redirect HTTPS request to captive portal: If this option is selected, the HTTPS access request sent before authentication will be redirected to the authentication page.
Authentication Conflict
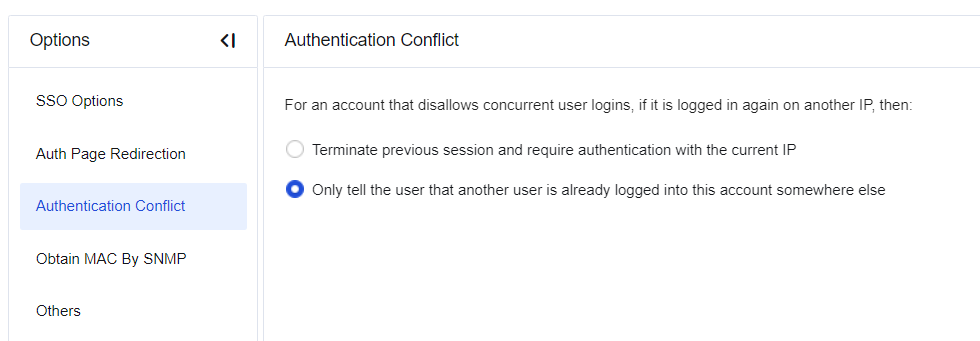
Authentication Conflict: Specify how to process repeated logins of accounts that disallow concurrent logins. If repeated login is detected, the device either Terminate previous session and require authentication with the current IP or Only tell the user that another user is already logged into this account somewhere else. See the figure below.
6.6.3.2.1.8Obtain MAC By SNMP
When LAN users are authenticated by binding or limiting the MAC address in layer 3 LAN, Obtain MAC by SNMP must be enabled to obtain the MAC addresses of LAN users. To access this function, the switch on the LAN must support the SNMP.
Principle: The Network Secure device sends SNMP requests to the layer 3 switch regularly to obtain the MAC address table of the switch and stores the table in the device's memory. Assume that a computer with the MAC address from another network segment of the layer 3 switch (different from the network segment of the LAN port of the device), for example, 192.168.1.2, accesses the Internet through the device. When the computer packets pass through the device, the device detects that the MAC address of the packets is a layer 3 one. Instead of processing the MAC, the device looks for the real MAC in its memory by using the IP address 192.168.1.2 to authenticate the real MAC of the user.
Configuration Steps:
Step 1.Enable SNMP on the layer 3 switch.
Step 2.Navigate to Policies > Authentication > User Authentication > Authentication Options > Obtain MAC by SNMP and select Enable SNMP Settings.

Step 3.Specify SNMP Server Access Timeout (secs) and SNMP Server Access Interval (secs), which are generally set to default values.
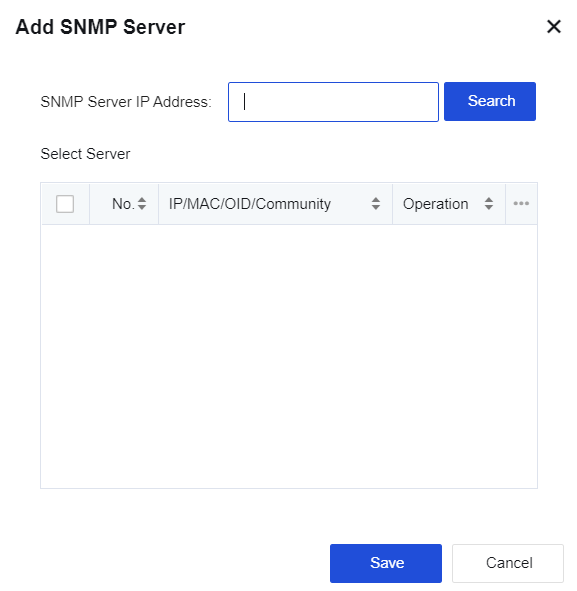
Step 4.In SNMP Servers, click Add Server. In the Add SNMP Server dialog box, specify the SNMP Server IP Address and click Search. Select the target server returned below and click Save. See the figure below.
Step 5.Go to Policies > Authentication > User Authentication > Authentication Policy. Set the authentication policy according to the IP or MAC address of the verified user.
Step 6.PCs under the layer 3 switch can now directly access the Internet after being authenticated as new users.
To search for the SNMP server by IP address, SNMP must be enabled on this server, and Community is set to public. Otherwise, the search will fail, and you must manually set the SNMP server.
Others
To configure the options related to authentication, as shown in the figure below.

• Auto-log out users who are idle for a specified period of time: You can set an idle period beyond which users are logged out automatically.
• DNS service is available before a user passes authentication: If this option is selected, the user can access the DNS service before authentication.
• Basic services (except HTTP/HTTPS) are available before a user passes authentication: If this option is selected, the user can use root group permissions except for HTTP and HTTPS services before authentication.
• Require authentication again if MAC address is changed: If this option is selected, the user who has passed the authentication will need re-authentication when the MAC address is changed. Assume that a user whose IP address is 192.168.1.1 has been authenticated by username and password. If the user goes offline and another user changes the IP address to 192.168.1.1 before this user is logged out, the MAC address will change accordingly. In this way, this user must be re-authenticated before network access.
• Lock users if authentication attempts reach the threshold: To specify the maximum attempts and lockout duration (mins) for authentication.


 {{ $t('index.defaultHeader.chromeBrowserTip') }}