


{{ secondMenu.name }}






An enterprise needs to synchronize the organizational structure of the LDAP server with that of the device while maintaining continuous synchronization. To achieve this, LDAP User Sync must be configured on Network Secure.
Step 1.Set the LDAP server to be synchronized by specifying the IP address, port, login username, password, etc. For details, see Chapter 6.6.3.3 External Authentication Server.
Step 2.Go to Policies > Authentication > Local Users > LDAP User Sync, click Add, and set synchronization parameters in the Add Sync Policy dialog box.

Step 3.Specify Name, Description, Sync Mode, and Auto Sync. Select Sync by OU for Sync Mode, and Enabled (once a day) for Auto Sync. Automatic synchronization is implemented once a day.

Step 4.In Server Settings, set information of OUs on the LDAP server to be synchronized.

LDAP Server: Enter the LDAP server to be synchronized. In this example, the server configured in Step 1 is selected.
LDAP Directory: Specify the OUs to be synchronized on the LDAP server. Click Select to select the OUs to be synchronized in the Select OU dialog box. Click Save.

Add top-level OU of selected LDAP directory below specified OU of local directory: When selected, the root domain on the LDAP server will also be synchronized as a group, and the OUs synchronized are its subgroups.
Add bottom-level OU of selected LDAP directory below specified OU of local directory: When selected, the synchronization starts from the selected OU.
Add sub-OU of selected LDAP directory below specified OU of local directory: When selected, the synchronization starts from the sub-OU of the selected OU. The selected OU and its affiliated users will not be synchronized to the device.
OU Depth: Specify the depth of the imported OUs. The value is 10 in this example, indicating that only sub-OUs up to level 9 can be synchronized as user groups to the device. However, users of OUs lower than level 9 can still be synchronized to the device as users under level-9 OUs.
Filter: Specify the filter parameters for synchronization.
Step 1.In Local Settings, set Method and Local Directory, and select whether to enable Allow concurrent logins on multiple terminals.
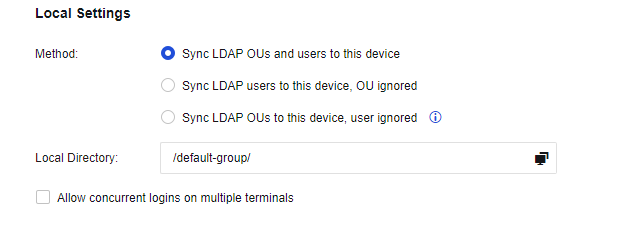
Method: Whether to synchronize OUs and users. Select an option based on requirements.
Sync LDAP OUs and users to this device: Synchronize OUs as user groups to the device and OU users to the OU user groups.
Sync LDAP users to this device, OU ignored: Synchronize OU users instead of OUs to the device.
Sync LDAP OUs to this device, user ignored: Synchronize OUs but no OU users to the device as user groups. In this example, select Sync LDAP OUs and users to this device to synchronize both OUs and users.
Allow concurrent logins on multiple terminals: The domain account synchronized to the device is a public account by default and can be logged in on multiple PCs. If this option is not selected, the user is a private account and can be logged in on a single PC at a time.
Local Directory: Select an existing group on the device, to which synchronized OUs will be subgroups. In the Select OU dialog box, select the corresponding group.
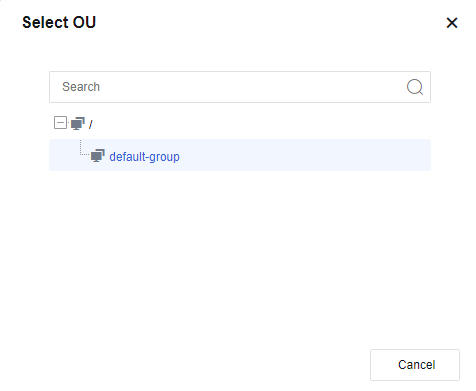
Step 2.Click OK to complete setting the policy. The added synchronization policy is displayed on the LDAP User Sync page. Click Sync Now to perform a synchronization immediately. Or wait for the daily automatic synchronization.

Step 3.Go to Policies > Authentication > Local Users > Group/User to view the synchronization results, as shown in the following figure. The imported OUs and users are consistent with those on the LDAP server.

If the names of OUs or users to be synchronized duplicate existing user groups or users on the device, the synchronization will fail.
6.6.2.4.1.1Delete a Synchronization Policy
When a synchronization policy is unwanted, you can delete it. Specifically, go to the LDAP User Sync page, select the synchronization policy to be deleted, and click Delete. The deletion of a synchronization policy will not affect the groups and users already synchronized to the device.

6.6.2.4.1.2View Logs
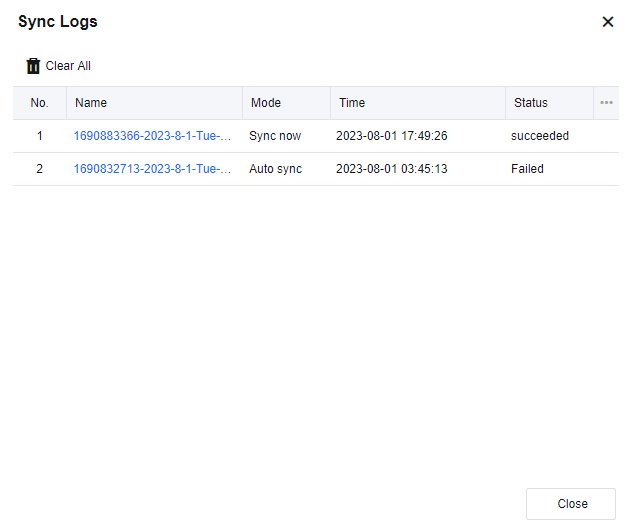
A synchronization log is generated every time the device synchronizes OUs or users from the LDAP server to inform you of the synchronization status. Click View Logs. In the Sync Logs dialog box, select and download the synchronization log you want to view by clicking the corresponding name.


 {{ $t('index.defaultHeader.chromeBrowserTip') }}