


{{ secondMenu.name }}






To add, modify, and adjust the application control policy. Select the checkbox next to the priority number to perform the corresponding operation on the policy group.
| Operation |
Note |
| Add |
Add the application control policy. |
| Delete |
Delete the current policy group. |
| Enable |
Enable the selected policy. |
| Disable |
Disable the selected policy. |
| Insert Above |
Insert a new policy group above the current policy group. |
| Move to Top |
Move the current policy group to the top. |
| Move Up |
Move the current policy group up by one position. |
| Move Down |
Move the current policy group down by one position. |
| Move To |
Move the current policy group to a specified position in the order. |
| Test Policy Match |
Simulate the policy matching for a specific IP. |
| Add Filter |
Add display filter. |
Table 14:Policy Configuration Operation Options
Application Control Policy:
On the Policy Configuration page, click Add. Then, the Add Application Control Policy dialog box appears. The settings are as follows.

Basics:
Name: Enter a custom policy name.
Status: Set the policy status to Enabled or Disabled.
Description: Enter the description of the policy. This parameter is optional.
Policy Group: Select the policy group to which the policy belongs.
Position: Set the priority of the policy to enable it before or after a policy.
Tags: Select the policy tag. This parameter is optional and can be set for displaying a specified zone or filtering.
Source:
Src Zone: Select the source zone of the data to be controlled. By default, any is selected. It indicates that data from all zones needs to be controlled.
Src Address: Select the source Network Objects to be controlled. You may choose the MAC Address as the source address.
User/Group: Indicate user information obtained by navigating to Policies > Authentication > Local Users > Group/User.
Destination:
Dst Zone: Select the destination zone of the data to be controlled. By default, any is selected. It indicates that data from all zones needs to be controlled.
Dst Address: Select the destination IP group of the data to be controlled. To control the data of LAN users accessing the internet, select All for the Dst Address parameter.
Services: Select services that need to be controlled. Services that you can select are the ones set on the Objects > Services page.
Applications: Select applications to be controlled. Application signatures are called by going to Objects > Content Identification Database > App Signature.

Both the Services and Applications parameters need to be filled in to match the policy.
Others:
Action: Set whether to allow or deny the data packets that meet the defined conditions.
Schedule: Indicate a filter condition. The policy can take effect only if filtering is performed within a specified point in time. The time object defined on the Objects > Schedule page is called.
Advanced: Click Settings. Then, the Advanced dialog box appears. See the figure below.

Persistent Connection: This function only supports special servers with a persistent connection request. In this case, this request is not affected by firewall timeout. If this function is enabled, the connection release slows down. The value can be 1 day to 15 days. Proceed with caution.
Logging: By default, the application control log function is not enabled. Before setting this advanced option, you need to navigate to Monitor > Settings > Logging Options, enable Application Control Logs, and select the Local option to save the application control logs. Enable the Logging option, Application Control logs will then be recorded on the NSF device. The large size of the application control logs will degrade the read/write performance of system disks. It is recommended that the logs be stored with an external data center or using the Syslog server.
Endpoint App Control Policy:
On the Policy Configuration page, click Add. Then, the Add Endpoint App Control Policy dialog box appears. The settings are as follows.

Name: Enter a custom policy name.
Status: Set the policy status to Enabled or Disabled.
Description: Enter the description of the policy. This parameter is optional.
Policy Group: The endpoint app control policy will be set in Integration Policy Group.
Tags: Select the policy tag. This parameter is optional and can be set for displaying a specified zone or filtering.
Endpoints: Select the endpoint IP to be controlled. You can create the endpoint IP according to the endpoint list in SOC > Next-Gen Security > Endpoint Protection > Endpoints.
Applications: Select applications to be controlled. Application signatures are called by going to Objects > Content Identification Database > Application Signature > Endpoint App Signature.
Schedule: Indicate a filter condition. The policy can take effect only if filtering is performed within a specified point in time. The time object defined on the Objects > Schedule page is called.
Action: Set whether to allow or deny the data packets that meet the defined conditions.
On the Policy Configuration page, click More > Settings for more configuration options, as shown in the following figure.

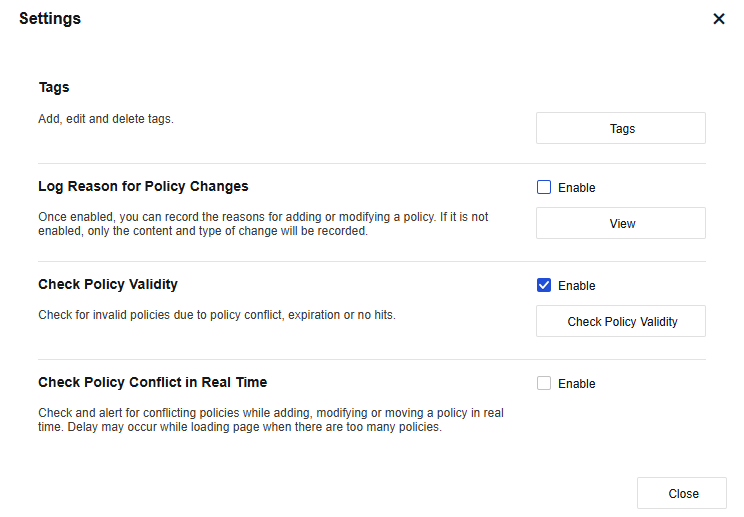
Tags: Set related tag operations, including adding, editing, and deleting tags. See the figure below.

Log Reason for Policy Changes: After this function is enabled, you can record the reasons for adding or modifying a policy. If it is not enabled, only the content and type of change will be recorded. Click View to go to the Policy Change Tracking page.
Check Policy Validity: Check invalid policies.
Check Policy Conflict in Real-Time: Check and alert for conflicting policies while adding, modifying, or moving a policy in real time. After this function is enabled, a delay may occur while loading a page when there are too many policies.
6.2.1.1.1.1Application Control Configuration Case
An enterprise does not allow R&D department personnel to use IM chat tools during working hours. When R&D personnel use IM tools, the device will refuse the request. To implement this function, you need to add an application control policy on Network Secure.
Operation Steps:
Step 1.Navigate to Policies > Access Control > Application Control > Policies and click Add. Then, the Add Application Control Policy dialog box appears.
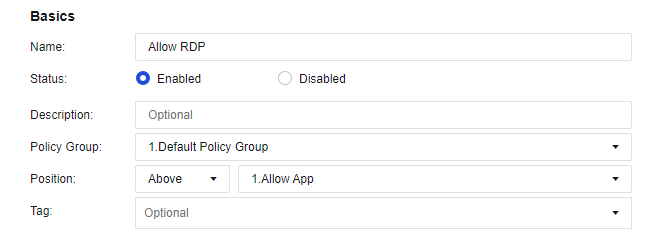
The relevant parameters in the Basics section can be set as follows:
Name: Enter Allow RDP.
Status: Select Enabled.
Description: Enter custom descriptions, such as personnel in the R&D Department not being allowed to use IM.
Policy Group: Select a default policy group.
Position: Set the priority before the P2P download is limited.
Tag: Enter a customizable tag or select a default one.
Step 2.Select a custom LAN zone for the Src Zone parameter. For more information about how to define a zone, see Chapter 8.2 Zones. Select a custom R&D department for the Src Address parameter. For more information about how to define a user group, see Chapter 6.6.2 Local Users.

If the user group is selected in the current policy, you need to enable the authentication function and configure relevant authentication policies. If the authentication policy is not enabled, this application control policy will not take effect.
Step 3.Set the parameters in the Destination section. Select WAN for the Dst Zone parameter, All for the Dst Address parameter, any for the Services parameter, and Remote Login/RemoteDesktop for the Applications parameter.

Step 4.Set the parameters in the Others section: Select Allow for the Action parameter and all-week for the Schedule parameter. If you need to view the logs, click Settings and select Logging in the Advanced dialog box.

Step 5.Click Save. Then, the configuration is complete.
Step 6.After that, if the R&D department personnel use PCs to log in to the remote desktop, they can log in to the remote desktop normally.
Step 7.Navigate to Monitor > Logs > Access Log to view the details of denied logs.


 {{ $t('index.defaultHeader.chromeBrowserTip') }}