{{ secondMenu.name }}


AC in this article refers to the SANGFOR AC device.
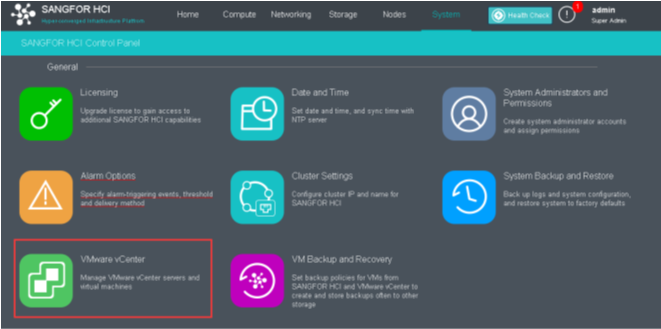
VMware ESXi is a bare-metal hypervisor that installs directly onto a physical server. It is usually deployed in most customer environments as the first choice of virtualization. However, it is always a headache to manage a different party of the hypervisor at a time. Hence, Sangfor HCI 5.8.3 started to integrate most of the VMware function as part of features in HCI.
The vSphere API is exposed as a Web service, running on VMware vCenter server systems. VMware allows the third-party corporation to communicate with vCenter through provided API. While Sangfor HCI 5.8.3 utilized VMware API to integrate the basic management function of vCenter in a better and friendly user interface.
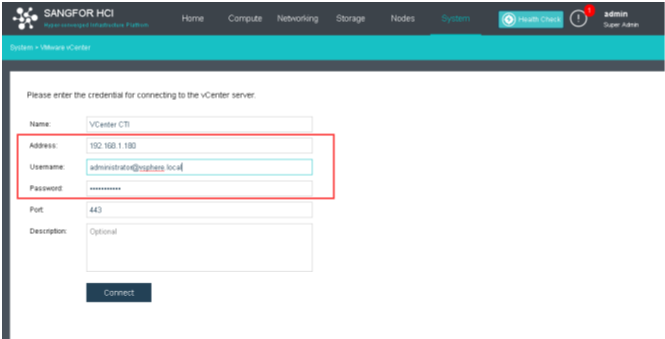
Name: Naming of added VCenter
Address: VCenter server IP address
Username: Username of VCenter (Default VCenter username: administrator@vsphere.local)
Port: Port that configured at VCenter (Default: 443)
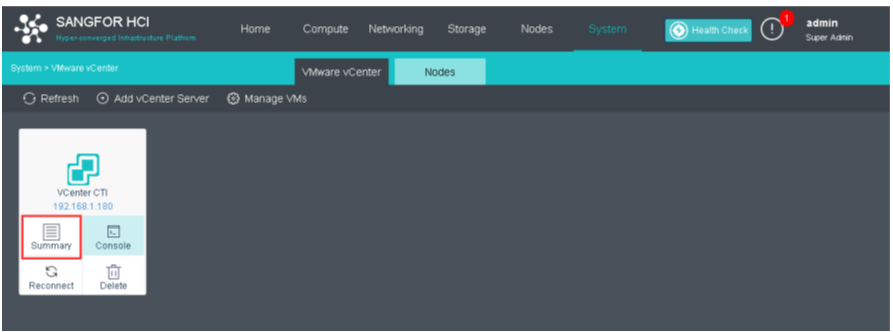
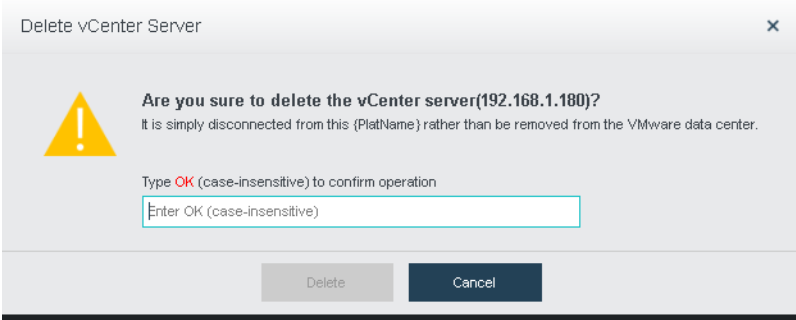
Once VMware VCenter is added, it will show a new panel in the option of VMware VCenter. Mouse over to the following panel will show Summary, Console, Reconnect, and Delete.
Summary: Shows the information of VCenter such as Memory, Disk usage, CPU usage, deployed VMs, etc.

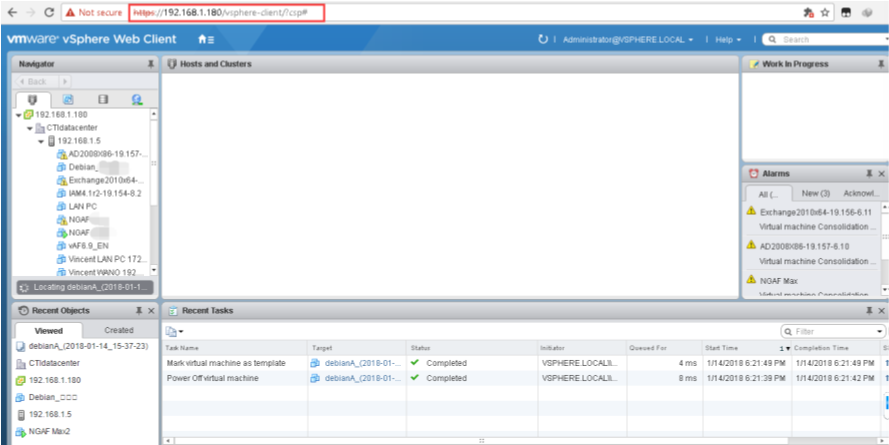
Console: Redirect to VCenter/Web-based VSphere client.
Reconnect: Refresh the connection to VCenter.
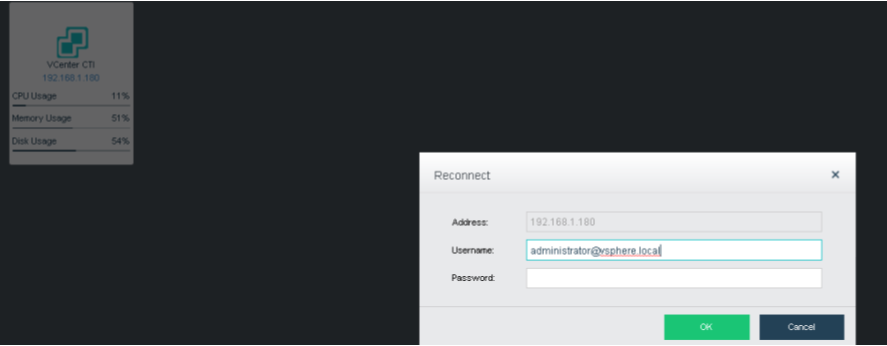
Delete: Delete current connected VCenter entry.
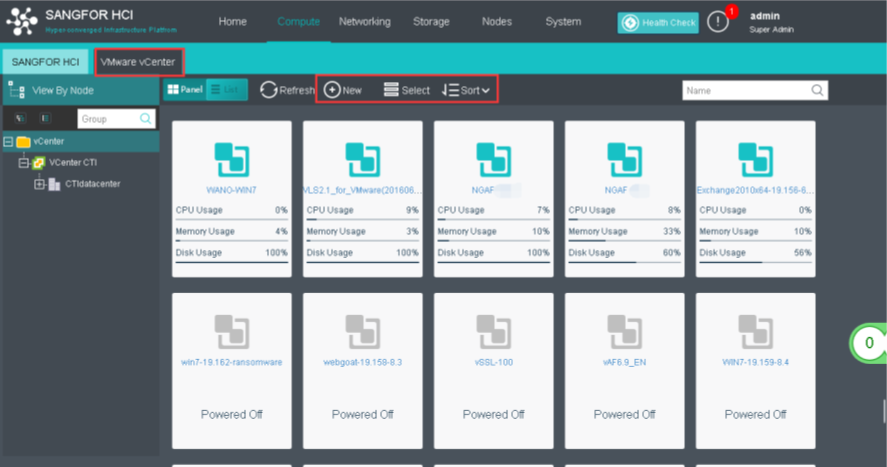
Navigate to Compute > VMware VCenter Tab will show current VMs that are deployed in ESXi.
HCI manage VM interface provides grouping features such as multiple select and sorting tools. (CPU, Memory, Name, or Disk usage.)
Mouse over to VMware VM, basic features such as power-off, shutdown, console, or more can be found.
Users can directly create a new VM from HCI that reflects in VMware VCenter. However, It is constrained to deploy VMs from VMware template only.
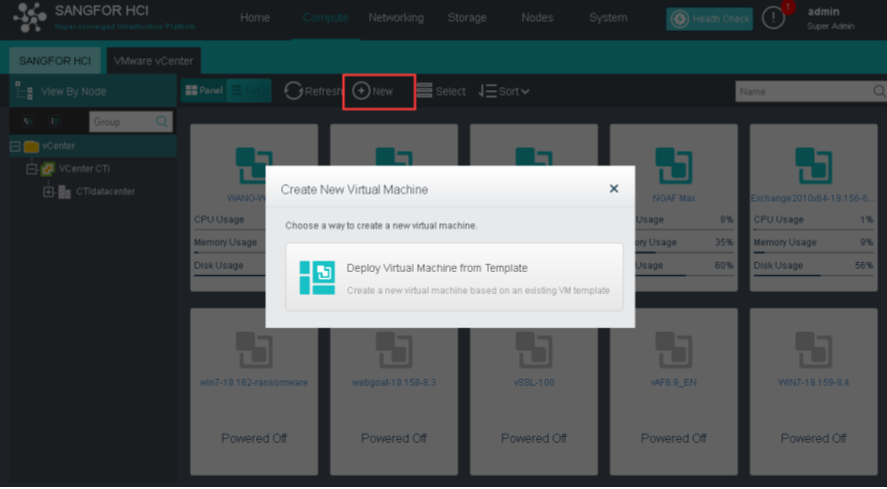
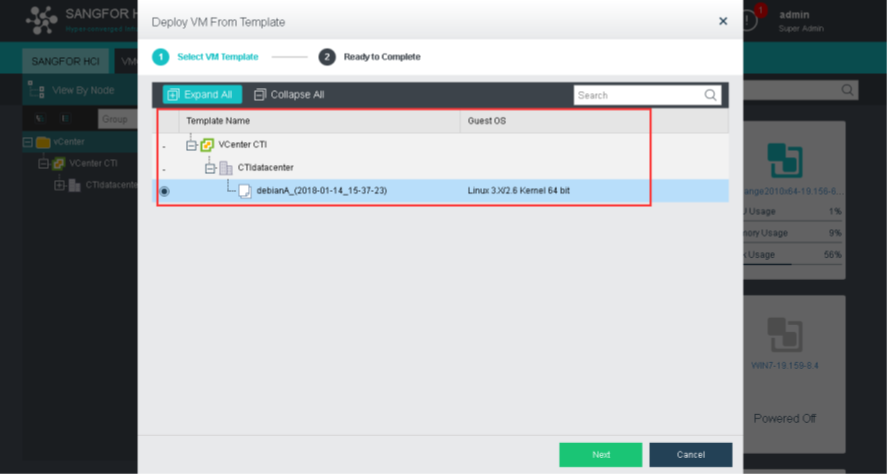
The following diagram shows templates that exist in VMware. Users are only allowed to create template VMs through HCI.
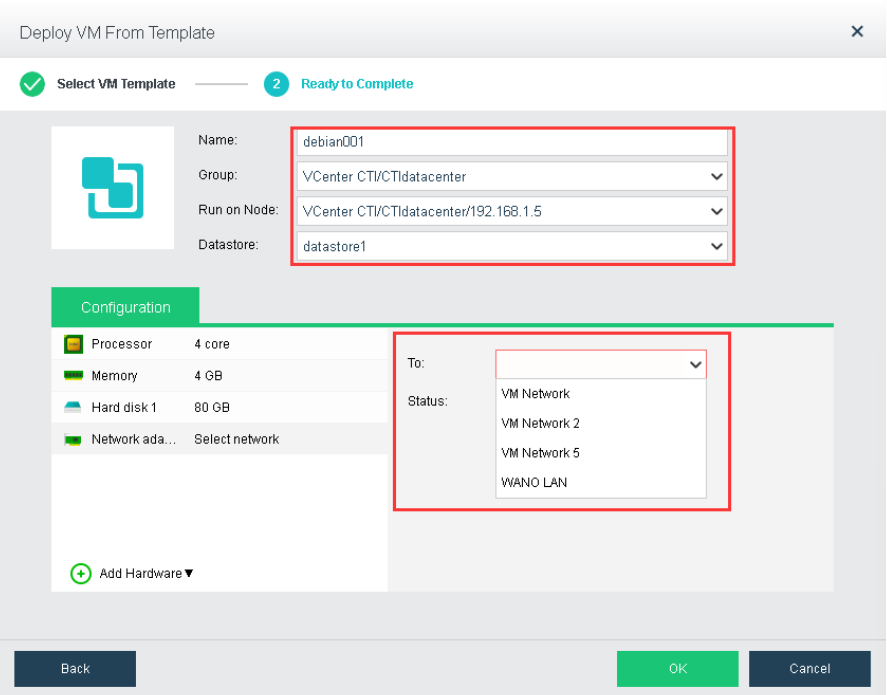
Name: Naming of new VM
Group: Group in VMware VCenter
Run on Node: ESXi nodes that added to VCenter
Datastore: ESXi datastore
Network: Network adapter of ESXi
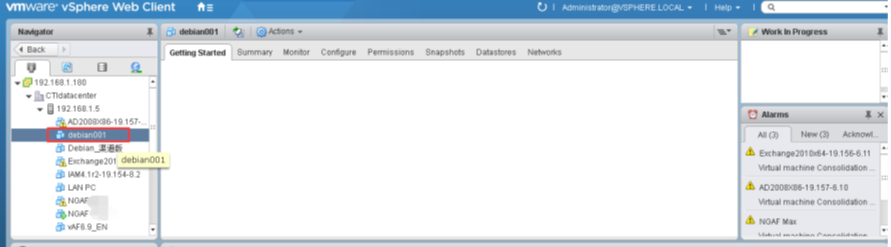
After the deployment is done, it will show the newly created VMs in VCenter.
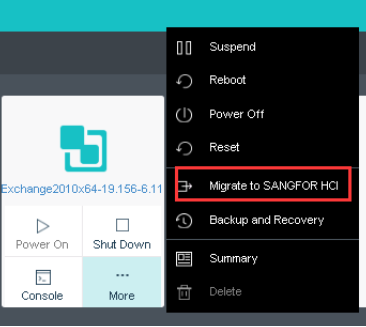
Mouse over to VM that need to migrate and click More > Migrate to SANGFOR HCI.
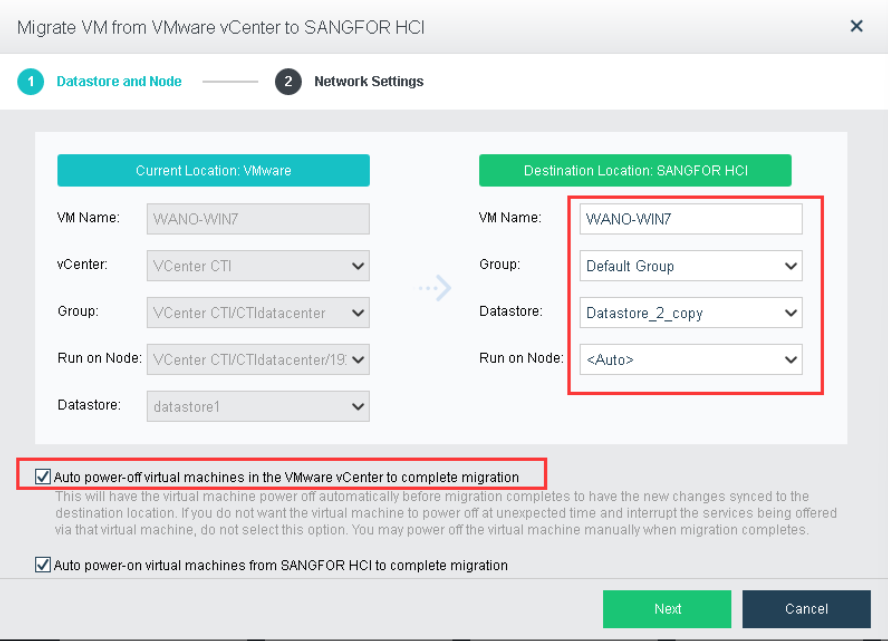
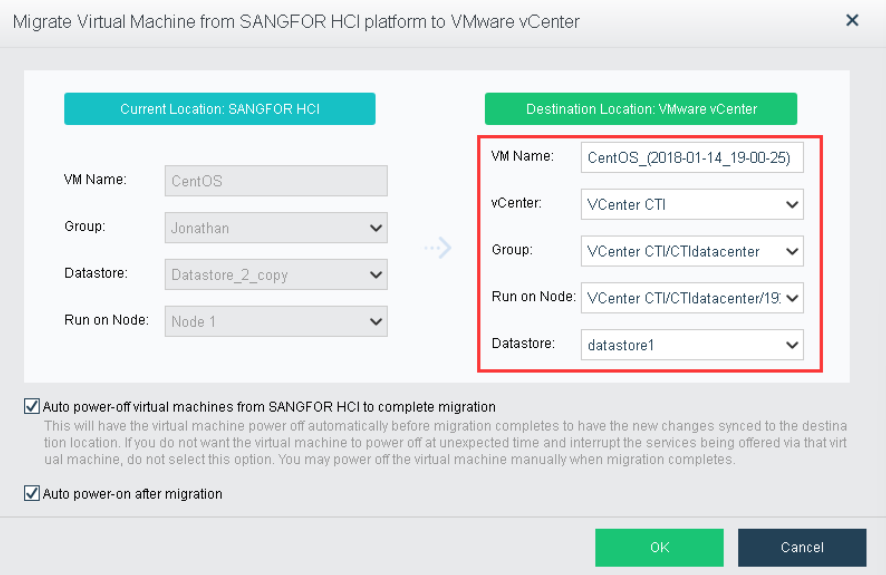
VM Name: New VM name that used in HCI after migration
Group: HCI groups
Datastore: HCI virtual storage
Run on Node: Run on which node after finish migrating. (Default: Auto)
Note: Migration of VM from HCI to VMware need to be powered off.

1. Select the Auto power-off virtual machines in the VMware vCenter to complete migration.
2. If it is not selected, VMware to HCI migration will stop at 95%. It requires users to power off the VM to complete the migration process manually.
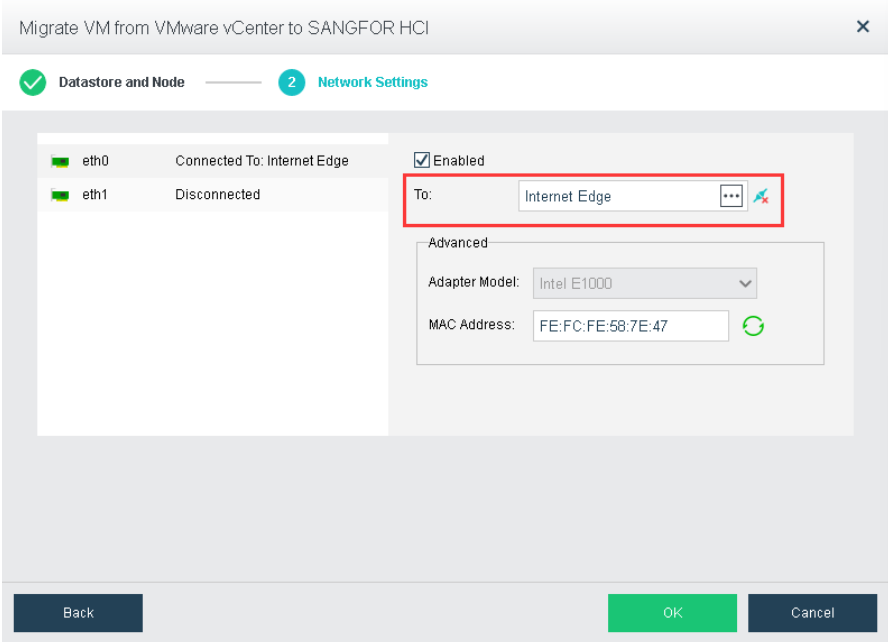
It is recommended to select the correct/available Edge interface to reduce network downtime of VMware VM after migration.
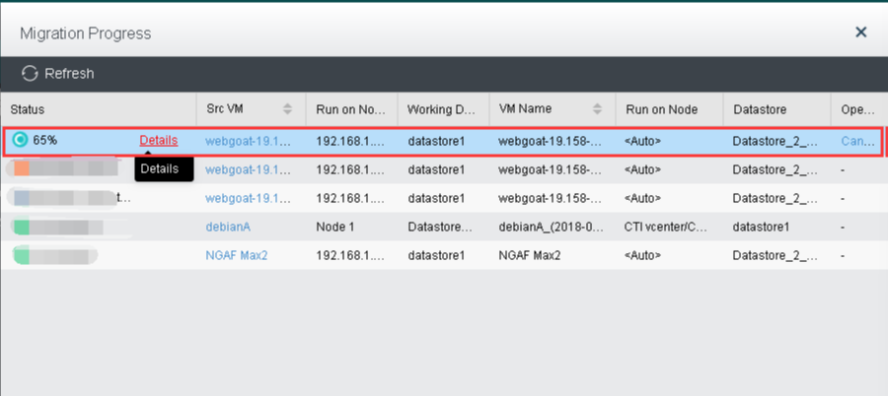
Click Details to check migration information such as transfer speed and completed percentage.
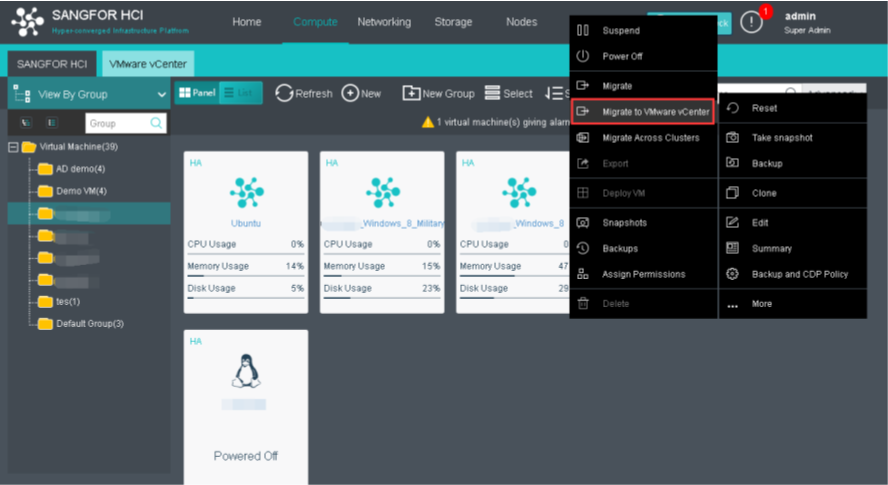
Navigate to VM > More > Migrate to VMware VCenter.
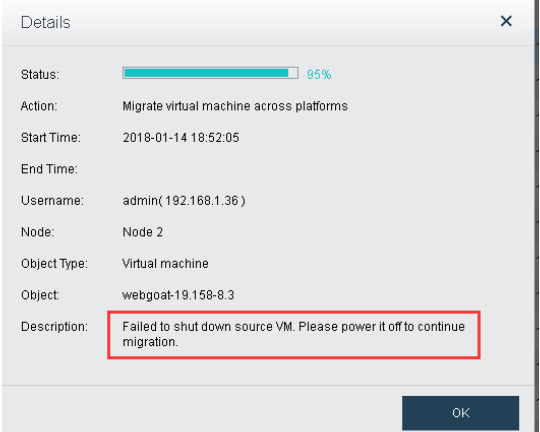
For VM that does not select Auto power-off virtual machines in the VMware vCenter to complete migration, the migration will stop at 95% with the description: Failed to shut down source VM. Please power it off to continue migration.
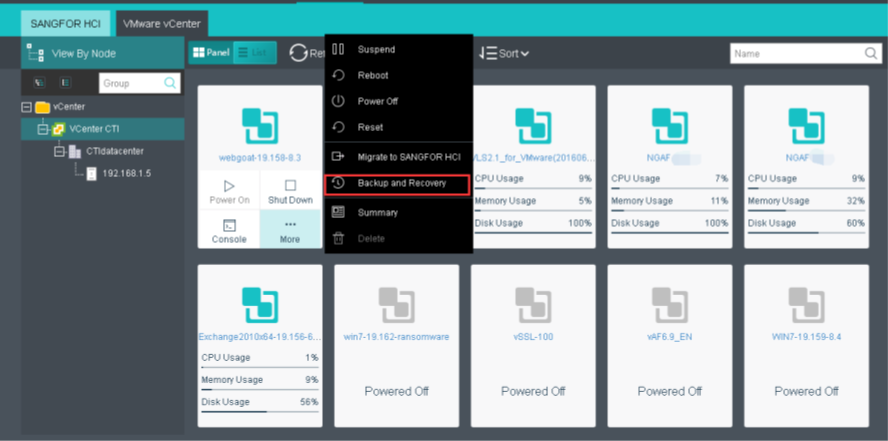
Navigate to VMware VM, click More > Backup and Recovery.
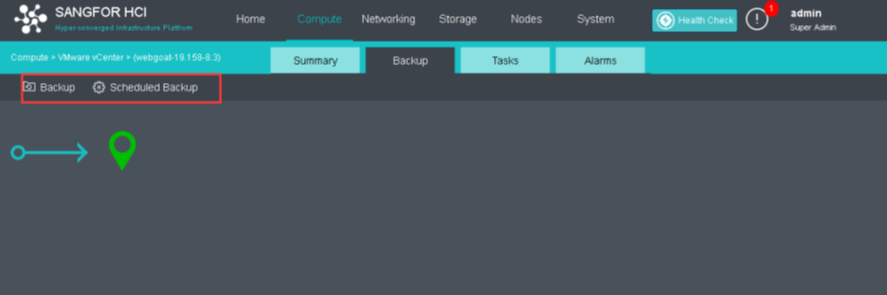
Click Backup will start the back up process.
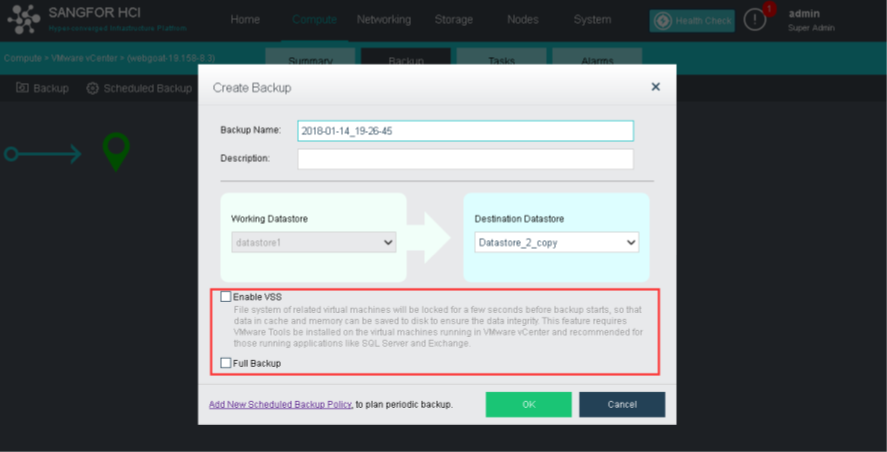
Select Enable VSS if VMs is running high IO usage server such as SQL server. It will increase the data integrity by locking down the file system before backup.
Create a new scheduled backup policy.
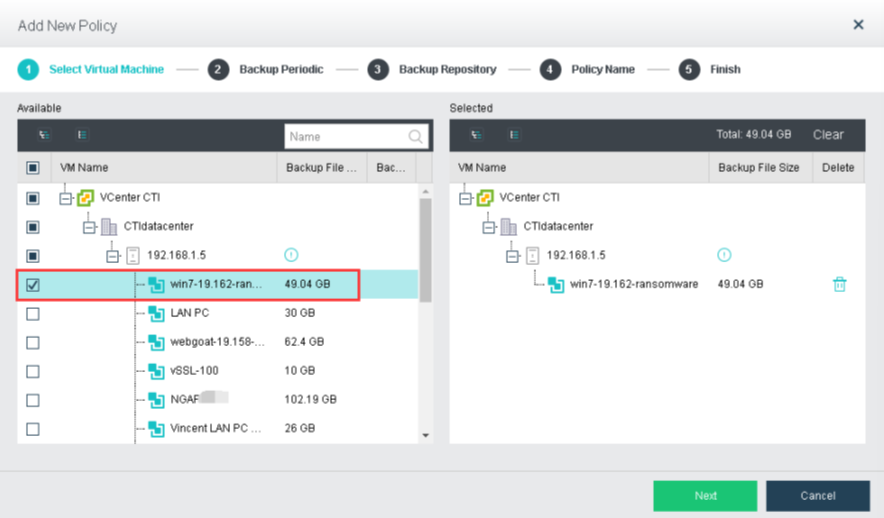
Step 1. Select VMs that are allocated in the backup policy.
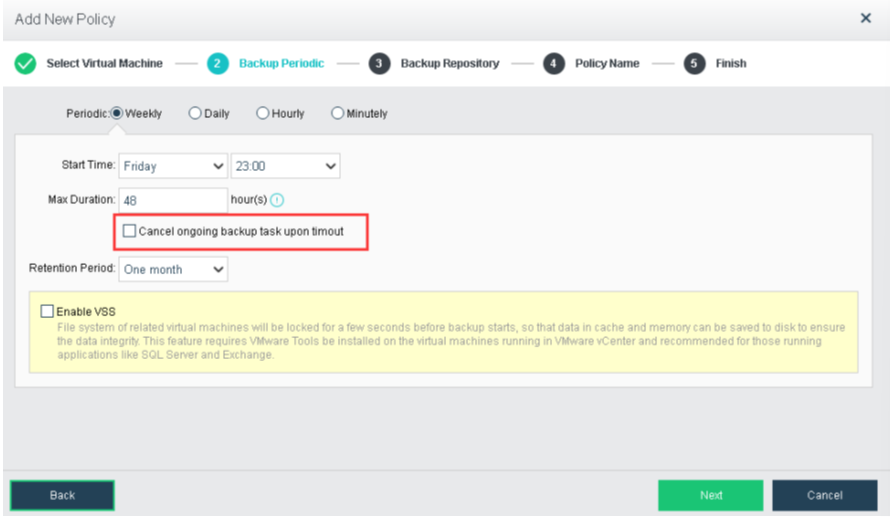
Step 2. Select the backup periodic (Weekly, Daily, Hourly, Minutely).

HCI 5.8.3 allows users to terminate the backup process by selecting Cancel ongoing backup task upon timeout. In this case, the backup process will be terminated if it does not complete within 48 hours.
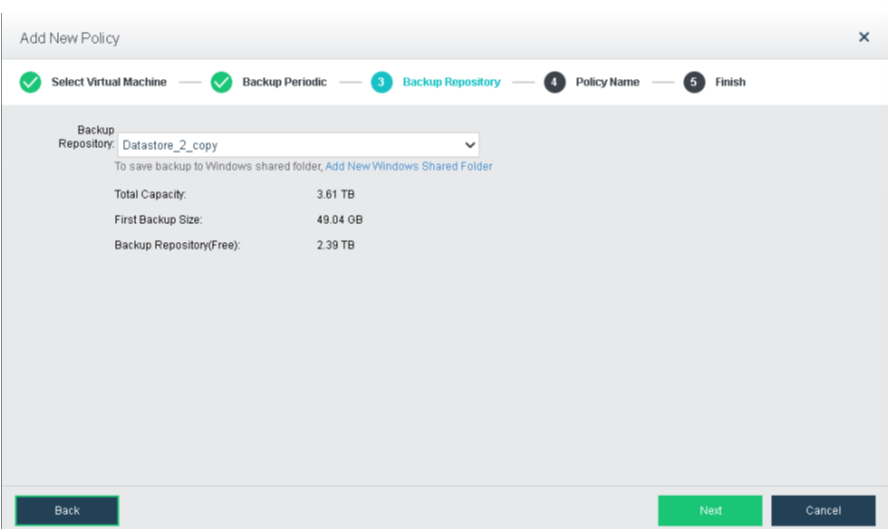
Step 3. Choose the backup storage in HCI.
HCI support local virtual storage, external iSCSI server, and NFS used as part of the backup storage pool.
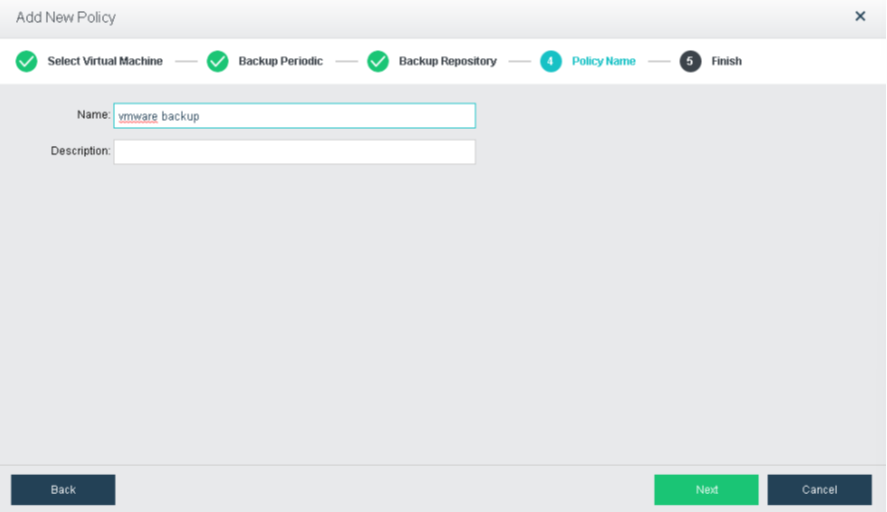
Step 4. Create a name for the backup policy. Lastly, click Next to complete the scheduled backup policy.
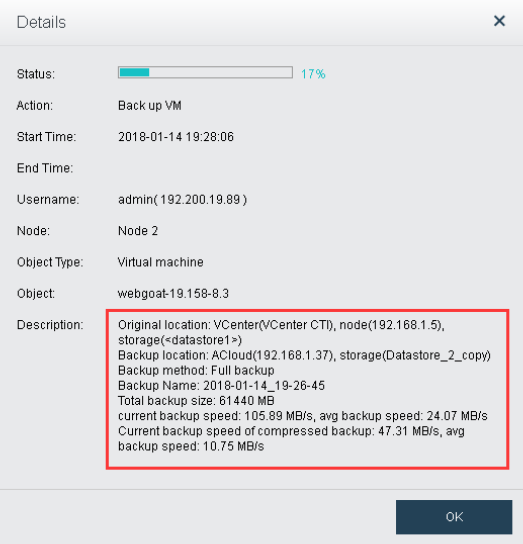
Click the task log to check on the detail of the backup process. In HCI 5.8.3 and onwards, users can check the live backup transfer rate and completed percentage.
HCI backup recovery can be found at System > VM Backup and Restore > VMware Backups.
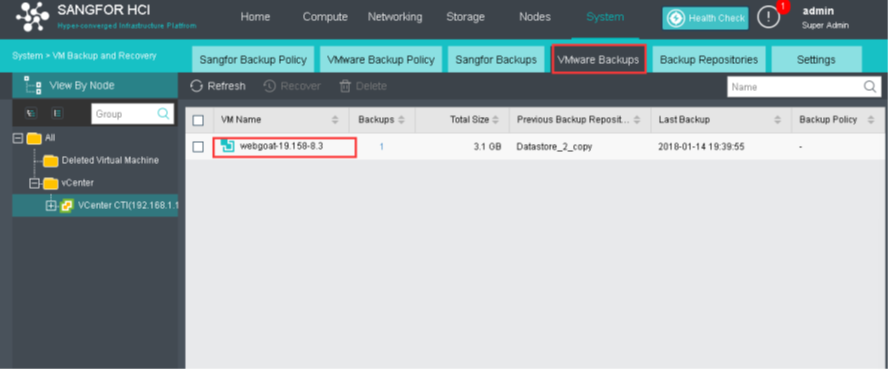
Click 1 of the Backups column will navigate to the VM summary page.
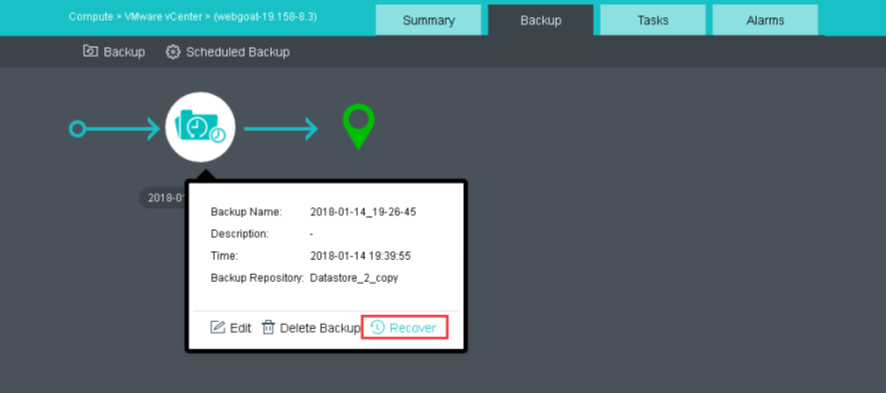
Click Recover to start the VM recovery.
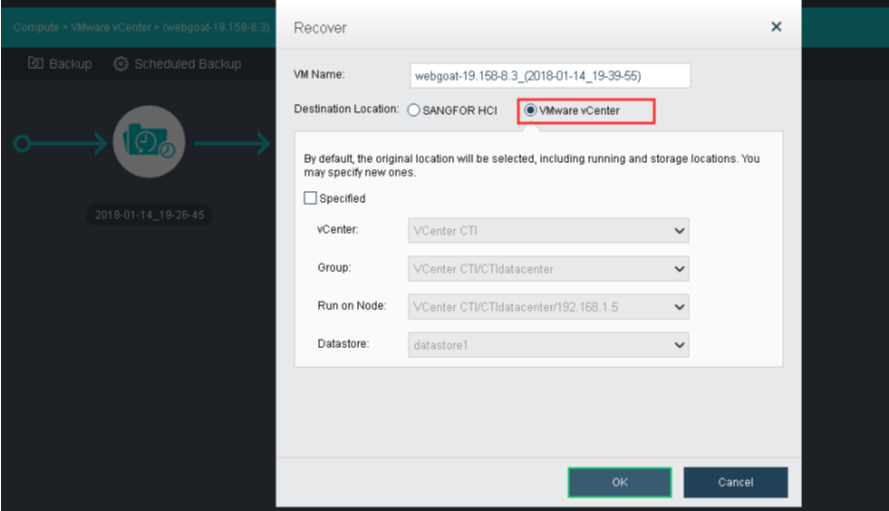
HCI allows users to recover the backup with a destination of Sangfor HCI or VMware vCenter.
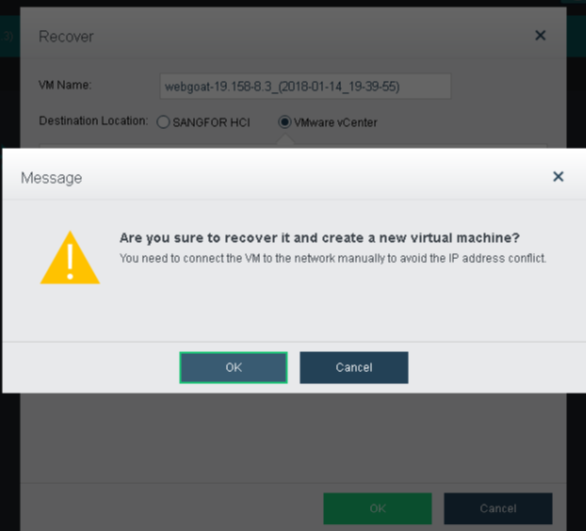
However, it constrains the recovery by creating a new VM only instead of overwriting the respective VM.

 {{ $t('index.defaultHeader.chromeBrowserTip') }}